I make my own thank-you cards, so it makes sense that my son would make his own also. Any excuse to get out the art materials! Trevor selected a three different 'thank you' stamps and three different ink colors and got right to work.
He had a specific plan for each card. Some had lots of stamping, while others had color pencil or ink drawings.
Three colors of Glimmer Mist added the perfect final touch to some of the cards. Trevor still can't quite work the spray nozzles by himself because his hands are too small, but he tried repeatedly before asking for help.
Here are some of his completed cards!
I think the one with the rainbow and a snake is my favorite.
6/14/11
Trevor's Thank You Notes
Labels:
Cards
Cindy deRosier has a masters in Education and taught 4th and 5th grade for 11 years. She uses that experience to blog about crafts and family-friendly educational travel. She spent many years as the Editor of Fun Family Crafts, a website with over 12,000 kid-friendly craft tutorials. Cindy is the co-author of "What Would Jesus Patent?", does freelance writing and designing, loves jigsaw puzzles, is an avid scrapbooker, and has been to all 50 states.
6/13/11
Zoo Party, Take Two
My last post was about Trevor's family birthday party. Today I'm going to tell you how we celebrated with his friends. The night before the party, Trevor and I baked cupcakes. I frosted the cupcakes and he did all the facial features. We were inspired by cupcakes we saw at Betty Crocker.
The tigers are white cake with vanilla buttercream frosting, which we tinted orange. The eyes are chocolate chips and the ears are orange jelly beans cut in half. The nose, mouth and stripes are chocolate frosting.
For some reason, I didn't take a picture of the monkeys on their own. They are white cake with chocolate frosting. To make the light brown muzzle area, we mixed chocolate and vanilla frosting. The eyes are marshmallows cut in half. The ears are Junior Mints. The pupils, nose and mouth are piped on with chocolate frosting.
Fortunately, the weather was perfect the day of the party. Here we are in the enormous and awesome petting area at the Oakland Zoo.
We spent about an hour looking at animals, then exited the zoo into Knowland Park. The kids played on the zoo-themed play equipment while I set up for the party.
Here are their goodie bags, all ready to go.
We played Animal Bingo. All the animals on the cards are at the Oakland Zoo.
"Bingo!" Kylinn was the first winner. We played lots of rounds to allow everyone the chance to win.
I lined the kids up for a group photo, but they were not particularly thrilled to pose.
They were far more interested in going on a candy hunt!
When they returned, I set up Animal Memory. They had to study the 20 plastic animals I spread on the table (again, all animals at the Oakland Zoo). I covered up the animals and the kids took turns trying to remember the animals. Everyone won prizes... zoo-themed stickers and plastic animals.
We ate our cupcakes, then the kids played in the park while we cleaned up.
Then it was back into the zoo to see more animals.
The tigers are white cake with vanilla buttercream frosting, which we tinted orange. The eyes are chocolate chips and the ears are orange jelly beans cut in half. The nose, mouth and stripes are chocolate frosting.
For some reason, I didn't take a picture of the monkeys on their own. They are white cake with chocolate frosting. To make the light brown muzzle area, we mixed chocolate and vanilla frosting. The eyes are marshmallows cut in half. The ears are Junior Mints. The pupils, nose and mouth are piped on with chocolate frosting.
Fortunately, the weather was perfect the day of the party. Here we are in the enormous and awesome petting area at the Oakland Zoo.
Here are their goodie bags, all ready to go.
We played Animal Bingo. All the animals on the cards are at the Oakland Zoo.
"Bingo!" Kylinn was the first winner. We played lots of rounds to allow everyone the chance to win.
I lined the kids up for a group photo, but they were not particularly thrilled to pose.
They were far more interested in going on a candy hunt!
When they returned, I set up Animal Memory. They had to study the 20 plastic animals I spread on the table (again, all animals at the Oakland Zoo). I covered up the animals and the kids took turns trying to remember the animals. Everyone won prizes... zoo-themed stickers and plastic animals.
We ate our cupcakes, then the kids played in the park while we cleaned up.
Then it was back into the zoo to see more animals.
Labels:
Parties
Cindy deRosier has a masters in Education and taught 4th and 5th grade for 11 years. She uses that experience to blog about crafts and family-friendly educational travel. She spent many years as the Editor of Fun Family Crafts, a website with over 12,000 kid-friendly craft tutorials. Cindy is the co-author of "What Would Jesus Patent?", does freelance writing and designing, loves jigsaw puzzles, is an avid scrapbooker, and has been to all 50 states.
6/11/11
Zoo Party
As I've mentioned before, we always have two parties for Trevor's birthday- an outdoor BBQ for family, then a separate party for his friends. Today I'll tell you about the family party.
I'd planned for Trevor's party to be a backyard BBQ, as we have done for all his birthdays in the past. It's usually gorgeous here in early June- bright and sunny, with temperatures in the low 80s. Unfortunately, this year it was raining on the day of the BBQ, so we had to move the party indoors.
We decorated the house with homemade lions, pandas, monkeys, and giraffes. I made a banner using animal alphabet letters that I found at Goodnight Stories.
As soon as the guests arrived, I had the kids use zoo stamps and stickers to decorate plain white treat bags.
Then we played a rousing game of Pin the Banana on the Monkey.
Next, we did a word search that had a hidden message inside.
I made a small error when I created the word search. From now on, "elephany" is a valid word in family Scrabble games.
Next, we played Zoo Animal Memory. I revealed 20 stuffed animals and gave everyone two minutes to memorize them. Then I covered them up and everyone had to write down which ones they remembered. We ended up with a three-way tie for first place!
Next, the kids made Zoo Animal Shrinky Dinks. I printed out some zoo animal shapes, which the kids traced onto shrink plastic. They colored in their designs, cut them out, and punched a hole. Everyone gathered around the oven to watch the magic! I didn't get any pictures of them making the Shrinky Dinks or the finished product, but they turned out well.
Here are Trevor and Kylinn, ready for dinner. Check out the monkey behind them. Five people erred to the left, but no one erred to the right. I wonder why?!
After dinner, it was time to break the Zebra Pinata. I'd planned to do this outdoors, but because of the rain we ended up in the garage.
While the kids were breaking the pinata, a few adults stayed inside to hide candy and presents for our traditional candy hunt.
Each child got a box of animal crackers and a make-your-own-bug fruit snack pack, in addition to whatever candy they found.
I had a great time planning the Zoo Party! It was a really easy theme (in contrast to the Maze Party!) and it turned out really well. Trevor was thrilled with everything about his party.
I'd planned for Trevor's party to be a backyard BBQ, as we have done for all his birthdays in the past. It's usually gorgeous here in early June- bright and sunny, with temperatures in the low 80s. Unfortunately, this year it was raining on the day of the BBQ, so we had to move the party indoors.
We decorated the house with homemade lions, pandas, monkeys, and giraffes. I made a banner using animal alphabet letters that I found at Goodnight Stories.
As soon as the guests arrived, I had the kids use zoo stamps and stickers to decorate plain white treat bags.
Then we played a rousing game of Pin the Banana on the Monkey.
(Steve was not the only one who veered significantly to the left.)
Next, we did a word search that had a hidden message inside.
I made a small error when I created the word search. From now on, "elephany" is a valid word in family Scrabble games.
Next, we played Zoo Animal Memory. I revealed 20 stuffed animals and gave everyone two minutes to memorize them. Then I covered them up and everyone had to write down which ones they remembered. We ended up with a three-way tie for first place!
Next, the kids made Zoo Animal Shrinky Dinks. I printed out some zoo animal shapes, which the kids traced onto shrink plastic. They colored in their designs, cut them out, and punched a hole. Everyone gathered around the oven to watch the magic! I didn't get any pictures of them making the Shrinky Dinks or the finished product, but they turned out well.
Here are Trevor and Kylinn, ready for dinner. Check out the monkey behind them. Five people erred to the left, but no one erred to the right. I wonder why?!
After dinner, it was time to break the Zebra Pinata. I'd planned to do this outdoors, but because of the rain we ended up in the garage.
While the kids were breaking the pinata, a few adults stayed inside to hide candy and presents for our traditional candy hunt.
Each child got a box of animal crackers and a make-your-own-bug fruit snack pack, in addition to whatever candy they found.
I had a great time planning the Zoo Party! It was a really easy theme (in contrast to the Maze Party!) and it turned out really well. Trevor was thrilled with everything about his party.
Labels:
Parties
Cindy deRosier has a masters in Education and taught 4th and 5th grade for 11 years. She uses that experience to blog about crafts and family-friendly educational travel. She spent many years as the Editor of Fun Family Crafts, a website with over 12,000 kid-friendly craft tutorials. Cindy is the co-author of "What Would Jesus Patent?", does freelance writing and designing, loves jigsaw puzzles, is an avid scrapbooker, and has been to all 50 states.
6/10/11
Giraffe Cake
A few weeks ago, I blogged about the birthday cake Trevor wanted for his zoo-themed party... a zebra that stands up. As I was blogging, he informed me that he actually wanted a giraffe cake. I made it clear to him that a giraffe would be fine, but due to my poor cake decoration skills, his cake would not be standing up.
This is what I made:
It was actually quite easy. I cut a piece of paper into a 9x13-inch rectangle (the size of my largest cake pan). I experimented with cutting it into pieces that would make a giraffe shape, keeping in mind two goals: 1) maximum cake usage; and 2) minimal cut edges requiring a crumb coat. Here's the template I made:
And here's how it looks laid out like a giraffe:
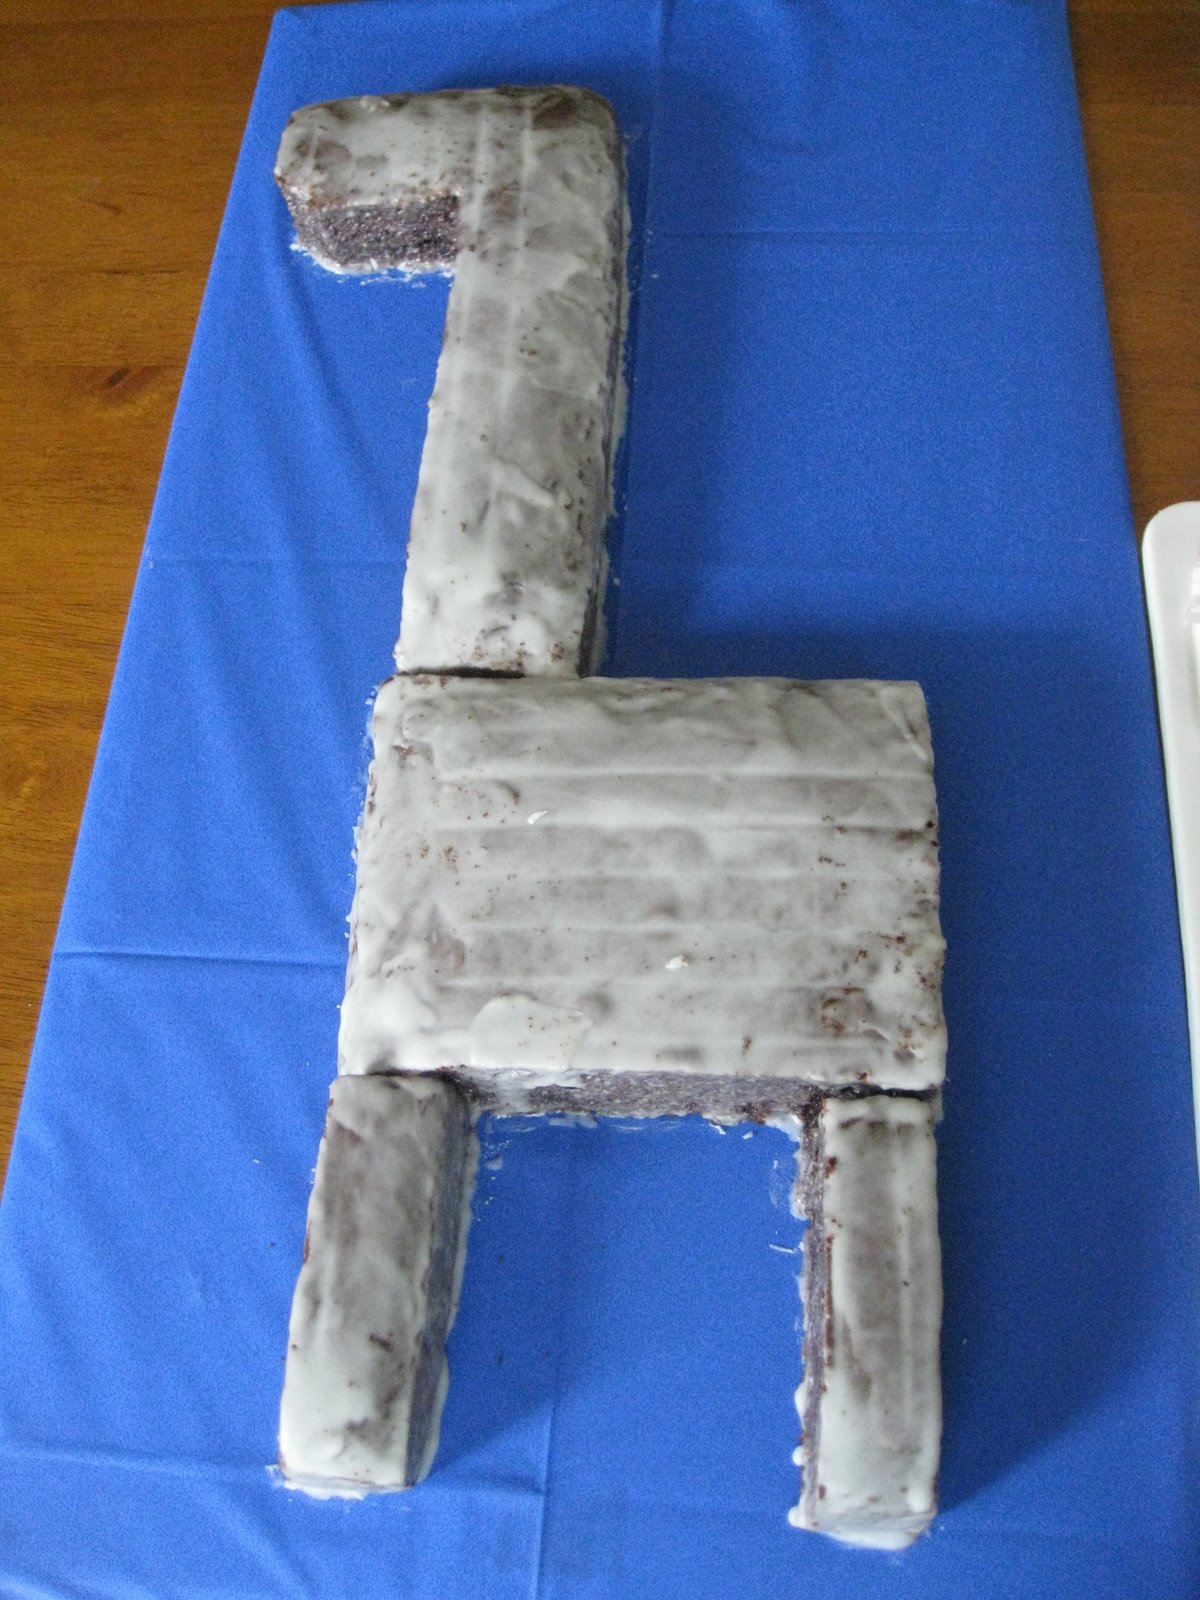
Steve found a piece of metal for me that would work as a cake board. I covered it with a blue plastic tablecloth. Trevor and I baked the cake and let it cool. I took a deep breath and followed my template to cut the giraffe pieces.
Here it is with its crumb coat.
I frosted the giraffe in yellow buttercream. I have no idea how anyone gets buttercream smooth, so I intentionally left 'fur marks' to give the giraffe texture.
To make the spots, I heated Tootsie Roll Midgees in the microwave for 12 seconds. I cut them in half, then rolled each with a rolling pin to make irregular spots. I used a similar technique for the horns- I heated them for 12 seconds, then molded them into the right shape. To make the tail, I used a knife to cut little slivers of Tootsie Roll, then squished them all together. Here are the horns and the tail pieces.
To make the mane, I used a knife to repeatedly score softened Tootsie Rolls.
Here's the finished cake, with the candles lit:
Trevor absolutely loved it!
This is what I made:
And here's how it looks laid out like a giraffe:
Steve found a piece of metal for me that would work as a cake board. I covered it with a blue plastic tablecloth. Trevor and I baked the cake and let it cool. I took a deep breath and followed my template to cut the giraffe pieces.
Here it is with its crumb coat.
I frosted the giraffe in yellow buttercream. I have no idea how anyone gets buttercream smooth, so I intentionally left 'fur marks' to give the giraffe texture.
To make the spots, I heated Tootsie Roll Midgees in the microwave for 12 seconds. I cut them in half, then rolled each with a rolling pin to make irregular spots. I used a similar technique for the horns- I heated them for 12 seconds, then molded them into the right shape. To make the tail, I used a knife to cut little slivers of Tootsie Roll, then squished them all together. Here are the horns and the tail pieces.
To make the mane, I used a knife to repeatedly score softened Tootsie Rolls.
Here's the finished cake, with the candles lit:
Trevor absolutely loved it!
Cindy deRosier has a masters in Education and taught 4th and 5th grade for 11 years. She uses that experience to blog about crafts and family-friendly educational travel. She spent many years as the Editor of Fun Family Crafts, a website with over 12,000 kid-friendly craft tutorials. Cindy is the co-author of "What Would Jesus Patent?", does freelance writing and designing, loves jigsaw puzzles, is an avid scrapbooker, and has been to all 50 states.
6/9/11
Dressing up a Gift Bag
I wrote this as a member of the Design Team at Flamingo Scraps and wanted to share it here.
I love dressing up plain gift bags. Here's a very inexpensive gift bag from Michaels. With a coupon, I paid under $2.00 for a pack of 10.
I didn't like the white handle, so I gave it a quick spray with Peach Delight Glimmer Mist. I also gave the front of the bag a light spray. The colors matched really well, so it mostly provided a bit of shimmer.
With Key Lime Pie Glimmer Mist, I colored some lace. I used the same technique to curl the lace into vines that I did during September's Flamingo Five at Flamingo Scraps.
I dug into my scraps pile and layered a green polka dot on some plain white paper. (Actually, the white paper is the back of a very ugly pattern!) I rubbed some Orange Peel Stickles onto a Prima flower, added a button in the center, then attached my green vines.
Here's the finished bag. I think it's much cuter and much more personal than the original!
Do you dress up your gift bags? If so, put a link in the comments so I can see what you've done!
Labels:
Gift Bags
Cindy deRosier has a masters in Education and taught 4th and 5th grade for 11 years. She uses that experience to blog about crafts and family-friendly educational travel. She spent many years as the Editor of Fun Family Crafts, a website with over 12,000 kid-friendly craft tutorials. Cindy is the co-author of "What Would Jesus Patent?", does freelance writing and designing, loves jigsaw puzzles, is an avid scrapbooker, and has been to all 50 states.
Subscribe to:
Posts (Atom)