3/31/22

Bunny Week 2022: Trouble deRosier, Interior Designer

Rabbits are opinionated. They expect things to be the way they want them and are not shy about telling you when you haven't done something to their liking. Try as we might, our interior designing skills are just not up to Trouble's high standards. When we finish cleaning his cage, he runs in to make sure everything is just so. It usually isn't, despite our best attempts to put things exactly where they belong. 


That is not to say that Trouble always likes things to stay the same. When he gets in the mood to redecorate, he'll spend an hour pushing, pulling, nudging, and/or throwing things into just the right position. It's fascinating to watch. 

Life with a house rabbit is the best. 

3/30/22

Bunny Week 2022: Marshmallow Bunnies

If this group of marshmallow bunnies doesn't make you smile, I don't know what will! These were so much fun to make. I'm particularly pleased with how the whiskers came out. That was a spontaneous addition and I think they make a big difference. Give them a try! Affiliate links below. 


Marshmallow Bunnies


Materials: 


Steps: 


Draw a pair of rabbit ears on a piece of scratch paper. You'll be using this as a guide to keep the ears in proportion with the marshmallow. 


Slide the ear sketch under a piece of parchment paper, then prepare the pink and white Candy Melts following the instructions on the packages. 

Spoon the white candy onto the parchment paper so that it fills the pattern you made for the ears. Immediately use the scribe tool to drizzle a thin line of pink candy on top of the white candy to make the iner ears. Fix any stray bits or lumps with the scribe tool. I found it easiest to keep two scribe tools handy (one for each color). 

Carefully slide the parchment paper over so that the pattern is under a clean area. Repeat the steps to make the next set of ears. Continue until you have all the sets of ears you'll need. Set them aside to harden completely. 


Use the Food Writer to draw mouths on each marshmallow. Pick out enough pink and black confetti sprinkles to give each bunny two eyes and one nose. 


Remelt the white candy. Dip the scribe tool into the melted white candy and use it to draw whiskers onto each bunny. Then add dots of melted candy to adhere the black sprinkle eyes and pink sprinkle nose in place. 


To attach the ears to the bunnies, you'll need a warm, flat surface. Something like a frying pan would work, but I just used a small ceramic dish. I filled it with water, then put it in the microwave until the water was boiling. I poured out the water, then inverted the dish on a potholder. 

I picked up a pair of ears using kitchen tongs (so my warm fingers wouldn't melt them) and pressed them gently against the bottom of the hot dish. Then I placed them onto a marshmallow. The candy solidified almost instantly, so I didn't even have to worry about propping the ears up as they dried. 


Each bunny looks a bit different from the rest. Marshmallows surprisingly irregular; I tried to find six that were sort of the same size and shape, but gave up and just picked any six. The fact that the marshmallows differ took away any pressure I might have felt to try to make the ears and faces look identical. 


If you make your own marshmallow bunnies, I'd love to see them. For that matter, I always enjoy seeing any crafts made from my tutorials. My email address is right above my picture - send me a photo of your creations!

3/29/22

Bunny Week 2022: How to Decoupage Napkins onto Coasters

Welcome to Day 2 of Bunny Week 2022!

My 50th birthday celebration was everything I'd hoped it would be and more. One of the "and more" details: Suzzi brought beautiful bunny napkins featuring a rabbit that looks just like Trouble. I loved them. I brought the extras home and used a variety of decoupage techniques to make a set of coasters. 


I don't have a lot of decoupage experience. The little I've done has been with patterned paper or fabric, neither of which are nearly as delicate as a napkin. But despite not having done it myself, I've seen a lot of tutorials about the best ways to decoupage napkins. Not surprisingly, what is "best" varies from person to person. I decided to try four techniques I've seen to determine my personal favorites. Affiliate links below. 


---------


Four Ways to Decoupage Napkins onto Coasters


Materials:


For all techniques: 

For certain techniques:

Steps: 


Most napkins are either 2-ply or 3-ply. You will only be using the top (printed) ply. The easiest way to separate the plies of the napkin is to barely moisten your fingers and rub gently at the corner. 


For my first coaster, I used the brush to put a generous coat of Mod Podge onto one coaster, then carefully lowered the napkin onto the surface. Starting from one corner, I gently used my fingers to smooth the napkin. This technique works with heavy paper, but (spoiler alert) it is a terrible method for napkins. As you can see, there are wrinkles I didn't get out (particularly in the bottom left), but the bigger issue is that the napkin started to tear in the center. 


For my second coaster, I started by putting a generous coat of Mod Podge on the coaster. I placed the napkin down, covered it with a piece of plastic wrap, and gently smoothed the wrinkles, starting at the center and working out. When I got to the edges, I added more Mod Podge and gently smoothed each down with the help of the plastic wrap. There was no tearing at all, and only minor wrinkling, so this was a huge improvement over my first coaster. 


Technique #3 was the one I was most excited to try because it just seemed so crazy. I did all the same steps as with #2 (Mod Podge on coaster, napkin on top, plastic wrap over that, smooth out wrinkles, add Mod Podge to edges, smooth down napkin), but then things went an entirely different direction. 


And an entirely different location: outdoors, on a concrete surface. Holding the coaster in my left hand and a lighter in my right, I lit the napkin on fire. The excess burned away, but when it reached the decoupage, it stopped. Sort of. You can see a small amount of singing by the bunny's nose.


Here's how the back looked. I did not expect the outline of the tongs to show like that. 


My fourth technique was my favorite by far. Easy alignment, no wrinkles, no stress. I put a generous coat of Mod Podge onto the front and sides of a coaster, then walked away and let it dry completely. When it was 100% dry, I put the napkin on top, covered it with a piece of parchment paper, and used a hot iron to press it. When the top was sealed, I did each side individually. Check it out - it's perfect!


For each of the coasters, I added two topcoats of Mod Podge, allowing the first coat to dry before adding the second. Then I used a file along the back edges to remove any extra napkin (or napkin ashes). Finally, I glued felt squares to the back. 


This was such a fun experiment and makes me interested in diving deeper into decoupage in the future!

3/28/22

Bunny Week 2022: Wood Bunny

Welcome to Bunny Week 2022! ("It's Like Shark Week, but Fuzzier!") Bunny Week is an annual tradition here at My Creative Life, a time to celebrate All Things Rabbit. I'm starting off Bunny Week with a wooden rabbit. I found it, unfinished, at Target. With a little paint and patience, I ended up with this: 


Except during the Christmas season when I decorate it with snowmen, our mantel has had the same nine items displayed for well over a decade: a wine bottle engraved with our wedding information, our cake topper, a photo of Steve and me holding Trevor, three of my favorite pictures of Trevor as a baby, a geode, and a potted plant on either end. Nothing representing the fourth member of our family. Now Trouble is represented on the mantel. Trevor thinks I should switch out one of the photos of him with a picture of Trouble, but I pointed out that other pictures of Trouble are visible near the mantel. 


I had two goals in mind when painting the unfinished wood: keep the grain visible and mimic Trouble's unique grey/tan coloring. I started by watering down a reddish brown paint until it was very watery, then used a paper towel to rub it onto the wood like a stain. I covered everything except the tail. I let the paint dry completely, then did the same thing with grey. Finally, I added a layer of white (and covered the tail that time). Together, the three colors make a close match to Trouble's beautiful fur. It's a wonderful addition to the mantel. 

3/25/22

My College Schedules

I am 50 years old. I graduated from college 28 years ago, yet multiple times a month I have a recurring college-related nightmare. In it, I don't know what classes I'm taking that term, what time they are, or where they're located. I spend the whole dream searching for my schedule, or going to the admin building to see if someone can tell me where I should be, or randomly popping into classrooms hoping I'll find something familiar, or realizing I've missed an entire month of Tuesday evening classes because I'd forgotten I had signed up for an evening class. It's maddening.

Oddly, I didn't have these nightmares during college, when I theoretically could have lost or forgotten my schedule and it would actually matter. Instead, my sleeping brain worried about not being able to find my bike. Or that I had a 100 page paper due that day that I'd forgotten about. Or that I couldn't remember my high school locker combination. Sigh. 

During college, it was unlikely I would forget my schedule because I made myself a pretty schedule each quarter, using colored pencils and pens on graph paper. I pinned my schedule in my room, and carried a copy in my backpack. 

Here's my very first one:


As you can see, I took a very light load my first quarter of college (13 units). I took Spanish, Economics, and Public Speaking. Giving myself such an easy first quarter was one of the best decisions I ever made (particularly given that I was regularly traveling as a State Ambassador for 4-H, which took a huge amount of my time) and something I always recommend to high school seniors. College life is a major adjustment, even without the academics. Give yourself time to adjust, then ramp up the units the following quarter if you're comfortable. 

I took Western Civ, Economics, Geography, American Studies, and First Aid during the second quarter of my freshman year. By then, I had figured out all of the "how do I...?" stuff associated with living away from my parents for the first time, had made lots of friends and adjusted well to dorm life, and was ready to challenge myself more academically. 


In the spring of freshman year, I took my third Economics class and my second Western Civ class, along with Psychology and Bio Sci. 


I started my sophomore year with more Economics and more Western Civ, along with Political Science and Religious Studies (Judaism). 


In the winter, I took more Economics, along with Statistics, Calculus, and Forestry (one of my all-time favorite classes). I also took my first PE class, Ballroom Dance. 


I wouldn't meet Steve for another 8 years, but we would eventually meet through ballroom dance. So in a way, this is where it all started. 

In the spring of my sophomore year, I took Economics, Sociology, History, Landscape Architecture, and another dance class. 


I started my junior year with Plant Science, Geology, Human Development, Political Science, and History. I also worked on campus as a Program Advisor. I had staff meetings on Tuesday nights and a one-on-one with my supervisor on Wednesday mornings. 


During winter quarter, I took Agricultural Economics, Geology, and History. The meetings for my job are in green. 


And that's it. Apparently, I stopped making pretty schedules for myself at this point. I find that hard to believe, but I find it equally hard to believe that I would have saved the first eight and thrown away the remaining four or stored them in a different place. But I'm missing Spring 93, Fall 93, Winter 94, and Spring 94, when I graduated with a BA in International Relations. (You thought it was going to be Economics, right? Or Education, since you know I taught elementary school? Nope!) 

For the sake of completeness (and because I know my mom will ask), the rest of my degree included the following: 

Spring 1993: Education, History, Poli Sci, and Healthful Living
Fall 1993: Education, Environmental Studies, History, Nutrition
Winter 1994: Education (x4), Music
Spring 1994: Education (x2), English, History

Thanks for indulging another stroll down Memory Lane. It was a treat to me to find those schedules and all the memories those simple papers contain. 

3/24/22

Pretzel Monarch Butterflies

I've used pretzels to make a butterfly craft before, but that was a savory project suitable for young children. This is a sweet craft, better for preteens and up. I had a lot of fun figuring it out as I went and I'm happy with the end results. Affiliate links below. 


Pretzel Monarch Butterflies


Materials:


Steps: 


Place a sheet of parchment paper underneath a wire rack. Prepare the black candy melts following the directions on the package. For each butterfly, dip two pretzel twists and one pretzel stick into the melted black candy, then transfer them to the rack. I used a sharp knife to make the pretzel sticks shorter; whether you need to do this or not depends on the brand you use. After the pretzels have sat for 30 seconds, transfer them to a different part of the rack so that they don't stick. Let them set completely. 


You'll be melting more black candy, so don't clean that container yet. 

Move the rack, then transfer the pretzels to the parchment paper. Prepare the orange candy melts. I experimented with different methods of filling the holes of the pretzel twists with orange (see failures below). I found the easiest and most effective method was spooning a dollop of melted candy into each opening, then using an extra pretzel stick to push it over the black candy. The goal is to leave a thin border of black between the orange areas. 

In retrospect, I should have used the scribe tool to get rid of the peaks in the orange that the pretzel stick left. 


When the orange has set completely, prepare more black Candy Melts. Use the scribe tool to draw lines of black candy across the orange to mimic the patterns of a monarch butterfly. Symmetry is more important than accuracy, so work on both the left and right wings at the same time so that you end up with matching pairs. Let the black candy set. Don't clean the container or the scribe tool - you'll use both again.  


Prepare a small amount of white Candy Melts in a separate container. Use a clean scribe tool to put dots along the outer edges of the pretzels. Again, work in pairs and focus on symmetry. Let the white candy set. 


Crumple a small piece of foil into a cradle to hold the butterfly wings in the position you want. Do this for each of your butterflies. Carefully remove the pretzel twists, keeping the stick pretzels in position. Melt more black candy. Working on one butterfly at a time, use the scribe tool to paint a line of melted candy along each side of the stick pretzel, then gently place the pretzel twists back into position.  


Reinforce the wings by adding a bit of extra black candy along the point where the wings meet the body. Let the candy set completely, then remove the butterflies and place them onto frosted cupcakes. 


Happy spring, everyone! Celebrate with a cupcake. 

3/23/22

Colored Pencil Potted Succulents

I finished the colored pencil succulents project I shared last week. Even starting with a greyscale guide, it was a major challenge to match the colors, place the shadows, and get good blends. This was a great way for me to practice, and definitely something I'll be doing again. 


This is my original photograph. Obviously, there are quite a few differences between my coloring and the photograph. But, while it's easy to see what's wrong, I'm also making sure to look at what's right. And what's close. It's all about progress, not perfection. 


Another thing I've learned is that an exercise like this needs good light. I worked on this project exclusively at my desk in the craft room, which doesn't have great light most of the time. I was surprised to see that some of my attempts at color matching were way off, even though they didn't look that different at the time. I'm going to try better bulbs in my overhead light as a first step, but will probably have to invest in a better light source. Blick has a wide variety of artist lamps, as does Amazon (affiliate links), but I'm not sure what's going to work best for my space. I'm open to suggestions!

3/22/22

Torn Newspaper Giraffe

The fourth animal in my series made with painted and torn newspaper is a giraffe. Click to see the tiger, monkey, and lion


Painted Newspaper Giraffe


Materials: 

  • newspaper
  • acrylic paint (yellow, brown, black)
  • glue

Steps: 


Find three newspaper pages that have small text, like sports scores, stock information, or classifieds. Use a single coat of paint to color one sheet of newspaper yellow. Do not rinse your brush. Color a second sheet with brown. The yellow left on your brush will make a light brown. As the yellow runs out, you'll get a true brown. Paint half of a sheet black and leave the other half unpainted. 

When the paint is dry, tear out the giraffe's face from yellow. The basic shape is like a footprint. Tear slowly and carefully because newspaper tends to want to rip in just one direction. 

Tear the giraffe's muzzle from light brown, then glue it to the face. Tear two nostrils and a smile from black and glue them in place. 

Tear two outer ears, two ossicones, and some spots from the light brown. Then tear two inner ears and a mane from dark brown. To make the mane, I tore a rectangle, then carefully tore one short end into strips, leaving the other end intact to make it easier to glue.  

Finally, tear two eyes from the unpainted newspaper and two black pupils. Glue everything together. 


3/21/22

Photo Fun with Vintage Candy

My sister gave me a box of vintage candy for my 50th birthday. What a great gift! Before trying anything, I spread everything out on the table and snapped a photo so I'd remember what was in the box. There's a fun mix of things I enjoyed as a child and candies I don't know that I've tried before. 
 

I decided I wanted a photo of just the candy without the birthday insert, so I removed the paper and rearranged the candy to fill the space. 


It was really fun trying to fit the candy together, so I challenged myself to arrange it by color in a perfect rectangle. I left out a few things that didn't have a dominant color. I think the candy looks so pretty arranged this way!


I made one final arrangement with my candy, from best to worst. I left out anything I'd never tried before. Of all the candies, Sugar Daddy is my favorite, so it's in the top left. I also love Double Bubble, Lemonheads, BarNone and Pixie Sticks. The next tier are candies I like, then ones I feel meh about. As you get toward the bottom, you'll see the candies I don't like at all. The worst of all are the banana Now n Laters, banana Laffy Taffy, and the wax lips. Gross. 


I don't think my sister anticipated that I'd have just as much fun, if not more, arranging the candy than eating it. Thanks for a great gift, Kari!

The Vintage Candy Company (affiliate link) has boxes like this for all the milestone birthdays, as well as candy by the decade. They have special occasion and holiday boxes, global boxes, and boxes featuring a flavor, like sour, spicy, or fizzy candy. They even have boxes where all the candy is sugar-free or vegetarian. Check it out!

3/18/22

Scouts, Fall 2021-Winter 2022

I usually create stand-alone layouts about Trevor's most memorable Scout trips and events, but every once in awhile I like to make a page that combines pictures from meetings, service projects, and trips. This page has eight events on it, including: Scouting for Food, California Coastal and Creek Cleanup, Scout Day at the Food Bank, September 11 flag ceremony at Rush Ranch, fishing at Doran Beach, the December Court of Honor, the lock-in at Rockville, and preparing boxes of food for the hungry. 


I didn't leave much room for journaling, but I tried to cover the basics as best I could. In the case of the Creek Cleanup, I noted that the photo was "before the bee stings..." I know that will be enough to jog our memories even years from now, because it was pretty traumatic. 

We'd been cleaning that same stretch of Dan Wilson Creek annually for years. Each year the job was easier, with far less accumulated trash. Until 2021. It was evident that people had been living along the creek and treating it as their personal garbage dump. We were all sad and frustrated to see the creek that way. One of the Scouts picked up what he thought was an empty pizza box and almost immediately let out a bloodcurdling scream as multiple bees (or wasps - not sure which) stung him. Turns out there was pizza in the box, and a swarm on said pizza. One by one, the Scouts around him started screaming as they were stung. It was a nightmare. I was spared, along with about half the group. Trevor was stung on his ear, but fortunately only stung once. 

We all raided our first aid kits for sting relief. If you don't keep this on hand, both at home and in the car, use this affiliate link to buy Sting Kill immediately. It is very effective at numbing the pain of a sting, easily a million times better than the calamine lotion or baking soda nonsense of my childhood bee stings. Once all the sting victims were suitably numbed and calm, we continued our cleanup and ultimately the event was a success.  

I could have made this negative event a page of its own, but why would I? Trevor's Scouting experience has been 99.9% good. I don't need to make pages about the less pleasant 0.1%. The brief reference in the journaling is enough to jog our memories. Putting 7 positive experiences on the page along with the 1 negative is a more accurate look at his experience than if I'd made a page all about the stings. 

In case anyone wonders, I feel completely different about the page that tells the story of Steve's medical evacuation from a Scout hike. That is the worst Scout-related thing that's ever happened to any of us by far. I needed to tell that story, from my point of view. I need to have that awful thing in our album, just like I need to have this awful thing in our album. Both were traumatic, but both ended well. Both remind me to be grateful for each other, our home, and all our blessings.

3/17/22

Fall at Solano

I've mentioned before that Trevor attends high school on a community college campus. Back in November, I spent four days at his school listening to the 12th graders pitch their Senior Project ideas and providing feedback. During my breaks, I walked around and admired the beauty of the campus with its fall colors and dramatic skies. I had the place to myself. Ordinarily, it would be highly unusual for a college campus to be completely empty, but a pandemic has a way of changing things. Out of an abundance of caution, all college classes were remote, so the only people on campus were the high schoolers, who were in their classrooms. 

Of the many photos I took, I chose nine for this layout. 

Fall at Solano (affiliate link)

A fun fact about this page: literally every single letter spelling out SOLANO was cobbled from another letter. The S is actually an 8. The first O is a zero. The L is a Z cut into pieces and rearranged. The A is an upside-down V, with a chunk of the Z as a crossbar. The N is an upside-down U. The second O is a modified Q. I was ridiculously pleased with myself to have made 80ZVUQ spell SOLANO.  

3/16/22

Celebrating My 50th in Plymouth, California

After two years of very low-key pandemic birthdays, I was ready to celebrate the heck out of March 12, 2022. Not only was I turning 50, but my birthday fell on a Saturday. I found a beautiful Airbnb in Plymouth, California and invited two of my very favorite people, Jonna and Suzzi, to join the three of us for a weekend of fun. It was incredible. Everything about the trip exceeded my expectations. 


We stayed at the Historic Bunk House at Butler Hill. The bunk house was once the sleeping quarters for dozens of miners working the nearby gold mine, now restored with all the modern conveniences and plenty of historic touches. 


The 3-bedroom 3-bath house had more than enough space for our group of five. 


The large grounds include a lawn, an amphitheater area, water features, and a bar inside a granary.


The back fence is a replica of an old mining town.  


We arrived in Plymouth Friday night and enjoyed a fantastic dinner at the Plymouth Hotel. Definitely get the lumpia and a wood-fired pizza (or three). We spent the rest of the evening chatting and playing games at the house. Well, four of us did. One of us had to write an English essay that was due at midnight. I don't know why, but a lot of Trevor's homework is due on Fridays at midnight. 

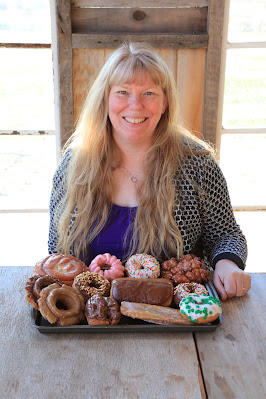
On Saturday morning, Jonna, Suzzi, and I took a field trip to Donut Street Cafe. Look at their gorgeous donuts. They all tasted incredible. Lest you think I ate a dozen donuts by myself, let me clarify that I cut every donut into fifths so that we could each try them all. So I only ate 2.4 donuts. 


We dined al fresco. The weather was beautiful and it was a great way to start the day. 


We went back inside where I opened my gifts. 


Then we did a murder mystery set at the bunk house back during the mining era. That's one of the neatest things about this Airbnb - you tell them how many people will be there and they set up a murder mystery for you that is perfectly suited to the size of your group. We had so much fun trying to solve the mystery. I won't spoil it for you, but I will say that I guessed correctly!

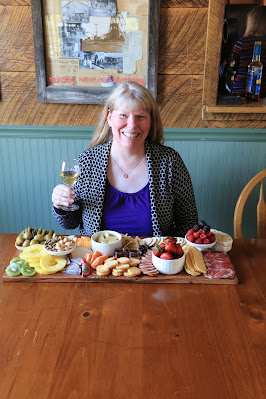
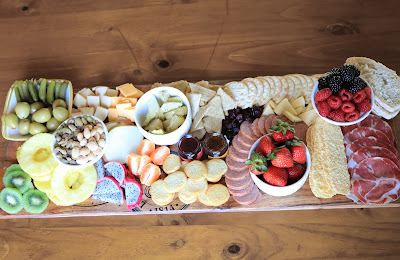
Jonna and Suzzi worked together planning a gift that was absolutely perfect for me: a charcuterie board and a huge assortment of cheeses, meats, fruits, breads, crackers, nuts, and more for me to arrange for lunch. I LOVED it. I had no idea putting together a charcuterie board was that much fun. 


Here's a top-down view: 


Again, that was food for five. Despite the fact that I posed with it by myself, that most definitely wasn't a single serving. We didn't even finish everything on the board (despite our best efforts). 

We'd planned to go out to a fancy dinner, but I had so much fun making the charcuterie board that I asked if I could make a different one for dinner. There was so much food left that I hadn't put onto the lunch board that I thought it would be a great challenge to see if I could make something completely different for dinner. I'm skipping ahead a bit, but here's how that one turned out:  


So what did we do in between lunch and dinner? I put together my puzzle, we played games, and we walked through the town of Plymouth. After dinner, we had cake, watched a movie, and played more games. It was the perfect way to spend my birthday. 


We went to sleep way past my bedtime and lost an hour during the night (I'm not a fan of Daylight Savings Time), but we still had plenty of time on Sunday to continue celebrating. I'd requested a late checkout from our hosts, which they were happy to grant. 

I'd also requested their scavenger hunt. Not only do they have that great murder mystery you can do, but they also set up a hunt that takes you around the property and into historic sites in town. So cool! 

We hunted for rocks that spelled out the next clue. 


We visited the site of the original mine and used the sign to find another clue. 


We assembled a map and a followed a poem for more clues. 


The Dead Fly Diner was not part of the scavenger hunt, but I had to take a photo. I have no words.  


We found a clue by a grave near the Odd Fellows Hall. 


At the end, we found certificates declaring we'd completed the scavenger hunt. What a fun touch!


I loved absolutely everything about our time in Plymouth and specifically at the Historic Bunk House at Butler Hill. If you're looking for a fun weekend trip, definitely check it out. 


Huge thanks to Steve, Trevor, Jonna, and Suzzi for making my 50th birthday one I will never forget. It was absolutely perfect and I am so grateful.