3/31/20

Hay Buffet (Bunny Week 2020, Day 2)

In nature, wild rabbits are foragers. They spend up to 75% of their waking hours searching for their next tasty bite. They eat all sorts of leaves and flowers and bark and stems and grasses. House rabbits have the same foraging instinct and need a variety of foods to stay healthy. But the bulk of their diet should be hay. 

Rabbits should have access to unlimited hay. When we adopted Trouble, we learned that timothy hay is the best for rabbits, so that is what we bought for him. Now we know that is a simplification. The best hay for pet rabbits is any hay that is high in fiber (which keeps the digestive tract moving) and low in protein (which in excess is fattening) and calcium (which in excess can cause bladder problems). Just like humans, rabbits like having choices when it comes to eating, so we bought a few bags of different types of hay and set them out for Trouble. He LOVED being able to pick just the right piece of hay from the bags. 

Hay Buffet (affiliate link)

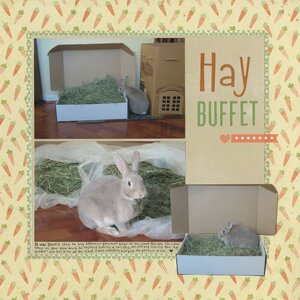
Now we buy the Sampler Box (affiliate link) from Small Pet Select. It has four types of hay and is delivered super fresh. It smells wonderful. 


As you can see from the photos in the layout, the box is large and sturdy enough for Trouble to hop inside to graze. We call it the Hay Buffet. What's interesting is about the Hay Buffet is that Trouble never just rests or hangs out in there. He'll stop by for a few pieces of hay, then move along to another place to relax. 

3/30/20

Peekaboo Bunnies (Bunny Week 2020, Day 1)

Welcome to Bunny Week 2020!

Bunny Week is an annual tradition here at My Creative Life where we celebrate All Things Rabbit. I'm starting off Bunny Week with an easy paper craft I'm calling Peekaboo Bunnies. One person can make all the bunnies, or a group of kids can each make a bunny. You can make small bunnies on backgrounds the size of playing cards, or large bunnies with a full sheet of construction paper as the background. Affiliate links below.


---------


Peekaboo Bunnies


Materials:


Steps: 


Determine what size you want your finished background to be, then cut down pastel construction paper as needed. Use a circle punch or scissors on grey construction paper to cut a partial circle that will be the bunny's head. It should fill about 1/3 of the background paper and have one or two flat edges.

Cut two ears from grey construction paper. Cut two inner ears and a nose from pink cardstock. 


Ink around the edges of each cut piece. This will help the bunny stand out against the background and add some dimension. Fingertip daubers give great control. 


Glue everything to the background paper. Use the pen to add eyes and whiskers. Back each bunny with black paper, then arrange them to make a grid. 


---------


Wondering about the inspiration for my Peekaboo Bunnies? Rabbits are incredibly curious. Hold up a camera and you're likely to get a bunny photobomb as the rabbit looks closely to figure out what is going on. It's adorable.

3/27/20

Cards for Eagle Scouts

There are three new Eagle Scouts in Trevor's troop. They have been excellent role models for Trevor and I am thrilled to have watched them through their journey to Eagle. The Court of Honor to celebrate one new Eagle was supposed to have been tomorrow, but obviously it was postponed. I'd made his card (and one for the second of the three Eagles) weeks ago and scheduled this post to run today specifically because the Court of Honor should have been tomorrow. 

Like the card for Allison and Teagan's HAPPY birthday card, these cards were inspired by postage stamps


The first card is a virtual copy of the stamp that inspired it. To make it, I glued a blue rectangle to a white card base, added the red and white stripes, and layered the star (die-cut chipboard, painted white) on top. Then I added the sentiment and the rhinestones. 

While the first two new Eagles achieved the same rank and both exemplify the 12 points of the Scout Law, they are very different people. For the second card, I challenged myself to use exactly the same materials as the first, but in a different way. 


Congrats to all the new Eagles! I'm so sorry we can't come together to celebrate with you right now. Thank you for all you've done to help guide and inspire Trevor and other younger Scouts along their own paths to Eagle. Thank you for the service you've done to the community and all that you've given to Troop 482. 

---------

If you've been reading My Creative Life for awhile, you'll know that Bunny Week is an annual event that takes place each March. Starting on Monday, you'll get a week of bunny-themed crafts, layouts, and interesting tidbits about the Best Pet Ever. I've long explained Bunny Week as "Like shark week, only fuzzier." See you on Monday!

3/26/20

Hand-Carved Pineapple Stamp

Two of my best crafty friends (BCFs) and I had a craft day on Saturday, each in our own craft spaces, using Zoom. We chatted while we crafted and it was awesome. I mostly worked on scrapbook layouts during our 6+ hours together, but I also did a few other crafty things including hand-carving a stamp for the first time.

I've been following Julie Fei-Fan Balzer's #CarveDecember project for years. I love seeing what she makes and marvel each year that she can create an entire month's worth of hand-carved stamps during what is the busiest time of the year for many people. I find her repeating stamps particularly awesome. For my first-ever stamp, I went with something that I thought would be much simpler: a pineapple. Affiliate links below.


---------

Hand-Carved Pineapple Stamp


Materials:


Steps: 


Sketch your design on a piece of carving rubber. Using shallow cuts, remove the excess rubber around your design. You can always cut more off, but you can't add back what you've already cut away. Oh, and always cut away from yourself - these tools are sharp! 

I started by removing material around the edges to get used to the feel of the tool. Then I worked on the pineapple itself. Through trial and error, I learned that when cutting curves, it's easier to rotate the rubber than the tool. I held the knife vertically to create the notches on the surface of the pineapple. 


When you have carved away the entire background, ink up your stamp. If any ink shows on the background, you need to cut away more material.


Finally, it's time to stamp! I used juicy ColorBox cat's eyes for the yellow and green areas. I added a dot of brown to each notch using a Tombow brush pen. Huff your breath on the stamp to make sure the ink is moist, then stamp it on white paper.  


I'm very pleased with how my first carved stamp turned out! Have you ever carved your own stamps? Any tips? 

3/25/20

Volunteering at the Food Bank

Today's layout is all about our work with our local Food Bank. Our family has supported the Food Bank financially and volunteered at the warehouse packing food frequently over the years. (I even held Steve's surprise 40th birthday party there!) 

Last September, Trevor began work on the Citizenship in the Community merit badge, which requires 8 hours of volunteer service to a charitable organization within the community. Of course, he chose the Food Bank. We worked three two-hour shifts in the warehouse bagging produce ("we" since volunteers under age 16 need a parent with them) and two 1.5 hour shifts distributing the produce. This was the first time we'd done distribution. We loved it so much that we have done a regular biweekly shift ever since! In October, we attended Empty Bowls for the first time and really enjoyed it. Empty Bowls will be an annual event for us now. 

Food Bank (affiliate link)

As I'm sure you can imagine, the Food Bank provides an essential service and is remaining open during the pandemic. More people than ever need food and the Food Bank needs healthy volunteers and financial donations to keep up their mission. You can donate or search through volunteer opportunities here.

I am taking California's stay-at-home mandate very seriously, but after careful consideration and learning about the policies the Food Bank has put in place to prevent the spread of COVID-19, I did my regular food distribution shift last Friday. We had a record number of people come to get fresh produce. I am very glad I am able to help provide this essential service. We're all in this together. 

3/24/20

Posable Spoon Elvis (Jailhouse Rock Era)

As promised in my Cardboard Tube Elvis tutorial, I made a Young Elvis craft for you. Specifically, it is a Posable Spoon Elvis from Jailhouse Rock. 


I watched the Jailhouse Rock video about a thousand times for inspiration. It's one of my all-time favorite dance routines. Did you know that Elvis choreographed this himself? 


Are you inspired to make your own Posable Spoon Elvis? Affiliate links below. 


---------


Posable Spoon Elvis


Materials:


Steps:


Paint a thin coat of gesso on the spoon. (This will allow the paint to stick without peeling off.) When it is dry, paint the face and neck with Light Flesh. Set it aside to dry completely. 

Cut out the clothes from felt. You'll need a white rectangle for the shirt, two black sleeves, two black jacket panels, and a pair of pants. 


Use the Sharpie to draw horizontal stripes on the white shirt. 

Cut two lengths of black pipe cleaner that are just shorter than the sleeves. Bend the remaining pipe cleaner in half. It will be for the pants. 

Use the Sharpie to draw hair and facial features. Remember that the real Elvis' face is not shaped like a spoon, so cut yourself some slack if your version doesn't quite look like the King. 


Use a strong craft glue to attach the pipe cleaners to the sleeves and the pant legs. Glue the sleeves and other jacket pieces to the shirt. Set the clothes aside to dry. 


Use the scissors to cut construction paper hands, shoes, and uniform number for the jacket. Glue them in place. Fun fact: In the movie, Elvis' character wears #6239 on his uniform while in prison, but it changes to #6240 once he's out.

Glue the jacket and the pants to the handle of the spoon. When everything is completely dry, you can pose Elvis' arms and legs to mimic your favorite of his dance moves.


Not an Elvis fan? You can follow the same steps to create anyone you want! By changing the skin tone, hair color, and clothes, you can make your own action figure of a celebrity, historical figure, or family member. Give it a try!

3/23/20

Independent Study

As you know, our family travels often. Unfortunately, we've had to cancel what should have been our next major trip. So instead of traveling, I've been working on scrapbook pages about previous travels. 

Whenever possible, we'd scheduled our trips during Trevor's school breaks. When he did need to miss school, I set him up on Independent Study. That meant that he had to squeeze in schoolwork whenever he could during a trip. 

Independent Study (affiliate link)

I wanted this layout to show the wide variety of places that Trevor has done schoolwork. From the top left working clockwise, you can see Trevor doing schoolwork on an airplane, in a restaurant, in an airport, in the stateroom on a cruise ship, in bed in a hotel, and on a train. If you've ever thought our family's travel style sounds exhausting, remember that Trevor is squeezing in hours of schoolwork between all the museums and activities. I'm glad to have this layout to document that.

3/21/20

Construction Paper Animal Crafts for Kids

I don't usually post on Saturdays, but there is nothing usual about anything right now. With all of California ordered to stay at home, schools closed, and social distancing in effect throughout the country, many parents are looking for ideas for things to keep their kids entertained using what they have on hand. Quite a few of my friends have contacted me specifically for ideas for construction paper crafts. 

I went through all of my animal craft tutorials and pulled out the ones that are made exclusively, or predominantly, with construction paper. You'll find these below. In most cases, they can be made with scrapbook paper, cardstock, copy paper, or whatever else you have on hand.

Click on the link below the photo to go to the tutorial. Happy crafting!  


3/19/20

'Spell It With It' Challenge for Kids

With the pandemic keeping us home, it's time to get creative! This challenge is open to kids of all ages and can be done independently or with parents. It's a great way to work on spelling, motor skills, and critical thinking. And it's super fun!

---------

"Spell It With It" Challenge for Kids


It's simple. Find something in your house, then use it to spell out what it is! Take a photograph, clean up, and move on to the next item.


Here are some other examples.


Now it's your turn! Below are ten categories for you to "Spell It With It." Be creative and interpret them however you'd like. At the bottom, there are two bonus challenges. Whoever spells the longest word and uses the largest item score an extra point. There will be extra points for unique or clever items, beautiful photographs, or anything else that strikes my fancy.


So how do you enter? If you are 13 or over, you can enter on your own. If you are 12 or under, you'll need a parent to enter for you. Here are the steps:

  1. Upload your photos as a comment on the designated post on the My Creative Life Facebook page OR as a comment on the contest pin on the My Creative Life Pinterest account. You can use #SpellItWithIt, but the hashtag is not required. 
  2. Leave a comment on this blog post telling me your age and where to find your photos (either Facebook or Pinterest). 

You have until Friday, April 10 to enter. I will choose winners in different age groups to receive prizes and announce them on Monday, April 13. Good luck and have fun!