4/16/18

Cardboard Tube Lion

We receive a lot of submissions at Fun Family Crafts and it's part of my job as Editor to process them. This means I look at each one to determine if it is indeed a craft, child-friendly, and written as a tutorial. If so, then I write up the description, add tags, and schedule it to be featured. (If you have a blog and would like your craft tutorial to be featured at Fun Family Crafts, submit it here!) I love going through the submissions because it is such a source of inspiration. 

For example, when I saw this:


... I immediately thought of this:


You can find the instructions to make Petro's flowers here. Continue on to learn how I made my lion. Affiliate links below. 

---------


Cardboard Tube Lion


Materials:


Steps:


Use the pen to draw 2 parallel lines around the center of the tube. They should be about 1/8" apart. Make a cut from one end of the tube and stop when you reach the closest line. Continue to do this every 1/8" or so. Then rotate the tube and cut from the other end toward the closest line. If you offset these cuts from the cuts on the other side of the tube, you'll get a fuller mane. 


Bend all the cut sections in toward the pen lines you drew. Use the foam brush to paint the tube brown. (Or, you can paint the tube first on the inside and the outside, let it dry, and then make the cuts.)


While the paint dries, cut out a head and two ears from yellow paper. You can use a solid yellow construction paper or cardstock; I used a scrap of yellow patterned paper I had on hand. When you cut the ears, make the ends extra long so you have a place to put glue. Draw a face on the circle, then glue the ears in place behind the face. 


Press down gently on the cardboard tube to flatten the mane. Then use the scissors to trim the mane so it is even and looks fuller. I cut about 1/4" off both the front and back portions. 


Place the lion face on the mane. If you like how it looks, glue the face in place. To make it a bit more realistic and less whimsical, you'll do some trimming before you glue.  


First, trim the face by slimming down the bottom portion. Then trim the mane so that it is shorter on the sides and tapers down toward the bottom.


When you are happy with the lion, glue the face to the mane. Fun!

4/13/18

Long Pins and Roundups

Ready to see the latest batch of craft roundups and long pins I made as Editor of Fun Family Crafts? I hope so, because I love sharing them as much as I love making them! The last time I updated, I'd just started making long pins. We're seeing decent results on Pinterest, so expect to be seeing more of them as time goes on. 

I started out with hot air balloon crafts. As usual, I tried to show the diversity of crafts we have on the site. In this case, I chose two projects that are flat and two that are three-dimensional. They use different materials as well. Next, Eric Carle crafts. The Very Hungry Caterpillar appears twice, reflecting the fact that we have at least a dozen of VHC projects for each other Carle-inspired craft. (Two of the four projects are mine. Do you recognize them?) I had great fun putting together the April Fool's Day pin. If those look like potstickers, a turkey dinner, and hot dogs to you, click the link below the image to find out what they really are! 

                     
Hot Air Balloon Crafts * Eric Carle Crafts * April Fool's Day Crafts

The next two long pins I made were Cookie Monster and Kermit the Frog. I'm working on a new feature for Fun Family Crafts where we pit two characters, or supplies, or some other craft component against each other and have our readers vote for their favorite via likes and pins. I'll be announcing the results of the Cookie Monster vs. Kermit face-off soon!


Now onto the roundups! First, nest crafts to celebrate spring. I used one of mine in the graphic. It happens to be one of my all-time most popular crafts. It's also one of my favorites. 


April 11 is National Pet Day, so I put together a roundup featuring some of the 2000+ animal craft tutorials we have at Fun Family Crafts. I carefully chose ten different pets for the graphic, rather than using primarily dogs and cats. Obviously the rabbit craft is mine, but can you spot the other project I made?


April is also National Frog Month. How cute are these ten projects I featured?! None are mine but I love them all. 


So far, all the roundups and long pins I've shared above and in past posts have been for Fun Family Crafts. After seeing their success, however, I've made it a priority to make ones for My Creative Life as well! I started with a graphic showing my favorite edible bunny crafts, then did one featuring six unique ways to dye Easter eggs. I made them about a week before Easter, and both have generated decent traffic. 


Just yesterday, I published my first travel-related long pins, both from our recent Portland trip. If they lead to traffic increases, I'll be going back and creating pins from previous travels as well. 

        
Where to Eat in Portland * What to Do in Portland

As always, I made all of the graphics using PicMonkey. I love it - so easy and so intuitive.

4/12/18

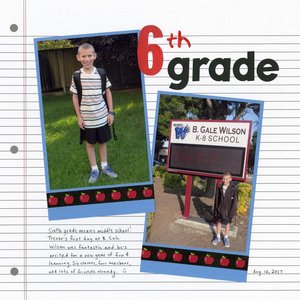
6th Grade

Trevor's first day of 6th grade, into the album! 

6th Grade (affiliate link)

It's a really simple layout, but it took longer than it seems like it would. The '6' was originally tan with weird blueish flowers and the 'th' came from a teal sticker sheet. I painted both with red paint, but the flowers showed through, so I had to add a coat of gesso, let that dry, and then try again with the red. Success!

4/11/18

Exploring Tennessee Through Little Passports

Time to explore another state through Little Passports! This time it's Tennessee, the Volunteer State. Trevor started by building the model of a country music stage. 


Not surprisingly, many of the activities in the Tennessee State Journal were inspired by music. We solved a puzzle to learn the names of Tennessee's official state songs. Yes, plural. They have ten! Even stranger, two of them have the same name ("Tennessee"). The craft was an Elvis-style white cape. The science activity had us making a guitar from a cereal box to explore how vibrations create sound. Trevor was not interested in an Elvis cape and has done the cereal box guitar many times, so we worked together to come up with a craft that combined the two activities into something else... a record player! (This craft would be great for a study of Mississippi, too, as that's where Elvis was born.)


Record Player Craft


Materials:

  • 2 cereal boxes
  • compass
  • black paint
  • scissors
  • construction paper
  • glue
  • pens

Steps:


Set one cereal box aside. Cut the other open and use the compass to draw a circle that reaches the edges of the chipboard. Paint it black, making the brush strokes go around the circle to mimic the grooves in a record. Let the paint dry completely, then cut out the circle.


While the black paint is drying, use the compass to draw a 3" circle on yellow construction paper. Cut it out, then use the black pen to copy the record label of your choice. Since we were inspired by Elvis, we with went his first single with Sun, 'That's All Right." Glue it to the dried record. 


Cover the intact cereal box with brown construction paper.


Cut a sheet of white construction paper 2" shorter than the length and the width of the front of the cereal box. Glue it in place, leaving 1" margins on all sides. Cut grey construction paper to make the record player arm and glue it to the right side of the white paper. Add two small circles of grey to the bottom left. Label one VOLUME and one POWER. Add a red dot in the center of the POWER button. 


Now place your record on top.


It'd be fun to set this on a table during a party with a bluetooth speaker (affiliate link) hidden underneath so that it sounds like the music is actually coming from the record player. In fact, we did something on a bigger scale for the awesome National Craft Month party I hosted in 2011. That was quite an event!

After making our record player, Trevor and I learned about the animals that live in the caves of Tennessee. I had no idea, but Tennessee has more caves than any other state- over 9000! Next we did a hidden picture puzzle based on Raccoon Mountain Caverns. 

We worked on an anagram activity inspired by the Knoxville Biscuit Festival. (Note to self: Attend Knoxville Biscuit Festival someday.) Then we read about famous events in Tennessee history and matched famous Tennesseans to their accomplishments and the years they were born. We learned about 'The Athens of the South" and the birds that make their home in Great Smoky Mountains National Park. Did you know it is the most visited national park? I had no idea.

The cooking project for Tennessee was Moon Pies. Yum! Here is Trevor making the cookies for our moon pies. 


He sandwiched the cooled cookies around a delicious marshmallow filling...


... then dipped the cookies into chocolate. 


Our homemade Moon Pies were outstanding! The recipe is definitely a keeper. Thanks, Little Passports! Trevor and I had a great time learning all about Tennessee and can't wait to visit someday. 

4/10/18

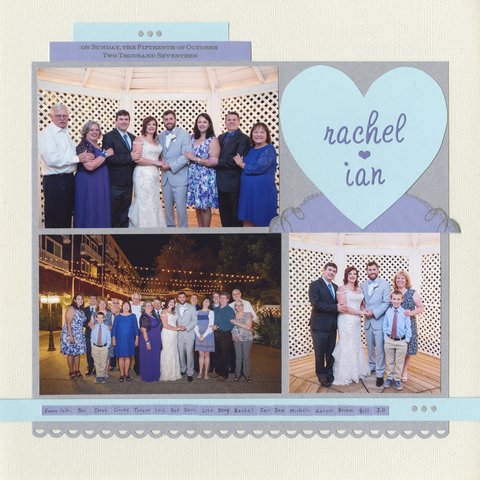
The First Wedding Layout I've Done in a Long, Long Time

I can't remember the last time I scrapped wedding photos, so it was fun to work with the photos from our nephew Ian's October wedding.  

Rachel & Ian (affiliate link)

Almost everyone in the groom's extended family dressed in similar colors, which is a scrapbooker's dream. It made it so easy to pick my color scheme: pale blue, purple* and a sparkly silver and on a pearlescent background. Neither the sparkle nor the shimmer shows up in the scan, so you'll have to trust me. 

*The purple is actually the wedding invitation! I used part to anchor the heart, then cut the location and date from the text and adhered it to the top. Finally, I wrote my journaling on little rectangles that I cut from the scraps. It felt weird to cut the invitation apart, but I love that it's actually on the page.