10/8/13

Cheesy Red Potato Casserole

Each day at bedtime, we ask Trevor to describe his favorite part of the day. Usually, it's a playdate, Cub Scout activity, special outing, or fun project at home. Last night, his favorite part of the day was the red potato casserole I served for dinner. With an endorsement that glowing, I thought I'd better share the recipe.   


Cheesy Red Potato Casserole


                                                  2 lbs. red potatoes                                   3 c. shredded cheese 
                                                  3 slices bacon                                           2 T. minced chives
                                                  1/2 c. sour cream                                     1 avocado, cubed

Wash potatoes and poke with a fork. Microwave until done (7+ minutes, depending on size). Set potatoes aside to cool enough to handle. Put bacon slices into 13 x 9 inch Pyrex pan and microwave until bacon is fully cooked (2+ minutes, 30 seconds at a time). Remove bacon from pan and set aside to cool. Remove all but 1/2 tsp. of the bacon grease from the pan and discard. Cut potatoes into 1-inch cubes and place in pan. Cut bacon into small bits and sprinkle over the potatoes. Dot sour cream over potatoes, then sprinkle with shredded cheese. (I used a blend of mozarella, cheddar, and jack because that's what I had on hand.) Stir gently. Bake uncovered at 350° for 15 minutes. Remove from oven and sprinkle with chives and avocado cubes. Return to oven for 5 more minutes. 

10/7/13

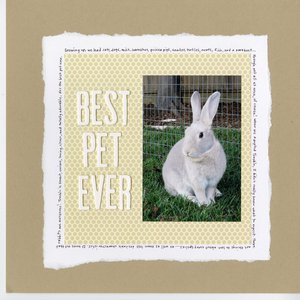
Best Pet Ever

Growing up, we had a lot of pets. Dogs, cats, turtles, mice, hamsters, fish, a parakeet, snakes, newts... not all at once, of course, but there were always at least a few different species of animals in our home. There was something to love about each species, whether it was their intelligence, friendliness, loyalty, curiosity, ingenuity, cleanliness, ease of care, beauty, or something else.

I've mentioned many times that as soon as he could talk, Trevor started asking for a pet rabbit. A rabbit? I knew next to nothing about rabbits. I really had no idea what to expect when I started my research, other than that rabbits are cute.

When we adopted Trouble, I had no idea how incredibly smart and loving rabbits are. I didn't know that they are so clean or so clever. I didn't expect rabbits to be as playful or friendly as Trouble is. And yet, as I meet more rabbits and rabbit owners, I'm learning that Trouble is not the exception. Rabbits are smart and loving and clean and playful and friendly. Sadly, many rabbits spend their lives in cages where their owners never get to see these characteristics. It's heartbreaking. 

After having lived with so many different animals over the years, I can honestly say Trouble is the best pet ever.

Best Pet Ever (affiliate link)

Here is a post I did all about owning a house rabbit, including Frequently Asked Questions. If you have any other questions, feel free to ask!

10/4/13

Paper Plate Pumpkin

Trevor and I participated in a run last weekend called SoFitCity. It's a friendly competition between all the cities in our county to see which city can get the most participants out running and having fun. It's sponsored by the local hospitals and benefits our county library, so it was a win all-around.


Because Trevor had been very sick just a few days before the run (and because crafting and blogging do not keep me in the best shape), we did the Family Fun Mile rather than the 5K Trevor originally wanted to do. It was a good decision. Both of us were able to finish strong and feel good about it. Here's Trevor crossing the finish line.    


After the run, we headed over to the Kids Zone to check out their many games, crafts and other activities. We did a few crafts together, then Trevor headed into a bounce house while I moved on to a nearby craft table. He bounced and I made this:  

 
It's a paper plate, colored with an orange crayon.  I cut out the face and stapled a toilet paper tube to the top. Simple + fast + inexpensive + non-messy = perfect for an event with hundreds of kids.  

When I brought it home, I started thinking about how I would have done it differently if it were a project for just one child (vs. 400+), near a sink (vs. in a mall parking lot), with plenty of drying time (vs. no location to set projects to dry). Here's what I came up with: 


Materials: paper plate, black construction paper, toilet paper roll, orange paint, green paint, scissors, tape, stapler. 

Begin by cutting out a face from the paper plate. Use the scraps to cut white fangs and set them aside. Paint the paper plate orange and the toilet paper roll green. When they are dry, tape the fangs to the back side of the paper plate, then tape construction paper over that. Staple the toilet paper roll to the top of the pumpkin.  
Another fun Halloween project!

10/3/13

Fun Family Crafts

In December 2012, I started a job as the Editorial Assistant at Fun Family Crafts.


I mentioned it briefly in a post on New Year's Day, yet somehow in the 9 months since, I haven't actually blogged about what it is that I do.  Time to change that.

First, a word about what Fun Family Crafts is.  It is a website that houses a huge collection of tutorials for kid-friendly crafts.  Simply enter a search term and chances are that dozens of projects will pop up related to your desired topic.  Each has a link to a tutorial that includes a materials list and easy-to-follow steps.  It is a wonderful resource for anyone who is looking for a project suitable for kids (toddler through teenager).  

My job is to publish twenty tutorials each week.  Those 20 are a combination of ones I write myself and ones that I find on other people's blogs or sites.  I tend to work a month or two ahead of major holidays, seasons, and occasions so that the tutorials are there for people to search. Which meant that in August, I was searching through countless blogs for the best Halloween-themed tutorials I could find.  When I find something great, I immediately submit it.  My boss, the awesome Amanda Formaro, schedules it.  When the post goes live, I return to the blog to share the good news to the author that (s)he has been featured.  
   
Sometimes, a project looks so fun that I bookmark it so that Trevor and I can try it out.  Here's one example.


I found a tutorial for Candy Corn Coolers back in August and immediately submitted it.  Now two months later, Trevor and I made our own to try.  Verdict?  Delicious!

If you've never been to Fun Family Crafts, I'd encourage you to check it out.  It's an amazing resource with thousands and thousands of tutorials.  As you look around, you might find a project or two you recognize from my blog.  I just counted... there are 86 of my projects there.  :)  Let me know what you think!  And if you have a tutorial for a kid-friendly craft, please submit it or send it my way so that I can submit it.  I'm always on the lookout for awesome stuff.

10/2/13

Name Skeletons

I love name art for many reasons, but the primary reason is because each person's project comes out completely different than everyone else's based solely on the shape of their name. Here's my version of the classic name art skeleton. Tip your head to the left to see my name if it isn't readily apparent.


Materials: black construction paper, white paper, scissors, glue, and a pencil.

Fold the white paper in half lengthwise and lightly write your name in cursive along the fold line. If your name has a letter that drops below the fold line (like the y in my name), skip the dropped part and continue with the 'tail' of the letter. Keeping the paper folded, cut out the name, staying about 1/8" away from the actual letters.   


If you are making this project with children who haven't learned cursive yet, simply have them print their name and then draw a bubble around the letters to connect them before cutting them out. When cutting, you can choose whether to cut out interior spaces (like my d or Trevor's e and o). It's too difficult for young children, but older ones can do so if they want. I did and Trevor didn't.


After cutting out the name, open it up and place it vertically on the black paper. Use scraps to cut out arms, legs, hands, and feet. To make the skull, fold a small piece of white paper in half before cutting. This makes it easy to create a symmetrical shape. If you have a small hole punch, one quick punch on the folded skull will give you two perfectly round and perfectly placed eyes.

Like I said, each name gives a completely different look. Even the way you orient a name makes a huge difference. Here is my my name facing the two different directions. It took me a long time to decide which I liked better before settling on the one on the right.  


Here's Trevor's finished skeleton. You may wonder why it is holding a sword.  

 
 He was inspired by this minifig.   
 
He really wanted me to add a weapon to my skeleton. I'm not a weapons kind of person, so I jokingly cut out a small butter knife for my skeleton. It made Trevor laugh and he agreed that my skeleton could stay weapon-free.