Showing posts with label Dia de los Muertos. Show all posts

10/8/21

Oval Faux-Framed Calavera for Dia de Los Muertos

So far, all of my colored pencil work since starting my class has been on white paper. For today's project, an oval-framed calavera for Dia de los Muertos, I started with black paper. I love the way the colored pencil pops against the black! Affiliate links below. 


Oval Faux-Framed Calavera for Dia de Los Muertos


Materials:


Steps:


Use a white colored pencil to lightly sketch the outline of a skull on the black chipboard. Add two large eye sockets, a nose, and a mouth.

Test your colored pencils on a scrap of the chipboard. Use the most vibrant colors to add flowers, swirls, dots, and other decorations to the skull. 
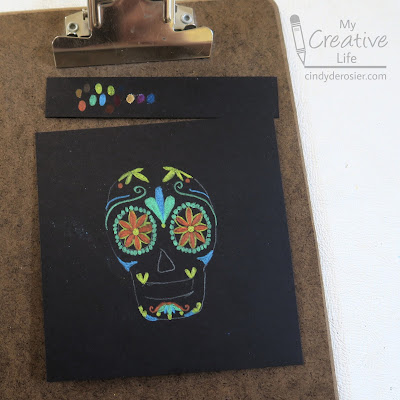

Color the skull white, leaving the eye sockets, nose, and mouth black. Add teeth, then draw oval vertebrae. Then add clothing at the bottom. 
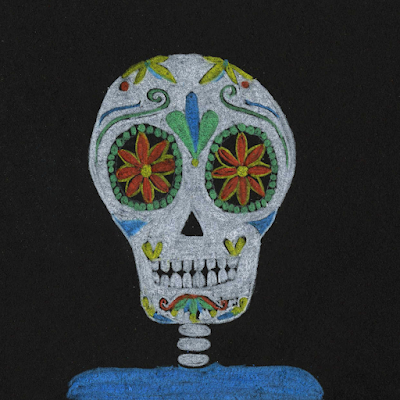

Position the oval template over your calavera and lightly trace a cutting line. I used the largest oval on the template. 

Cut out the oval, then glue the trim to the back. 

Using my colored pencils (particularly the white) on black was a fun experiment. It was a departure from my other Dia de Los Muertos crafts, which are all black (and other colors) on white. I'm definitely going to be experimenting with this again. 

10/26/20

Dia de los Muertos Collage (and Virtual Make-Up)

While I don't celebrate Dia de los Muertos, I love the meaning and the beauty of the holiday. In my never-ending quest to better understand others' traditions, I've been doing more research into Dia de los Muertos and its rich history. I learned there are seven main colors: 

  • black, a symbol of death
  • white, representing hope and purity, and the belief that each soul gets a clean slate after death
  • yellow, representing the light that guides the departed
  • orange, representing the sun, the source of light
  • pink, a color of joy and celebration
  • purple, the color of suffering and mourning
  • red, the color of Jesus' blood

I used those seven colors to make a collage, using construction paper, scissors, and punches.  


I started by cutting a basic skull, vertebrae, and clavicles from white construction paper, then cut the eye sockets, nose, mouth, and hair from black paper. I punched out a bunch of circles and flowers in different sizes, and cut a few other shapes by hand. Then I just started layering and gluing until I was happy with the end result. It was really fun to just let myself play. 

Speaking of playing, PicMonkey has a neat feature that lets you apply virtual make-up to yourself for Dia de los Muertos, so I gave it a try. I'm not a fan of real make-up, but it was fun applying it digitally. 


I also recently learned about Pan de Muerto (Bread of the Dead) and plan to make some on November 2. Having never tasted it before, I'm not sure what recipe to follow, so if you celebrate Dia de los Muertos and can steer me in the right direction, I'd appreciate it. Otherwise, I'm just going to pick a recipe that looks promising and hope for the best!


10/9/18

Dia de los Muertos Calavera Mask

I had so much fun making a Paper Plate Calavera last year that I decided to make a calavera mask this year. I love how it turned out!


It's really easy to do. The only limit is your own creativity! I've included affiliate links below. I'll receive a small commission for anything you purchase after clicking a link, at no extra cost to you. 

---------

Calavera Mask for Dia de los Muertos


Materials:


Steps:


Fold the scratch paper in half and draw the shape of a skull on it. When you are happy with the shape, cut along the line you've drawn, keeping the paper folded. If you want to make tweaks to the shape, refold the paper and cut small amounts off of the areas that aren't quite right. 

Open the paper and mark where the eye holes should go. Fold the paper and cut out the eyes. With the paper still folded, cut a small semi-circle along the fold for the nose. 

When you are happy with the shape of the skull, trace it onto the cardstock.  


Cut out the skull. Microtip scissors work great for getting in small areas like the eyes and nose. I ended up changing my mind about a round nose. Below you can see the upside down heart design that I drew (and would soon cut). 


Now use the pencil to start designing! I put the teeth in place first, then outlined the eyes with petals. Next, I added flowers to the top, the chin, and where both ears would be. Once I'd drawn these features and was happy with their placement, I went over them with pens. Then I filled in the empty spaces with designs, making sure to maintain vertical symmetry. There's no right or wrong - have fun!

When you are happy with your design, glue the stick to the back and your mask is ready to use. Trevor thought it was funny to hold the mask far away from his face so that I could see his smile through the nose hole. 


If you plan to display your mask rather than wear it, you can add black tissue paper to the backside to cover the eye and nose holes.


Give it a try! It really is a lot of fun to make your own calavera. 

10/30/17

Day of the Dead: Paper Plate Calavera

I've never made a Day of the Dead craft before, so I decided to jump in and create a calavera from a paper plate. I LOVE how it turned out!


---------


Paper Plate Calavera


Materials:

  • paper plate with a corrugated edge
  • scissors
  • pencil
  • regular Sharpies in a variety of colors
  • black fine-tip Sharpie

Steps:


Use the scissors to cut the paper plate into a skull shape. Keep a small part of the corrugated area to be the teeth and cut the rest away. Use a black Sharpie to color in the dips in the corrugated edge. Draw a line through the middle to separate the upper and lower teeth.


Cut a piece of scrap paper into an oval. Trace it where one eye socket goes, then flip it and trace it again to make the second eye socket. If you can draw two eye sockets that look like mirror images without making a tracer, go for it. For me, it's much faster to cut and trace than to draw one good eye socket and try a zillion times to draw its mirror image in just the right place. Draw a nose, too. It looks like a stretched out upside-down heart. 


Now start adding your designs! Calaveras commonly feature flowers (particularly marigolds), paisleys, circles, swirls, and dots in bright colors. The left and right sides should match each other and the background of the eye sockets and nose should be black; otherwise, be creative! 


Use the extra fine black marker to outline all the shapes and add dots and lines. Continue until you are happy with your design. Finally, draw black lines on the top and bottom of the teeth. 


Need inspiration for your calavera? Hershey's came out with awesome Cookies 'n' Creme Skulls this season and sent me some samples to try. They're delicious and a great addition to a Day of the Dead celebration.


Inspired to make your own paper plate calavera? I'd love to see it if you do!