Showing posts with label construction paper. Show all posts

6/11/26

Common Loon Craft

The common loon is a beautiful and distinctive bird that lives primarily on lakes in the northern US and Canada. An expert diver, 80% of its diet is fish. The loon is the state bird of Minnesota (and the provincial bird of Ontario, Canada) and is also found in abundance in Wisconsin, Maine, Michigan, New Hampshire, and Alaska. Make a loon of your own by following this easy tutorial. Affiliate links below. 


Common Loon Craft


Materials: 


Steps: 


Cut out the basic shape of the loon from black cardstock. Draw your own on scratch paper first or print my shape below in the correct size to use as a template. 


Shade the loon's beak with a grey colored pencil. Use a black colored pencil to add a line to define the upper and bottom mandible. 

Color the eye orange, then add a black pupil in the center. Use an extra-fine Posca marker to add a white catchlight at the top of the eye. 

Draw a series of vertical lines along the throat and the back of the neck to make the distinctive bands. 


Use a Posca pen to make the rest of the markings on the loon: white hatch marks on its breast, curved white lines on its shoulders, and blocks of white on the wing that are bigger at the top and center than lower and on the sides. Finally, use the grey colored pencil to define the tail feathers. 

The underside of the loon is white like its chest, but I didn't bother coloring it since I knew it would be covered by the water. Also, I trimmed the loon to give it a more rounded bottom. Here's my finished loon. 


Cut three (or more) strips of cardstock to make the lake water. You want them to be a little wavy. Glue one piece to your background paper, then glue the loon on top of that. Glue the next strip so that it covers the underside of the loon, then glue the final strip over that. 


I'm glad to have made this project and learned more about this super cool bird!

10/24/25

Silly Ghosts Halloween Craft

Not all kids like the scary aspect of Halloween. This fun project features silly ghosts and challenges kids to experiment with different cartoon-style facial features. Affiliate links below. 


Silly Ghosts Halloween Craft


Materials: 


Steps: 

Cut a piece of black cardstock into the size you want your finished art to be. Then cut squares of patterned paper to fill the background. My background is 8" with nine 2.5" squares, but you can make any size you want. Glue the squares in place. 


Cut ghost shapes from white cardstock. Try to vary the shapes, making them different sizes, with and without arms, etc. Then draw silly faces on each ghost. Play around with different eye shapes and mouth shapes, then add teeth or tongues to some of the ghosts. It could be fun to add silly eyebrows, mustaches, or other features too. Glue the ghosts in place. 


If you're looking for other ideas for Halloween crafts (or costumes or carved pumpkins), be sure to check out all of my Halloween tutorials. There are also a few ideas for Dia de Los Muertos. Enjoy!

5/20/25

Ohio Star Paper Quilt Craft

Have you heard of the Ohio Star? This classic quilt pattern has a very interesting history. Kids studying the Civil War or Ohio state history will enjoy making their own version of the Ohio star, using paper instead of fabric. This tutorial makes 9” squares. Affiliate links below. 


Ohio Star Paper Quilt Craft


Materials: 


Steps: 


Cut a 9" square piece of white cardstock to use as a background. Cut the scraps into 3" squares. 

Select 2-3 pieces of patterned paper or construction paper that go nicely together. I chose a green polka dot, a pink with swirls, and a yellow stripe. 

If you are only making one quilt square, you will need one 3" square of each color. Set aside the one you'll be using for the center. Cut the other two along one diagonal, then cut each of the resulting triangles in half. Here are the steps: 


Be as accurate as possible when cutting. A paper cutter helps immensely, but you can do this with scissors. (Use a ruler to mark the lines!)

Set aside four white squares. Cut the other white squares into 4 triangles each, just like with the colored papers. 

Arrange your squares and triangles in place. When you find a pattern you like, carefully glue them down. 


This is the finished design. 


Of course, I couldn't stop at just one quilt square. 


I love how they look assembled into a 9-square quilt! So pretty!


If you want to simplify things, use a single color with white. It's still really pretty. 


Two colors with white is nice too. 


There are tons of variations you can do with the Ohio Star. It's a beautiful and versatile design and makes a really fun project for kids. 

2/26/25

Absurd Burgers: A Creative Craft for Kids

If I were going to make a hamburger craft using cardstock or construction paper, it would look something like this:


I cut the individual pieces of a traditional burger from cardstock: a pair of tan hamburger buns, a white onion slice, a red tomato slice, green lettuce leaf, a slice of yellow-orange cheese, a brown burger patty, and a blue plate for them to sit on. Then I arranged them on a black piece of paper. But I didn't glue them down. Why? Because this craft is called Absurd Burgers. To make an Absurd Burger, you have to change things up from what is expected, which is where the creativity really comes in. 

This is an example of an Absurd Burger. 


Melting the cheese onto the plate and then stacking the items on top of the melted cheese is absurd. 


This Absurd Burger looks challenging to eat. 


Is this burger actually absurd, or is it just vegan-friendly, with the meat and cheese separate from the rest?  


This is definitely an Absurd Burger.... 


... but at least the bun is what's touching the table. In this burger, the meat is. 


After the last two burgers, anything with the plate at the bottom suddenly doesn't seem quite as absurd. Until you stop and think about how you'd react if this is what you were served at a restaurant.  


There is so much room for creativity with this project. I stuck to traditional burger components, but I know that if you let a classroom of kids loose with this activity, you'd eventually see non-traditional ingredients in some of the burgers. The more absurd, the better! 

When everyone has made their Absurd Burger, have them glue it to the background paper. Then it's time for a writing assignment. Give the kids several options: 
  • Write the menu description for your Absurd Burger, with the goal of making it sound as appealing as possible. 
  • Write a restaurant review, imagining you ordered an ordinary burger and your Absurd Burger is what arrived. 
  • Write about an alien planet where your Absurd Burger makes perfect sense. 

Wouldn't you love to read the results?! 

1/9/25

Year of the Snake Craft for Chinese New Year

January 29 marks the start of the Year of the Snake. I love making snake crafts, so I couldn't pass up the chance to add a project inspired by Chinese New Year to my repertoire. Affiliate links below. 


Year of the Snake Craft for Kids


Materials: 


Steps: 


If the red paper you are using is single-sided, turn it upside down so the white side shows. If it's double-sided (like cardstock or construction paper), you're ready to go no matter what side is up. 

Starting in the center of the paper, draw a spiral. When you have just about filled the paper (or made a snake as large as you want), stop making the spiral and turn that final line into the snake's head by curving it around to meet back up with the previous loop of the spiral.

Use the scissors to cut along the line you drew. Your cut-out snake will look like this. It's hard to see the coils on the scan, but they're obvious in real life. 


In order to make it more visible for this tutorial, I cut a sliver off of the spiral to give better definition. This is totally optional. 


Before you get rid of your scraps, cut a forked tongue and glue it behind the snake's head. Then use a gold Sharpie to decorate your snake. You can use stripes, geometric patterns, or florals. When you get to the head, draw an eye on either side by making vertical lines and then putting a dot in the middle of each line. Finally, add nostrils.  


You can display your snake flat, or you can hang it. The coils will spiral down with a neat effect.

2/12/24

Atari Breakout Name Art

I was born in 1972, which means I was four years old when Atari Breakout debuted in 1976. I never played that original version with 8 rows of bricks. The Breakout of my childhood, with a 6-row rainbow of colors, was released in 1978 for the Atari 2600. I'm not sure exactly when our family got our Atari, but I'm guessing 1979. Breakout quickly became one of my favorite games. (Other games I remember playing a lot include: Adventure, Pitfall, Outlaw, Haunted House, and Night Driver.) I have a lot of fond memories of playing Atari with family and friends. Hence, Breakout Name Art. Affiliate links below. 

Name art inspired by Atari Breakout


Atari Breakout Name Art


Materials: 


Steps:


Use the paper trimmer to cut a piece of black cardstock so that it is approximately 10.5 x 11". You will be gluing it to a sheet of 12x12" grey paper. (Change the measurements accordingly if you're starting with paper that isn't 12x12". Basically, you want a wide border of grey to show on the top and narrow borders of grey to show on the sides.) Set the grey aside for now. 

Cut strips of red, pink, orange, yellow, green, and blue cardstock that are 3/8" tall and 11" wide. Glue them to the black cardstock. 


Use a piece of graph paper to translate your name into pixels. It may take some experimentation to get the spacing right. If you're struggling with a letter, try switching the capitalization; some letters are easier using either uppercase or lowercase. 

When you're happy with your name, transfer it (in pencil) to your Breakout rainbow. I colored in each letter as I went because I was confident about the spacing. You can see below that I've colored in CIND and that the Y is ready for black ink. 


Cut a strip of red paper for the paddle and glue it to the paper. Then cut a single pixel from the grey background paper and glue it in place. This is the ball. Orient the grey paper so that the cut part is at the bottom, then glue the black paper on top. This will hide the missing part of the grey paper. 

Name art inspired by Atari Breakout

If you're feeling nostalgia for Breakout (or never played it because you're too young), I strongly recommend getting an Atari Flashback! Yes, they are for sale and yes, they are just as awesome as you remember. Better, actually, because the games are preloaded instead of having to switch out cartridges. I even found a Breakout t-shirt on Amazon. It's available in a lot of colors, which I'd ordinarily appreciate, but Breakout has to have a black background or it's just not Breakout. I'm a purist that way. 

9/25/23

Paper Plate Apples with Peekaboo Seeds

 Tis the season for apple crafts! 


Paper plate make great apples and they're even more fun when they're hiding a surprise inside! Those are real apple seeds, arranged just the way they were in the apple they came from. Affiliate links below. 


Paper Plate Apples with Peekaboo Seeds


Materials:


Steps:

Carefully cut an apple in half horizontally and observe the star pattern that the seeds make. Remove the seeds. Rinse them and set them aside to dry. 

Choose the color(s) for the apple(s) you're making. I made a solid red, a solid green, and a solid yellow, but you can mix colors to mimic different varietals. You can see examples of that with this apple craft, which uses the same tissue paper technique. 

Tear the tissue paper into strips. Use a paintbrush to moisten the back of a paper plate (the non-eating side) with a little bit of undiluted Sta-Flo, then place a piece of tissue paper on it. Paint over the top with more starch. Repeat until the back of the plate is covered. Set it aside to dry. Glue the apple seeds to the front (eating side) of a second paper plate. 

When everything is dry, carefully trim off any excess tissue paper from the apple and then cut it in half. Arrange those pieces on top of the plate with the seeds. Use a craft pick (adults only!) to poke a hole through the bottom of each side of the apple, then use a brad to attach each piece.  


Cut apple stems from brown cardstock and glue them to the back of the apple. Fold a piece of green cardstock in half, then cut an arched shape (rainbow, hilltop, etc) along the fold. Open it up and glue the leaf to the back of the apple. 

Pair this craft with fun and educational children's books about apples!

9/5/23

Canada Goose in Flight

My friend Brenda (of meteorite fame) was recently at my house for a marathon craft day. She's a middle school English teacher who will also be teaching one period of art this semester. She spent the day working on lesson plans and making samples. Among the materials she brought was a well-worn Canada goose craft from her days teaching elementary in the 90's. She is planning to adapt it for her middle-schoolers. I did my own adaptation.

This is mine: 


This is Brenda's original:


Her goose started with the two main body parts cut from a manila folder. She used a black marker to color the head and tail, then a brown crayon to color the top half of the body. She cut white paper to make the belly and the marking on the face. Then she tore pieces of brown construction paper and glued them to the back and wings. 

I started by using scratch paper to make a template for the two body parts. I wanted to be able to cut them from a single sheet of 12x12 black cardstock. (Affiliate links here and below). When I got them the size and shape I wanted, I traced my templates with a white colored pencil and then cut the pieces out. 


I flipped the cut pieces over (so that any stray colored pencil marks wouldn't show). Then I used Folk Art acrylic to paint the belly and part of the face white. 

While that was drying, I tore some brown packing material into strips. Gotta love free craft supplies! I used a brown ink pad to swipe ink along the left side of each strip. Then I started tearing the strips to make the individual feathers for the wing. I glued them in place with tacky glue


I finished up the wing, then added feathers to the goose's back. This is how the two pieces looked when I was done. 


All that was left was to glue the wing piece onto the body, then add a googly eye


I've shared a Canada goose project before - way back in 2014. It was Trevor's choice for G in our Cursive Project. Good memories. 

4/5/23

Monarch Caterpillar Craft

Sharing the photo of Eric Carle's messy studio got me thinking about the Very Hungry Caterpillar, which in turn got me thinking about actual caterpillars. There are tons of butterfly crafts (here are six of mine) but with the exception of the Very Hungry version, there are not a lot of caterpillar crafts. Since the monarch caterpillar is distinctive, beautiful, AND the larval form of the state insect of 7 states (Alabama, Idaho, Illinois, Minnesota, Texas, Vermont, and West Virginia), it was the perfect choice. 


I chose to use yellow and white paint on black cardstock for my monarch caterpillar. If you use black and yellow paint on white cardstock, you'll get better coverage. If you want to avoid paint altogether, just cut the stripes from the appropriate colors of cardstock or construction paper. 


Monarch Caterpillar Craft


Materials:

  • cardstock or construction paper
  • paint and black pen (optional)
  • scissors
  • glue

Steps:

Cut out the following caterpillar body parts from cardstock or construction paper: 1 oblong body (slimmer than the one below- I trimmed mine later), two large tentacles (filaments) and two smaller ones, four prolegs, and three true legs. Insects, including caterpillars, have six legs but only three will show on each side. 


Paint white stripes onto the caterpillar's body. At this time, add a circle of white onto each proleg. If you are using paper instead, cut strips for the body and circles for the prolegs and glue them in place. 


When the paint has dried, paint every other white stripe yellow. (Or, glue strips of yellow in place.) Let the paint dry, then use the pen to draw black lines on either side of each yellow stripe. At this point, I realized my caterpillar came out a bit more plump than the real thing, so I trimmed it. 

Glue the tentacles, prolegs, and legs into place.  


Indulge me in a brief soapbox moment regarding monarch caterpillars. You may have pleasant memories of raising monarchs as a kid. It is fascinating to see them go through their life cycle and it feels amazing to release them into the wild. This used to be a fairly common practice in elementary classrooms, but captive rearing is now thought to be harmful. Those who care about the future of monarchs should focus on efforts to protect their breeding and overwintering territories. Our kids' kids and their kids deserve to have a world filled with monarchs, too.  


3/30/23

Washington Monument Cherry Blossoms Craft

The cherry blossoms in Washington D.C. are iconic. I have several friends who live in the D.C. area who post photos when the blooms are at their peak. One such photo inspired me to make this craft featuring the Washington Monument. Affiliate links below. 


Washington Monument Cherry Blossoms Craft


Materials:


Steps: 

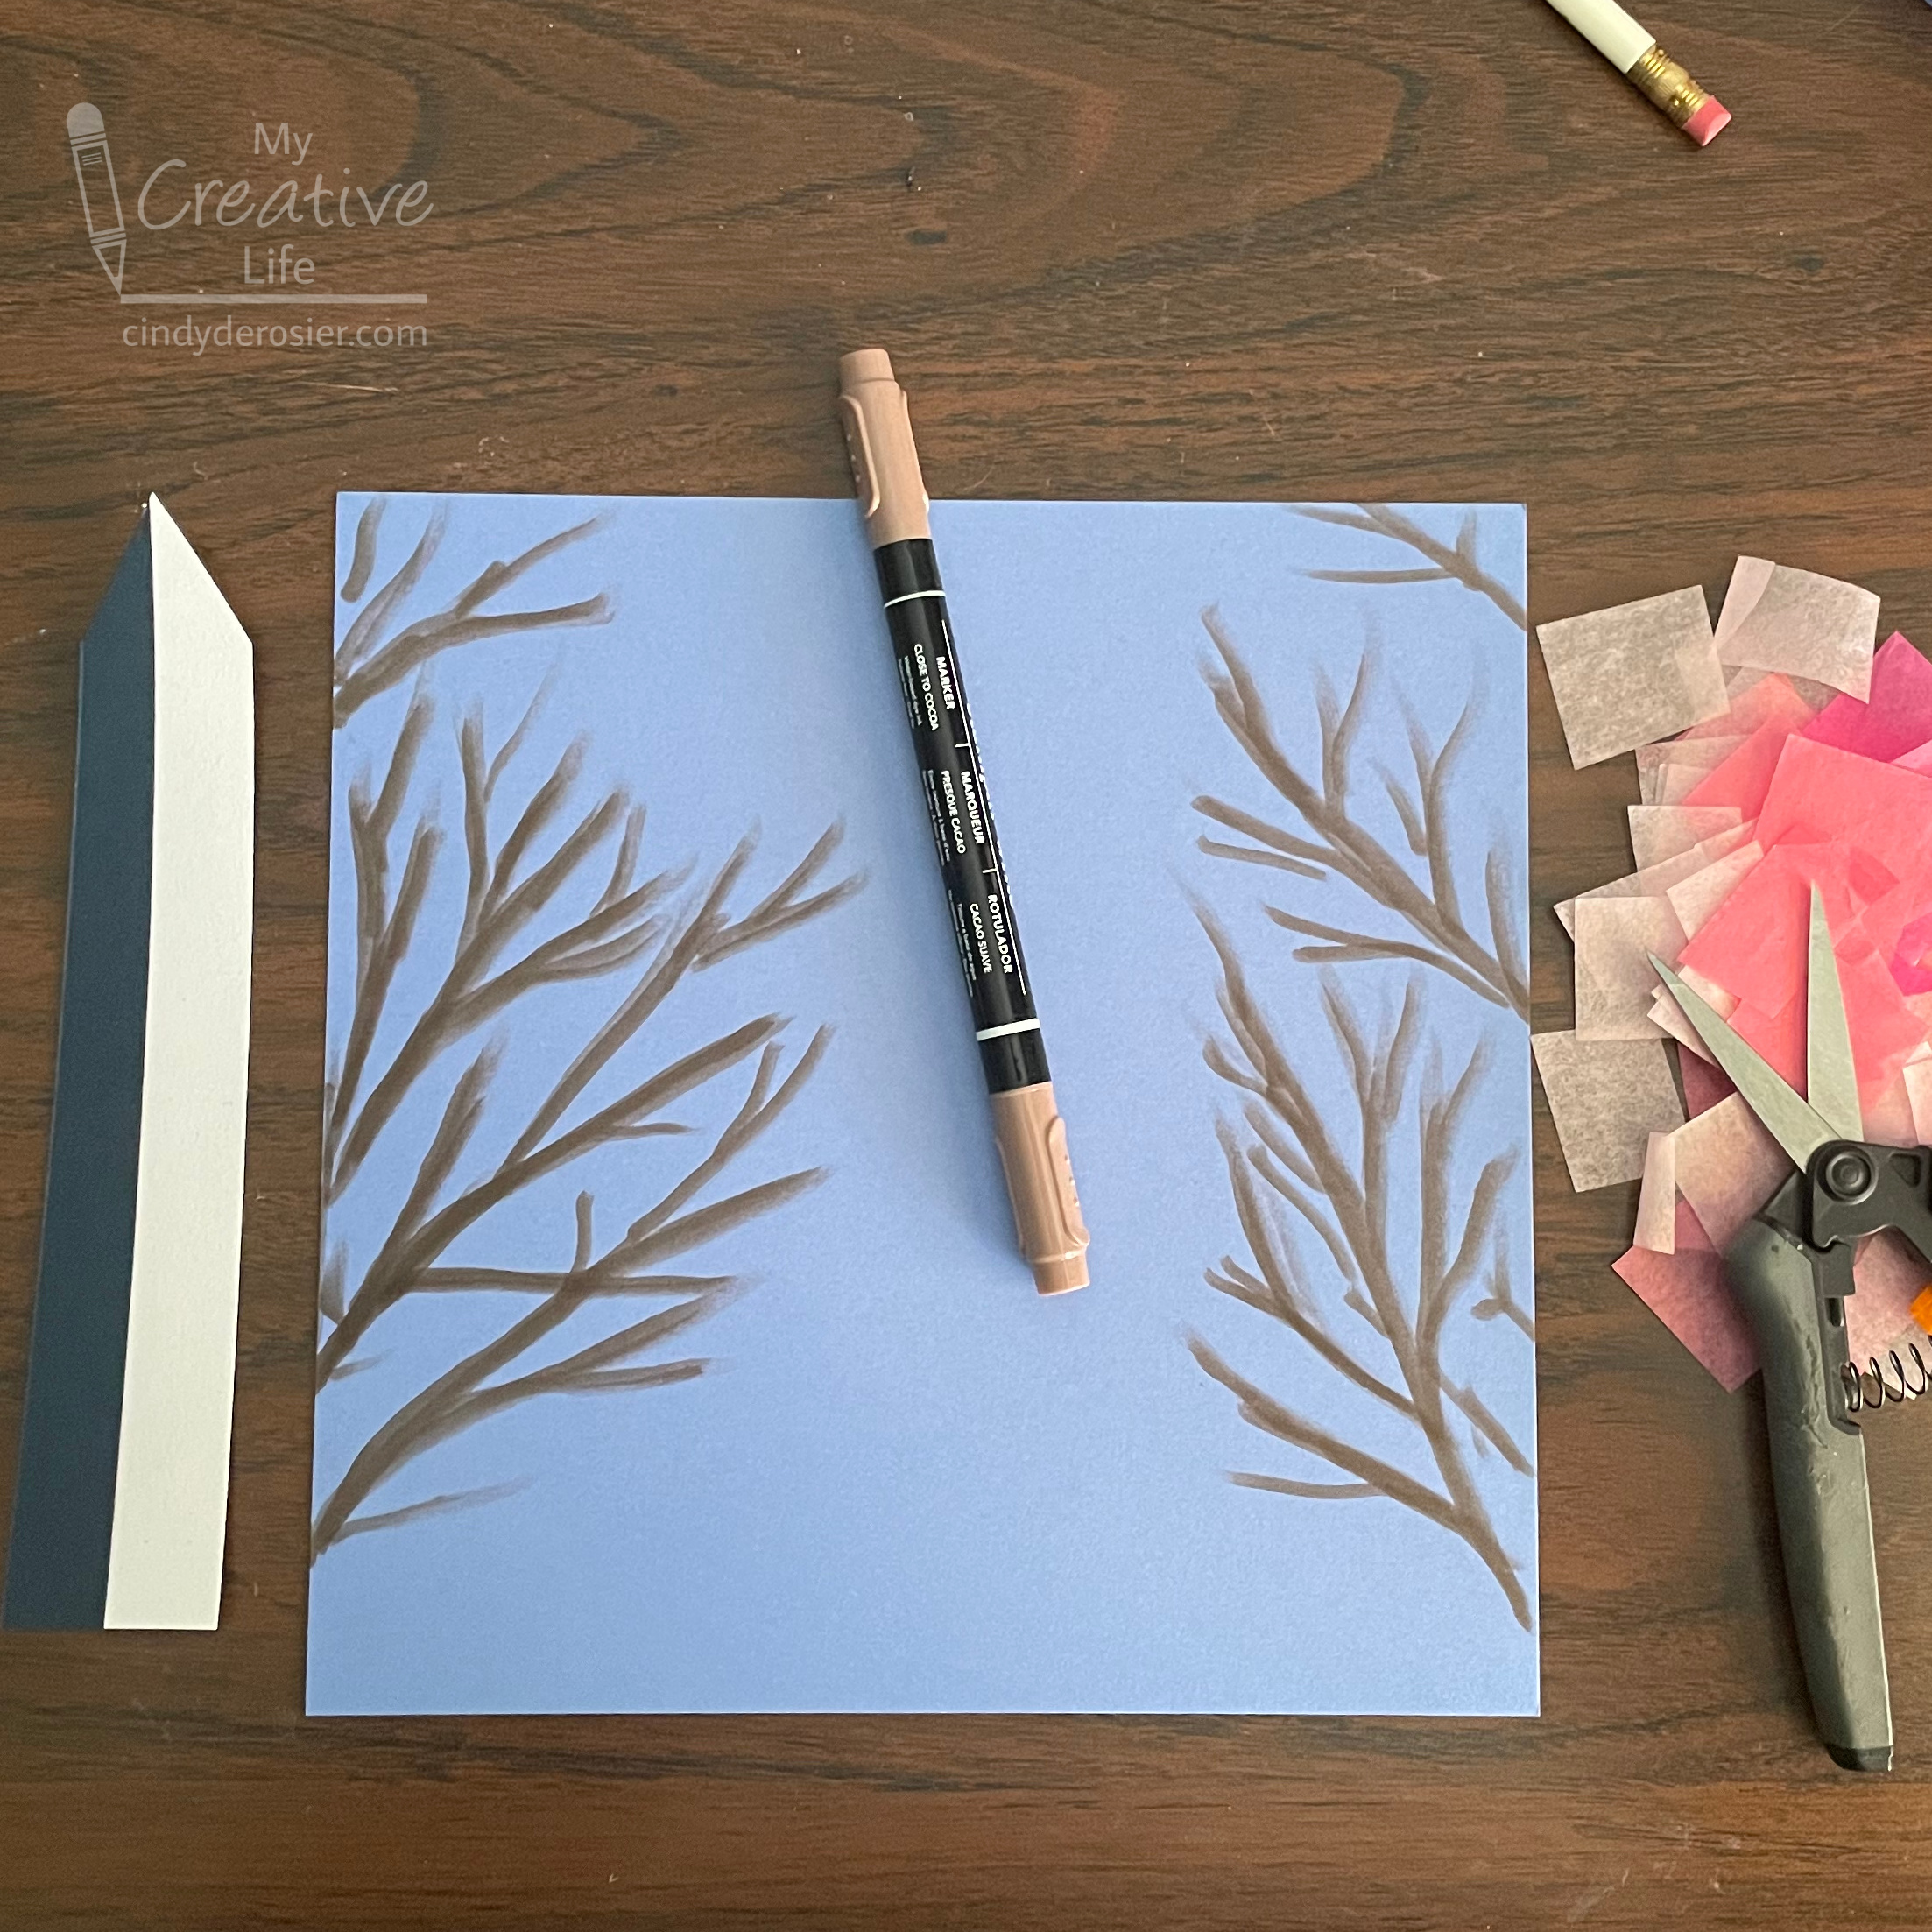
Use the brown marker to draw branches and twigs on either side of a piece of blue cardstock. They'll largely be covered with blossoms. 

Cut a narrow rectangle from the white and black (or dark blue) cardstock. Glue them together so that half of each color shows. With scissors, trim the top of each color to make the point of the Washington Monument. Then, on each side, cut a slight taper from the top of the rectangular part to the bottom. 

Cut shades of pink and/or white cardstock into 1" squares. 


Glue the Washington Monument onto the blue cardstock. Put a dot of glue onto one branch, then crumple up a square of tissue paper and stick in to the branch. Repeat this process until you've filled the branches. You might find it easier to do all the crumpling and then all the gluing. I worked in batches of about 10 blossoms at a time. 


In researching this project, I came across these fun facts about the Washington Monument, courtesy of the National Constitution Center. We visited in 2017 and LOVED it. I hope to return someday. George Washington will still dwarf Trevor, but not by nearly as much!