Showing posts with label Cursive Project. Show all posts

1/28/15

Revisiting the Paper Quilts from the Cursive Project

Trevor and I received the coolest gifts recently from Jonna, Godmother (and Friend) Extraordinaire! Each of us received a soft, cylindrical present that looked a little bit like she'd wrapped a half-used roll of paper towels. We opened them simultaneously, as neither of us wanted our surprise ruined by seeing the other's first. 

Here's what I unwrapped:


And here's Trevor's:


We both recognized them instantly. They are fabric versions of the paper quilts that Trevor and I designed back in August! Here are our paper quilts; read more about them by clicking the link.


Thanks again, Jonna, for such a thoughtful gift! We love them!

8/22/14

The Cursive Project: Zebra

The final craft for The Cursive Project was a zebra. While we'd made a zebra pinata before, I had no problem making a different zebra craft. A pinata is such an involved task that having a simple zebra in my list of Crafts from A - Z would be good.

We based our zebra on the Footprint Giraffes we made years ago. We traced Trevor's left shoe on white cardstock, then cut out a neck and two rounded ears.


We used a Sharpie to add black stripes, eyes, and a nose. Then it was time to add his mane. We took black yarn and looped it back and forth, then cut through the loops to make a whole bunch of pieces that were all the same size.


We turned the neck piece over and added a strip of adhesive, then pressed the mane pieces in place.


We added adhesive between the ears and added the rest of the mane.


Then we glued each piece to a blue background. Trevor added googly eyes. Here's his finished zebra:


This is my zebra. I didn't cut down the blue cardstock base yet, because I have some plans in mind. Stay tuned!


Now that Trevor has learned how to write all the letters from A to Z in cursive, he's putting it all together and writing a sentence for each of the crafts he made throughout the month. He's enjoyed learning cursive and we've both had fun doing all this crafting together. The Cursive Project has officially been a great success!

8/21/14

The Cursive Project: Yawn + Yak

For Letter Y of The Cursive Project, Trevor wanted to make a yak. Like I've mentioned before, I've had his completed list for the whole month, giving me lots of time (in theory) to dream up each craft. Yet, when we reached yak, I was still completely uninspired. I decided to think up a 'yawn' craft and suggest it to Trevor.

With Trevor watching, I cut out the following pieces from tan, yellow, black and red cardstock.


I glued them all together to make this yawning guy. I really like him (although I yawned the whole time I was making it, during the scanning and editing, and while writing this post). 


Trevor was not into making his own version, as he was determined to make a yak. He went through my cardstock scraps, pulled out a bunch of browns, and glued them to a white background. Then he turned it over and drew a yak on the back. He drew a separate head so that he could pop it up. He cut the pieces out and ended up with this cool yak.


Although we used different techniques from each other on other letters, this was the only time during The Cursive Project that we made totally different items for a particular letter. One final letter and we're done!

8/20/14

The Cursive Project: Xylophone

There aren't too many crafts that start with X. We've already done an x-ray craft in the past, so we were pretty much limited to a xylophone for Letter X of The Cursive Project. Just like with the ukulele, we have an actual xylophone. For some reason, we store the xylophone (and the rest of our kid musical instruments) in a snake basket.


We decided to make a different style of xylophone from the traditional wooden one we own. We pulled out the mallets, then gathered 6 of the empty Snapple Jelly Belly jars, and some food color.


Trevor filled each of the 6 jars with a different amount of water.


Then he added food color to make a rainbow.


We lined up the jars on several layers of felt. 


They worked ok upright, but they worked even better when we laid them on their side. They had a really cool wooden tone to them. Trevor had a lot of fun composing.


Two more crafts to go before we reach the end of The Cursive Project!

8/19/14

The Cursive Project: Watermelon

For Letter W of The Cursive Project, Trevor and I made handprint watermelons. We painted our hands red from fingertips to midway down our palms, added a thin white line, then finished with a band of green. 


We stamped them onto white cardstock and let them dry.


Then we used our pinkies to add black seeds. We matted our papers with red, then added them to white card bases. My hand was too big for the cardstock I'd prepared. I should have made a larger card. Oh well.


Trevor's cards turned out much cuter.


The end is near! On to Letter X!

8/18/14

The Cursive Project: Vampire

For Letter V of The Cursive Project, Trevor and I made vampires. The process was a lot of trial and error, with each of us cutting out shapes and making alterations until we had a cool-looking vampire. Here are the pieces we used:


We assembled the pieces and then used a black Sharpie to add hair, a nose, a mouth, and fangs.


We attached our vampires to white card bases and folded up the capes. At that point, I added feet because it looked weird without them. Trevor disagreed and his vampire remains footless.

I suggested that we add a 'Happy Halloween' message that is visible when you open the cape. Trevor was adamant that this was a terrible idea, as it was still months until October 31. He zoomed off to look through my collection of stamps. Here's how Trevor's card looks with the cape closed:


When you open the card, you can see the message.


Not the most traditional birthday image, but fun none-the-less. 

Here's my vampire birthday card:


One of my cousin's kids was born on Halloween; we could save these to send to him. Or, we could randomly send them to someone with an August or September birthday, leaving him/her wondering why on earth we're sending a vampire card. Hmmm... which to choose? If you know me at all, you should have no difficulty guessing which appeals to me more.  :D 

8/14/14

The Cursive Project: Ukulele

For Letter U of The Cursive Project, Trevor chose ukulele. There's a reason. When Trevor was two, we took a cruise to Hawaii from San Francisco (which I blogged about as an example of what not to do when scrapping). I took ukulele lessons on each of the at-sea days.  Trevor sat on my lap during many of the lessons and loved playing with my practice ukulele back in the cabin.


Trevor was absolutely thrilled to watch Mommy perform in the ukulele concert.


For Trevor's third birthday, my dad (Woodworker Extraordinaire) surprised both of us with ukuleles he made. They hang on the wall above our piano.


There are many, many excellent tutorials for making a ukulele or guitar from cereal boxes and rubber bands. Since we already have real ukuleles, we decided against making a toy one. Instead, we made a 2-dimensional ukulele.

We started by each tracing a ukulele on chipboard, with separate pieces for the body and neck. We cut out the shape, primed it with gesso, and painted it. We traced circles and then colored them with a black Sharpie.


We stamped tropical leaves and flowers to decorate our ukuleles.


After stamping, we used the Sharpie to add a bridge. 


We attached the neck to the body, then used a ruler and a Sharpie to add frets and tuning pegs.


Finally, we used a ruler and a pencil to add strings to our ukulele. Here's Trevor's finished project:


This is mine:


On to Letter V!

8/12/14

The Cursive Project: Turtle

For Letter S of The Cursive Project, I made a crayon melt seahorse and Trevor made a paper strip seahorse. We switched techniques for Letter T.


To make a paper strip turtle:
  • Cut scraps of green patterned paper into strips and glue them to a cardstock background.
  • Draw a half-oval on the back of the cardstock and cut it out.
  • Use a solid or subtly-patterned green to make a head and a tail and glue them in place. (Feet are optional. My turtle is resting with his feet tucked in.
  • Add a googly eye and draw in a mouth.  


To make a crayon-melt sea turtle:
  • Draw a sea turtle on watercolor paper using a Sharpie.
  • Put the paper on a warming tray and color with crayons. Remove the paper from the warming tray. 
  • Water down some blue paint and brush it over the turtle. Dab the turtle with a Kleenex to remove any paint. 
  • Add googly eyes.

It was a lot of fun trying each other's techniques. On to Letter U! Any guesses what we're making? It should be easier to guess than E was!

8/11/14

The Cursive Project: Seahorse

Letter S of The Cursive Project is Seahorse. My mind immediately went to the beautiful book Mister Seahorse, by my all-time favorite illustrator, Eric Carle. I wanted to create a whimsical, colorful, graphic seahorse. I drew a seahorse on watercolor paper using a black Sharpie...


... then used crayons and my beloved warming tray to color my seahorse.


Meanwhile, Trevor announced that he had a different idea for his seahorse. He went through my patterned paper scraps and started cutting long strips. He attached them to a white background.


He turned the paper over, drew a seahorse, and then cut it out.


He added a googly eye and then he was done.

I watered down some blue paint and brushed it over my seahorse. I used a Kleenex to blot the wet paint off the waxy crayon areas.


Here is my finished seahorse:


This is Trevor's.


What do you think? Which technique do you prefer?

Trevor and I talked about making a second set of seahorses using each other's techniques, but we were running out of time before Trevor's baseball game. So instead, we decided that we would swap techniques for the Letter T craft. I'll share those tomorrow.

8/6/14

The Cursive Project: Rubik's Cube

When Trevor made his A-Z list for The Cursive Project, it was no surprise that he put "rabbit" down for Letter R. But we've done tons of rabbit crafts together (listed here under B for bunny), so I told him to think of a second choice for Letter R. He chose Rubik's Cube.

After finishing his Rr cursive page, he zipped to the games cabinet and pulled out the Rubik's Cube. He was mesmerized.


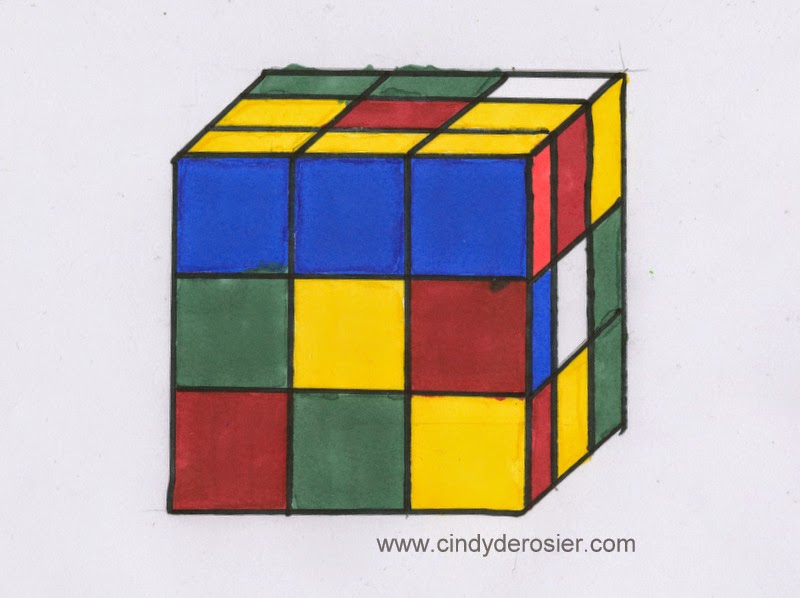
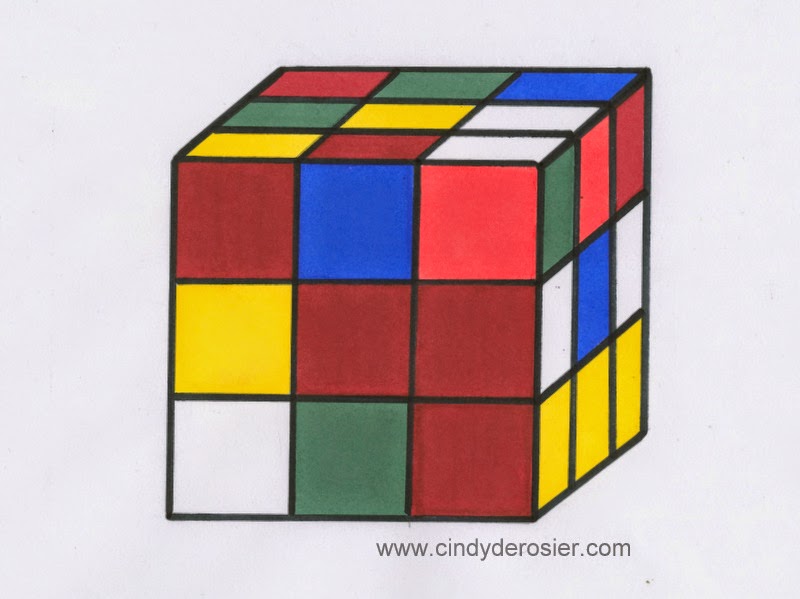
Meanwhile, I got out a square Kleenex box, with the plans that we'd add gesso, paint it black, then cut colored squares of craft foam and glue them in place. Turns out that a square Kleenex box is not really square. Close, but not nearly close enough for an object that really has to be a cube. Darn. All attempts to find a cube-shaped box failed, so I told Trevor that instead of making a craft version of a Rubik's cube, I'd teach him how to draw one. He loved the idea.

Step one: Trace something square on a piece of white paper. (Trevor is using an empty Godiva chocolates box that I found while digging around looking for a cube-shaped box.)


Step two: Move the box up and to the right without rotating it, and trace again. Use a ruler to connect each corner of the first box with the corresponding corner of the second box. Erase any lines that wouldn't show if the cube were solid and not see-through. (Trevor, like most kids his age, had already learned how to do this during a geometry unit at school.) 

Step three: Measure each side and make marks to divide it into thirds. (The Godiva chocolates box was exactly 9 cm. across, which meant Trevor made marks at 3 cm" and 6 cm".)


Step four: Connect the marks to form the squares of the Rubik's Cube. 


Step five: Color each square blue, green, yellow, red or orange (or leave it blank for a white square), leaving each pencil line white. If you care about accuracy, use an actual Rubik's Cube as a sample so that you don't inadvertently invent an impossible configuration.

Step six: Use a ruler and a black Sharpie to trace over the pencil lines, which should fill in any white spaces. Do touch-ups as needed. 


Done!


Here's a closer look at Trevor's drawing:


This is mine. I've already added an orange Prismacolor art marker to my Amazon wishlist, as the orange we used on these is clearly not orange. It didn't look that bad as we were coloring, but I hate the way it looks on the monitor. I'm going to add a brighter red to my wishlist too. 


I'm thinking we should frame these and put them on display next to these guys:

(Tutorial here

And some of these: 


(Tutorial here)

I could have a lot of fun redecorating a room with 80's-inspired crafts!  Hmm... something to ponder...