Showing posts with label footprint. Show all posts

11/15/21

Handprint and Footprint Turkey

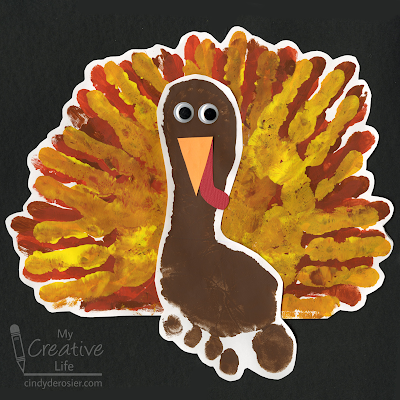
We're fifteen days into November and I haven't posted any turkey crafts yet. Time to change that! Today's project is a turkey made from handprints and a footprint. 


Handprint and Footprint Turkey


Materials:

  • construction paper or drawing paper (white, red, orange)
  • paint (brown, rust, orange, yellow)
  • foam brush
  • scissors
  • googly eyes
  • glue

Steps:


Put a sheet of white paper onto a hard floor (not carpet). Use brown paint and the foam brush to apply paint to the bottom of one foot, then step onto the paper to get a good footprint. Set the paper aside to dry, then wash your foot but not your paintbrush.
 
Put a second sheet of white paper onto a hard surface, like a table. Or the floor. Paint rust-colored paint onto one hand (it will mix with the brown already on the brush), then stamp it on the bottom left of the paper with your fingers pointing to the left. Add more paint to your hand and stamp five more times, rotating your hand 20°(ish) each time. You'll end up with a semi-circle of red-brown turkey feathers. Don't worry if there are gaps; they'll be filled with the next two layers. 
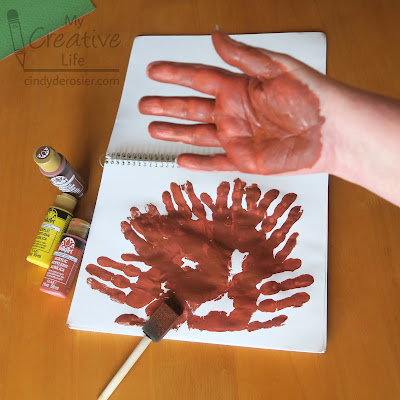

Without cleaning your hand or the brush, paint your hand orange. Stamp it the same way as with the rust- a total of 6 times, with each handprint rotated 20° clockwise. Do the same thing with yellow. Since all the layers are still wet, the colors will blend.  
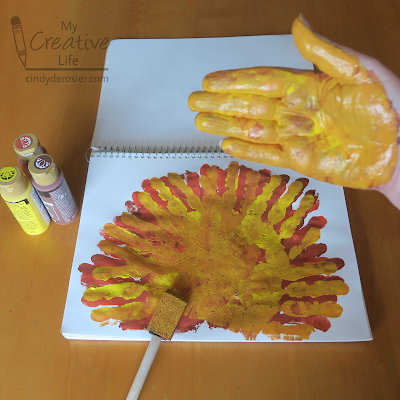

Now you can wash your hand and the brush. Take a break; the footprint and handprints need to dry completely before you can continue. 

When the paint has dried, cut out the footprint, leaving a small border of white around the edges of the print. Do the same with the handprint feathers. Then cut out an orange triangular beak and a red wattle. Glue the footprint to the feathers, then add the googly eyes, beak, and wattle. 


Tomorrow I have a fun edible turkey craft to share. 
7/2/21

Footprint Alien

In case you weren't aware, today is World UFO Day. At Fun Family Crafts, we celebrate all the holidays, so I made this footprint alien specifically to add to our collection of UFO and alien crafts. It was a lot of fun to do! Affiliate links below.


 Footprint Alien


Materials:


Steps:


Paint the bottom of your foot with green paint, then step onto a piece of black cardstock. Do NOT lift your foot. 

Dip the stiff paintbrush into white paint. Drag your thumb across the bristles to send flicks of paint onto the black paper, mimicking stars. You can also use an old toothbrush.  

When you are happy with the starry background, lift your foot off the paper. Wash the paint off your foot, thumb, and wherever else it may have gotten. Use the paintbrush to make a grey planet for the alien to stand on. Let the paint dry completely. 

Add googly eyes, a mouth, feet, and any other features you'd like. Be creative and have fun!

9/30/19

Footprint Unicorn

It's been awhile since I've shared a footprint craft. I used to do them with Trevor all the time to preserve his tiny feet in my memory. His feet are no longer tiny. He's just a little bit shorter than me and his feet are about the same size as mine. 

Trevor is not into unicorns. This footprint unicorn was inspired by my niece, Allison, who lives and breathes unicorns. Her feet, small and cute, are 600+ miles away from me now, so I had to use my own foot for my craft. Affiliate links below. 


----------

Footprint Unicorn


Materials:


Steps: 


Trace your foot on a piece of white construction paper. This will be the unicorn's head. Cut it out, then trace your arm on the large white scrap. This will be the unicorn's neck. Cut it out. Cut two ears and two nostrils from the remaining white scraps. 

Cut a horn from pink construction paper. Cut two inner ears from the pink scraps.

Lay strips of purple diagonally on the horn, glue them in place, and then trim the excess. Cut two eyelids from the purple scraps.


Cut a bunch of yarn pieces approximately 2" long. The easiest way to do this is to wrap the yarn many times around the fingers of one of your hands, then cut it on both sides of your hand to get pieces all the same length. Set aside 2/3 of the yarn to use for the mane. Tie one piece of yarn around the remaining yarn to make a tight bundle. 


Glue one strand from the bundle behind the middle toe of the cut-out foot. 


Glue the ears and the horn in place, then bring the yarn bundle forward and arrange it to make the forelock. 


Use the sharpie to darken the nostrils, to draw a mouth, and to add eyelashes to the eyelids. Glue the eyes, eyelids, and nostrils to the unicorn's face. Glue the remaining yarn to the back of the neck. Finally, glue the unicorn's head to the neck. 


You can't see the sparkle in the yarn very well in the photo, but I love how it looks in real life. Change out the yarn with pastels, or bright rainbow colors, or whatever you prefer. With a mythical creature, there's definitely no right or wrong!


8/22/14

The Cursive Project: Zebra

The final craft for The Cursive Project was a zebra. While we'd made a zebra pinata before, I had no problem making a different zebra craft. A pinata is such an involved task that having a simple zebra in my list of Crafts from A - Z would be good.

We based our zebra on the Footprint Giraffes we made years ago. We traced Trevor's left shoe on white cardstock, then cut out a neck and two rounded ears.


We used a Sharpie to add black stripes, eyes, and a nose. Then it was time to add his mane. We took black yarn and looped it back and forth, then cut through the loops to make a whole bunch of pieces that were all the same size.


We turned the neck piece over and added a strip of adhesive, then pressed the mane pieces in place.


We added adhesive between the ears and added the rest of the mane.


Then we glued each piece to a blue background. Trevor added googly eyes. Here's his finished zebra:


This is my zebra. I didn't cut down the blue cardstock base yet, because I have some plans in mind. Stay tuned!


Now that Trevor has learned how to write all the letters from A to Z in cursive, he's putting it all together and writing a sentence for each of the crafts he made throughout the month. He's enjoyed learning cursive and we've both had fun doing all this crafting together. The Cursive Project has officially been a great success!
