7/10/19

Scrapping the California Cookie

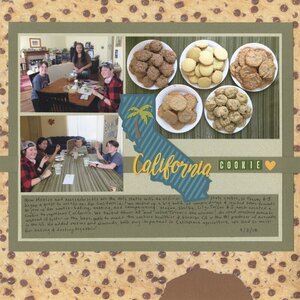
Remember when Trevor and I asked some of his friends to join us in creating a potential State Cookie for California? It was so much fun. And now the memory is forever preserved in the album. 

California Cookie (affiliate link)

The layout design started with a mistake. When I order photo prints, I want the originals, not the ones that I watermark before putting them on my blog. But I accidentally printed the watermarked version of the plates of cookies. Sigh. 

I was determined to make it work. After trying a bunch of different things, I came across the die cut of California I'd received in my VIP goodie bag at Pinners Conference. It covered up the watermark perfectly. I added the letter stickers and heart to finish the title. Having the title so high made the layout unbalanced, but I couldn't lower it without the watermark showing. Inspiration struck and I took a (faux) bite out of the bottom to help balance the page. 

7/9/19

One Point Perspective Name Art

Here's a fun and easy project to introduce one point perspective. (Yes, I'm obsessed with Name Art.)


---------

One Point Perspective Name Art


Materials:

  • paper
  • Sharpie
  • ruler
  • colored pencils

Steps:


Write your name in block letters. It is easiest if you use all capital letters so that you don't have ascenders and descenders. You want a little space between the letters, too. 

Make a single dot below your name. 


Now, you are going to draw lines between each of the corners of your letters and the dot at the bottom. If the line would cross through any of the letters, lift your pen to leave a gap. It's easiest to work from the outsides in so you don't have lines that cross. 


Finally, color in your artwork. I chose five different shades of blue colored pencil to create an ombre effect. The darkest color is on the fronts of the letters, then the shades get lighter toward the dot. Experiment with different ways to color your artwork!

7/8/19

The Reason for Scrapbooking

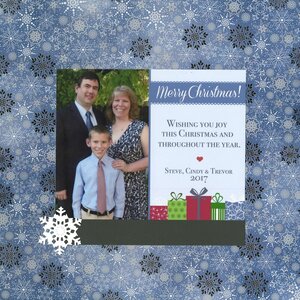
I was hesitant to share this layout here because it barely counts as scrapbooking. Literally all I did was glue our 2017 Christmas card in the center of a piece of patterned paper, add a strip of black cardstock, and stick on a die-cut snowflake. It took 2 minutes, tops.

Christmas 2017 (affiliate link)

But I did decide to share it. Why? Because it IS scrapbooking. There's no title, there's no journaling, there's no artistic arrangement of elements, and there's just one lonely embellishment. (I did design the Christmas card myself, so I guess there's that.) But none of those are mandatory in scrapbooking. My reason for scrapbooking is to record our family's memories. Most of the time, I choose to do that in an artistic manner because I love playing with paper and experimenting with design. But ultimately, I want our scrapbooks to trigger memories and document our lives. Bonus points if the pages turn out looking great.

What's your reason for scrapbooking?

7/5/19

Austin 2018

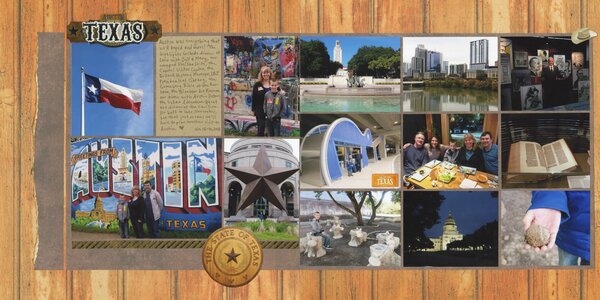
We had an amazing time in Austin last Thanksgiving. If you've never been, I highly recommend a visit.

Austin 2018 (affiliate link here and below)


This layout came together quickly and easily with goodies from Paper House Productions. The paper is from the Great Outdoors collection and the stickers are from their Texas Destinations sticker pack. The striped gold trim in the lower left is rice paper, a new-to-me item. I struggled to pick which photos to use, but these do a good job hitting the high points of the trip. 

7/4/19

Be the Rainbow in Someone's Cloud

Maya Angelou said to, "Be a rainbow in someone else's cloud." So simple, and such a good way to live your life. When I saw a version of this quote in a coloring book, I decided to experiment with putting it on a canvas. I don't mean the quote - I mean the actual coloring page. Could I transfer the coloring page to a canvas and still use it for its intended purpose of coloring it in? Answer: Yes! This project also answers a question I get asked ALL THE TIME: "What can I do with my extra Diamond Dotz?" Affiliate links below. 


---------


'Be the Rainbow in Someone's Cloud' Coloring Page Canvas


Materials: 


Steps: 


Because this was experimental, I did some things in what turned out to be a strange order. I'll do my best to tell you how I'd go about making it now that I know what I know. 

I started with a canvas that already had paint on it (a project I started and never finished - you can see the pinks and yellows on the edges in the first two photographs below). If you're starting with a new canvas, I'd apply a base coat of grey (which I mixed myself with black and white). Let it dry completely.

Trim the coloring page to remove the copyright info and to even up the margins. Add an even layer of Mod Podge to the canvas and center the coloring page on top of it. Use the smoothing tool to make it perfectly flat. Add a second coat of Mod Podge on top of the coloring page and smooth it down. Let it dry completely. 

Mix equal parts Mod Podge and grey paint and put a thin coat on top of the coloring page. You should still be able to see the lines on the coloring page. Let it dry completely. 


Use the Sharpie to trace the lines of the design. 


Dry brush some blue horizontally onto the top of the canvas. Paint the cloud white. Fill in the rainbow with paint. 


Add a second coat of white on the cloud, touch up the rainbow as needed, and paint the edges of the canvas black. 


I traced the letters with Sharpie a second time, then filled them in with paint. This was unnecessary. If you have a steady hand, just paint the letters.


Add a coat of Extreme Glitter to each color of the rainbow. When that is dry, paint black dividing lines between the colors in the rainbow. 

Place dots of craft glue along the red band of the rainbow. Use the stylus that comes with Diamond Art kits to place red Dotz on the glue. 


Repeat the process with the other colors of the rainbow. 


Now display your canvas where you will be inspired. 


Now that I know how easy it is to put coloring pages onto canvases and paint over them, I'm definitely going to do this again. And I love how much the sparkly Dotz add to the finished design.