Showing posts with label Leisure Arts. Show all posts

9/28/21

Colored Pencil Progress

Last week, I discovered Colored Pencil Magazine exists. Now I've learned that there is a Colored Pencil Society of America. I'm continually amazed by how much I didn't know about colored pencils, despite using them regularly for 47+ years! 

I've also discovered that I own more colored pencils than I thought I did. I keep my open-stock colored pencils on the paint shelf in the craft room and the complete sets in the craft room closet, plus Trevor has a bunch in his bedroom and more at his desk. Before making my colored pencil swatches, I did what I *thought* was a thorough search of the other places more pencils would be hiding. And yet I continue to find colored pencils here and there. It's a good problem to have, I suppose, but it makes me realize there are a few more drawers and bins in the house that need reorganization. 

Here is my latest colored pencil effort. The pages are from Leisure Arts' Love Grows and colored with Prismacolors (affiliate links).   


I'm really happy with the progress I'm making with blending and shading, thanks to Sarah's videos. Speaking of which, Sarah is on a quest to reach 100K subscribers on YouTube by the end of 2021. Considering how valuable her content has been to me, I'm doing my part to help her out. If you have enjoyed any of her videos I've shared, or want to learn more about colored pencils, subscribe to Sarah's YouTube channel. She's giving away a bunch of prizes as her following grows, so there's some extra incentive for you!

I like to do something with my colored images, but these have me stumped. Ordinarily, I'd fussy-cut them and use them on cards or something. But the many tiny leaves, cactus spines, and line-thin stems make these a very poor choice for fussy-cutting. I used the trimmer to separate the images, thinking maybe I could use them that way. Here they are, with a colored pencil for scale:


If you have any thoughts on how I can use these, let me know!

11/9/20

Diamond Art Thanksgiving Pumpkin

I'm all about experimenting. I had no idea whether Diamond Art would work on a real pumpkin, so I gave it a try. I'm happy to report that it worked beautifully! This pumpkin will make a great Thanksgiving centerpiece, but it would be even more cool to use mini pumpkins with guests' names on them to act as place cards. In future years, anyway. In 2020, Thanksgiving will be deRosier, Party of Three. Affiliate links below. 


Diamond Art Thanksgiving Pumpkin


Materials:


Steps:

The first thing you need to do is transfer your design to the pumpkin. I printed out the word thanks, then used a retractable craft pick to pierce holes along the design to give me a guideline for where the gems would go. It worked really well, although I'm concerned that poking holes in the pumpkin's skin will hasten its spoiling. A smarter idea would be to print out the word, scribble on the back of it with a pencil, then trace the word, transferring the pencil marks to the pumpkin. 

Next, paint liquid adhesive along the marked lines. Let the adhesive sit for 15 minutes, or until it appears clear. Then start adding dots. I work from right to left since I'm left-handed. 


That's all there is to it! 

8/26/20

Personalizing a Diamond Art Kit

I recently finished my latest Diamond Art project. It's a full-drill 12"x12" snowman and I love it! 


I made it with the Snowman Diamond Art kit by Leisure Arts. This is what the finished design looks like if you follow the directions.... 


.... but I'm not much of a 'follow the directions' person when it comes to crafts (or cooking, for that matter). Here are the two designs side-by-side. See if you can spot all the changes I made.


There are five major changes: 
  • replaced the light blues and creams in the scarf and hat with darker blues and purples
  • turned the stubby red nose to an orange carrot
  • changed the buttons from red to black
  • thickened the arms so they weren't so spindly
  • removed the dark blue mountain and moved some clouds in the background on the left

So how did I do it? The first step was deciding what changes I wanted to make. Then I used the colors provided with the kit to fill in anything that I DIDN'T want to change. With those elements completed, I dug through my Diamond Art storage and chose colors for the items I did want to change. 

Below, you can see that I've filled in the background and changed the nose, arm, and buttons. The red vertical stripes in the scarf are complete, so my next step was filling in with blues (and eventually purples). It took a little bit of trial and error to make things look the way I wanted, but it is really easy to pop up the gems after you've placed them if you aren't satisfied. 


I love the way the hat and scarf turned out. I'm happy with the carrot nose, too. In fact, my only complaint about changing up the colors is that there are a few places where the original canvas color shows through. You can see this in the black buttons - the area around them is clearly red. You can also see a tiny bit of red at the bottom of the snowman's arm where I widened it. I can live with that. 


With the Diamond Art and Diamond Dotz Freestyle Program, you can make your own design completely from scratch, or do like I did and alter a kit with a few replacement colors. I love the flexibility. Diamond Art is so much fun. 

5/26/20

Peacock Diamond Art

I did a lot of crafting during my pre-COVID-19 days, but the amount I do now that we're home 24/7 has increased significantly. I've made time to work on some big projects, including this FABULOUS Diamond Art peacock (affiliate link here and below).


This was the first large (14.6" x 16.5"), full-drill (dots covering the entire surface) Diamond Art project I've done. I didn't keep track of how long it took, but I'd estimate somewhere between 30 and 40 hours. Honestly though, the time flew by. I worked on it an hour or so at a time and loved seeing it come together. The sparkle and shine are amazing. Here's a close-up of the peacock's face:


I've mentioned before that our neighborhood is home to a flock of approximately 200 peafowl. I absolutely love them. Other neighbors, not so much. There is an ongoing battle between those who love the peafowl and those who inexplicably bought or rented a home where a flock of 200 birds that they don't like have been living for the last century. We've been living here for 16 years and the Peacock War has been raging the whole time. While there is no easy compromise between "I love the peacocks!" and "I want the peacocks gone, yesterday!" a group of neighbors from the former group stepped up with a partial solution. They feed the peafowl at a dedicated spot within the preserve in our neighborhood in order to encourage them to roost, scratch, and poop there instead of at people's houses. 

Peafowl food isn't free. To do my part to contribute, I'm selling this completed Diamond Art to the highest bidder. It is unframed (because I'm not going to a framing shop during a pandemic) but can easily be framed or mounted for display. I'll deliver locally or ship elsewhere. Since the materials alone are around $25, that's the minimum bid. If you'd like to bid, contact me at cindy.mycreativelife at gmail.com.

If you have 40 hours to spare and have Diamond Art experience, I'd encourage you to make your own Diamond Art peacock! However, if you've never done Diamond Art, I'd recommend starting with a much smaller project. The Beginner kits only take a few hours to do and will give you an idea of whether or not this craft is for you. Either way, I HIGHLY recommend my favorite magnifying lamp when doing Diamond Art. What a difference it makes! 

Long live the peafowl! 

4/22/20

Diamond Art Flower and Monogram Tags

The new Diamond Art Freestyle program by Leisure Arts lets crafters buy gems individually to get exactly the colors you want. They have over 400 colors of gems, including metallics, aurora borealis, neon, and even glow-in-the-dark. With all the colors of sparkly gems available and two different adhesives that work on practically any surface, you can now create any design you can dream up. Today I'm sharing ideas for gift tags. First up, flowers. Scroll down further to see the instructions for the monogram tag. Affiliate links below. 


---------

Diamond Art Flower Tag


Materials:


Steps:


Paint the tag and let it dry completely. Use the punch to cut flowers from the sandwich adhesive. Remove the white side of the adhesive and stick the flowers to the tag. Then remove the clear lining from one flower and start dotting. In this photo, you can see one completed flower. The second flower still has the clear lining on it. 


When the second flower is complete, use the liquid adhesive to draw leaves and vines on the tag. Let the adhesive dry until clear, approximately 15 minutes. Dot the leaves and vines. Finally, add embroidery floss to the top of the tag.


---------


Diamond Art Monogram Tag


Materials:


Steps:


Paint the tag and the wood letter. When the paint is completely dry, add a coat of Freestyle adhesive to the front of the monogram. Wait 15 minutes or until the adhesive is clear.

Add gems to the monogram. Glue it to the tag with Supertite, then add dots of adhesive randomly on the tag. Wait until the adhesive is clear, then add gems. Tie a loop of embroidery floss to the tag.


---------


For more ideas for using gems, check out all of my Diamond Art ideas! There is truly no limit to how you can use these. 

4/20/20

Diamond Art Monogram Necklace

With the new Diamond Art Freestyle program by Leisure Arts, you can buy gems individually to get exactly the colors you want. There are over 400 colors of gems, including metallics, neon, aurora borealis, and even glow-in-the-dark. With so many colors of sparkly gems available and two different adhesives designed to work on practically any surface, you can now create any design you can dream up. 

Today's project is a simple monogram necklace. It is very easy and takes just minutes. I used Aegean Blue #5003, but any color would be beautiful. Affiliate links below. 


Diamond Art Monogram Necklace


Materials:


Steps:

Choose a letter and paint it with your desired color. When the paint is dry, add a coat of Freestyle adhesive. It will go on milky white. It is ready to use when it is clear, anywhere from 10-30 minutes depending on the temperature and humidity. 

Apply gems to the front of the monogram. Glue the bail to the back. When it is dry, measure enough embroidery floss for the length of your necklace, thread it through the bail, and tie it with a knot. 

4/14/20

Diamond Art Freestyle (My Books are Out!)

Last October, I designed nineteen crafts for a book series that would accompany Leisure Arts' new Diamond Art Freestyle Program. The Freestyle Program is awesome. It takes everything you love about Diamond Art and lets you create your own designs on whatever surfaces you want. You can buy individual colors of gems (over 400 colors!), two types of adhesives that work on practically any surface, fabrics, tools, and accessories. The sky is the limit!

If you know exactly what you want to create, the Freestyle Program lets you jump right in and make it. If you need ideas, patterns, or templates, the accompanying books are fabulous. I designed four of the projects in the Paper Crafting book (including the rainbow card and the flower box on the cover) and fifteen of the projects in the Sparkle Holiday book (including everything on the cover except for the Christmas tree with the red background). In January, I got to see the mockups of those books during Creativation. It was so exciting! Now they are finally available for purchase.


I'd been planning to take photos of myself in a big box store holding my books as soon as they were released... but COVID-19 changed those plans. Fortunately, Leisure Arts shipped the Paper Crafting book to me. It's not the same as seeing it in the store, but it's still exciting.

Also exciting: Leisure Arts asked me to do the "Teach Me Tuesday" Facebook Live this afternoon! Join me at 2:00 PM Pacific (4:00 PM Central, where Leisure Arts is located) on the Leisure Arts Facebook page. I'll be showing off the book, and teaching you how to make some beginner projects using the two different types of adhesive on a variety of surfaces. I'll see you then!

2/12/20

Football Diamond Art

I'm not a sports fan, but Steve and all of my inlaws are rabid 49ers fans. They were thrilled that the 49ers were in the Super Bowl, but obviously not particularly happy about the outcome. Maybe next year! 

If you or someone in your life is a football fan, you're definitely going to want to check out the NFL series by Leisure Arts (affiliate link here and throughout the post). I used the 49ers kit, then framed it with a wood panel and poured paints by Plaid. 


I started by completing the Diamond Art kit, which was straightforward and relatively quick. The kit includes everything you need. Next, I cut out away the background fabric with my microtip scissors. I LOVE them. 


My goal in cutting away the background fabric was two-fold. First, I wanted to be able to fit the design in the square panel, and second, I wanted to have a less busy background. Cutting out the basic shapes was quick and easy. 


Cutting out the inner parts was not. It took a really, REALLY long time to carefully cut away all of the inner fabric using a sharp craft knife and a self-healing mat


Once everything was cut, I turned my attention to the frame. I mixed the pouring medium into Folk Art acrylics (yellow, red, and black) and drizzled them over the frame until I was happy with the marbling. Once the paint was dry, I added the cardstock and the Diamond Art pieces with Supertite.


Now that this is done, I'm looking forward to starting my next Diamond Art project. What to make though? I have a few kits I could start (including this one that I love), or I could do a freestyle design. So many options!

12/4/19

Diamond Art Gingerbread Family

Remember the snowman family portrait on a pillow I shared recently? Similar concept, different holiday icon. Affiliate links below. 


Diamond Art Gingerbread Family


Materials:


Steps:


Drill holes in each gingerbread man's hands. Paint the gingerbread men and hearts Teddy Bear Brown.

Add white gems to the gingerbread people's face, arms, and legs using tacky glue. I used our family colors for the buttons.

Add white gems around the edge of the hearts. Thread the wire through the holes. I curled the ends of the wires around a toothpick.

Glue the hearts to the wire using Supertite. Alternately, you can drill holes through the hearts so that you can string them as well.


I thought about adding dates to the hearts: 5/30/04 for the heart connecting Gingerbread Steve and Gingerbread Cindy, then 6/07/06 for the heart connecting Gingerbread Cindy with Gingerbread Trevor. I love the idea, but at this scale it's not possible to do in a way that realistically mimics royal icing. I might go back and add it anyway. What do you think?

11/15/19

Diamond Art Scissors Hair Accessory

With my fabulously-organized stash of leftover Diamond Dotz, it's super easy to pull out exactly the colors I need to bedazzle just about anything. In this case, a pair of chipboard scissors.


But it's not just a pair of scissors - it's my new hair accessory, inspired by Fiskars beloved orange-handled scissors!


My original plan was to turn it into a necklace, but I already have a scissors necklace. Affiliate links below. 


---------

Diamond Art Scissors Hair Accessory


Materials:


Steps:


Paint the scissors (orange on the handles, silver on the blades). When the paint is dry, use craft glue to attach the dots to the scissors. Finally, use E-6000 to attach a bobby pin to the back of the scissors. Your masterpiece is ready to wear!


---------


You probably already know how awesome Fiskars scissors, trimmers, punches, and other craft tools are. But that's not all they make! Fiskars makes my favorite gardening tools as well. Check them out!

11/14/19

Bible Verse Christmas Tree

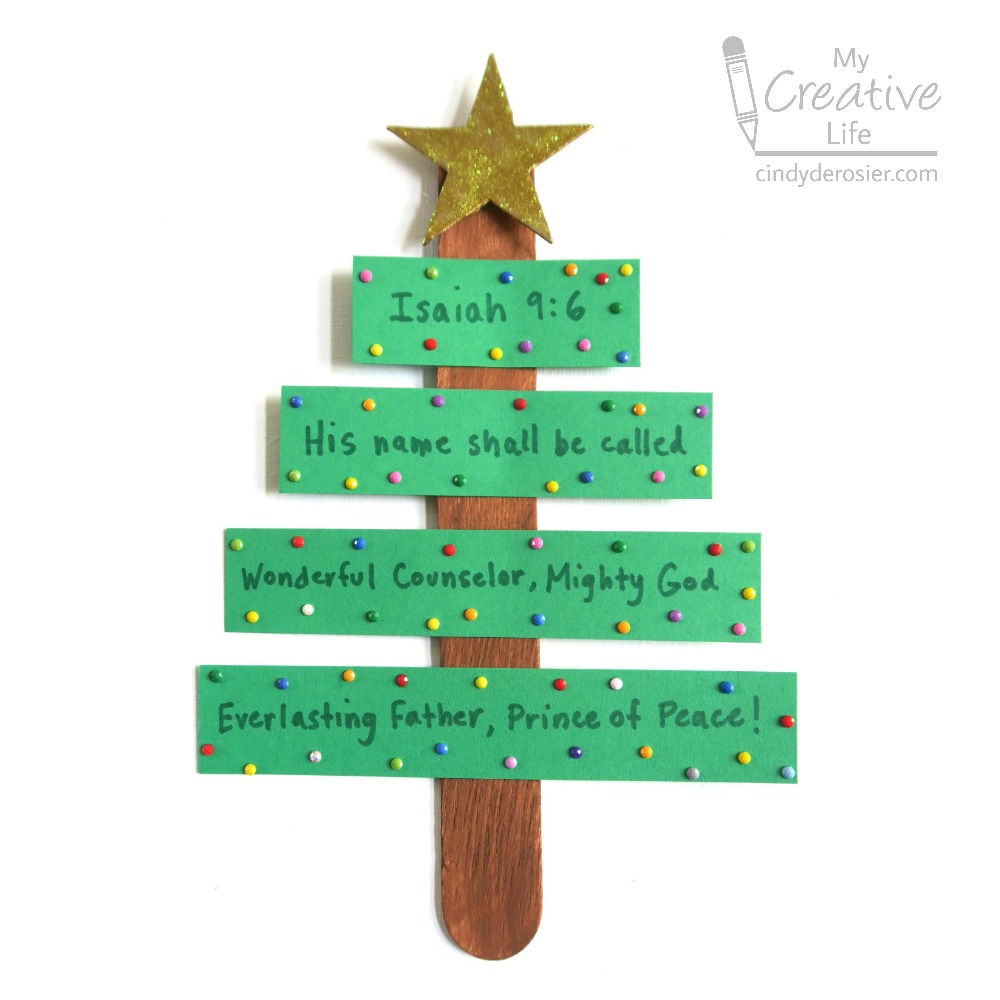
In my continuing obsession with adding leftover Diamond Dots to everything, today I have a Bible verse Christmas tree ornament. It's perfect for Sunday School, youth group, or an adult craft group.  Affiliate links below.  


Bible Verse Christmas Tree


Materials:


Steps:


Use the craft drill to make a hole in one end of the craft stick. Paint the stick brown. Paint the star Treasure Gold. Set both aside to dry.

Cut the cardstock into strips that are 1" x 2", 1" x 3", 1" x 4", and 1" x 5". 

Choose a Bible verse you like (ideas below) and write it onto the paper strips using the Sharpie. I recommend doing a rough draft on scratch paper to get the spacing right. 

Add dots of craft glue to the paper strips, then put colorful Diamond Dotz on each spot. 

Cut a piece of fishing line and thread it through the hole. Tie a knot. Glue the star over the hole. Glue the paper strips to the craft stick. 


Bible Verse Options:


Isaiah 9:6
His name shall be called Wonderful Counselor, Mighty God, Everlasting Father, Prince of Peace.

Isaiah 40:3
Prepare the way of the Lord, make straight in the desert a highway for our God.

Psalm 118:24
This is the day that the Lord has made; let us rejoice and be glad in it.

Luke 2:10
Do not be afraid. I bring you good news that will cause great joy for all the people.

Luke 2:11
For unto you is born this day in the city of David a Savior, who is Christ the Lord.

Luke 2:12
And this will be a sign for you: you will find a baby wrapped in swaddling cloths and lying in a manger.

John 3:16
For God so loved the world that he gave his only begotten Son, that whoever believes in him shall not perish but have eternal life.

Romans 15:13
May the God of hope fill you with all joy and peace in believing.

2 Corinthians 9:15
Thanks be to God for his unspeakable gift.

Philippians 4:4
Rejoice in the Lord always; again I will say, Rejoice.

11/13/19

Creating Custom Diamond Art from a Kit

One of the items in my Prime Con swag bag back in May was the Rainbow Tree Diamond Art by Leisure Arts (affiliate link). It's pretty, but as I got new Diamond Art projects to review, I kept moving this one to the bottom of the stack. Rather than complete it as intended...


... I used the kit to create my own custom design!


The first thing I did was to cut out a cardstock heart that was approximately the same size as the tree image. I traced the pattern onto the protective plastic using a Sharpie. 


I cut out the heart, following the lines I'd drawn on the plastic. I cut off the color guide from one side of the canvas and threw the rest of it away. 


Then I got to dotting! Because the canvas was printed, I started out by following the color guide, filling in the reds, oranges, and yellows on the left. 

Three problems arose: First, I didn't want the black branches to show, so I had to get creative there. Through experimentation, I found that hiding the black was the most effective when I did an ombre transition of color directly across the black areas. You can see a little bit of the black in the light yellow area, but it's camouflaged well elsewhere. 


My second problem was that there were two tiny areas (upper left and in the middle far right) where there wasn't any adhesive because my heart had extended slightly beyond the size of the tree. I solved that problem with craft glue. The dots stuck beautifully. 

Problem #3 was that the dots didn't perfectly fit the arbitrary heart shape I'd cut out. Take a closer look: 


The perfectionist in me was annoyed that the rows aren't smooth and perfect all the way around the heart like they are along the bottom left, but I got over it. I haven't decided what I'm doing with the finished heart, but I'll choose something that allows me to camouflage the edges. 


I completed 98% of my heart using the colors in the kit, but I've amassed such a large collection of leftover dots (see my storage system here!) from other kits that I used some other colors to help with the ombre effect I needed to cover the black.

I've been using my leftover gems to dot everything that doesn't move. It's so much fun! Tomorrow I'll show you a fun Christmas ornament and Friday my new hair accessory, both made with leftover Diamond Dotz.

11/4/19

Pillow Party 2019

I love a creative challenge, so when I was invited to join up with 24 other craft bloggers for a Holiday Pillow Party, I jumped right in! Each of us received pillows and other goodies from Fairfield World with the instructions to decorate our pillows for the holidays. I love seeing what everyone made! Based on what you know about me, can you pick out mine?


If you guessed that I made the snowmen family portrait, you're right! Follow the steps to make your own. Affiliate links (and a big giveaway!) below. 


---------

Snowmen Family Portrait Pillow


Materials: 


Steps: 

Remove the Poly-Fil from the pillow and put it temporarily into the bag the pillow came in.

In a shallow disposable tray, mix paint with 1 cup of water. You want a completely liquid consistency, but not so diluted that it won't color the pillow. Dip the top half of the pillow into the paint. After the paint has soaked in, spread the pillow case flat to let it dry. (I did this on the lawn so I wouldn't make a mess indoors.)


Meanwhile, cut out snowmen to represent each member of the family. Use black Stickles for eyes, mouths, and buttons; orange Stickles for carrot noses, and pink Stickles for bunny ears. I also added our family colors to the snowmen's hats. 

When the pillow and the Stickles were dry, I used the Beacon glue to attach the felt to the pillow. Then I used the brown Stickles to add arms.

While the arms were drying, I added my leftover Dotz to the sky to make snowflakes. They're hard to see in the picture, but they add so much sparkle in real life! 

Finally, I re-stuffed the pillow.  

---------


I had so much fun making my pillow, but it was even more fun to check out all the other designers' pillows. There's so much talent out there! Each pillow is so different from the others.

If you'd like to make your own pillow (or anything else crafty), I have good news for you! You can enter this Rafflecopter giveaway for a chance to be the lucky one to win a $100 gift card to Michaels and 10 pounds of Poly-Fil. Good luck, everyone!

10/25/19

Kind People are My Kind of People

Way back in my beginner teacher days, my aunt Vickie (then a 4th grade teacher and now a curriculum specialist who doesn't seem to understand how to retire) taught me how to do a cool art project with Sharpies, cling wrap, and aluminum foil. I used a page from one of my favorite coloring books by Leisure Arts to show you this unique craft. Affiliate links below. 


---------


Kind People Are My Kind of People


Materials:


Steps: 


Remove the coloring page from the coloring book. Put it on top of a piece of chipboard, then cover it with plastic wrap. It should be tight and without wrinkles. You can tape the back if you'd like. 


Use the sharpies to color in your design. Outline everything in black for the best results. 


Carefully remove the top half of the plastic wrap and check that your coloring is dark enough. I didn't outline with black and my design looked too washed out, so I carefully rewrapped the plastic wrap and did the outlining. 


Carefully remove the plastic wrap and set it aside. Remove the coloring page - you can use it for a future project.

Cut a piece of foil that is bigger than the chipboard. Gently ball up the foil, then unfold it and smooth it out. Don't ball it up too tightly or you'll have difficulty smoothing it. Repeat this process if necessary, then wrap the foil around the chipboard. Cover the foil with the plastic wrap and tape it on the back side. Mount the artwork onto black cardstock that's been trimmed to 9" x 11.5". 


You can do this with any coloring book, or draw a design or quote of your own. Be creative!

10/24/19

Sparkly Unicorn Diamond Art

I'm doing something I've never done before - posting a Christmas gift on my blog before giving it to the recipient. In this case, however, the recipient is my 6-year old niece, Allison, and I'm fairly confident she doesn't read my blog unsupervised. Not only that, but I kinda already told her what the gift would be. In fact, I posted a picture of Allison (and my godson Teagan) helping me with Allison's gift when we visited back in July.

So Allison knew that I would be taking the completed unicorn Diamond Art and turning it into something sparkly and fabulous for her, but she didn't know exactly what. Neither did I, to be honest! I debated all sorts of options before settling on wall art. I think she's going to like it. I wish you could see just how sparkly it is! Affiliate links below.


---------

Sparkly Unicorn Diamond Art


Materials:


Steps: 

Complete the unicorn, following the instructions on the package. Use microtip scissors to carefully cut it out. 

Paint the wood canvas with black paint. When it is dry, add a coat of Extreme Glitter. The more coats you add, the more sparkly it gets. I did two coats and got tons of sparkle. (Allison likes sparkle. It's practically a requirement for being a 6-year old girl to love glitter in all its forms.)


Cut the cardstock to size, then use a strong craft glue to attach it to the inside of the wood canvas. Use the same glue to attach the unicorn, alphabet letters, and heart(s) to the cardstock.


Diamond Art makes a fantastic gift for practically anyone on your gift list. My favorite diamond art manufacturer, Leisure Arts, has a huge (and growing) number of designs to choose from. If someone on your list would prefer to receive a completed design instead of doing it themselves, you have plenty of time to make this thoughtful gift before the holidays.

9/25/19

Storage for Leftover Diamond Dotz and a GIVEAWAY!

I'm officially obsessed with Diamond Art! In addition to the llama, the rose, and the others I've shared on the blog, I've finished three more projects and started another. I will eventually share them here, but first I wanted to show you what I did to tame my growing collection of leftover Diamond Dotz. After completing the first few projects, I used the included ziplock bags to hold my extra Dotz. That worked fine, but by the 7th or 8th project, I had a mess on my hands. It took awhile, but now I have an organization system that I LOVE. Check out the before and after!


Interested in organizing your leftover Diamond Dotz? It's so worth it! Not only is the mess contained, but it's so easy to combine the same colors from different kits. The containers are portable, flexible, and spill-proof. Here's what the container I used (affiliate link here and below) looks like from the bottom (plus my hand to provide scale):


Each box holds 24 small containers. The lid comes out entirely, or you can flip the top back to pour out a small amount of Dotz. They're basically Tic-Tac containers.


I added the labels using a P-Touch. I got it for Steve years ago and he uses it to label everything (it's been 5 years and HAREWARE still cracks me up). It's come in handy so many times and it was absolutely perfect for this organizational project.

---------

Astute readers probably noticed the word GIVEAWAY in the title. My friends at Leisure Arts have just introduced two fabulous new Diamond Art lines: Holiday Diamond Art and NFL Diamond Art and I get to give away the design of your choice!


Even better, you can choose your prize from among all of the Diamond Art kits that Leisure Arts offers! Trust me, you will have a very hard time picking just one.

For a chance to win, take a look at this photo below and tell me in the comments which Diamond Art kit it is. Then tell me which kit you'd like to win! 


You have until next Wednesday, October 2 to leave a comment. Sorry to my international friends, but the winner's shipping address must be in the continental US. 

Off to work on my nearly-completed Diamond Art... as I said, I'm obsessed!