Showing posts with label Diamond Art. Show all posts

11/18/24

Western Meadowlark Diamond Art Ornament

I liked my wood slice American Robin ornament so much that I made one for the Western Meadowlark. It is the state bird of Kansas, Montana, Nebraska, North Dakota, Oregon, and Wyoming and is easily recognized by the black V-shaped bib on its yellow breast. Beautiful! 

As with the robin, you can make this with leftover drills from previous diamond art projectsbuy a bunch of colors, or get just the colors that you need. I used a variety of greys to make my bird since that's what I had on hand. Affiliate links below. 


Western Meadowlark Diamond Art Ornament


Materials: 


Steps: 


Paint a thin coat of DOTZ Stick onto the wood slice, following the package directions. Don't use too much or the moisture can cause your ornament to crack. 

When the adhesive is ready, apply the drills. The stars on my pattern mark the center of each axis, so the plus sign is the center of the whole design. 


In order to center the meadowlark, put the center drill onto the center of the ornament. Then fill in the rest of the drills around that central one. 

Ordinarily, I'd suggest sealing your diamond art, but since these ornaments can crack with too much moisture, I wouldn't risk it. Instead, rub cornstarch or baby powder over the uncovered area of the wood. That will eliminate the tackiness of any extra adhesive not covered by drills. 


-------


Have you seen the Aububon Birds stuffed animals from Wild Republic that feature a realistic call? I love them! There are over 30 different birds. This is the Western Meadowlark


Interested in learning more? Read about the Western Meadowlark and hear its calls at Audubon.com

11/13/24

American Robin Diamond Art Ornament

I've been wanting to make a bird ornament using my copious supply of leftover drills from diamond art for a long time. I'm so happy with how this robin turned out! Don't have leftover diamonds in the correct colors? Not a problem! Substitute with what you have, buy a bunch of colors, or get just the colors that you need. Affiliate links below. 


American Robin Diamond Art Ornament


Materials: 


Steps: 


Paint a thin coat of DOTZ Stick onto the wood slice, following the directions on the package. If you use too much, your ornament can crack from the moisture. 

When the adhesive is ready, apply the drills. This is the pattern I made. The stars mark the center of each axis, so the plus sign is the center of the design. 


In order to center the bird on my ornament, I put the center drill onto the center of the ornament... as best I could. The wood slices I used are quite irregular. In retrospect, I could have moved my starting drill over a hair to the left to better center the design. It didn't bother me much, so I left it that way.

Fill in the rest of the drills around that central one. 

Ordinarily, I'd suggest sealing your diamond art, but not on wood like this. Instead, rub cornstarch or baby powder over the uncovered area of the wood to eliminate the tackiness of any extra adhesive not covered by drills. 

-------

The American Robin is the state bird of Connecticut, Michigan, and Wisconsin, making this a great activity for kids (or adults!) in those states. But it's equally great no matter where you live. This interesting songbird is one of the most recognized and most widespread in North America. Pair your craft project with a shaped puzzle featuring the American Robin, then check out these fun facts about this beloved bird. 

9/22/23

Custom Diamond Art from Heartful Diamonds

I've done a lot of diamond art since I first discovered Diamond Dotz in 2017. I really enjoy it. The process is relaxing and the finished art is so sparkly and pretty. All of the early work I did with diamond art was with ready-made kits, then I started dreaming up projects to use up leftover diamonds (gems, dotz, drills... whatever you want to call them). I've customized pre-made kits more than once. The most fun I've had with diamond art was designing the projects for two diamond art books by Leisure Arts

On a whim, I decided to do something I've never done - order a custom diamond art kit. It turns out there are a zillion companies that do custom diamond art. I spent 5 minutes eliminating the sketchiest looking sites and settled on one that looked very promising, Heartful Diamonds. Without giving it any thought (or even reading through all the information on their website), I ordered a 12x12" square design with my travel logo. With shipping, it was about $30. It took about two weeks to arrive. 

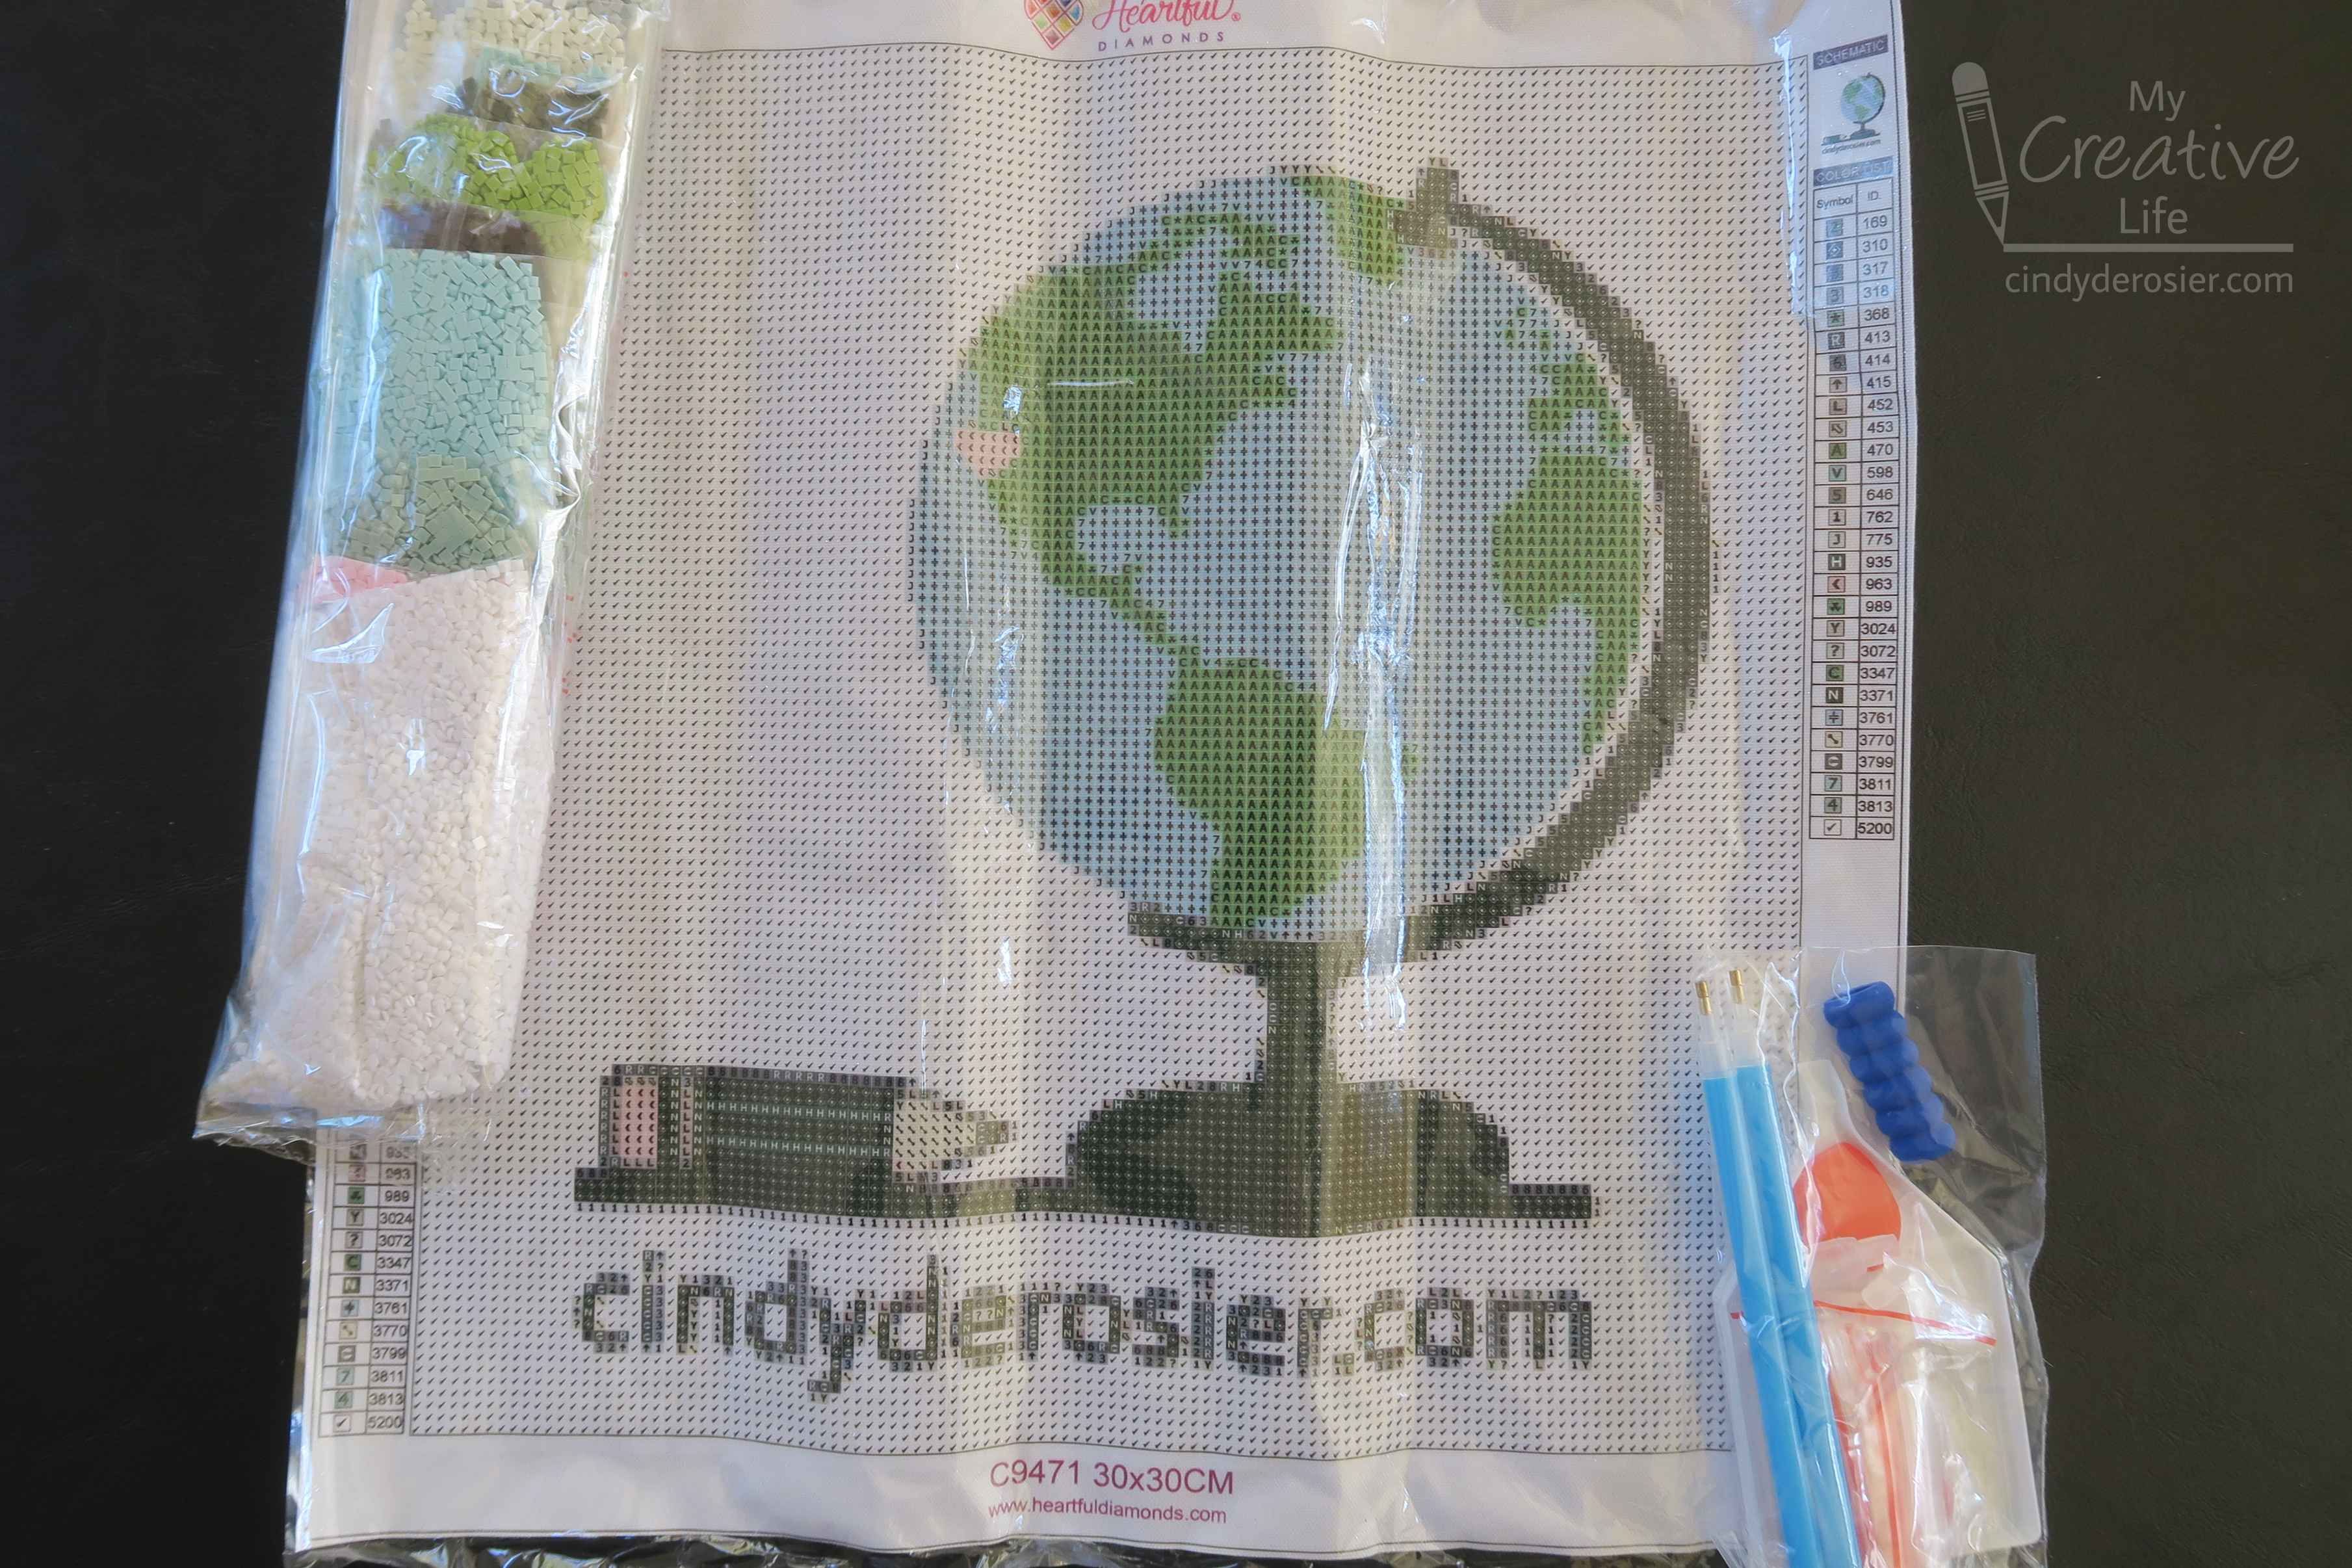
At first glance, it was just what I expected. 


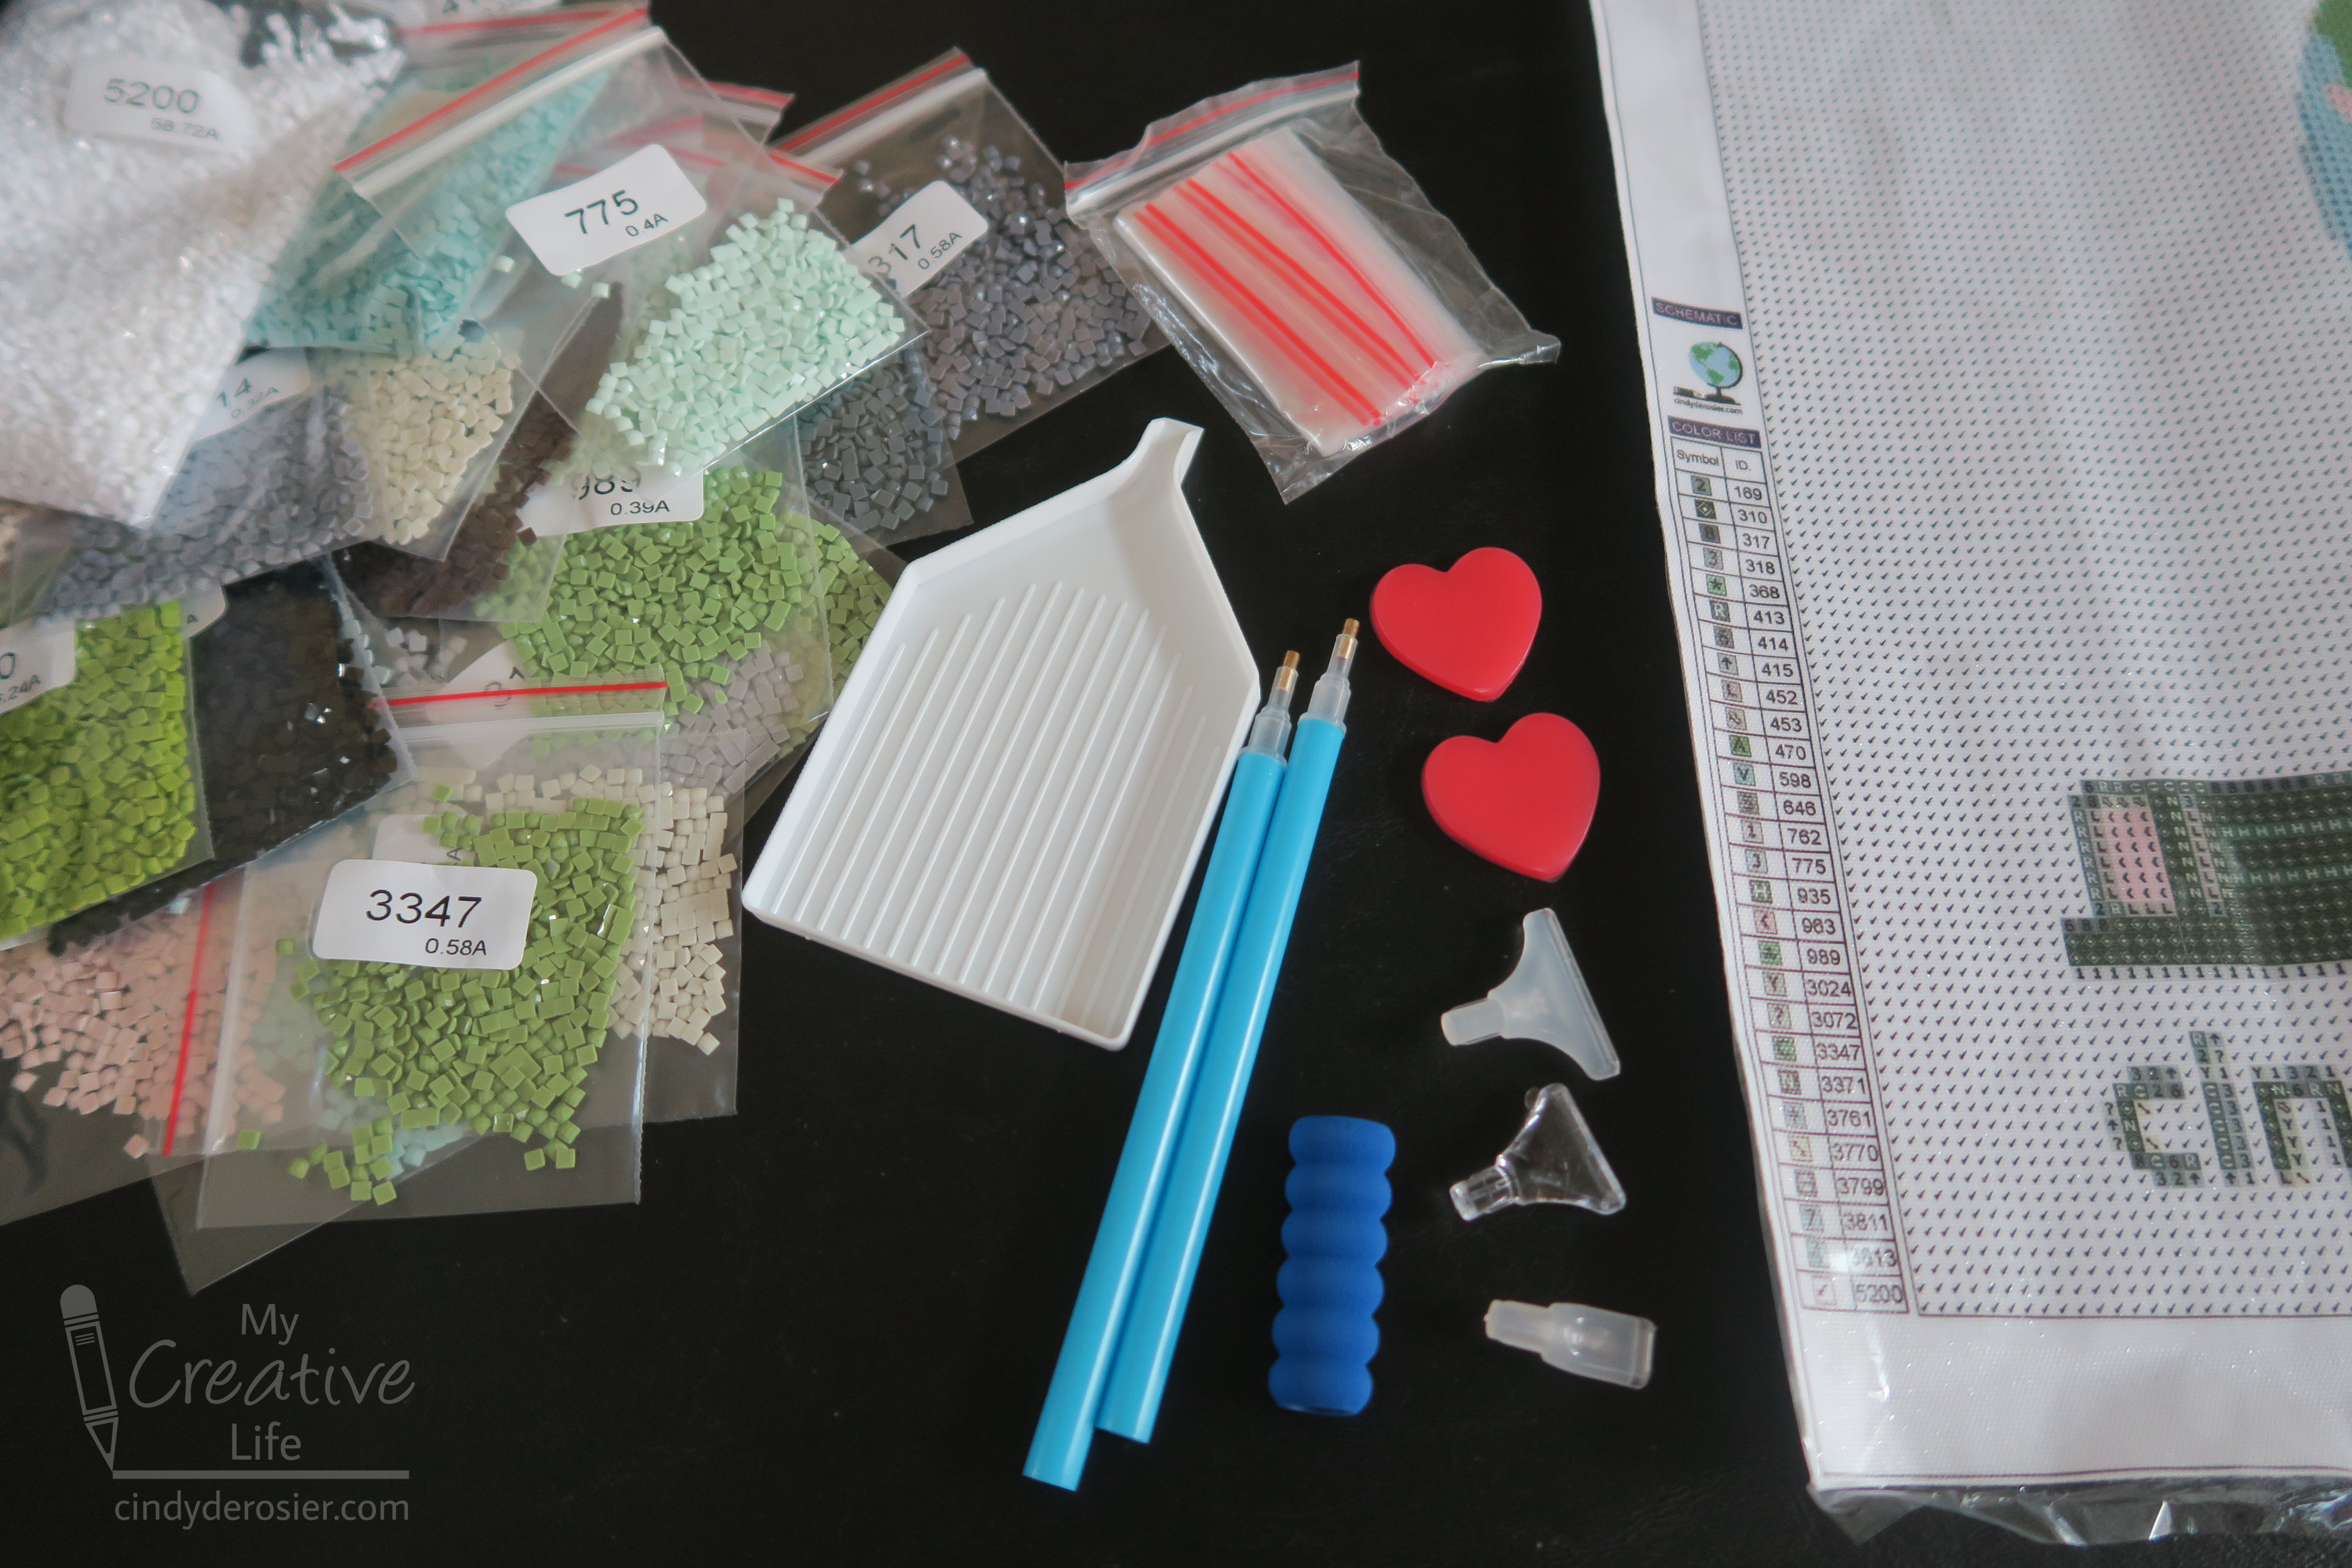
As I looked closer, there were a bunch of things I hadn't expected. Some were good. I love the fact that a company called Heartful Diamonds uses heart-shaped bubble wrap (affiliate link here and below).


The wax is heart-shaped too! And there are two pens in the kit, as well as multi-placer tips. I've seen those before but never tried them. Fun!


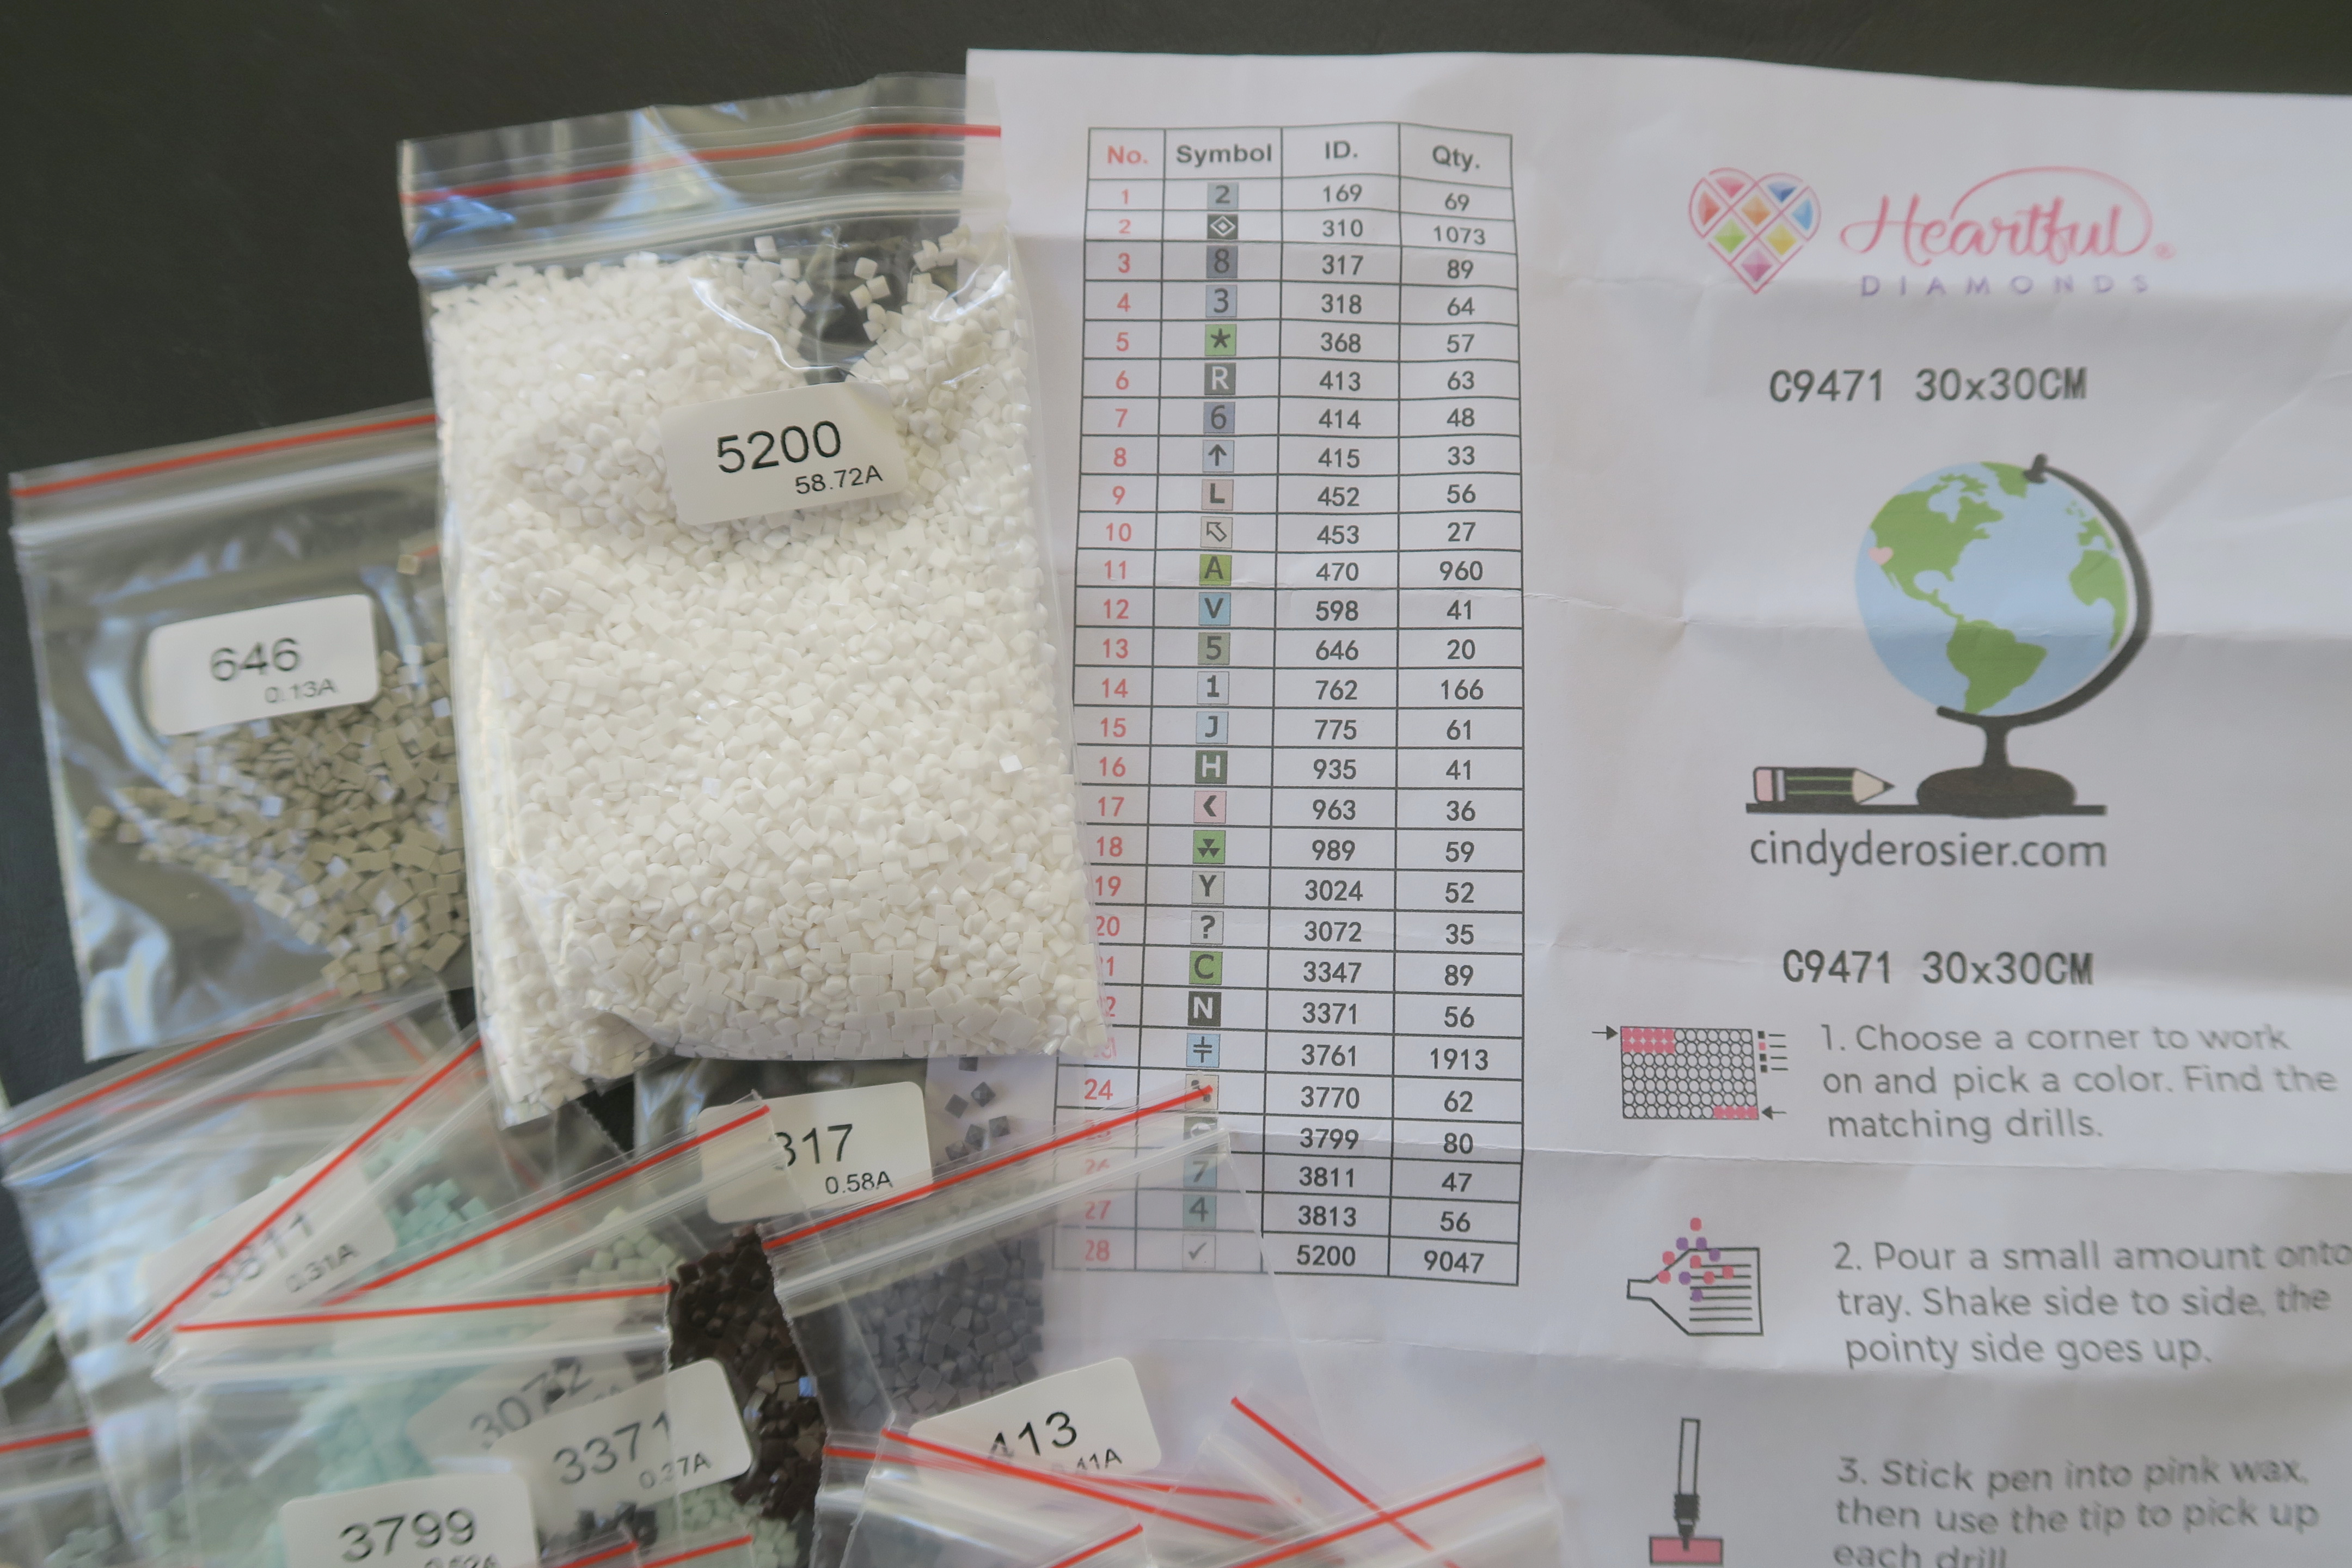
This chart is cool. It shows how many diamonds of each color there are in the kit. 


But... why are there SO many different colors? 


My logo, which I designed digitally, has seven colors. There's blue (globe), green (globe and pencil), pink (globe and pencil), tan (pencil), light grey (pencil), black (globe and pencil), and dark grey (top of globe base). 


With the white background, I should have eight sets of diamonds. Instead, there are 28. There are no shadows or color variations in the file I uploaded, so there should be no reason for 20 additional shades. 

Take a look at the text. It should be one color: black. I count 11 different colors in just the letter o. 


I know weird things happen when you try to convert certain shapes into pixels, but that much color variation for a single letter is crazy. Also crazy: this heart. It has three different shades. The bottom looks like a heart (sort of) but the top sure doesn't. I'll be tinkering with the text and the heart to make them look more like the way I want them. It should be a relatively easy fix.  


I was disappointed that the kit came with square diamonds. I prefer round for both their ease of application and their extra sparkle. But... it turns out that is 100% my fault. Remember how I said I ordered a 12x12" square design? It turns out I ordered a 12x12" design with square diamonds. It clearly says on the website that you can choose round or square diamonds. I was so focused on getting a square canvas that I didn't notice that I was actually selecting square diamonds! I love that they offer both. 

One more thing to mention is that the colors on the canvas aren't quite the same as the gems themselves. Not a big deal, since the canvas gets covered. Check out what's printed on the canvas vs. the diamonds themselves. 


Overall, I'm happy with my purchase and looking forward to getting started on my diamond art. 

Have you done a custom diamond art project? If so, what company did you use and how was the quality?

6/22/23

Sparkly 49ers Sign

I rarely work with bling, yet I have an enormous supply of sparkly, glittery things that have been sitting in the craft room forever. Time to use some of it up! This wooden arrow is decorated with gold paint, gold glitter, and leftover Diamond Dotz, It’s super sparkly; the photo doesn’t do it justice.

You may recognize the 49ers logo from a diamond Art kit I completed a couple of years ago. I had enough extra Dotz to make a second logo. Self-adhesive canvas with a printed grid makes it really easy. Affiliate links below. 


Sparkly 49ers Sign


Materials:


Steps: 


Sand the wooden arrow until it is smooth. Add a coat of Treasure Gold. When that is dry, add a generous coat of gold glitter glue. 

Create the logo or design of your choice by applying the Diamond Dotz to the canvas. When it is complete, carefully cut it out with microtip scissors and glue it to the arrow with a strong craft glue.  

11/9/20

Diamond Art Thanksgiving Pumpkin

I'm all about experimenting. I had no idea whether Diamond Art would work on a real pumpkin, so I gave it a try. I'm happy to report that it worked beautifully! This pumpkin will make a great Thanksgiving centerpiece, but it would be even more cool to use mini pumpkins with guests' names on them to act as place cards. In future years, anyway. In 2020, Thanksgiving will be deRosier, Party of Three. Affiliate links below. 


Diamond Art Thanksgiving Pumpkin


Materials:


Steps:

The first thing you need to do is transfer your design to the pumpkin. I printed out the word thanks, then used a retractable craft pick to pierce holes along the design to give me a guideline for where the gems would go. It worked really well, although I'm concerned that poking holes in the pumpkin's skin will hasten its spoiling. A smarter idea would be to print out the word, scribble on the back of it with a pencil, then trace the word, transferring the pencil marks to the pumpkin. 

Next, paint liquid adhesive along the marked lines. Let the adhesive sit for 15 minutes, or until it appears clear. Then start adding dots. I work from right to left since I'm left-handed. 


That's all there is to it! 

11/5/20

Diamond Art Joy Ornament

This time last year, I was frantically designing Diamond Art holiday crafts. I was contracted to make fifteen projects that would appear in Leisure Arts' Sparkle Holiday book, along with four projects for their Paper Crafting book. I had a ridiculously short turn-around time and I did pretty much nothing except Diamond Art for two weeks in November. It was awesome and I loved the whole experience. Plus, I am really proud of what I designed. 

Leisure Arts bought my actual projects from me. So when my friends at Creative Crafts invited me to participate in the 2020 Christmas Edition, I decided to make a Diamond Art ornament that I can keep and display. I actually like it better than the glass ornament I made for the book. :)


Diamond Art Joy Ornament


Materials:


Steps:

Remove the top from the ornament and fill it with glitter and feathers. Replace the top. 

Use Sharpies to color in the letters JOY while the stickers are still on the sticker sheet. Then, adhere the letters to the ornament. 

Use a small paintbrush to spread the adhesive onto the letter stickers, trying not to get any on the ornament itself. Add tiny dots of adhesive around the edge of the ornament top. Wait 15 minutes, or until the adhesive becomes clear. 


Time for dotting! Add red dots to the J and the Y and green dots to the O and around the top. Add a loop of ric rac and your ornament is ready to display!

  ---------

If you're looking for more ideas for holiday dotting, I highly recommend Leisure Arts' Sparkle Holiday book. It makes a great gift, too. Here are some of my favorite projects I designed for the book (the ones I most wish I still had and could display in our house):


For even more fun Christmas crafting ideas, check out these ideas!

8/26/20

Personalizing a Diamond Art Kit

I recently finished my latest Diamond Art project. It's a full-drill 12"x12" snowman and I love it! 


I made it with the Snowman Diamond Art kit by Leisure Arts. This is what the finished design looks like if you follow the directions.... 


.... but I'm not much of a 'follow the directions' person when it comes to crafts (or cooking, for that matter). Here are the two designs side-by-side. See if you can spot all the changes I made.


There are five major changes: 
  • replaced the light blues and creams in the scarf and hat with darker blues and purples
  • turned the stubby red nose to an orange carrot
  • changed the buttons from red to black
  • thickened the arms so they weren't so spindly
  • removed the dark blue mountain and moved some clouds in the background on the left

So how did I do it? The first step was deciding what changes I wanted to make. Then I used the colors provided with the kit to fill in anything that I DIDN'T want to change. With those elements completed, I dug through my Diamond Art storage and chose colors for the items I did want to change. 

Below, you can see that I've filled in the background and changed the nose, arm, and buttons. The red vertical stripes in the scarf are complete, so my next step was filling in with blues (and eventually purples). It took a little bit of trial and error to make things look the way I wanted, but it is really easy to pop up the gems after you've placed them if you aren't satisfied. 


I love the way the hat and scarf turned out. I'm happy with the carrot nose, too. In fact, my only complaint about changing up the colors is that there are a few places where the original canvas color shows through. You can see this in the black buttons - the area around them is clearly red. You can also see a tiny bit of red at the bottom of the snowman's arm where I widened it. I can live with that. 


With the Diamond Art and Diamond Dotz Freestyle Program, you can make your own design completely from scratch, or do like I did and alter a kit with a few replacement colors. I love the flexibility. Diamond Art is so much fun. 

5/26/20

Peacock Diamond Art

I did a lot of crafting during my pre-COVID-19 days, but the amount I do now that we're home 24/7 has increased significantly. I've made time to work on some big projects, including this FABULOUS Diamond Art peacock (affiliate link here and below).


This was the first large (14.6" x 16.5"), full-drill (dots covering the entire surface) Diamond Art project I've done. I didn't keep track of how long it took, but I'd estimate somewhere between 30 and 40 hours. Honestly though, the time flew by. I worked on it an hour or so at a time and loved seeing it come together. The sparkle and shine are amazing. Here's a close-up of the peacock's face:


I've mentioned before that our neighborhood is home to a flock of approximately 200 peafowl. I absolutely love them. Other neighbors, not so much. There is an ongoing battle between those who love the peafowl and those who inexplicably bought or rented a home where a flock of 200 birds that they don't like have been living for the last century. We've been living here for 16 years and the Peacock War has been raging the whole time. While there is no easy compromise between "I love the peacocks!" and "I want the peacocks gone, yesterday!" a group of neighbors from the former group stepped up with a partial solution. They feed the peafowl at a dedicated spot within the preserve in our neighborhood in order to encourage them to roost, scratch, and poop there instead of at people's houses. 

Peafowl food isn't free. To do my part to contribute, I'm selling this completed Diamond Art to the highest bidder. It is unframed (because I'm not going to a framing shop during a pandemic) but can easily be framed or mounted for display. I'll deliver locally or ship elsewhere. Since the materials alone are around $25, that's the minimum bid. If you'd like to bid, contact me at cindy.mycreativelife at gmail.com.

If you have 40 hours to spare and have Diamond Art experience, I'd encourage you to make your own Diamond Art peacock! However, if you've never done Diamond Art, I'd recommend starting with a much smaller project. The Beginner kits only take a few hours to do and will give you an idea of whether or not this craft is for you. Either way, I HIGHLY recommend my favorite magnifying lamp when doing Diamond Art. What a difference it makes! 

Long live the peafowl! 

4/22/20

Diamond Art Flower and Monogram Tags

The new Diamond Art Freestyle program by Leisure Arts lets crafters buy gems individually to get exactly the colors you want. They have over 400 colors of gems, including metallics, aurora borealis, neon, and even glow-in-the-dark. With all the colors of sparkly gems available and two different adhesives that work on practically any surface, you can now create any design you can dream up. Today I'm sharing ideas for gift tags. First up, flowers. Scroll down further to see the instructions for the monogram tag. Affiliate links below. 


---------

Diamond Art Flower Tag


Materials:


Steps:


Paint the tag and let it dry completely. Use the punch to cut flowers from the sandwich adhesive. Remove the white side of the adhesive and stick the flowers to the tag. Then remove the clear lining from one flower and start dotting. In this photo, you can see one completed flower. The second flower still has the clear lining on it. 


When the second flower is complete, use the liquid adhesive to draw leaves and vines on the tag. Let the adhesive dry until clear, approximately 15 minutes. Dot the leaves and vines. Finally, add embroidery floss to the top of the tag.


---------


Diamond Art Monogram Tag


Materials:


Steps:


Paint the tag and the wood letter. When the paint is completely dry, add a coat of Freestyle adhesive to the front of the monogram. Wait 15 minutes or until the adhesive is clear.

Add gems to the monogram. Glue it to the tag with Supertite, then add dots of adhesive randomly on the tag. Wait until the adhesive is clear, then add gems. Tie a loop of embroidery floss to the tag.


---------


For more ideas for using gems, check out all of my Diamond Art ideas! There is truly no limit to how you can use these. 

4/20/20

Diamond Art Monogram Necklace

With the new Diamond Art Freestyle program by Leisure Arts, you can buy gems individually to get exactly the colors you want. There are over 400 colors of gems, including metallics, neon, aurora borealis, and even glow-in-the-dark. With so many colors of sparkly gems available and two different adhesives designed to work on practically any surface, you can now create any design you can dream up. 

Today's project is a simple monogram necklace. It is very easy and takes just minutes. I used Aegean Blue #5003, but any color would be beautiful. Affiliate links below. 


Diamond Art Monogram Necklace


Materials:


Steps:

Choose a letter and paint it with your desired color. When the paint is dry, add a coat of Freestyle adhesive. It will go on milky white. It is ready to use when it is clear, anywhere from 10-30 minutes depending on the temperature and humidity. 

Apply gems to the front of the monogram. Glue the bail to the back. When it is dry, measure enough embroidery floss for the length of your necklace, thread it through the bail, and tie it with a knot. 

4/14/20

Diamond Art Freestyle (My Books are Out!)

Last October, I designed nineteen crafts for a book series that would accompany Leisure Arts' new Diamond Art Freestyle Program. The Freestyle Program is awesome. It takes everything you love about Diamond Art and lets you create your own designs on whatever surfaces you want. You can buy individual colors of gems (over 400 colors!), two types of adhesives that work on practically any surface, fabrics, tools, and accessories. The sky is the limit!

If you know exactly what you want to create, the Freestyle Program lets you jump right in and make it. If you need ideas, patterns, or templates, the accompanying books are fabulous. I designed four of the projects in the Paper Crafting book (including the rainbow card and the flower box on the cover) and fifteen of the projects in the Sparkle Holiday book (including everything on the cover except for the Christmas tree with the red background). In January, I got to see the mockups of those books during Creativation. It was so exciting! Now they are finally available for purchase.


I'd been planning to take photos of myself in a big box store holding my books as soon as they were released... but COVID-19 changed those plans. Fortunately, Leisure Arts shipped the Paper Crafting book to me. It's not the same as seeing it in the store, but it's still exciting.

Also exciting: Leisure Arts asked me to do the "Teach Me Tuesday" Facebook Live this afternoon! Join me at 2:00 PM Pacific (4:00 PM Central, where Leisure Arts is located) on the Leisure Arts Facebook page. I'll be showing off the book, and teaching you how to make some beginner projects using the two different types of adhesive on a variety of surfaces. I'll see you then!

2/12/20

Football Diamond Art

I'm not a sports fan, but Steve and all of my inlaws are rabid 49ers fans. They were thrilled that the 49ers were in the Super Bowl, but obviously not particularly happy about the outcome. Maybe next year! 

If you or someone in your life is a football fan, you're definitely going to want to check out the NFL series by Leisure Arts (affiliate link here and throughout the post). I used the 49ers kit, then framed it with a wood panel and poured paints by Plaid. 


I started by completing the Diamond Art kit, which was straightforward and relatively quick. The kit includes everything you need. Next, I cut out away the background fabric with my microtip scissors. I LOVE them. 


My goal in cutting away the background fabric was two-fold. First, I wanted to be able to fit the design in the square panel, and second, I wanted to have a less busy background. Cutting out the basic shapes was quick and easy. 


Cutting out the inner parts was not. It took a really, REALLY long time to carefully cut away all of the inner fabric using a sharp craft knife and a self-healing mat


Once everything was cut, I turned my attention to the frame. I mixed the pouring medium into Folk Art acrylics (yellow, red, and black) and drizzled them over the frame until I was happy with the marbling. Once the paint was dry, I added the cardstock and the Diamond Art pieces with Supertite.


Now that this is done, I'm looking forward to starting my next Diamond Art project. What to make though? I have a few kits I could start (including this one that I love), or I could do a freestyle design. So many options!

1/29/20

Framed Diamond Art Baseball Glove

When I saw that Leisure Arts had a Diamond Art baseball design, I knew it would make a great gift for my dad. The sparkly art is fantastic, but it really came together when I framed it. Actually, that's not technically a frame - read on to learn what I did! Affiliate links below. 


Framed Diamond Art Baseball Glove


Materials:


Steps:


Complete the Diamond Art, then carefully trim away the excess fabric.

Thin down the paint with water. You want a runny, ink-like consistency. Use a paper towel to rub the paint on the square panel, covering all surfaces. Let it dry. If you want a deeper color, repeat.

Cut the cardstock to fit inside the panel. Spread a thin coat of FabriTac on the inside of the frame and press the cardstock in place. Let it dry.

Spread a thin coat of FabrTac to the back of the Diamond Art. Center it on the cardstock.


---------


You can do this same thing with any Diamond Art designs. I'm working on a similar project using one of Leisure Arts' NFL designs. If you haven't tried Diamond Art yet, give it a try. It's definitely addictive!

12/4/19

Diamond Art Gingerbread Family

Remember the snowman family portrait on a pillow I shared recently? Similar concept, different holiday icon. Affiliate links below. 


Diamond Art Gingerbread Family


Materials:


Steps:


Drill holes in each gingerbread man's hands. Paint the gingerbread men and hearts Teddy Bear Brown.

Add white gems to the gingerbread people's face, arms, and legs using tacky glue. I used our family colors for the buttons.

Add white gems around the edge of the hearts. Thread the wire through the holes. I curled the ends of the wires around a toothpick.

Glue the hearts to the wire using Supertite. Alternately, you can drill holes through the hearts so that you can string them as well.


I thought about adding dates to the hearts: 5/30/04 for the heart connecting Gingerbread Steve and Gingerbread Cindy, then 6/07/06 for the heart connecting Gingerbread Cindy with Gingerbread Trevor. I love the idea, but at this scale it's not possible to do in a way that realistically mimics royal icing. I might go back and add it anyway. What do you think?

11/15/19

Diamond Art Scissors Hair Accessory

With my fabulously-organized stash of leftover Diamond Dotz, it's super easy to pull out exactly the colors I need to bedazzle just about anything. In this case, a pair of chipboard scissors.


But it's not just a pair of scissors - it's my new hair accessory, inspired by Fiskars beloved orange-handled scissors!


My original plan was to turn it into a necklace, but I already have a scissors necklace. Affiliate links below. 


---------

Diamond Art Scissors Hair Accessory


Materials:


Steps:


Paint the scissors (orange on the handles, silver on the blades). When the paint is dry, use craft glue to attach the dots to the scissors. Finally, use E-6000 to attach a bobby pin to the back of the scissors. Your masterpiece is ready to wear!


---------


You probably already know how awesome Fiskars scissors, trimmers, punches, and other craft tools are. But that's not all they make! Fiskars makes my favorite gardening tools as well. Check them out!