Showing posts with label smores. Show all posts

10/20/21

Dracula Smores

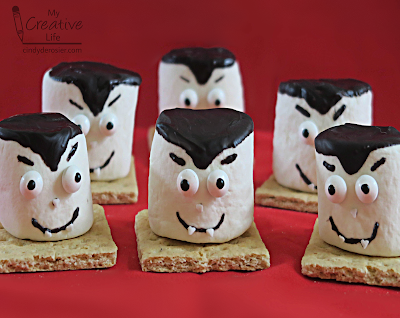
Smores aren't just for summer. Nor are they just for camping. They are just as appropriate indoors for Halloween. Evidence: 
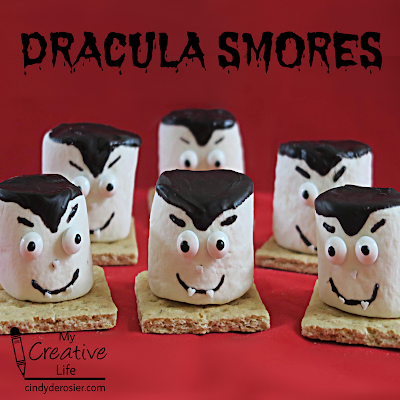

I had so much fun making these! They came out exactly how I'd hoped. Affiliate links and cooking suggestions below. 


Dracula Smores


Materials:


Steps: 


Prepare the Candy Melts according to the package directions. You'll need about 1.5 discs per finished smore. (I used 8 discs for 6 smores and it was just right.)

Dip the top of each marshmallow into the melted candy, then turn it to allow the candy to start to drip down one side to make Dracula's famous widow's peak. Stop the dripping by turning it upside down again. Within 20 seconds or so, it will firm up enough not to drip anymore. 


Use a toothpick to dab a small amount of melted candy to the back of the candy eyeballs and place them on the face. The dip the end of the toothpick in candy and press it to the marshmallow, just above the eyes, to make the eyebrows.


Use the toothpick to make a tiny dot for the nose and attach a white heart sprinkle. Draw a melted candy mouth with the toothpick and attach two heart sprinkles to make the fangs. I had to warm up the melted candy halfway through making my six Draculas. 

Place the Draculas on top of graham cracker halves. You can put a dollop of melted candy down first if you want them to stay in place. I didn't, because I wanted to experiment with cooking my smores. 


Experiment 1: Microwave. 

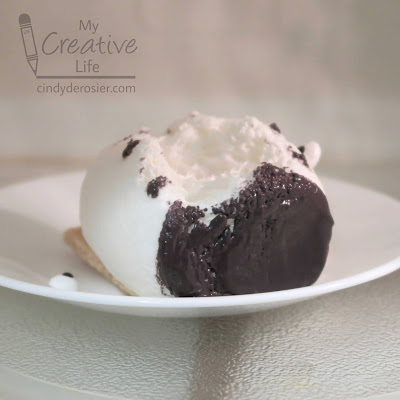
I set one smore on a plate and put it into the oven for 45 seconds at 50% power. As expected, it puffed up huge. I didn't not expect the eyeballs to pop off, nor for the face to basically melt away. 


Verdict: Quick, and easy, but with no browning it's missing most of what's good about smores. Not to mention, the end result is decidedly not adorable.  2/10


Experiment 2: Stovetop.
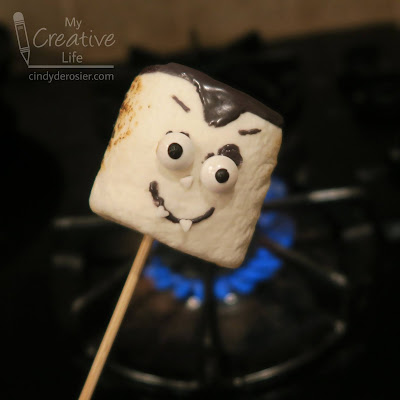
I poked a skewer into a Dracula and heated it over the stovetop, attempting to get a perfectly-golden toast while not letting anything drip or drop into the stove and make a huge mess.


Verdict: Not as quick and easy as the microwave, and definitely less safe. The eyes slid a bit despite my efforts to keep that side up. The back of the marshmallow got some nice browning and I was able to get some gooey melting going on.  5/10


Experiment 3: Toaster Oven. 

I must have been feeling confident, because I put two smores on foil into the toaster oven with the setting on TOAST. Within 30 seconds, their eyes started sliding downhill and their tops were bubbling...
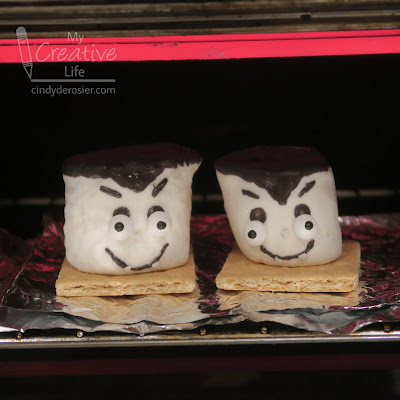

... so I took them out, laid them on their backs, and put the eyeballs back where they belonged. Then I slid them back into the toaster oven. 
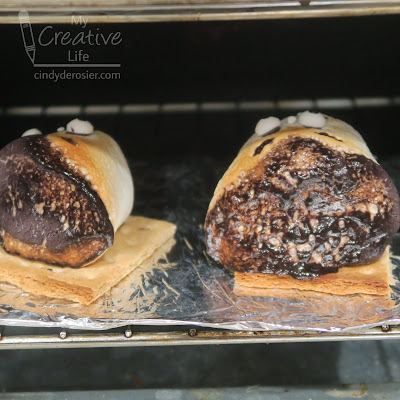

When their faces had a decent tan, I took them out and set them back up on their graham crackers. 


Verdict: This took more effort than the other methods, but it yielded the best browning and melting. I was concerned that the hair was burnt, but it wasn't. It tasted like the sugar on top of creme brulee and was nice and crackly. Yum! I think if I'd used white candy melts to attach the eyeballs, it wouldn't be as obvious that they're drooping in the finished Dracula. Next time.  7/10

Enjoy!

6/11/21

S'mores Pie

The idea of a s'mores pie popped into my brain a few weeks ago and I haven't been able to shake it. So I made one to share with friends. 


I started with a graham cracker crust, filled that with a layer of whipped ganache, and then added a sort of marshmallow cheesecake layer. 


I sprinkled marshmallows on top...


.... then used my heat gun to toast the marshmallows. We've found dozens of uses for the heat gun in the year and a half since I've had it, but this was the first time I used it for food. It worked like a charm!


It was good. Not amazing, but definitely good. The tang of the cheesecake layer was a bit out of place. And that layer was definitely out of proportion - way too much compared with the chocolate and graham cracker. The next time I make this, I might skip the cream cheese entirely. Ooh, maybe replace it with a marshmallow ice cream? And I want to add more graham cracker - maybe as a crumble beneath the top marshmallow layer.  We'll see. This recipe definitely has possibility. 

Here's the recipe as I made it. If you have other ideas for improving my pie, let me know in the comments!


---------


S'mores Pie


Graham cracker crust:
 
I used a store-bought graham cracker crust. Because we were taking this to a friend's house, I wanted to use a disposable pan so I could leave them the leftovers. When I make graham cracker crust from scratch, I combine a sleeve of graham crackers (crushed into crumbs) with 3 T. brown sugar and 6 T. melted butter. 

Ganache:

Heat 1/2 c. heavy cream for 45 seconds in the microwave. Add one 4 oz. bar of Ghiradelli 70% Cacao, chopped into small chunks. Let sit for 3 minutes, then stir until it is smooth. Put it in the refrigerator for 15 minutes to chill. 

Marshmallow cheesecake layer:

Whip 1 c. heavy cream. Set it aside. In a separate bowl, combine 8 oz. of cream cheese and 2 c. of mini marshmallows. Heat for 30 seconds in the microwave, stir, then heat for 30 more seconds. Whip for 2 minutes or until smooth and glossy. Fold in the whipped cream. 


Remove the ganache from the refrigerator. Without cleaning the beaters, whip the ganache until it has doubled in volume and lightened in color. Spoon the whipped ganache into the graham cracker crust. Spread it into an even layer that covers all of the crust. Spoon the cheesecake layer on top of the ganache layer. Refrigerate at least one hour or overnight. 

Sprinkle 1.5 c. mini marshmallows on top of the pie, then use the heat gun to heat them. The marshmallows will swell and brown. When they're evenly toasted, cut the pie into slices and serve. 

4/6/21

S'mores Campfire Treat Centerpiece

Out of the 2600+ blog posts I've written, my one about the World's Best Classroom Birthday Treat remains my most popular of all time. Today's project uses the same "recipe" to fill this cute campfire treat centerpiece. Affiliate links below. 


S'mores Campfire Treat Centerpiece


Materials:


Steps: 


Cut 7 teardrop shapes of various sizes from the yellow cardstock to make the flames of the campfire. Shade the edges with orange color pencil. 

Cut 5 cylinders from brown cardstock. Use a dark brown color pencil to draw concentric circles on the ends to mimic the cut ends of logs. Draw knots and bark lines randomly along the length of the cylinders. Switch to a brownish-red pencil and draw more bark lines, then again with light brown. 

Glue the logs together with craft glue, then add flames behind them. Use the tape runner to apply adhesive to the bottom of the display case, then press the campfire against it. 

Add spots of adhesive to the top of the display case. Pull bits of cotton from a cotton ball, separating them until they are whispy. Stick the cotton to the adhesive to mimic the look of smoke. Continue until the top is mostly covered. In this picture, you can see that I've covered the top already and have a large pile of cotton left over. All of that is from a single cotton ball. 


Prepare the s'mores trail mix


Fill the display case with trail mix. Sprinkle additional trail mix on the clean tables around the display cases so that hungry guests don't destroy your centerpieces.  


This would be a really fun activity for a Cub Scout Blue & Gold or other Scouting event, as well as for a camping-themed birthday party.