Showing posts with label Wilton. Show all posts

3/18/26

Jigsaw Puzzle Party

I threw myself a birthday party on Saturday. The theme was one of my favorite things: jigsaw puzzles!


To make my party hat, I started by coloring old puzzle pieces with Apple Barrel paint pens (affiliate links here and below). When they were dry, I coiled Twisteezwire in corresponding colors around each piece, then threaded the wire into a blue party hat. I secured the ends with masking tape. I used a Sharpie to write 54 on another puzzle piece and glued it to the front of the hat. 

Here's what the party invitation looked like. I had so much fun designing it! (I used PicMonkey, of course.)


I wore my puzzle piece necklace. It's from Springbok. I got mine for free awhile back for joining their loyalty club. I don't know that they do that anymore; probably not, since they're selling it now. 


So what do you do at a puzzle party? Puzzles, of course! We solved a neon 80's themed puzzle and a chocolate mystery puzzle. 


We made crafts using puzzle pieces. 


We played Puzzle Trivia (I'll share that tomorrow). And we played multiple rounds of Puzzle Chess. 


If you're not familiar with Puzzle Chess, I highly recommend it! We used a 48-piece puzzle; you can play with a puzzle up to about 100 pieces. Someone who is not competing completes the border and turns all the pieces face up. The contestants sit across from each other with a chess clock beside the puzzle. Start the clock, then the first player puts in a piece and hits the clock. The second player does the same. When the last piece goes in, the person with the least amount of time on their clock is the winner. It's really fun!

In between it all, we grazed. I love charcuterie boards for parties. They're so much fun to put together and everyone can grab what they like. Check out the puzzle piece candies!


I used the Celebrate It! Puzzle Piece silicone mold, sold by Michaels. I'm so frustrated that they don't sell it anymore, because it is AWESOME. As you can see, the finished candies actually interlock properly like puzzle pieces should. To make the candies, I prepared Wilton Candy Melts and added a drop of different LorAnn flavorings to each of the different colors before molding them. I didn't match the colors with the flavors logically (for example, purple was green apple), which left my guests a bit -ahem- puzzled.  

I had such a good time at the party! Thanks to my friends for helping make it so fun. If you're a jigsaw puzzle fanatic, I highly recommend throwing a puzzle-themed party of your own. 

1/15/24

Olympic Rings Treat on a Stick

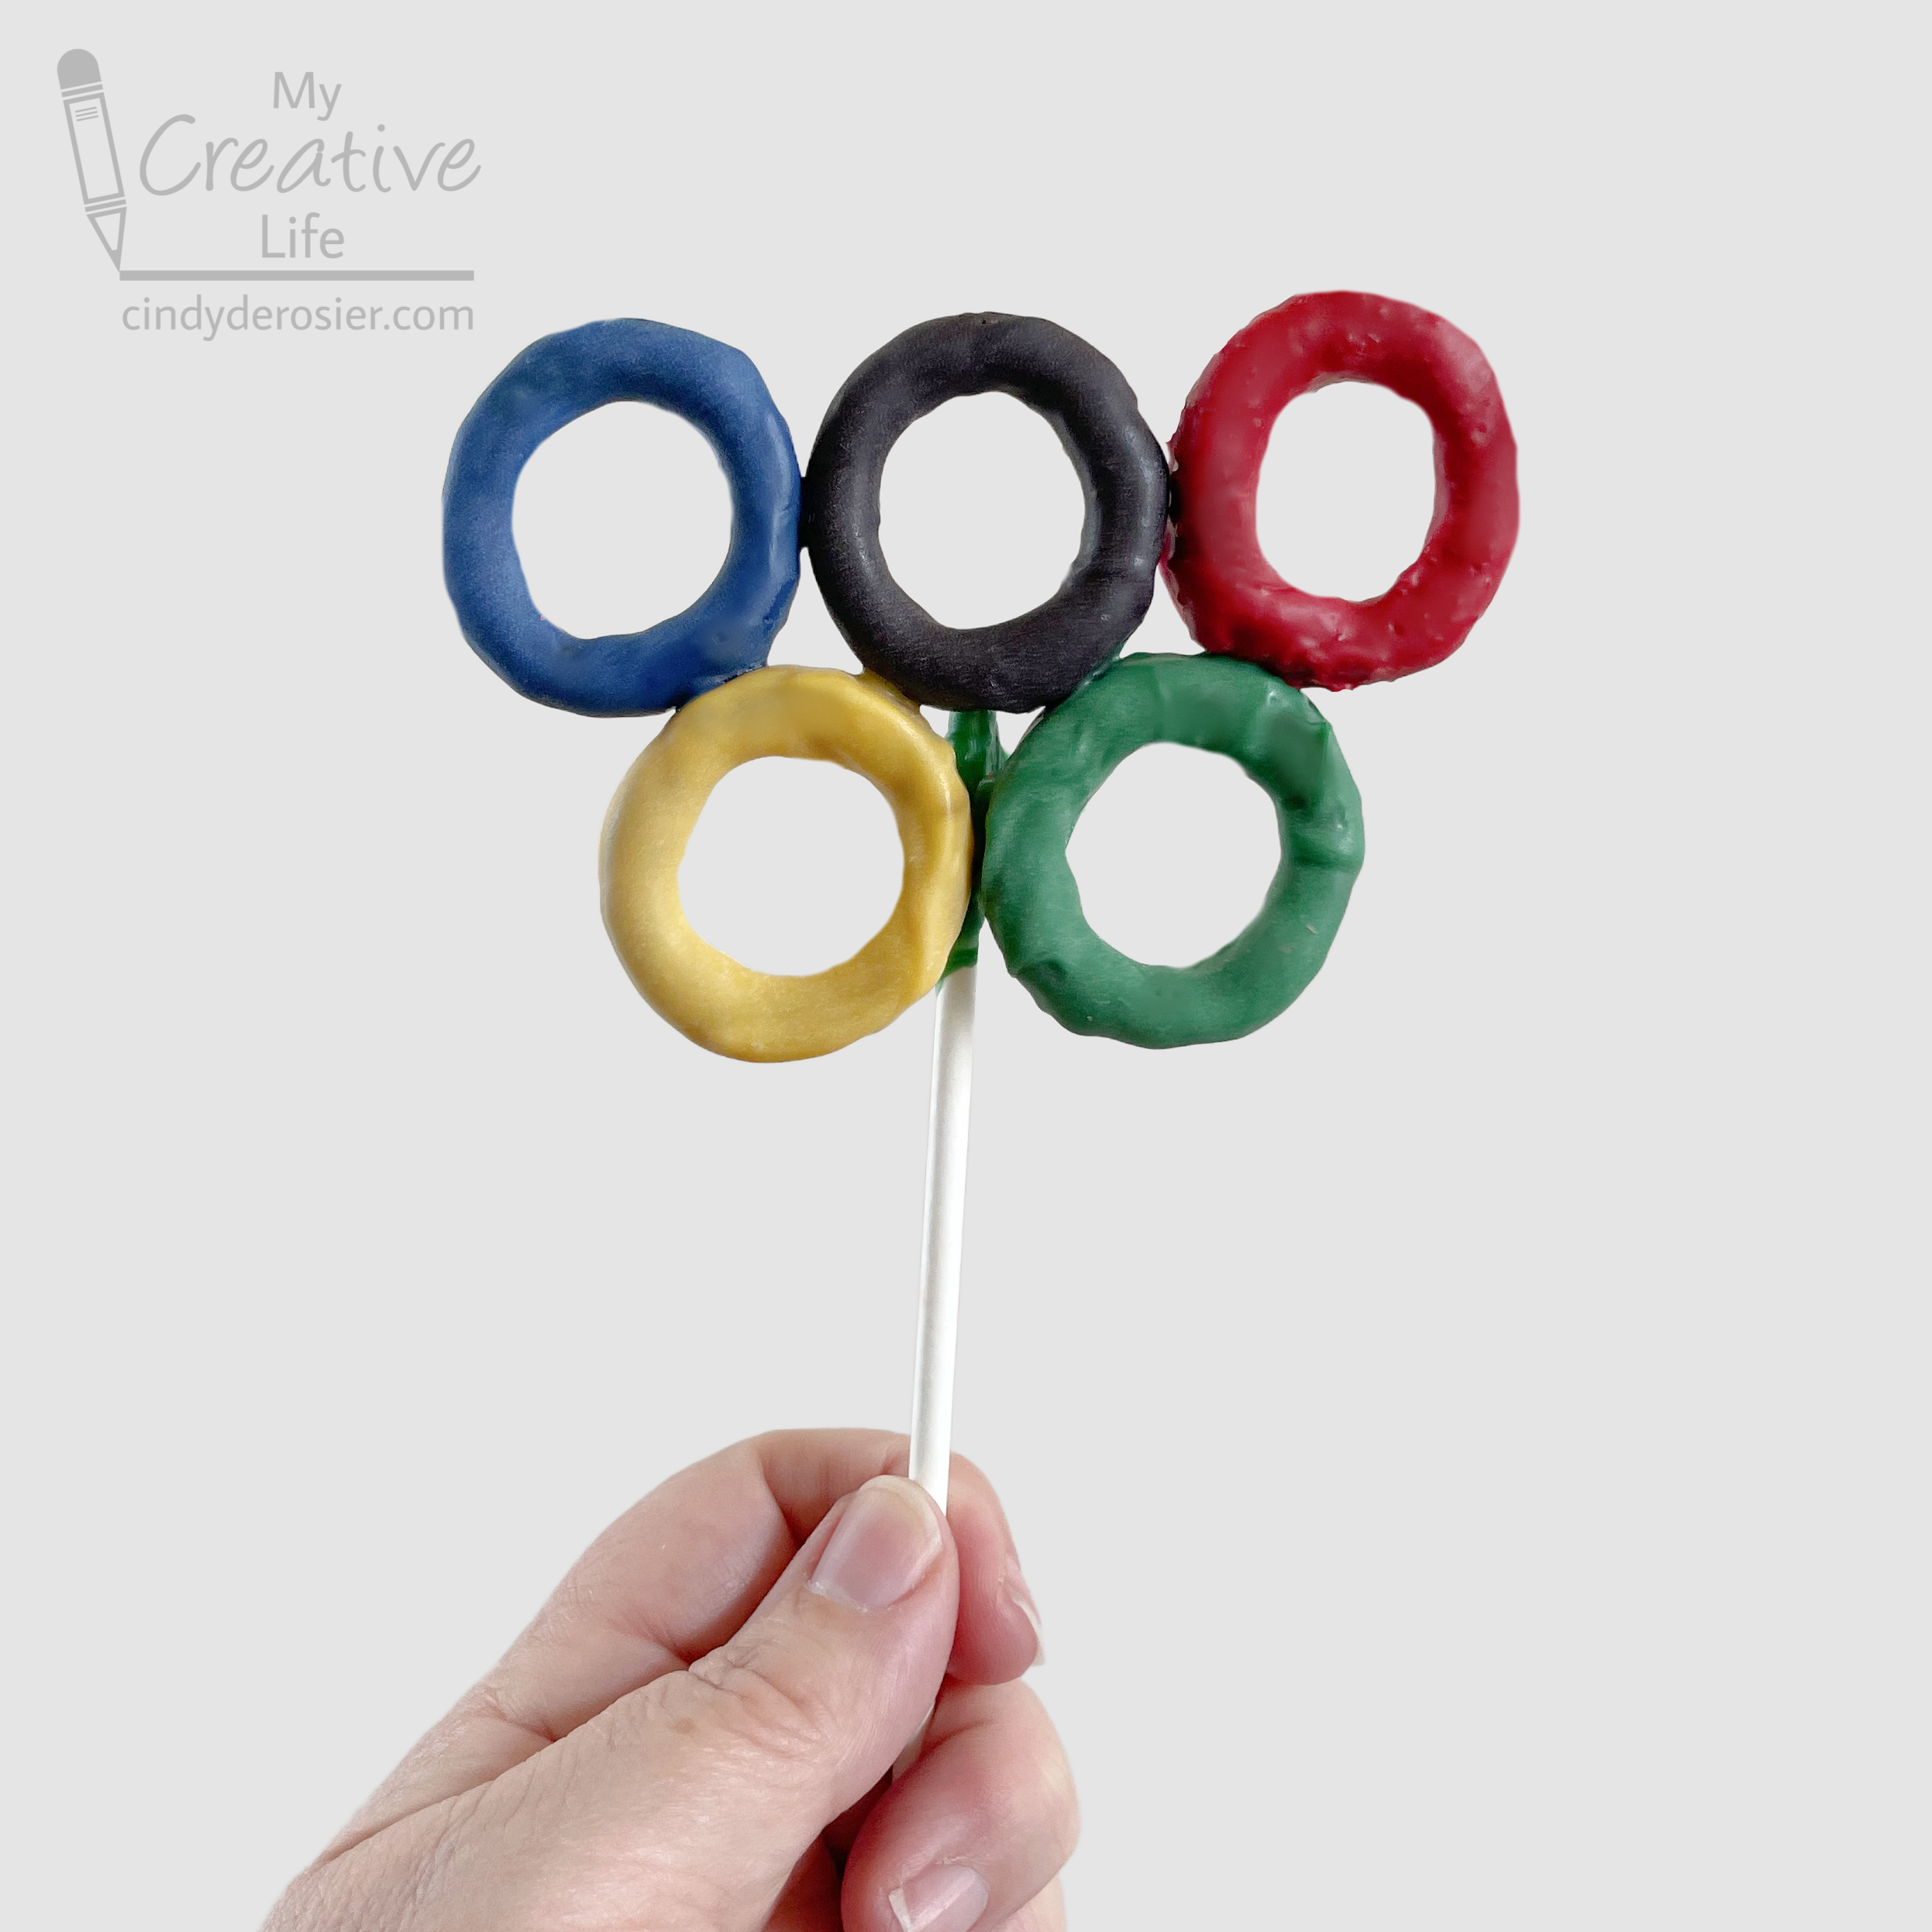
Back in December when I spotted round pretzels at the store, my first thought was "Olympic rings!" I ended up using them to make an edible Christmas wreath first, but now I made my rings. Affiliate links below. 


Edible Olympic Rings on a Stick


Materials: 


Steps: 


Working with one color at a time, prepare the Candy Melts according to the package directions. Dip a pretzel and allow the extra to drip off, then set it onto a sheet of parchment. Repeat the process until you have blue, black, red, yellow, and green rings. Let the candy set.

Arrange the rings in order on a clean sheet of parchment paper. You can line up your pretzels next to each other, or with 'interlocking' rings like I did on the bottom left. I used broken pretzel pieces to prop up the blue, black, and red rings on top of the yellow and green ones. In the end, the side-by-side rings were easier to make and stayed together better. 

Light the candle and place it nearby. 


Connect the rings by holding a blue pretzel over the candle for a second or two. Replace it on the parchment, pressing gently against the black and yellow rings. 


Melt the green ring and press it against the yellow and black rings. Finally, melt the red ring and press it against the black and green rings. 

When the joints are solid (about 5 minutes, depending on the temperature), flip the joined rings upside down. Melt some white candy and dip the end of a lollipop stick in it, then press it behind the black, yellow, and green rings. Do as I say and not as I do: I used green candy and it shows through. 


If you're looking for other Olympics crafts, I have a bunch! You can also find ideas for crafts inspired by many of the summer and winter events among my Sports Crafts for Kids. Enjoy!

12/12/23

Edible Christmas Wreath

Three years ago, I shared an edible Advent wreath that was super fun to make and turned out really cute. Today's craft is another wreath. But this time it's a Christmas wreath and it's made from different items. See if you can guess what I used, then scroll down to find out! Affiliate links below. 


Edible Christmas Wreath


Materials:


Steps: 


Cover your work surface with parchment paper, then melt the Dark Green Candy Melts following the instructions on the package. 

Coat a pretzel ring with candy, then use the skewer to set it on the parchment. Sprinkle some nonpareils onto the pretzel, then add sugar sprinkles. If you have a partner to do this, that is very helpful. Working alone, I dipped three pretzels before doing the sprinkles for each. (By the way, you can make your own colored - and flavored - sanding sugar very easily.)


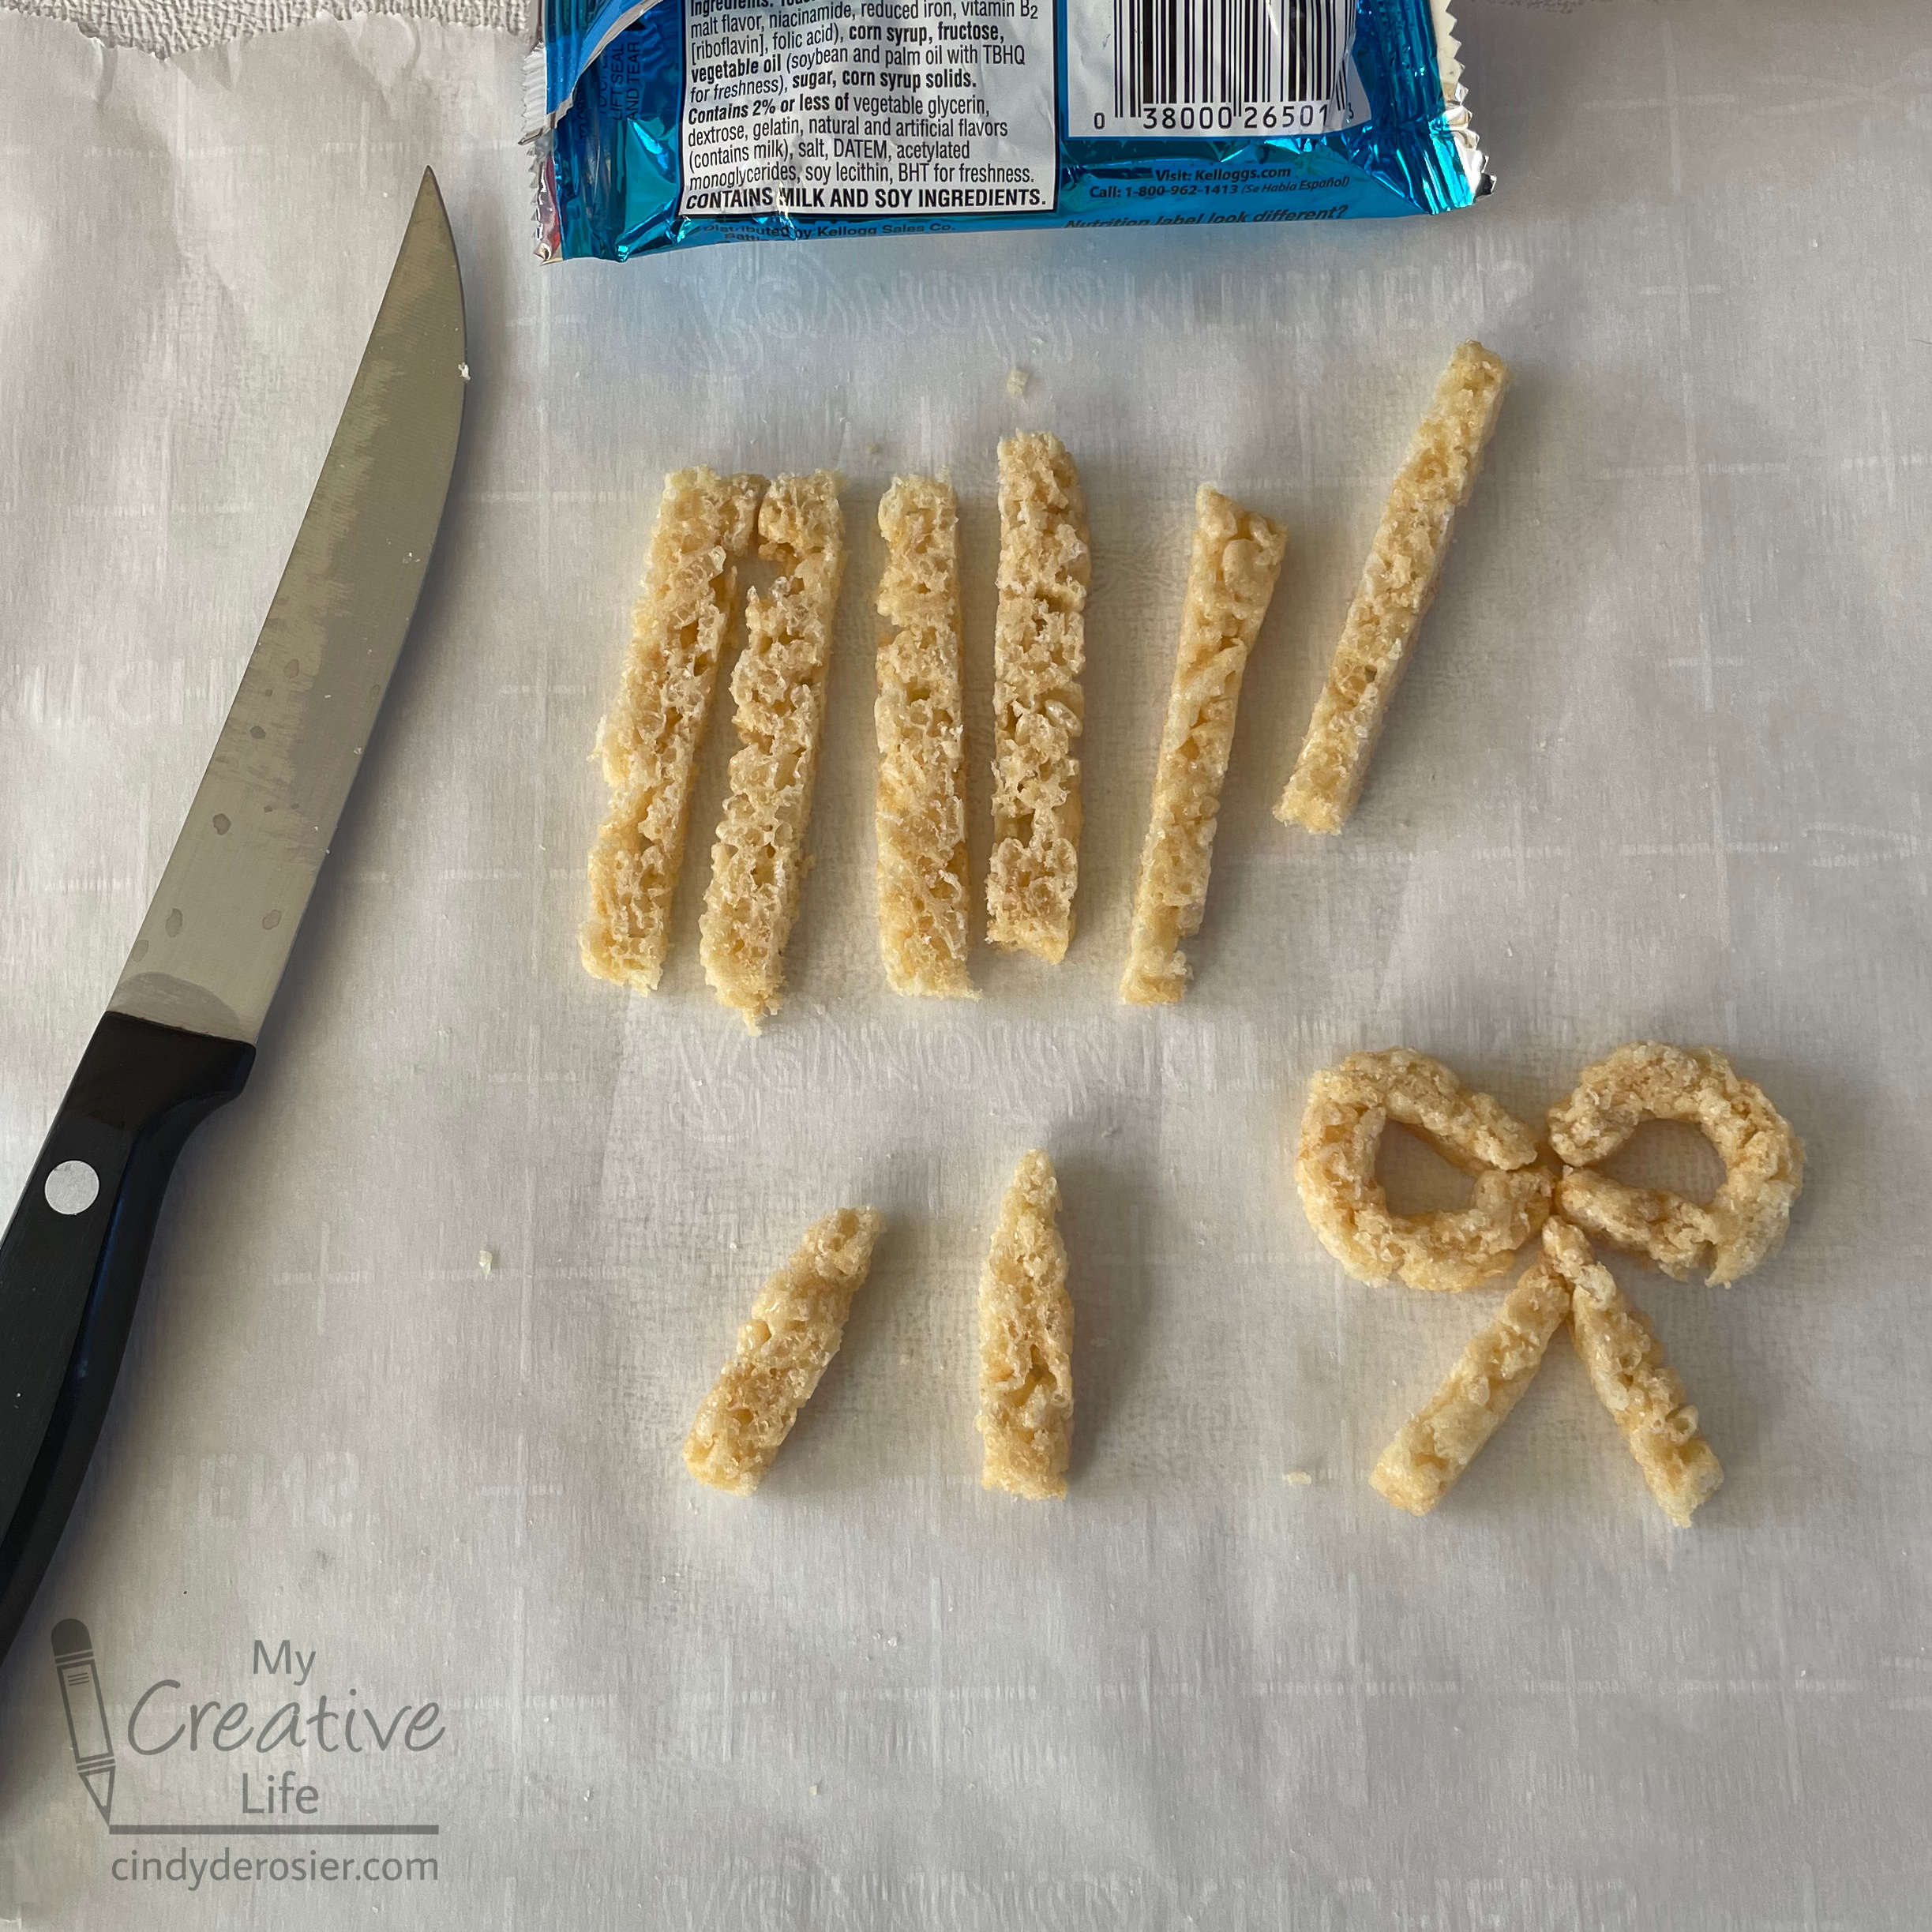
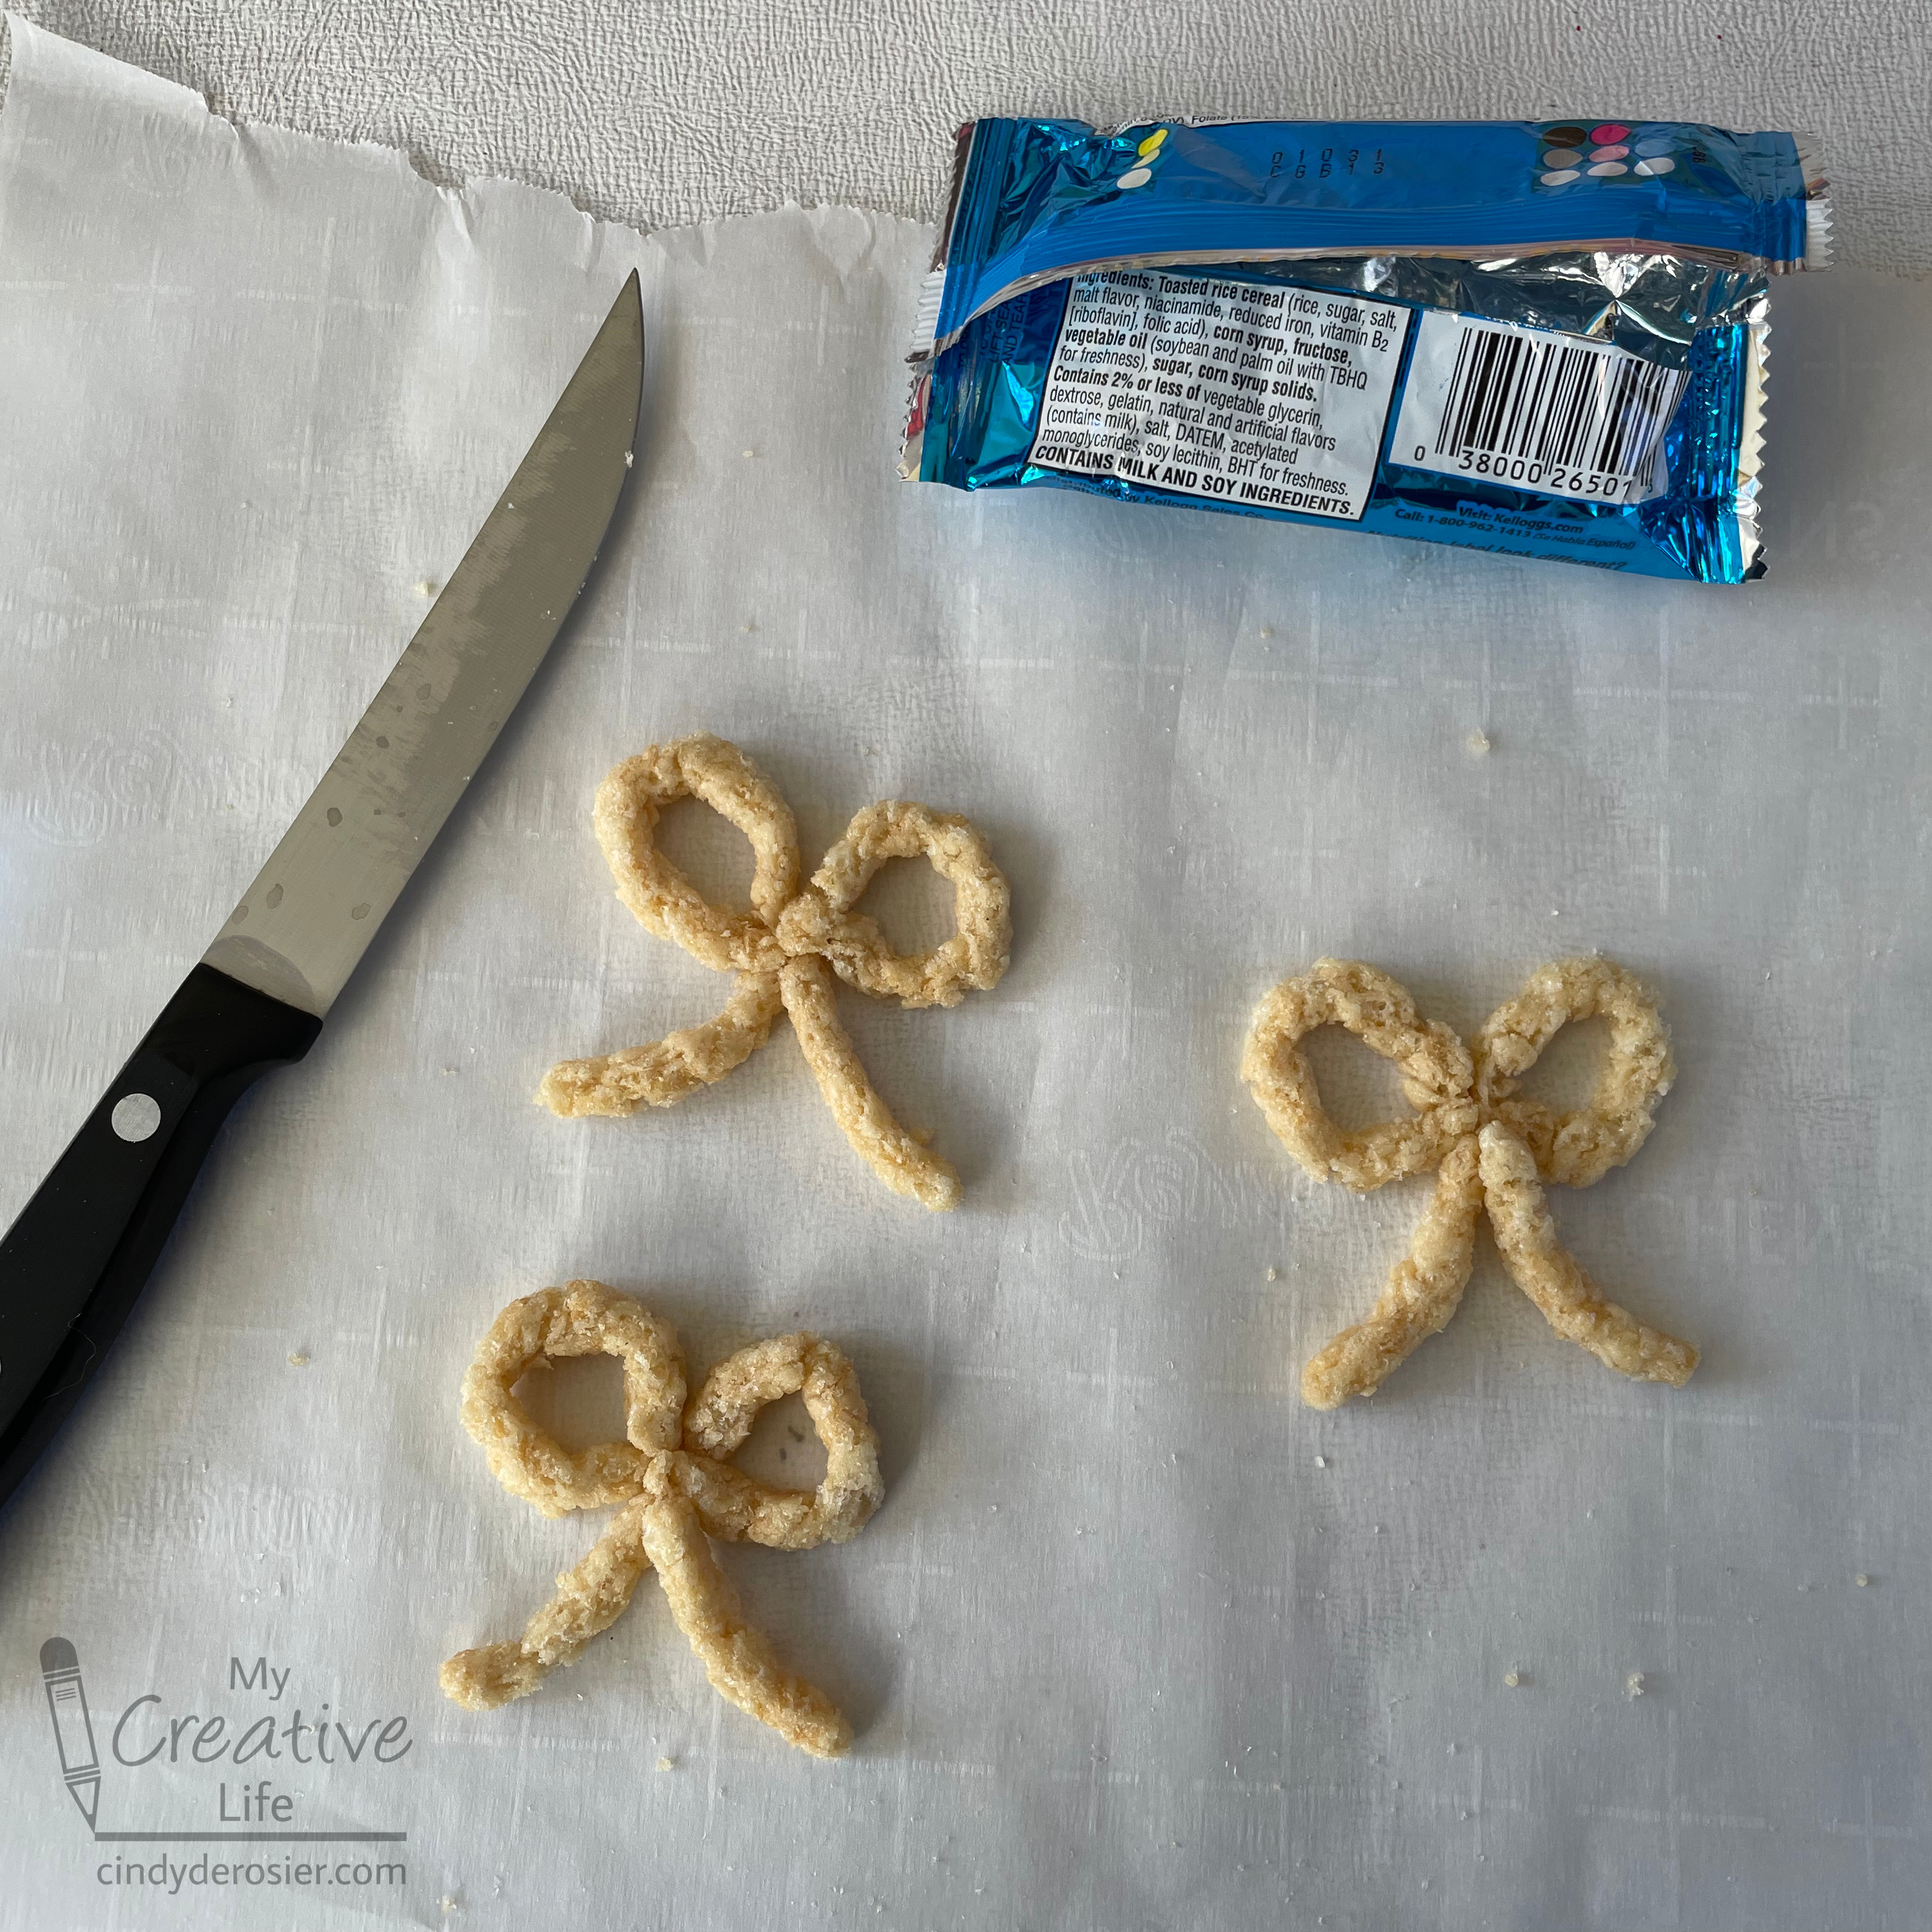
While the mini wreaths are hardening, use a sharp knife to cut a Rice Krispie Treat into thin slices. Use these to make a bow. I took three strips of the same length, curved two to make the loops of the bow, then cut the third in half to make the tails. 


Once you have the basic shape, smoosh the parts together. Then curl the ends slightly. 


Melt the Red Candy Melts, following the instructions on the package. I tried multiple techniques for coating the bows. What worked best was to pour the candy over a bow while it is flat on the parchment paper, then pick it up with skewers, briefly hold it vertically, then set it down on a clean area of the parchment. As soon as you set it down, add the red sprinkles. 

Coat Kix with the melted candy, then place them on the parchment in clumps of three. 

When everything is set, it's time to assemble. You have two choices: either keep everything separate for easy eating (people can grab a single pretzel or two from the wreath) or adhere everything together. I chose the former. The only difference is that you will need melted candy "mortar" to act as glue between everything. 

Arrange one layer of pretzels on a plate (mortar optional), then add three more layers, off-setting each layer from the previous one. Add the Kix-clusters and the bow. 


So how does it taste? Fantastic! A thin candy coating adds just the right amount of sweetness to the salty pretzels. This showstopper will be a hit at any Christmas celebration. 

10/14/22

Vampire Fang Treat Bags

If you're one of those weirdos who hates candy corn, or if you can't get behind the idea of candy-coated candy, today's craft isn't for you. Feel free to check out my other Halloween craft ideas

Still with me? Good! Because if you think adding a candy coating to candy is fine, you're probably also fine with giving out edible bloody vampire teeth on Halloween. You're my kind of people. Affiliate links below. 


Vampire Fang Treat Bags


Materials:


Steps: 


Melt the white candy according to the package instructions. Coat the candy corn with the melted candy and let the excess drip off, then set it on a piece of parchment paper. 


When the candy is completely set, melt a small amount of red candy and dip just the tips. Allow the candy to set completely. Put about 12 fangs into each treat bag, then set them aside. 

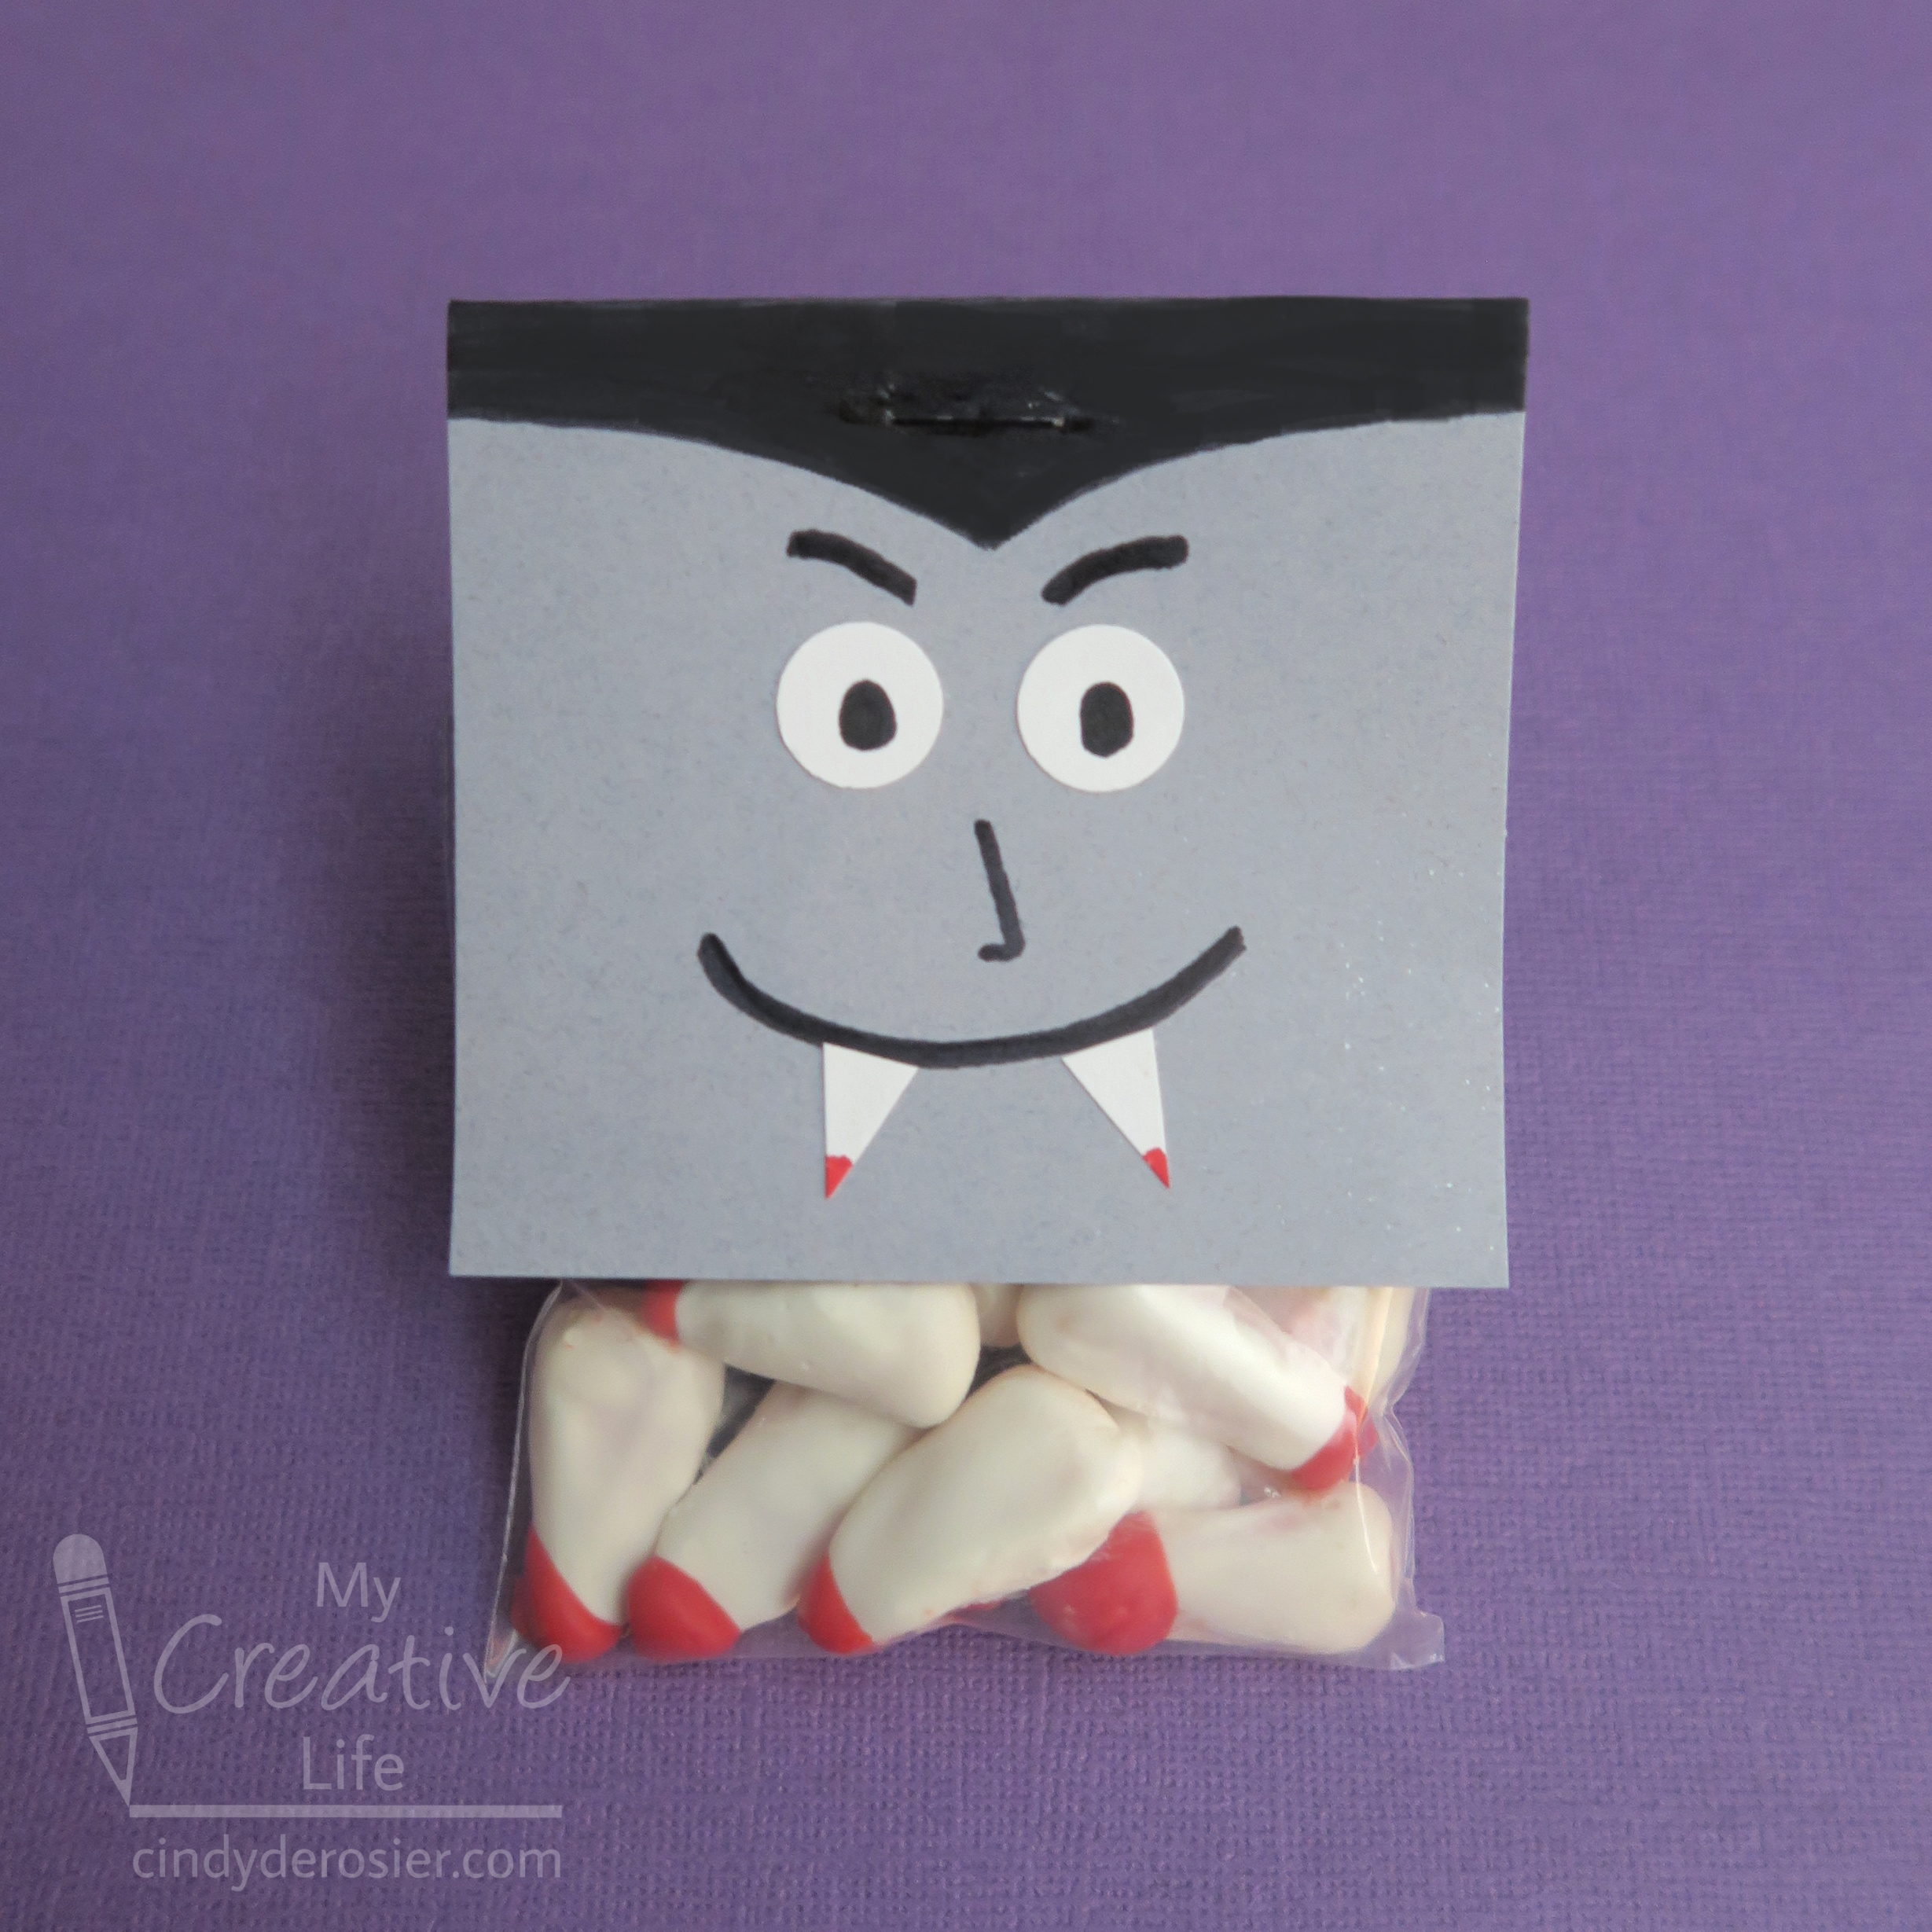
Cut one 3" x 6" rectangle for each vampire you're making. Fold the paper in half so that the face is a 3" x 3" square. Punch two eyes from the white cardstock, then cut out two tiny triangular fangs. Use the black pen to draw the vampire's widow's peak, using the fold line as a guide. Draw pupils on the eyes. Add a tiny bit of red to the ends of the fangs.


Glue the eyes to the face, then draw eyebrows, a nose, and a smile with the black pen. Glue the fangs in place. Staple the treat toppers to the bags of candy fangs and you're ready to dispense your candy-covered candy.

If you need another idea for an edible vampire craft, be sure to check out my Dracula Smores!

9/29/22

Cinnamon Spice Caramel Apple Popcorn with Felt Apple Tag

Tis the season for Pumpkin Spice Everything, but personally I don't get it. Pumpkin is fine, but for me fall is all about apples. Apples are sweet, sometimes tart, crisp, and full of flavor. They are delicious on their own, as juice or cider, mashed up as applesauce, baked with savory dishes (like pork), and excellent in desserts of all sorts. I like squash (though pumpkin is not even one of the best squashes), but there's no comparison. Virtually everyone agrees that Apple > Pumpkin. Spices definitely improve pumpkin, but I firmly believe Apple Spice > Pumpkin Spice. Don't even try to argue. 

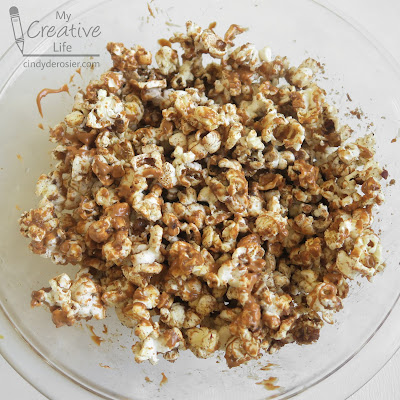
If you're tempted to argue, make some cinnamon spice caramel apple popcorn first. Then get back to me and tell me that pumpkin spice is better than apple spice. Affiliate links below. 


Cinnamon Spice Caramel Apple Popcorn

  
Ingredients:                                                           


Steps: 


There is no right or wrong when making your own flavored popcorns. It's not like baking a cake where chemical reactions mean that quantities matter. You can add more or less of any ingredient. I was hesitant to even put quantities above, as I didn't measure when I was making mine. Those are my best guesses. 

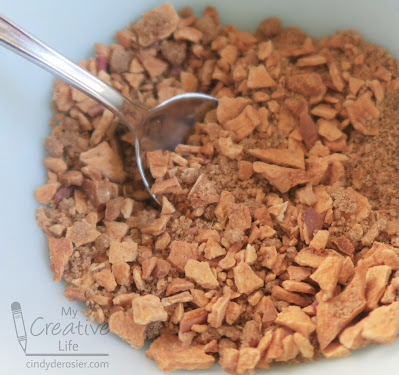
Start by crushing some crisp dried apples until about half of the apples are powder and the rest is pea-sized bits. Stir in some brown sugar and cinnamon, then add a dash of nutmeg. Mix thoroughly. 


Pop and generously butter approximately 10 cups of popcorn. Immediately pour the apple mixture over the popcorn and stir well. Some of the apple mixture will remain at the bottom of the bowl instead of stuck to the popcorn, but that's not a problem. 

Follow the directions to melt the Salted Caramel Candy Melts. Drizzle half of the melted candy over the popcorn and immediately stir well. Repeat with the remaining candy. Most of the apple mixture should now be stuck to the popcorn. 


If you eat the popcorn immediately, the tiny apple bits are still crispy. If you let the popcorn sit for a while, or bag it up, the apple bits will soften, but remain equally delicious. 

I made a cute felt apple tag to label my bagged popcorn. It's a quick and easy project. 

-------


Felt Apple Tag


Materials: 


Steps: 

Cut out an apple from the red felt, using pinking sheers. Cut the leaves and stem from green felt with regular scissors. Apply green Stickles to the leaves and set them aside to dry. 

Use two strands of black embroidery floss to backstitch a smile and two eyebrows.

Cut a piece of red cardstock that is slightly smaller than the felt apple. Glue it to the back of the apple, covering the knots from your stitching. Write a message to your recipient. 

Glue the googly eyes and the leaves to the front of the apple. 

6/3/22

Dried Pasta Coral Snake

Remember how I said I hadn't shared a single dried pasta craft in 11+ years of blogging? Time to change that! But what to make? When I design crafts, I try to fill gaps. The world doesn't need more tutorials for macaroni necklaces or pasta snowflakes. We don't need another explanation of how to dye pasta. We do need more realistic reptile crafts. So I decided to try to make a banded snake using a different method for coloring pasta than either dip-to-dye or brushing on acrylic paint. 

After a lot of experimentation, I came up with a pasta version of an Eastern Coral Snake. 
 

The first step was picking my pasta. I wanted my snake to have realistic curves, so elbow macaroni was out because the bends are too sharp. My next thought was rigatoni. Maybe I could cook the dried pasta, shape it with a gentle curve, then let it dry that way? We were out of rigatoni, so I used penne. In retrospect, I should have waited for rigatoni. Since penne is cut on the bias, I really struggled with gluing the pieces together without leaving gaps. But I'm getting ahead of myself. 

I boiled a bunch of penne, dried it off (not carefully enough, as it turns out) and put it on parchment paper. Then I dipped a wet paintbrush into food dye and painted the middle third of some penne. I made some black and some red. You can see some of the red ones in the bottom right where the dye ran up the ridges because I hadn't dried it off sufficiently. I gently bent about half of the pieces, hoping that when I left them to dry, they'd retain a gentle bend. Answer: not really. 


I cooked more penne and bent the warm pieces into demitasse cups. I left them to dry, hoping they'd retain the bends. Success!  


I painted the curved pieces with food dye, then used yellow food dye to color the ends. Then I did my best to fit the pieces together, the diagonal edges of the penne fighting me all the way. When I found an arrangement I liked, I glued it to a piece of background paper and added the label. (I'd thought about nestling it in a bed of tomato sauce instead of using glue on paper, because until I added glue, the pasta was edible... if cold and a bit crunchy.) Since making my snake, I've thought of a bunch of things I'd do differently if I made it again. I may or may not do some future experimentation for pasta snakes. 

One more thing I want to share: in researching coral snakes, I came across this interesting article about the famous rhyme. Since I'm not in the habit of touching snakes in the wild and I don't kill snakes, it doesn't really matter to me whether the rhyme holds true 100% of the time. 


4/26/22

Candy Cardinals

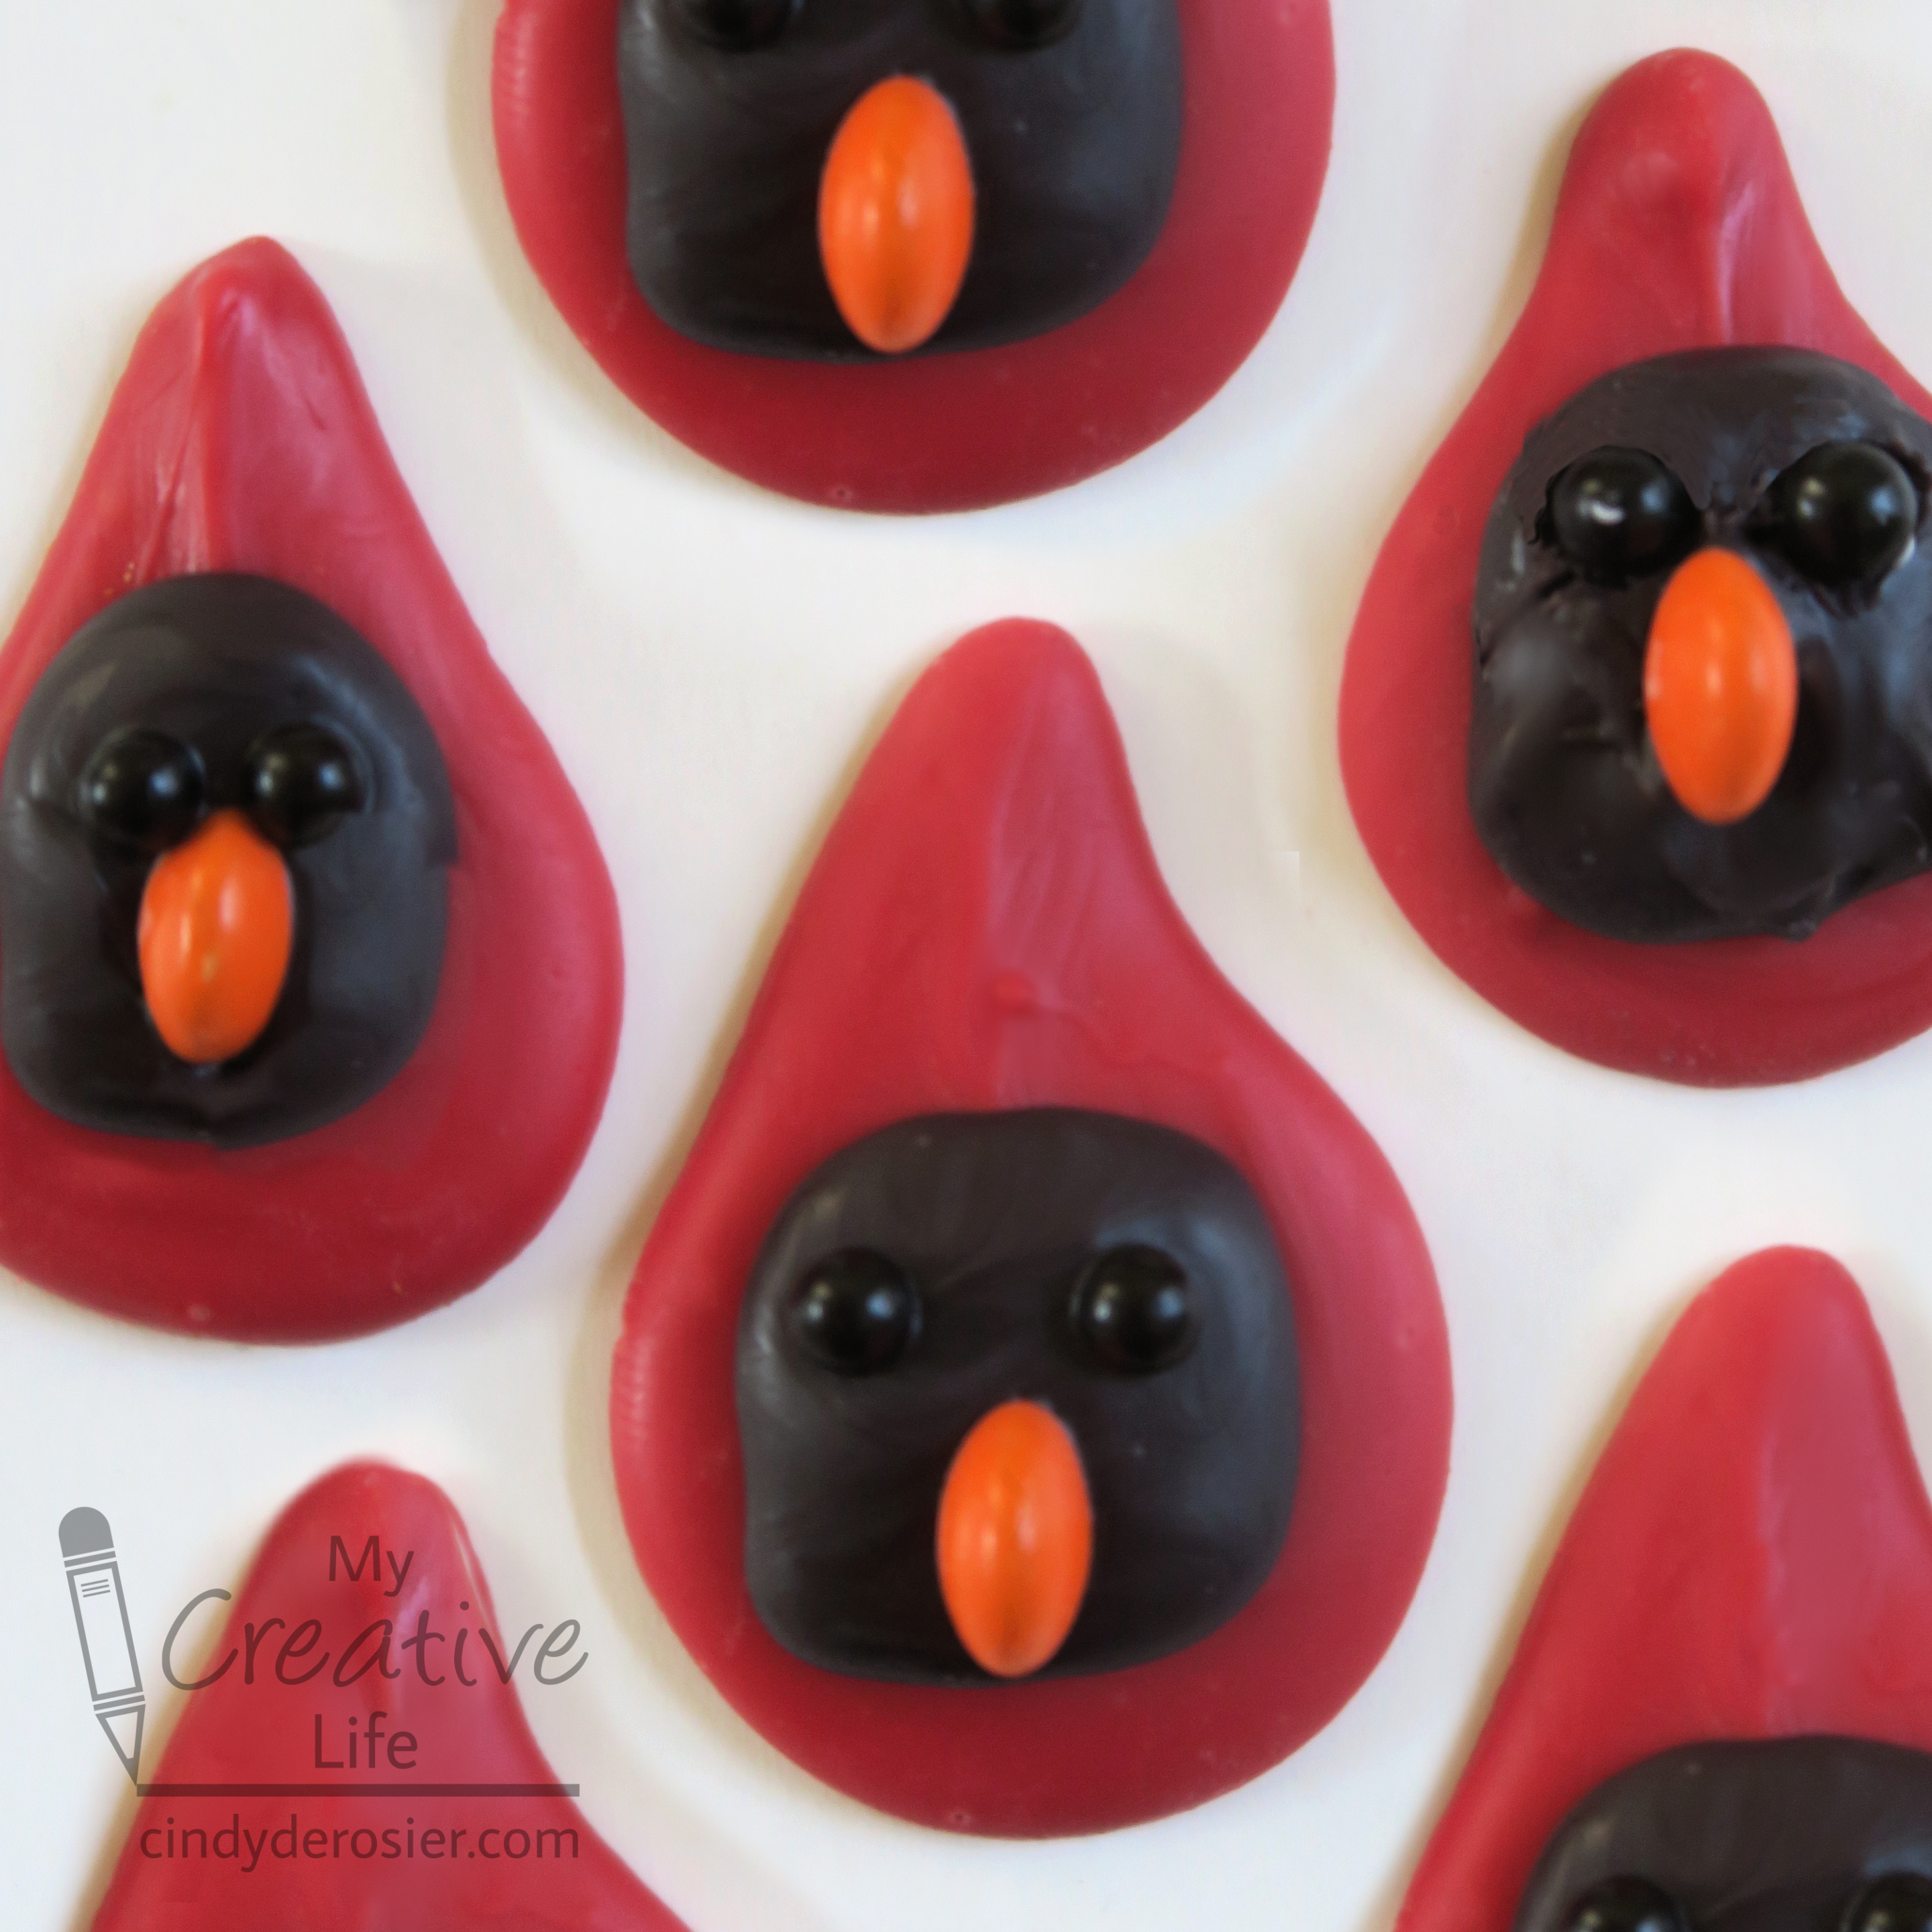
I had some extra black Candy Melts and black Sugar Pearls sitting out after I finished making the Pretzel Raccoons, so I used them to make Candy Cardinals. Can you tell what I used to make the beaks? Affiliate links below.   


Candy Cardinals


Materials:


Steps:


Melt the red candy according to the instructions on the package. Use a spoon to put a dollop of melted candy onto parchment paper, shaping it into the teardrop that makes the cardinal's head. While the candy sets, use a sharp knife to cut orange M&Ms in half. Press straight down firmly; they'll cut without shattering. 

Melt the black candy, then put a dollop onto the head to make the cardinal's face. Place two black sugar pearls and half an M&M onto the black candy to make the eyes and beak. Let the candy set completely, then peel it up from the parchment paper. 

---------


Looking for another cardinal project? I love this tissue paper cardinal craft! The cardinal is the state bird of Illinois, Indiana, Kentucky, North Carolina, Ohio, Virginia, and West Virginia, so it's an especially great choice to make if you live in one of those states. 

4/22/22

Pretzel Raccoon Craft

If you've been searching high and low for an edible raccoon craft, I have good news.


I was sketching a pretzel (as one does) when I noticed that the little nubs at the ends of the arms (do pretzels have arms?) looked like ears. So I dropped what I was was doing and made some raccoons. You'll notice I experimented with different ways to make whiskers on two of them and left the whiskers off the others. I prefer the no whiskers, while Steve says the white whiskers are best. Rather than a tutorial with one or the other, you get both. Affiliate links below. 


Edible Pretzel Raccoons


Materials:


Steps: 


Follow the instructions on the package to prepare the Candy Melts. I used 10 white discs and 3 black to make grey. Dip each pretzel in the melted candy, then transfer it to a sheet of parchment paper. Fill the holes of the pretzel with more melted candy. If the ears aren't prominent, add a little extra candy to emphasize them. Let the candy set. 


Follow the package directions to melt the black candy. Dip the scribe tool into the black, then lay it across the face (angled downward) to make one side of the raccoon's mask. Add a white pearl eye, the repeat on the other side of the face. 


Use more black to color the inner ears. 

If you want to make whiskers, do it now. For the white whiskers, I tried to use the same technique as with the marshmallow bunnies, but it didn't really work (since the marshmallow was convex and the pretzel surface concave), so I just drew them on. I used a clean scribe tool to etch whiskers from the solid grey, but it was really hard to get clean lines. Ultimately, I decided I preferred the raccoons whiskerless. Your call. 

Put a tiny amount of black candy onto the scribe tool, then touch it to the white sugar pearls to add pupils to the eyes. Add a dot at the bottom of the face to adhere the black sugar pearl nose. 

---------


If you're looking for more raccoon crafts, I have two others: a cardboard tube raccoon, inspired by The Kissing Hand, and a Valentine's Day raccoon that you could make with any box of treats, not just conversation hearts. 

Fun Fact: Tennessee named the raccoon its official state wild animal in 1971. 

3/30/22

Bunny Week 2022: Marshmallow Bunnies

If this group of marshmallow bunnies doesn't make you smile, I don't know what will! These were so much fun to make. I'm particularly pleased with how the whiskers came out. That was a spontaneous addition and I think they make a big difference. Give them a try! Affiliate links below. 


Marshmallow Bunnies


Materials: 


Steps: 


Draw a pair of rabbit ears on a piece of scratch paper. You'll be using this as a guide to keep the ears in proportion with the marshmallow. 


Slide the ear sketch under a piece of parchment paper, then prepare the pink and white Candy Melts following the instructions on the packages. 

Spoon the white candy onto the parchment paper so that it fills the pattern you made for the ears. Immediately use the scribe tool to drizzle a thin line of pink candy on top of the white candy to make the iner ears. Fix any stray bits or lumps with the scribe tool. I found it easiest to keep two scribe tools handy (one for each color). 

Carefully slide the parchment paper over so that the pattern is under a clean area. Repeat the steps to make the next set of ears. Continue until you have all the sets of ears you'll need. Set them aside to harden completely. 


Use the Food Writer to draw mouths on each marshmallow. Pick out enough pink and black confetti sprinkles to give each bunny two eyes and one nose. 


Remelt the white candy. Dip the scribe tool into the melted white candy and use it to draw whiskers onto each bunny. Then add dots of melted candy to adhere the black sprinkle eyes and pink sprinkle nose in place. 


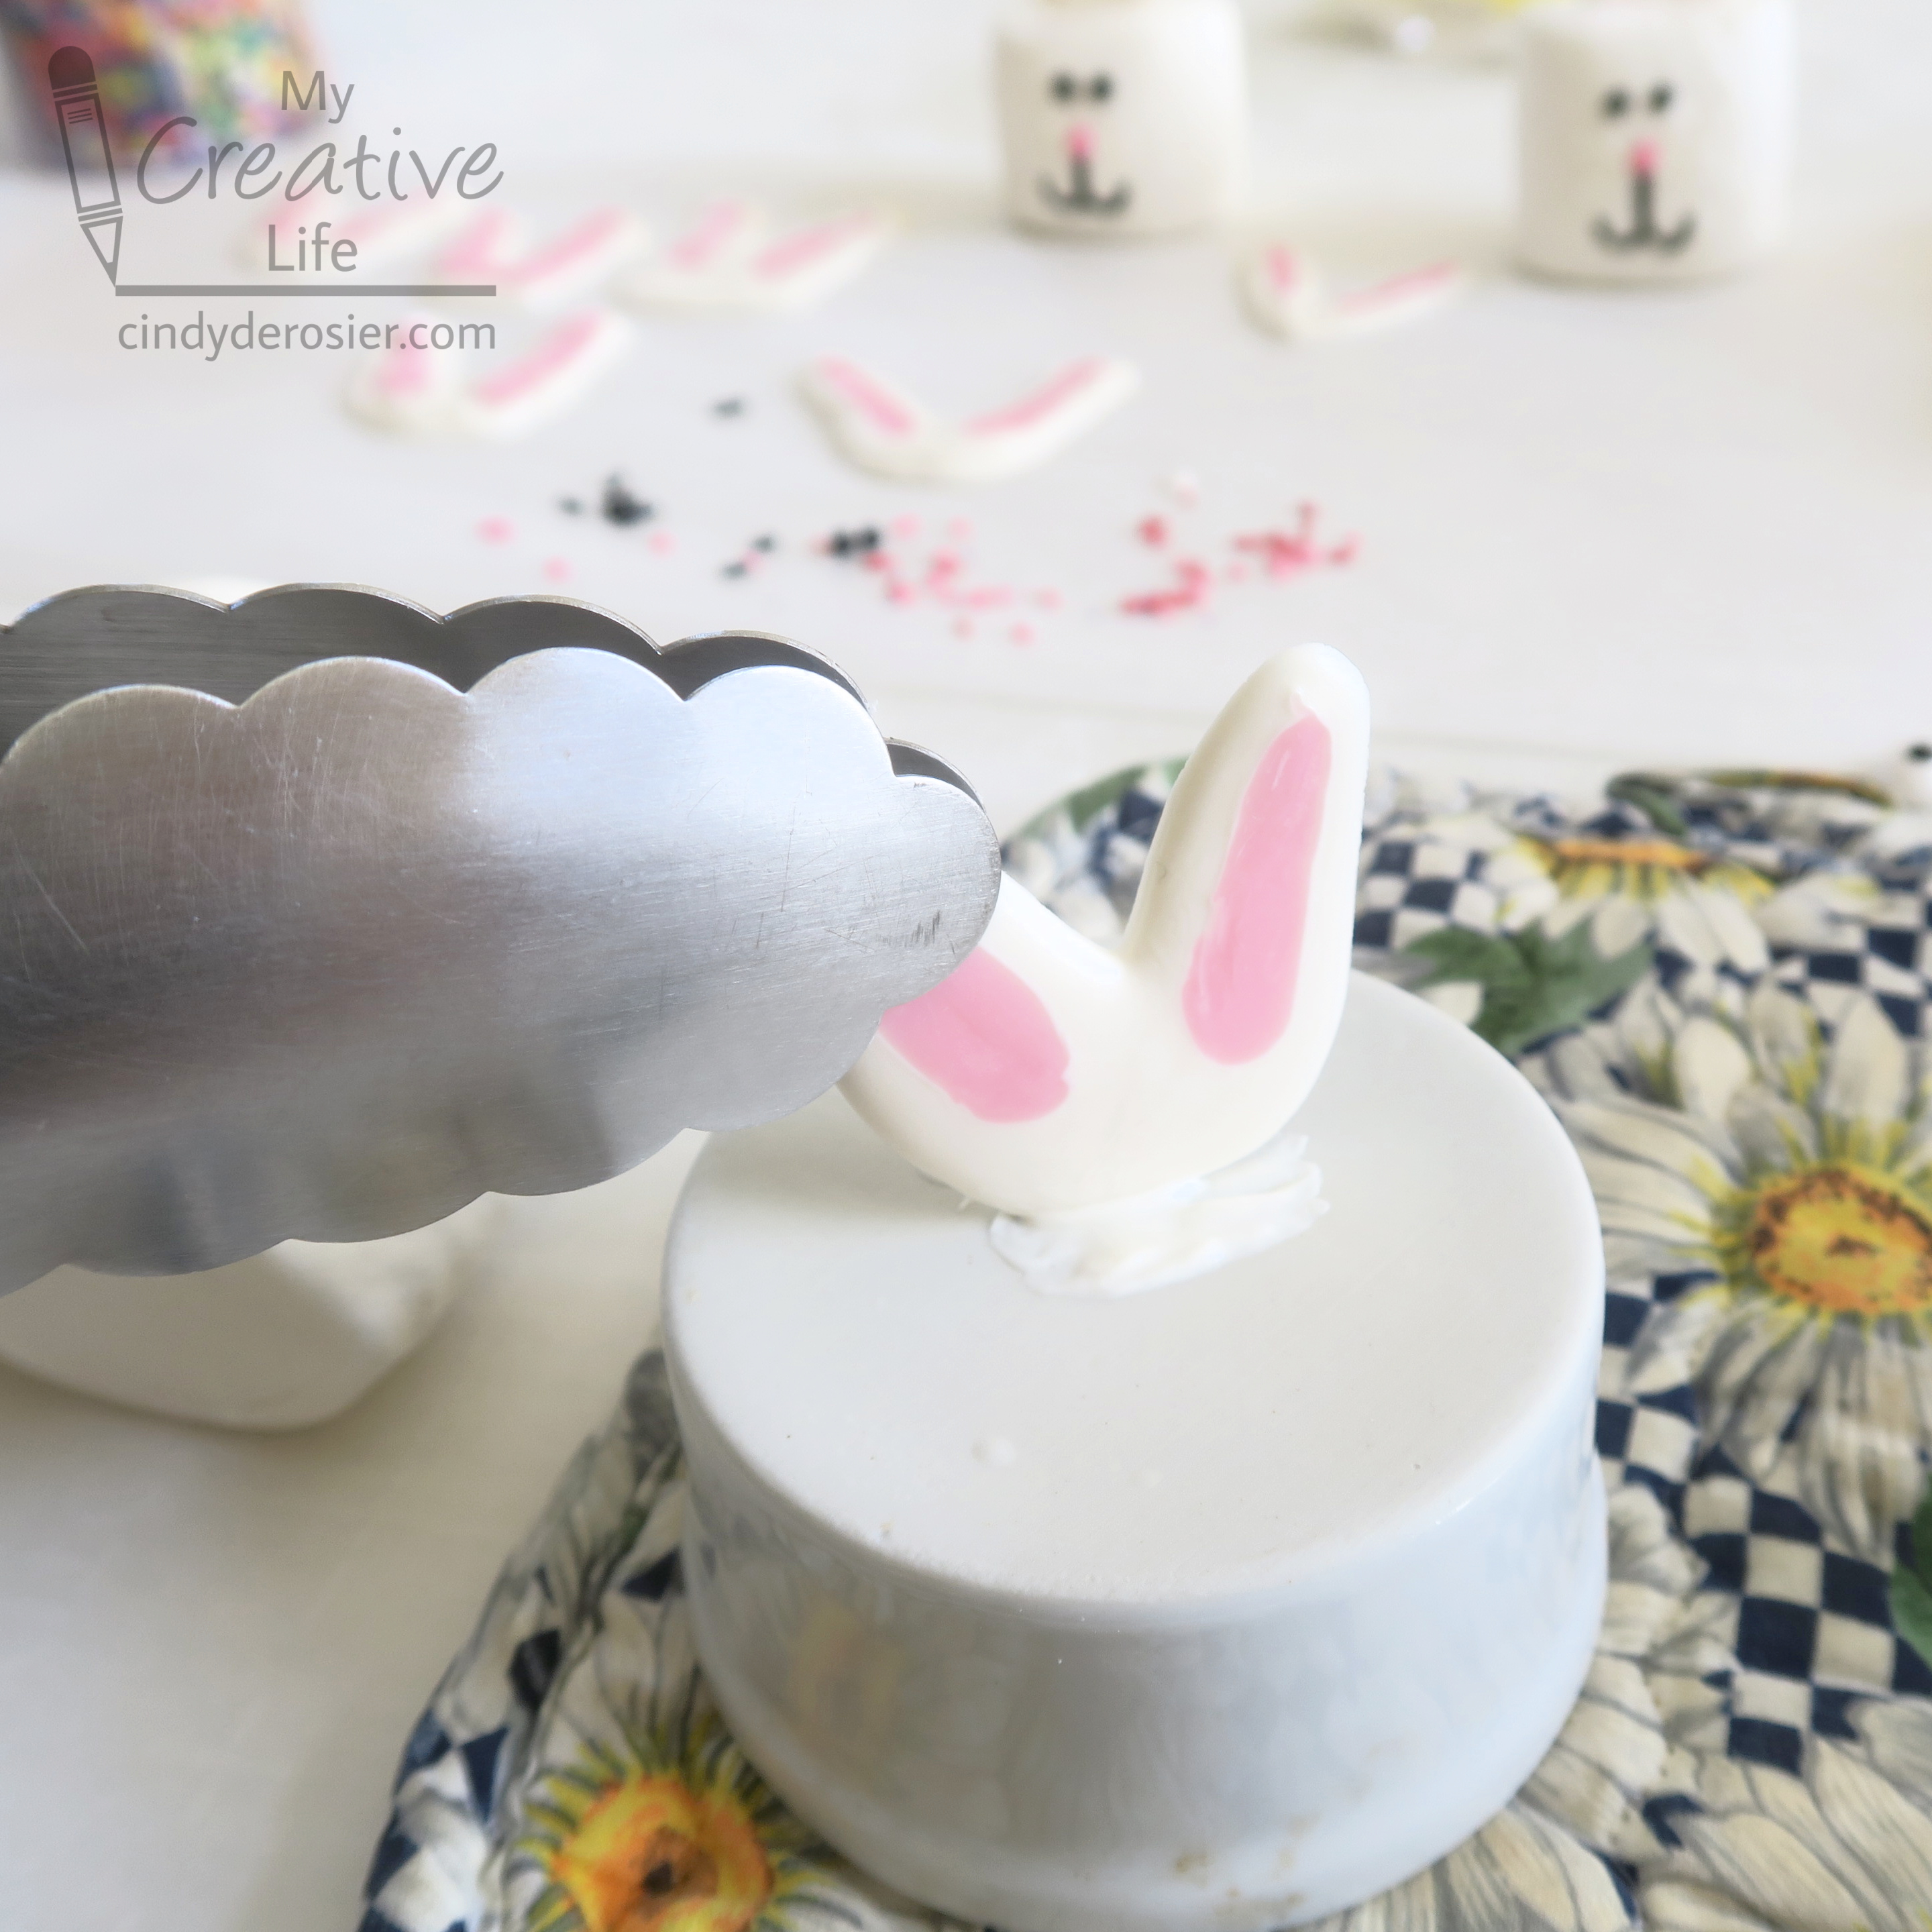
To attach the ears to the bunnies, you'll need a warm, flat surface. Something like a frying pan would work, but I just used a small ceramic dish. I filled it with water, then put it in the microwave until the water was boiling. I poured out the water, then inverted the dish on a potholder. 

I picked up a pair of ears using kitchen tongs (so my warm fingers wouldn't melt them) and pressed them gently against the bottom of the hot dish. Then I placed them onto a marshmallow. The candy solidified almost instantly, so I didn't even have to worry about propping the ears up as they dried. 


Each bunny looks a bit different from the rest. Marshmallows surprisingly irregular; I tried to find six that were sort of the same size and shape, but gave up and just picked any six. The fact that the marshmallows differ took away any pressure I might have felt to try to make the ears and faces look identical. 


If you make your own marshmallow bunnies, I'd love to see them. For that matter, I always enjoy seeing any crafts made from my tutorials. My email address is right above my picture - send me a photo of your creations!

3/11/22

Edible Numbers with Sprinkles

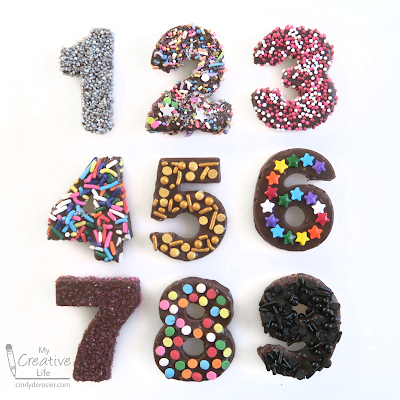
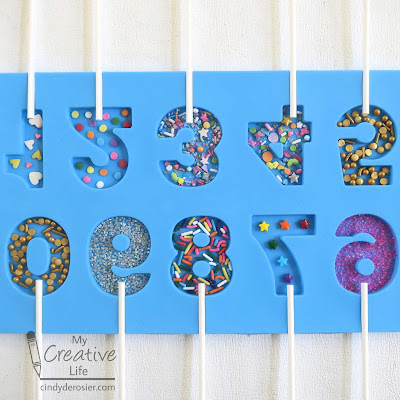
I have a new silicone number mold that I've been wanting to try out. (Affiliate link here and below). I made a set of chocolate numbers featuring the various sprinkles I had on hand. Each number is approximately 2" tall. Aren't they pretty?!


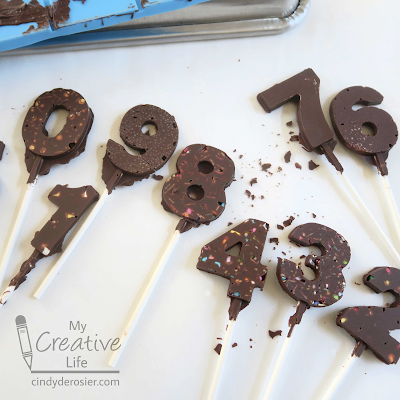
I'm glad they turned out so well in the end because I had major difficulties getting there. I thought it would work to fill each well in the mold with sprinkles, then pour the chocolate on top. Surely this would result in beautiful, sprinkle-covered numbers, right?  


Nope. Not at all. Total fail. 


Fortunately, I kept at it (skipping the lollipop sticks in case more trials failed, which they did) and eventually hit on a technique that worked perfectly. Read on for what did work. 


---------


Edible Numbers with Sprinkles


Materials:


Steps: 


Melt the candy according to the package directions. Fill the mold with melted candy. Gently drop the mold from a few inches off the table to bring any bubbles to the top. Insert lollipop sticks, if desired. Let the candy set up completely. 

Carefully remove the numbers from the mold and set them on individual pieces of parchment paper. Working with one number at a time, hold the heat gun over the number until the top is shiny. It takes only a second. (If you hold the heat over it for too long, you'll melt the whole number. If that happens, put the melted candy back in the mold and try again.) Apply the sprinkles to the shiny chocolate. Let the candy harden completely while you move on to another number.  

Obviously, you can use whatever sprinkles you want. I tried a bunch of different ones to see what results I could get. I think the most successful are the chunky silver (1), the tiny nonpareils (3), the gold variety (5), and the rainbow stars (6). The jimmies (4 and 9) were fine; I had to trim the excess off the edges after the candy had set, so there's an extra step. While I like the effect, the rainbow confetti (8) was the most challenging to place without actually touching the chocolate. The fine sanding sugar (7) was my least favorite, at least on the chocolate base I used. The color would probably show up much better on a white number.   


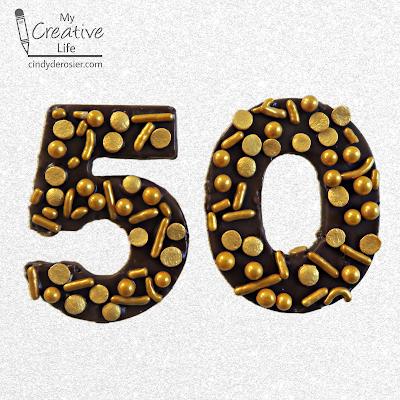
So what am I doing with my set of numbers? Most of them will just be a random dessert option for whoever wants them, but I am doing something special with the 5 and the 0 that I made to match it. 


They will go on my birthday cake tomorrow. Yep, I'm celebrating 50 on March 12, 2022! I'm so excited for this milestone. 

3/8/22

Experimenting with Royal Icing, Silicone Molds, and Vodka Paint

A significant portion of the crafts I do start with, "I wonder what happens if...." In this case, I was wondering what would happen if: 
  • I put royal icing into a silicone mold. Would it set properly? Would it pop out cleanly? Would the pieces break when I tried to get them out?
  • I mixed gel food dye into vodka to make paint. How intense would the colors be? Would they mix the way they do in water or in frosting? 
  • I painted on dried royal icing using the colored vodka. Would the paint stick? Could I blend and layer colors? Would it dissolve the icing? 
  • I dipped dried royal icing into my colored vodka. Would it color evenly?

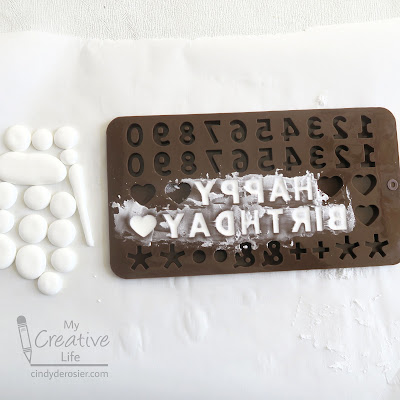
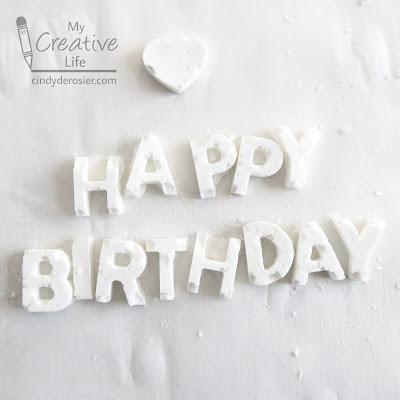
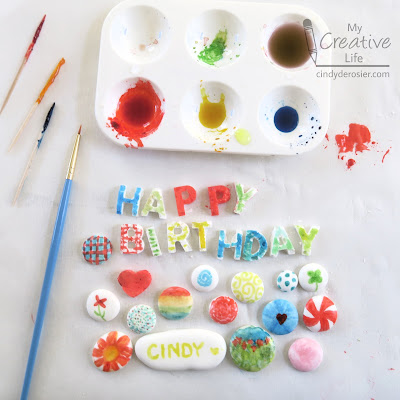
I started my experiment by piping flood consistency royal icing into this silicone mold (affiliate link here and below). I tried to force out air bubbles by dropping the mold onto the counter the way I do with Candy Melts, but it didn't seem to do anything. So I used a scribe tool to poke into each area, in hopes that I'd force royal icing into all the corners if it wasn't there already. I piped the remaining royal icing into random blobs onto parchment paper and let everything dry completely. 


Time for the unmolding! While the pieces came out easily and didn't break, there were pits and flaws on every piece. There was extra icing on most of the interior sections of the letters, as well as at the tops of each H. I'm calling this a fail


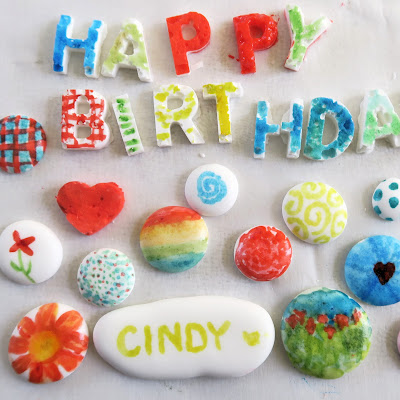
Moving on, I mixed gel food dye and vodka in a small paint palette. I made red, yellow, blue, and green, then put plain vodka into a fifth well to use as rinse water. (Rinse vodka?) I was pleased with the color intensity and how well the colors blended. I was surprised by how quickly the rinse vodka got dirty and how that color transferred back to the original colors. 

I began my first experiments with applying the vodka paint to the royal icing pieces using a very fine paintbrush. The paint stuck well, dried quickly, and remained vivid and bright. I could layer colors, though blending on the royal icing didn't work. The royal icing pieces didn't dissolve immediately, but if I left my brush in place for longer than a second, it would make a pit where the icing started to dissolve. 


Time for my final experiment. I dropped a letter P into the red vodka paint, then fished it out immediately. But immediately wasn't fast enough. While I got great coverage with this method, that much liquid made it start to melt way immediately. Good to know. Here's a closer look at the two P's next to each other. I painted the one on the left and submerged the one on the right.  


This was a fun experiment and I learned a lot. I'm planning to do some research and then will test out some other techniques. I'll let you know if I learn anything interesting!

2/24/22

Heart Tropical Fish Cookie

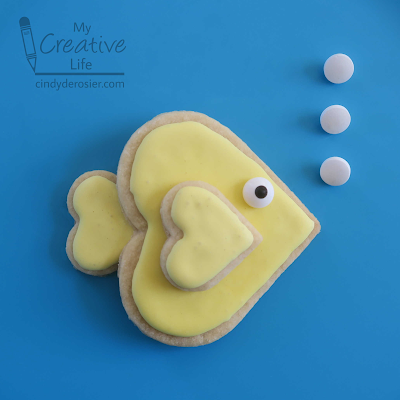
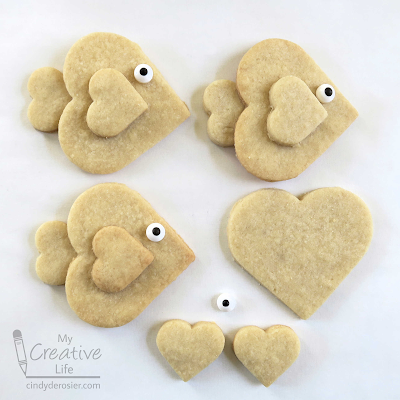
Heart-shaped cookie cutters get most of their use around Valentine's Day, but there are so many other things you can do with hearts. One large heart and two small hearts make an adorable tropical fish. This project gave me a great excuse to make my own royal icing for the first time! Affiliate links below. 


Heart Tropical Fish Cookie


Materials:


Steps: 


Prepare your cookie dough, either from scratch (my preferred recipe linked above) or purchased. For each fish, cut one large heart and two small hearts. Bake the cookies and let them cool completely. Set the cooled cookies and the candy eyeballs on a piece of parchment paper.


Make royal icing and color it as desired. Put it into a piping bag and cover each cookie, leaving a small edge around each cookie. Use the scribe tool to pop any bubbles or drag the icing as needed. Let the icing harden. 

To assemble the cookies, use a bit more royal icing to 'glue' one small heart onto the large heart to make the fin. Add the eyeball above that, then 'glue' the tail fin behind the large heart. Let the icing set before moving the cookies. 


I'm so happy with how these came out! I kept the fish really simple for my first time making my own royal icing, but you can use a variety of colors, or add spots, stripes, or other designs to your fish. There are endless possibilities! I will definitely be experimenting again in the near future.
11/16/21

Turkey Lollipop Cupcake Topper

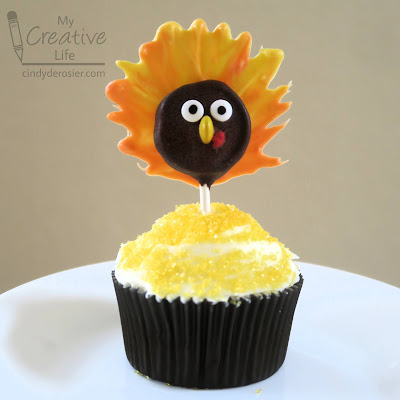
Pumpkin pie is ok, but frankly I'd rather have a turkey lollipop in a cupcake as my Thanksgiving dessert. Affiliate links below. 


Steps: 


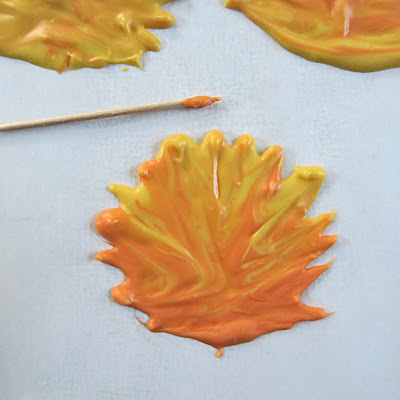
Put a sheet of parchment paper down on your workspace, then prepare the yellow and orange Candy Melts following the directions on the package. Spoon a quarter-sized dollop of orange Candy Melts onto the parchment paper, then add a nickel-sized dollop of yellow directly on top. Drag the toothpick through the candy to blend the colors and make the feathers. Repeat this process for each of the turkeys you'll be making. 


Prepare the rest of your supplies: unwrap the lollipops you'll be using, set out pairs of candy eyeballs, pick out pairs of red mini hearts, and use a sharp knife to cut the mini M&Ms in half (just press straight down, slowly and firmly).  Melt the Dark Cocoa candy melts according to the directions on the package. Dip a lollipop into the melted candy, turning to coat it on all sides. Place it on top of one of the turkey feathers, then place the the eyes, M&M (beak), and hearts (wattle) onto the face. The M&M should be sitting cut-side down and the two teeny hearts should be right up against each other without a gap. 

Repeat this for as many turkeys as you need. Let them set at room temperature for at least 15 minutes, then poke each lollipop turkey into a frosted cupcake. 


What about you? Would you rather have pumpkin pie or a turkey cupcake following the big meal? Or maybe both? Of course, you could pop these turkeys into slices of pumpkin pie or whatever else you're serving. Lots of possibilities!