Showing posts with label gift tag. Show all posts

3/22/24

Easter Bunny Gift Tags (What to Do with Old Business Cards)

I recently came across some outdated business cards. Rather than getting rid of them, I turned them into bunny gift tags that I can put on Easter gifts. Obviously, you can make these with plain paper, but it's fun to repurpose business cards that are no longer useful. Affiliate links below. 


Easter Bunny Gift Tags (Made from Old Business Cards)


Materials:


Steps: 


Cover the printing on the business card with a thin coat of gesso. Add a second coat if the business information still shows through. 

When the gesso is dry, paint the business cards in the pastel colors of your choice. Let them dry, then paint bunnies onto the cards. I intentionally painted my bunnies in different colors and sizes. 


When the paint is dry, use the micron pen to outline the bunnies and add facial features. Again, I made each bunny unique. 

Snip off the upper corners of the business cards to create the tag shape, then punch a hole in each. Add coordinating ribbon. The back of the tags are blank, so you can add a name or a short message there. 


This is the first rabbit craft I've done in over a year since my heart was broken into a thousand pieces. Having Brayden here helps, but I miss Trouble every single day. It's less painful as time passes and I'm glad to be able to make rabbit crafts again. 

12/8/21

Gingerbread Tags for Baked Goods

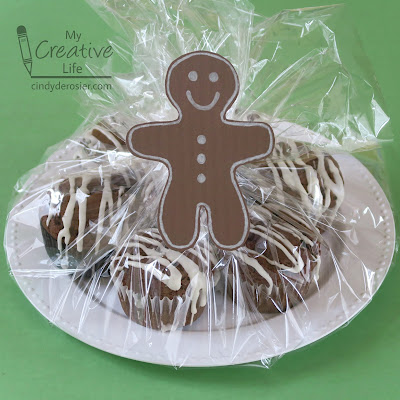
While I wouldn't blame you one bit if you kept an entire batch of gingerbread muffins for yourself, they do make really nice gifts. Bundle up a half-dozen and give them to friends and neighbors instead of (or in addition to!) a plate of cookies. The smiling gingerbread tag lets them know what's inside. 


To make your own, draw a gingerbread man on brown cardstock and then cut it out with microtip scissors. I actually cut the ears off the template I made for the torn paper bear and used that for my gingerbread man. Then I used a white colored pencil to draw the frosting onto the gingerbread man. I tested my various colored pencil sets to see which white was the most opaque and ended up using my Prismacolor Premier.  


I have another idea for using the same template that will let me test the opacity of more colors than just the white. Stay tuned! In the meantime, check out some...

12/1/21

Poinsettia Gift Tags

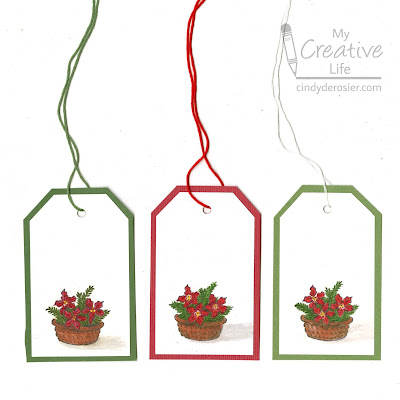
Homemade gift tags add an extra-special touch to Christmas gifts. They take only a few minutes to make and are an excellent excuse for pulling out the colored pencils for a little bit of relaxing during a busy time of year. (Or, if your kids are younger than mine, an excellent task to keep them busy while you get something done!) Obviously, you could use any image for any occasion. I wanted to use this poinsettia stamp so that I could experiment with the texture of the basket, shading the greenery, and adding cast shadows. 

You can simplify the tags by not backing them with colored cardstock. You can make things even easier on yourself by starting with pre-made tag blanks. Affiliate link here and below. 


Poinsettia Gift Tags


Materials:


Steps: 


Cut the white cardstock to the size and shape of tag you want. (I'm not a fan of measuring unnecessarily, so I eyeballed mine. I don't care if the tags aren't all precisely the same). Stamp the poinsettia image on each tag, then use colored pencils to color them in. 

To back your tags, you could measure and cut. That's not what I do (see above). I cut a piece of colored cardstock to the rough size and shape as the tag. Then I adhere the tag to the back, and use the trimmer to cut the backing so that there is an equal amount along each side of the tag. 

Punch a hole through the backed tag with the Crop-a-Dile, then add a coordinating piece of embroidery floss to hang your tag. (Surprise! I don't measure that either!)

12/2/19

Washi Tape Christmas Gift Tags

I recently added to my washi tape storage, as my collection of this handy little tape has grown to a ridiculous size. I now have three full dowels of regular washi, plus a fourth for holiday washi. While I was organizing it, I whipped up a few gift tags using 8 different Christmas washi tapes. Affiliate links below. 


Washi Tape Christmas Gift Tags


Materials:


Steps:


Cut white cardstock into 4" x 2" rectangles. Cut off two corners to make the tag shape. Tear lengths of washi tape to decorate the front of the tag. Wrap the excess washi around to the back.

Cut a piece of complementary cardstock slightly bigger than the white tag, then glue the two pieces together. (This isn't necessary, but it hides the back where you've wrapped the extra washi.) Punch a hole at the top of the tag.

Cut two 6" lengths of yarn. Fold them in half and add them to the tag using a lark's head knot. Trim the ends so they are even.

Write TO and FROM on the tag and it's ready to go!