
One of my most popular crafts of all time is this torn paper panda. I don't know if it's popular because it's a panda or because of the unusual technique used to make it, but either way, it generates a lot of traffic to my blog. Part of what makes this project unique is that the cheaper the paper you use, the better it turns out.
I found some scraps of very inexpensive brown construction paper and thought they'd be perfect for turning into a fuzzy bear. I love how my bear turned out!
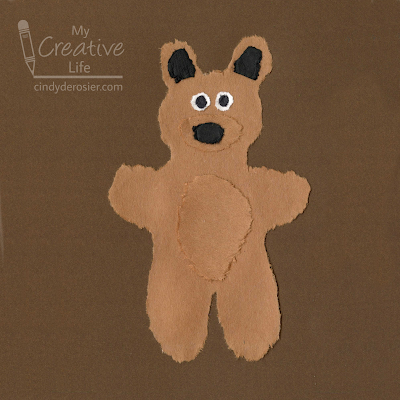
Torn Paper Bear
Materials:
- construction paper (brown, black, white)
- q-tips
- a bowl of water
- glue
Steps:
Dip a q-tip in water and "draw" the outline of the bear onto the construction paper. You can draw freehand, or you can create a template first.

Trace the outline at least twice (more times if you're using higher quality paper). You should be able to see the outline on the back of the paper. If you can't, wet the q-tip again and retrace.
While the paper is still wet, gently tear out the shape. The paper falls apart easily along the wet line and leaves a fuzzy texture.
Continue using for the rest of the body parts: brown ovals for the snout and the belly, white circles for the eyes, black circles for the pupils, a black oval for the nose, and black gumdrop shapes for the inner ears.
Let the paper dry completely, then glue everything together.

Awww...such a cutie!
ReplyDelete