Showing posts with label math. Show all posts

3/5/24

11 Fun Math Games and Crafts for Kids

Over the years, I've shared a bunch of my favorite fun math games and crafts for kids. It's time to compile them into one place! Most of these activities are appropriate for different ages, or are easily adapted to teach more basic or advanced skills. 

Fun Math Games and Crafts for Kids


Need a great way to practice addition, subtraction, multiplication, and division facts? Or, just looking for a fun travel game? Tic-Tac-Toe dice is one of my favorites for 3rd grade and up. (Parents will love it too!)

This art project is a wonderful introduction to the geometric concept of tessellations. Kids are fascinated with tessellations and making your own is so much fun! 

I liked having this activity on hand as a choice for early finishers. It challenges kids in a way they aren't used to thinking and helps develop observational and fine motor skills.  

We all learned about the alligator wanting to chomp the larger number. This fun craft reinforces the greater than and less than symbols. 

Kids are obsessed with using compasses. This art project familiarizes them with how to hold use it to draw circles and arcs of all sizes. 

Memorizing multiplication facts is really, really important in order to be successful in virtually all of the math that comes after it. These bracelets are better than flash cards, because they're fun to make and they're with you all the time!

Butterflies are great for symmetry lessons, but making symme-trees is just as fun. Kids love a good math pun!

This autobiographical project is a great icebreaker and teaches multiple math skills. As a twist, you could make a version based on a famous person. Or make "The Percentages of Us" to learn all about the class as a parts of a whole. 

Most kids absolutely love prime factorization, but it takes up a lot of room on paper. By solving the problems with cereal, you can practice a bunch of problems with ease!

Challenge kids to design their own math homework using a newspaper! This assignment is super flexible and can be used with any grade of students.

This is one of my all-time favorite games and is also easily changed for different grade levels. Give it a try!

2/14/24

Lucky Numbers Math Game for Kids (Decimal Place Value + Probability)

Back in my teaching days, I loved playing games with my students. It's such a fun way to introduce or reinforce a concept. I particularly enjoyed math games, as did the kids. One of our favorites was one I called Lucky Numbers. 

The beauty of Lucky Numbers is that you can play with any size group - we regularly played as a whole classroom. A single round is really short, so you can squeeze in a game in the awkward three minutes before dismissal, or during a 10-minute rainy day recess. All you need is a single 10-sided die (affiliate link here and below). 


Before I get to the game, I have to talk about kids and dice. Kids LOVE dice. Every single student I ever had liked playing with ordinary 6-sided dice. When I pulled out the 10-sided dice or the fraction dice, they'd go nuts. Kids who weren't ordinarily engaged during math time were practically falling out of their seats waiting for me to pass out the special dice and teach them the game we'd be playing. I never thought to do it, but honestly, I should have bought a bunch of dice and used them as rewards. Or a fundraiser! If I'd thought to have my students sell sparkly 10-sided dice back in the day, we could have paid for all of our field trips. These colorful 10-sided dice cost less than 13 cents a piece. I guarantee you we could have easily sold them for a dollar a piece. And if we'd done a blind purchase, where you pay your dollar to reach into the bag and pick a random color, we could have sold even more as people tried to get their favorite colors. 

Anyway, on to the game. The objective of Lucky Numbers is for students to learn decimal place value to the hundred thousandths, to understand what each position means, and to be able to accurately read a number with a decimal place. To play, each student needs a piece of paper and something to write with.  

On the chalkboard, draw a number of lines representing how many digits are in the target number. Around 5 is best. Have the kids copy this onto their paper. As an example, let's start with a number with three places to the left of the decimal points (hundreds) and two to the right of the decimal (hundredths). 


Roll the die and announce the number. (These huge dice are a hit in the classroom.) All players need to write that digit into one of the empty positions, trying to make the largest number possible. So if the digit is 9, the smartest location to put it is in the hundreds place. If the digit is 0, you'd put it in the hundredths place. Those are obvious - the other digits take some logic and some luck!

Here's a game in progress. Our pretend classroom is on our fourth round of the day. The student did great on their first round. 96.837 is a high number, but anyone who put the 9 in the tens place and the 8 in the ones place will beat it. The second round did not go well for this student, who was betting on a high digit coming up for the hundreds place and ended up with a 3. (Once a digit is written, you can't move it). In the third round, the student got the fourth highest possible number (9.820 would win, 9.802 and 8.920 would beat it). 


In the current (fourth) round, our pretend student put the four in the ones place. This is a good move. The next roll was a 5, which they put in the tens place. Now there's a three. Where should it go? Do you put it in the tenths place and hope that the next two rolls are higher than 3? Statistically speaking, yes, that's what you should do.

After the final roll, there are always immediate groans and cheers. After writing in my final digit, I would model how to read my number, then call on students to read their numbers. I emphasized using the place value chart to help them say the number correctly, which included saying "and" for the decimal point instead of "point." So 8.902 should be "8 and 902 thousandths" not "8 point 902." 


Anyone who scored higher than me AND could correctly pronounce their number (with help, if necessary) would earn a point. If I got the highest possible number, I earned the point. The points didn't really matter, of course, but the kids always got a kick out of beating me. And I got a kick out of seeing them learning while having so much fun. 

4/27/22

Multiplication Facts Bracelets: A Way to Teach Times Tables with Kids

Back in my teaching days, I used games and fun activities to help my students learn multiplication and division facts. One of my favorites, which worked beautifully for Trevor, is Tic Tac Toe Dice. Physical activities, like playing Steal the Bacon with products or coloring multiplication tables, worked for some kids, while songs and chants helped others. Regardless of the method, it's crucial for their future success that kids learn multiplication and division facts as soon as possible. When kids don't know 6x7 or 9x4 off the top of their heads, they're going to struggle with almost all of the math beyond third grade. 

I don't think I ever encountered a 5th grader who didn't know the 1, 2, 5, and 10 facts, and the vast majority of them also knew the 3's and 4's. But I had plenty of students each year who didn't know the 6, 7, 8, and 9 facts well enough to apply them to the more challenging math we did. I wish I'd thought of the idea of Multiplication Fact Bracelets idea back then, because I think these may have helped some of them. Making the bracelets is a useful way to practice facts, of course, but by wearing them and looking at them frequently, and even using them as a fidget device, I imagine some kids could become more confident with their times tables. Affiliate links below. 


Multiplication Facts Bracelets


Materials: 


Steps: 


Cut a 12" length of stretch cord. This will leave you with plenty to tie off the bracelet when you're done beading. Attach a binder clip to one end of the stretch cord to keep the beads from falling off that end. 

Choose a single color of seed beads for each bracelet. I used yellow for the 6's, red for the 7's, blue for the 8's, and green for the 9's. If you're doing this in a classroom, have everyone make the same set of facts in the same colors, so that you can refer to the "blue 8's" bracelet without causing confusion or the inevitable, "My 8's are pink!" interruptions. I'll use the blue 8's for this tutorial; obviously, follow the same steps for the other bracelets. 

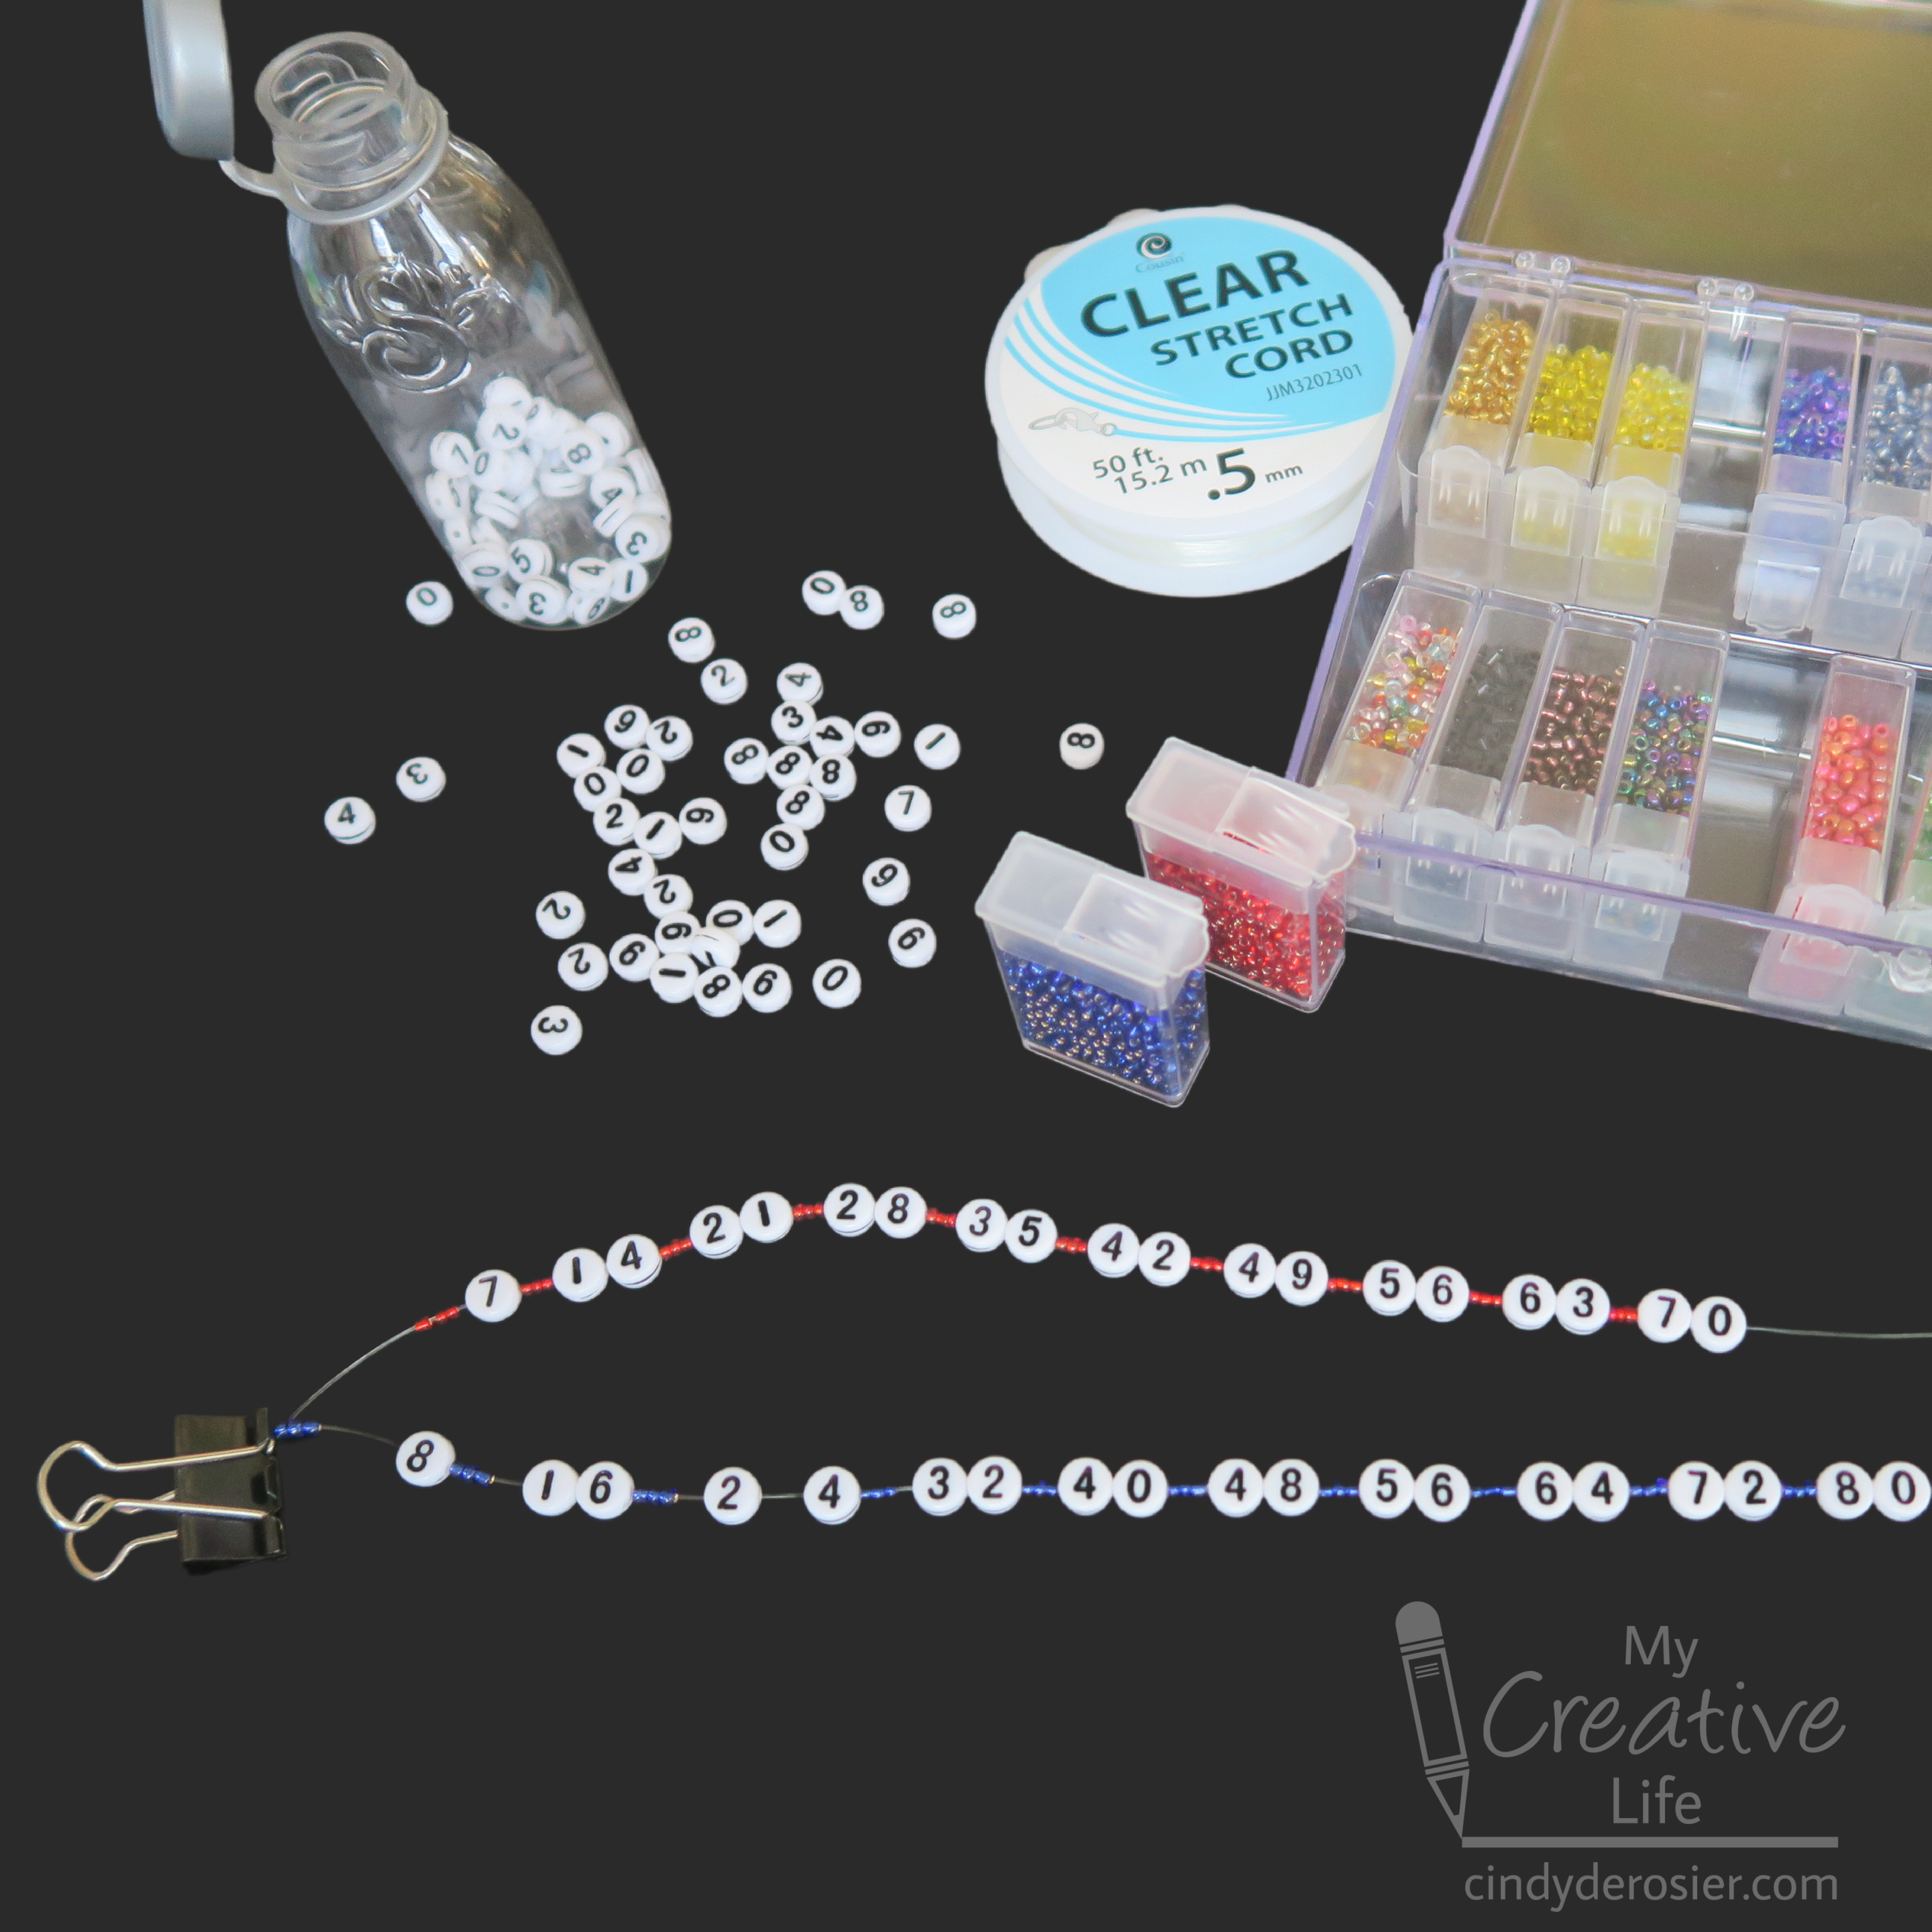
Begin by putting three blue seed beads onto the cord. The cord is sturdy enough that you can use it to poke into the hole of a bead to thread it. Then add the number 8. Add three more blue seed beads, then then 16. Three more blue seed beads, then 24. Make sure the numbers are all facing the same direction. There is no up and down for 0, 1, 3, and 8, but it matters for the others, particularly the 6 and 9. Continue this pattern until you reach 80.
  

Carefully remove the binder clip and then tie the ends together using a surgeon's knot. It's basically the same as the square knot they already know with an extra 'up and over' when you make it. 


Put the tied bracelets on a piece of parchment paper, then add a dot of glue directly onto the knot you just tied. Let the glue dry completely, then cut off the extra cord. 


The surgeon's knot and glue combination is strong, but to make sure your bracelet doesn't come apart when you're stretching it to put it on, hold onto the knot with one hand while you stretch the bracelet over the other. 


These bracelets are also fun for teaching the concept of Least Common Multiple. In the photo, you can see that 56 is visible on both the red (7) and the blue (8) bracelets and that 48 is visible on both the yellow (6) and the blue (8). Are these the LCMs of those pairs of numbers? Rotate the two bracelets to see if there's another lower number they both share!

4/30/21

Magazine Symmetry Art

The most challenging aspect of being an elementary school teacher is not the actual teaching part, where you explain or demonstrate how something is done. Sure, a teacher has to be a bit of an expert in everything (since they teach math, language arts, science, history, PE, art, music, and technology to a diverse group of 32 people with different ability levels) and that is definitely a challenge, but most people who go into teaching are quite good at explaining skills or demonstrating techniques across many subjects. That's not the hard part. 

The most difficult part of teaching is classroom management. Those 32 people with different ability levels also have different interests, arrive with varying amounts of background instruction, and have personal issues or circumstances that impact learning (whether positively or negatively). Even assuming all students exhibit excellent classroom behavior (a laughable assumption- in a group exhibiting no distracting behaviors, at least one child will rise to fill the void) and students are somehow so homogenous as to have the same base knowledge and familial situations (equally impossible), people naturally learn and work at different rates. 

All this to say, as a teacher it is really important to know how faster workers will spend their time without disrupting slower workers who require the attention of the teacher. Silent reading and creative writing are both obvious choices, as are independent extension activities like researching more about the topic at hand. You can also put students to work preparing materials.

One of my favorite "if you finish your art project early" activities is Magazine Symmetry Art. Students who finish early could select an image from a stack and use color pencils or other art materials to fill in the missing half. Here are samples from Gabbi (owl) and Ralph (upside down boy). 


Early finishers prepped these for me so that we always had a stack available. They would go through old magazines looking for symmetrical images, cut them out down the line of symmetry, and then glue them to paper. It took some time for my helpers to develop an eye for which images work and which do not. For example, if a face is even slightly tilted or turned, it will look mighty strange when you add the mirror image.  


If you aren't juggling 32 kids in a classroom, you may still find that you need a short activity for 1 or 2 kids to do at home while you tend to something else. Magazine Symmetry Art is a fun choice.


4/23/21

Compass Art

Kids LOVE compasses. I'm talking about the circle-drawing compass, not the direction-finding compass (although kids love those too). It was always a very exciting day in 5th grade math when I passed out compasses for the first time. We always started with art so my students could become familiar with their compasses and play with them before jumping into geometry lessons. I made this compass art yesterday, but it's typical of what my students would have made back in the day. Affiliate links below. 


---------


Compass Art


Materials:


Steps:


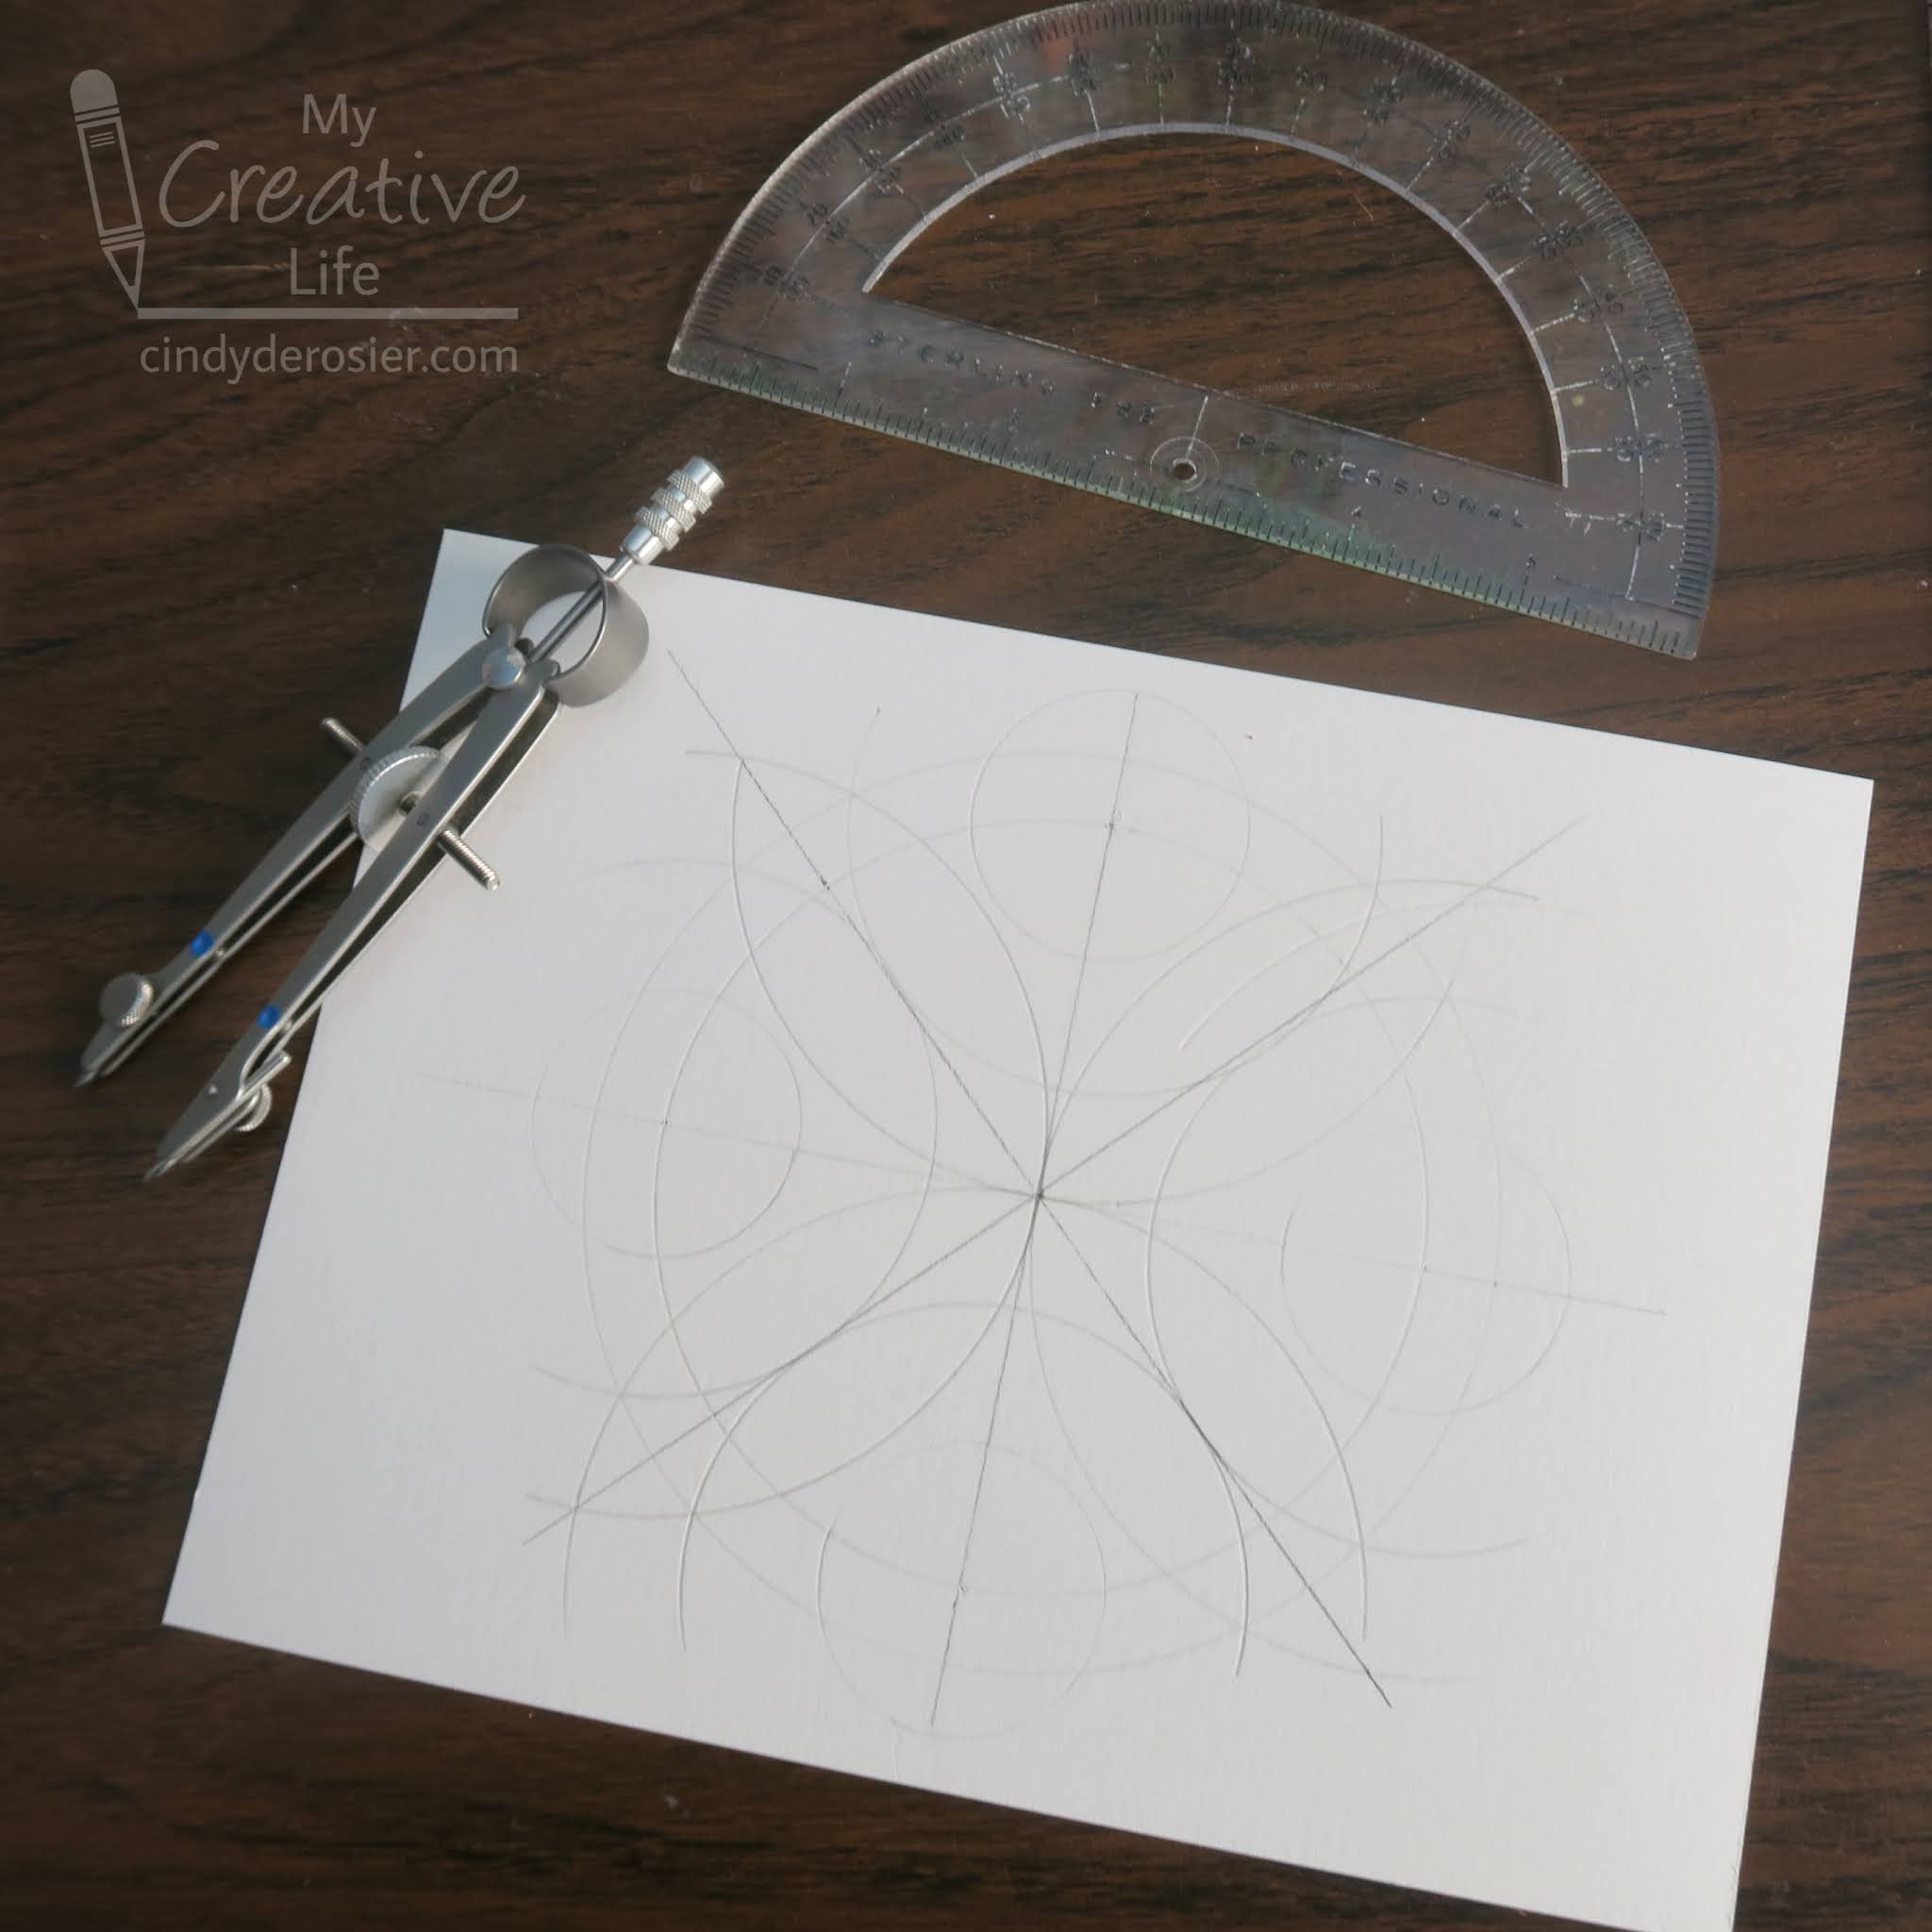
Make a point in the center of the paper, then use the straight edge of the protractor to draw a horizontal line that passes through this point. Use the protractor to make a vertical line (90° from the horizontal line) and two vertical lines (45° and 135° from the horizontal line) that pass through the center point. This is shown in black below. 

Open the compass wide to make a circle that will nearly fill the paper. Place the point of the compass on the center point and draw the circle. Add a second circle that is slightly smaller than the first by slightly reducing the distance between the points of the compass and keeping the point of the compass on the same center point. This is shown in blue below. 


With this basic framework, I would set my students free to create. I encouraged them to play with different sizes of circles. Most kids chose to make symmetrical designs, while others went for asymmetry. Some filled their designs with dozens more circles of all different sizes, while others made a more minimalist piece. My goal was for them to practice compass skills and whatever artwork they created was the means to that end. 

For this sample, I've added 12 more circles (shown in green, orange, and pink). 


This design is similar to (but not quite the same as) the one I made on paper. 


The next step is coloring. 


Once it is completely colored, use a black Sharpie to outline the design.


Finally, add dots and curls in a few strategic places. (Strategic because the pencil lines show through and this hides them nicely.) 


Each design turns out completely different and they look beautiful all together. I'm kicking myself (for the thousandth time) for not taking photos of the bulletin boards and other displays in my classroom back in the day. If only I knew then how much I would want those pictures now!

4/20/21

Newspaper Math

Last week's edible factor trees reminded me of a math activity I used to have my students do. Using a newspaper, they cut out numbers and glued them to a piece of paper in order to create six grade-appropriate math problems: one each of addition, subtraction, multiplication, division, fractions, and percents. I stressed "grade-appropriate" because single digit addition, for example, is not something most 5th graders need to practice. My expectations would be much different for younger or older children. 

This is what I would expect of a typical 5th grader:


The first step was to cut out 15-20 numbers from which they could generate the six problems. If students had trouble finding numbers, I would direct them to advertisements. You can usually find dollar amounts, phone numbers, percents, model year numbers (cars), and other useful numbers there. Once they had their numbers, they needed to arrange them on the paper so that they made sense (no dividing by zero) and so that they can be solved (no fractions that can't be simplified). With the problems set, they needed to leave enough space between the problems to solve them before gluing them down. 

While some may question how much solving six problems of their choosing could possibly be of much benefit to students, there's actually a whole lot more going into this assignment than just solving six math problems. Students become familiar with the layout of a newspaper, practice scanning (critical for reading proficiency), use fine motor skills to cut out small numbers, think about how to solve six types of math problems, judge the difficulty level and their own capabilities, develop spatial awareness, and learn to apply the correct amount of glue (another fine motor skill, and something 90% of kids need to practice more often). All this before they ever solve the math problems. Best of all, most of my students really enjoyed this activity that was packed with (hidden) learning.  

Here's how the completed assignment looks:


Six little math problems, scissors and glue, and a whole lot of learning. 

4/14/21

Cereal Math: Prime Factorization

Did you know that Sesame Street cereal is a thing?! I had no idea! I was really excited when I spotted it in the cereal aisle. It took great restraint, but I only purchased the 123 Berry and not the C is for Cinnamon (affiliate links here and below) because I still have leftover Alphabits and Steve already thinks I have a have an "issue" when it comes to purchasing cereal. (He's wrong. I can stop whenever I want.)

Anyway, when I saw the box of cereal with adorable little number shapes, I thought how fun that would have been back in my teaching days. I pictured students with trays of cereal, doing the same math they'd ordinarily do with paper and pencil, but in a tactile way! They would have loved it. Me too. It's always fun to shake things up a bit and present skills in a new, memorable way.

I poured out some of my new cereal on a tray and started sorting. At first, I was delighted to see how good the numbers looked. Look at the 8 - it is perfect! And the 4, 6, 7, and 9 - spot on! The 1 and 0 are great... but not true of the 2, 3, and 5. They're acceptable at best. Now I know why they designed the box they way they did, lol. Oh well!  

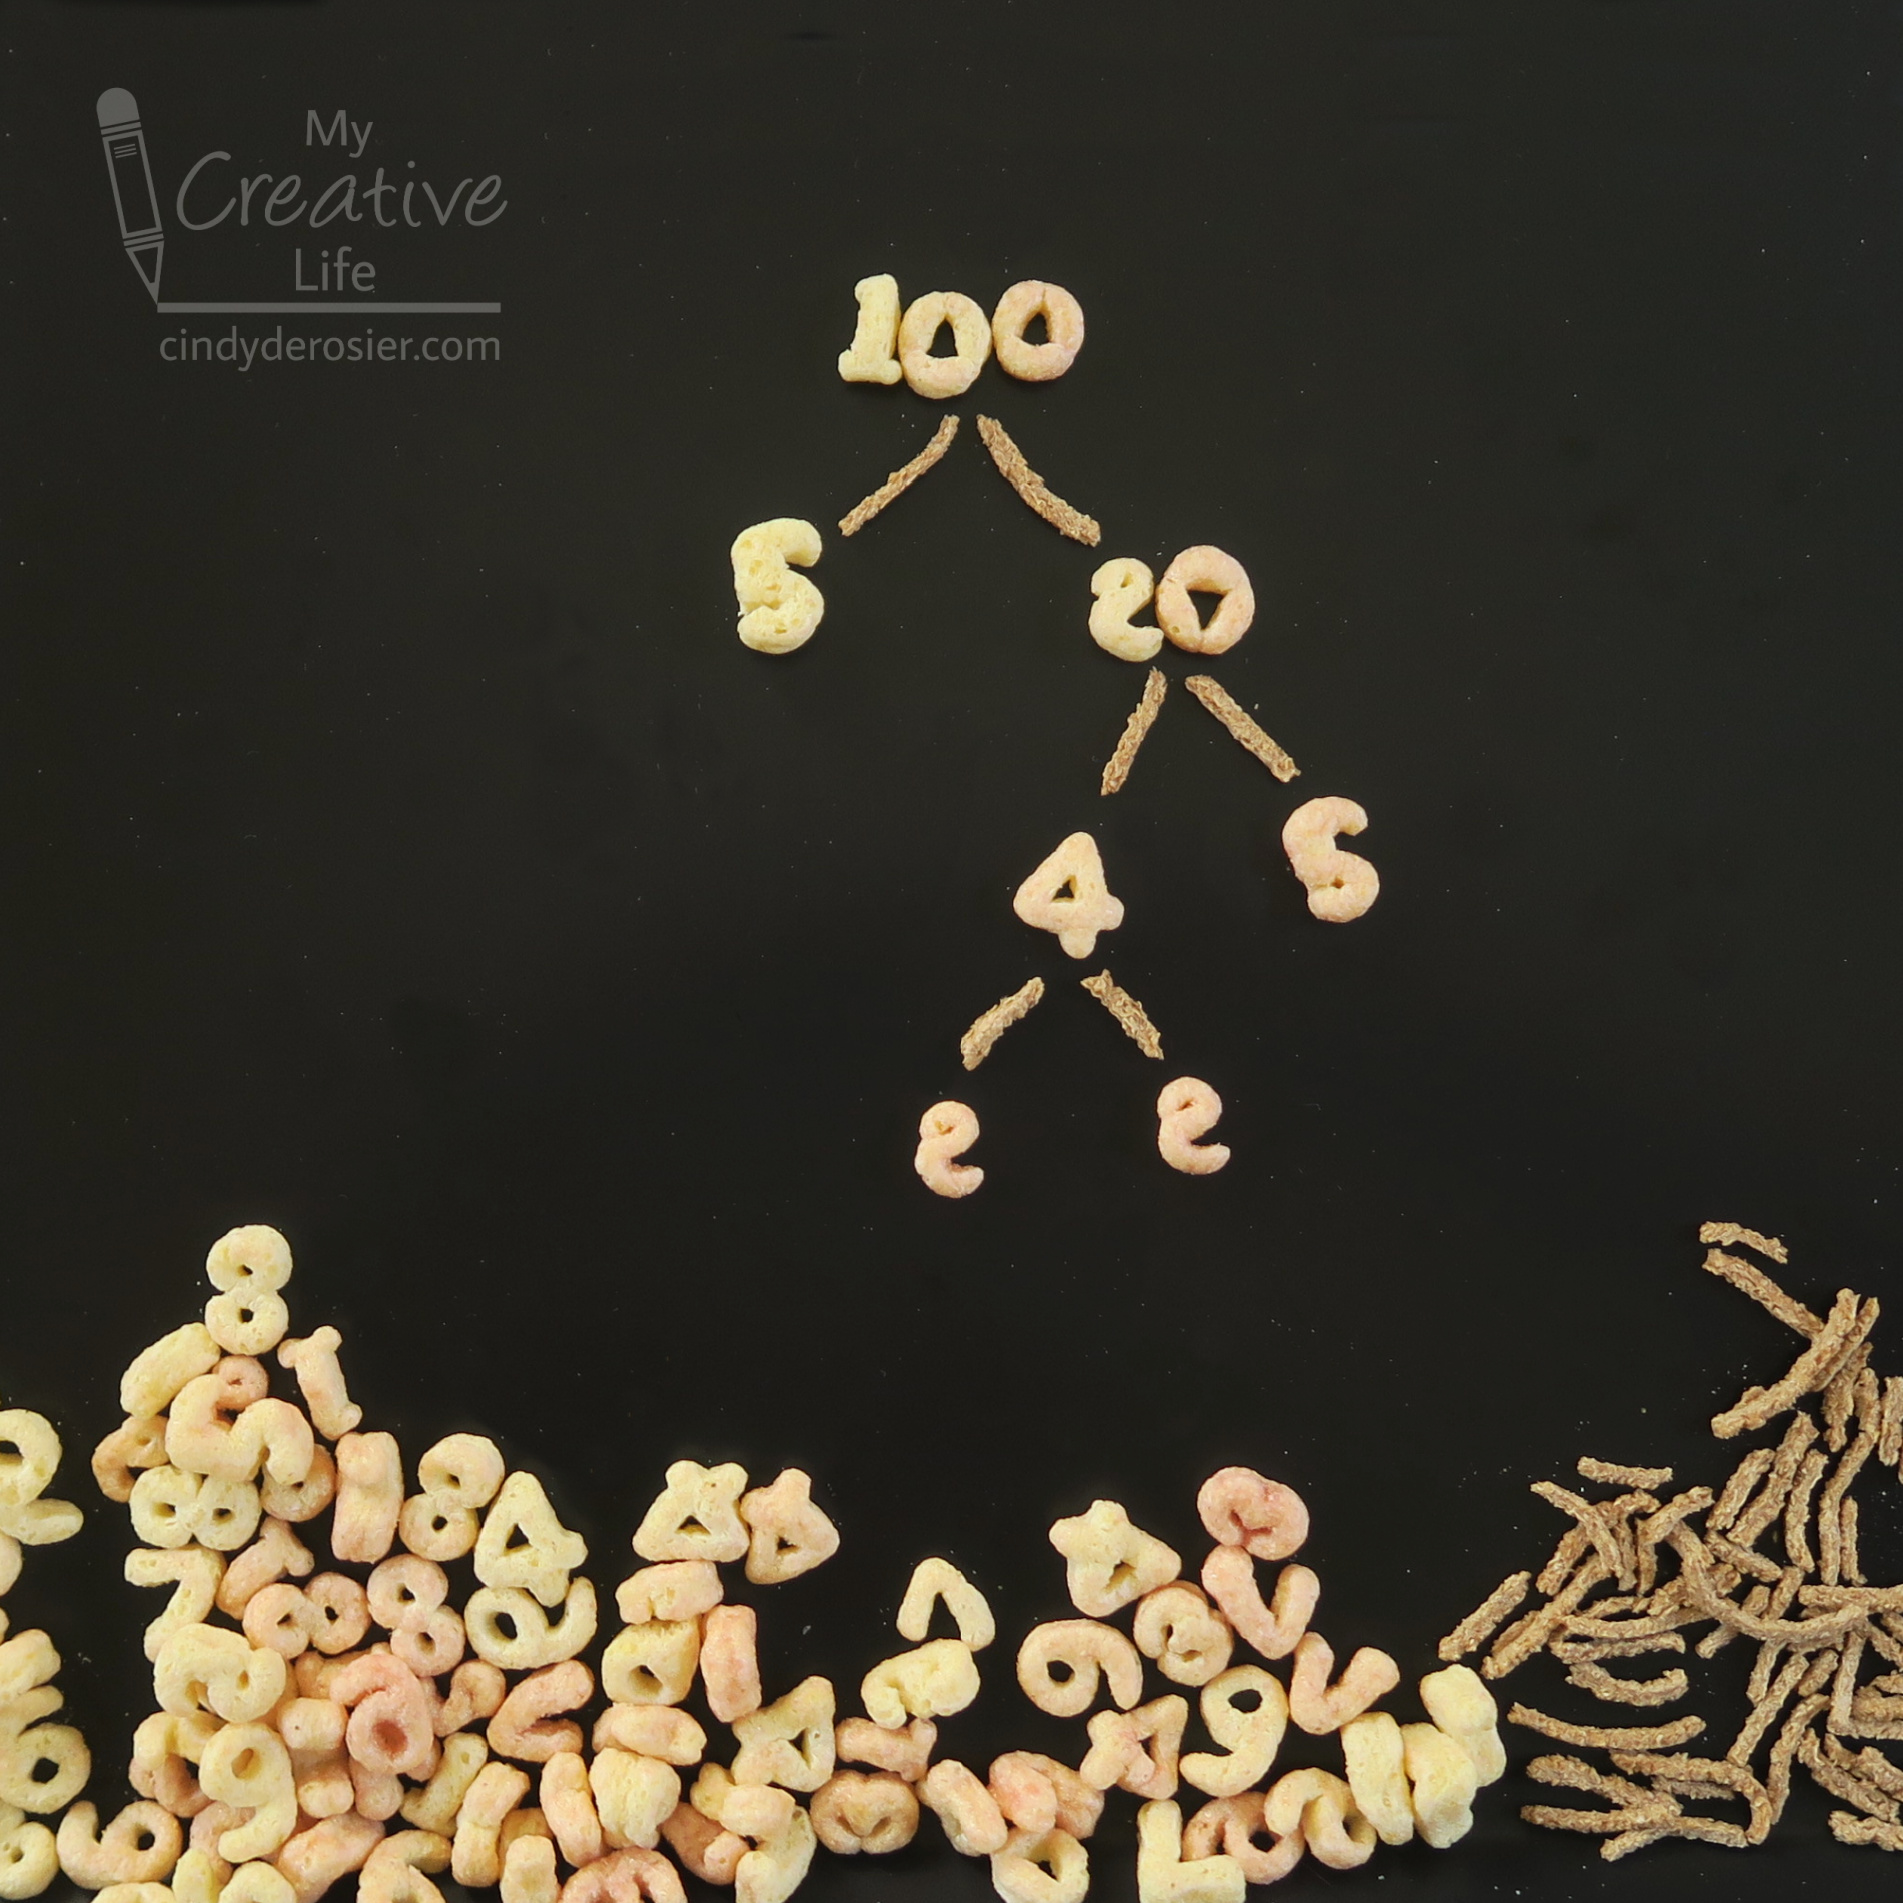
I dug in the pantry and found All-Bran. Together with the 123 Berry, I was ready for some math. I chose my very favorite skill to teach in 5th grade: prime factorization. 

100 = 5 x 2 x 2 x 5, which we write as 100 = 22 x 52.


Same problem, different way of solving it, same answer: 100 = 22 x 52. 


(Fun fact: Now I know how to do superscript tags in HTML!) 

I spent about 30 minutes playing with the cereal making a bunch of different factor trees, which was approximately 25 minutes longer than it took to get the photos I needed. It was fun. I KNOW that students would enjoy using this cereal for math problems. Obviously, you can do all sorts of math with this cereal: adding, subtracting, multiplying, dividing, fractions, and decimals (Grape Nuts would be great for decimal points), just to name a few. If you have kids at home, I definitely recommend giving this a try!

7/27/20

The Percentages of Me - Math Practice Art

The other day, I randomly wondered what percentage of my life I've lived in Fairfield, California. I did a quick calculation - I've been here for 23 of my 48 years, or approximately 48% of my life. I've only lived in two other places: Livermore, CA for 37% of my life and Davis, CA for 15% of my life. Interesting!

The next thing I knew, I'd pushed aside the work I'd intended to do and made this:


It struck me that this would make a great math activity for upper elementary and middle school kids. It provides lots of practice converting fractions to percentages, converting those percentages to degrees of a circle, then using a protractor to make the circle graphs.

To begin, brainstorm categories of things with clear start and end times, like cities (or states, or countries) you've lived in, or schools you've attended, or sports teams you've played on. I chose six categories. In addition to where I've lived, I included: 
  • who I've lived with (my parents, roommates, alone, and with Steve)
  • my primary job (student, teacher, blogger)
  • my church home (Holy Cross, St. Marks)
  • my main club/organization (4-H, a ballroom dance troupe, MOMS Club, and BSA)
  • my favorite food (bread)

After choosing your categories, create a chart. Here is the start of my work page. Looking left to right on the first line, you can see the span of years I lived in Livermore (1972-1990), the fraction of my life that represents (18/48), the equivalent percentage (37%), and the number of degrees of a circle that covers (37% of 360° = 133°).


Once all the math is done, draw circles on drawing paper. (In the classroom, we'd use compasses and make proper circles. I just drew mine with a Sharpie, which doesn't look nearly as good.) Label each circle with the category and put the 'answers' underneath. Then use a protractor to divide each circle into the appropriately-sized pieces. 


Now add the title at the top. 


Color it in and you have a cool glimpse at your percentages! Something neat about this is that you can redo it each year and it will look different since your percentages will change. 


This would look so cool on a bulletin board in a classroom. I wish I'd thought of this 15+ years sooner, lol!

3/29/17

Bunny Week: Bunny and Carrot Tessellation

I am a big fan of tessellation art. For Bunny Week, I was determined to see if I could make a bunny tessellate. I'm happy to announce that not only was I able to do it, but I LOVE the results. 


I told Steve that it should be our new flooring. Or countertops. I'm nothing if not flexible. (Snorts from all who know me. I am not flexible.)

---------

Bunny and Carrot Tessellation


Materials:

  • index card
  • scissors
  • tape
  • paper
  • pens


Steps:


The first step to any tessellation is to start with a rectangle. I cut down an index card so that my finished design would repeat more frequently, but you could use a full-size card. 

Cut an equilateral triangle from one of the short sides of the rectangle. 


Without rotating or flipping it, slide the triangle to the other short side and tape it in place. Now orient your shape vertically and trace it somewhere on the paper. It doesn't matter where you start. Once you've traced it, slide it, line it up with the existing lines, and trace again. Keep doing this, tracing all the way to the edges.  


Here's how it looks after everything is traced.


Now it's time to color it. Use orange and green to turn the triangle portion into carrots...


... and pink to make each bunny's nose and inner ears.


Add eyes, mouths and whiskers with a black pen and your tessellation is complete.


You know... this pattern might look good on our front door. That way, everyone would know what to expect when they enter the deRosier house! 

And finally, more of my favorite bunny crafts from the past. Click on the photos to go to the tutorials. 


9/24/14

Tic-Tac-Toe Dice

Trevor, like just about all third graders, is working on learning multiplication and division facts. We've done some flash cards and computer games and he's getting faster and faster, but still has a way to go before the facts are automatic. He does not like practicing them. I thought he'd prefer a math game I used to teach to my students back in the day. I was right. He loves it.

Tic-Tac-Toe Dice is for 2-4 players. You need a different colored pencil for each person, a 0-99 hundreds chart, and three dice.


Player 1 starts by rolling the dice. He must add, subtract, multiply or divide all three digits to reach a number between 0 and 99, stating the equation(s) out loud. For example, if a player rolled the 4-2-1 shown above, he could do (2+1)x4 to get 12. He would then color in 12 on the chart. Play passes back and forth between the players until someone gets five in a row. There's a lot of strategy involved in what numbers you pick. It can be just as important to block your opponent as to go for your own tic-tac-toe.

Here's a game in progress. I'm red and Trevor is blue.


He rolled 5-6-6. He started with 5+6+6 and got 17, which he rejected as not especially useful for either offensive or defensive purposes. He tried (5x6)+6 and got 36, which he announced was a 'maybe' because it was diagonally in line with two of his existing squares. He tried (6x6)-5 and got 31, which he strongly considered. He kept going and tried (6-6)+5 and got 5. He tried a few more options and eventually went back to 31 and colored that in.

Guess who won the very first game we played? Yep. Trevor. He's using his pencil to show where he has 5 in a row (4 through 8).

I don't get smiles like this from flash cards, that's for sure.

One particularly awesome thing about this game is that you can adapt it to allow more difficult operations, like exponents. You can also add a fourth die to increase the difficulty. That really gets the brain working!

In my book, there's nothing better than combining learning with fun.