Showing posts with label Jewelry. Show all posts

3/6/23

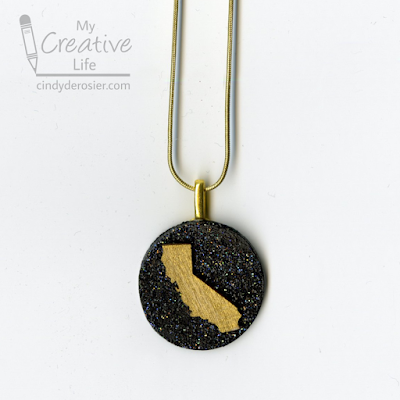
California Pride Necklace

Welcome to California Week, here at My Creative Life! 

All week, I'll be sharing California-inspired crafts, activities, foods, and more. Why? This week I will be attending the 2023 Visit California Outlook Forum. It is the main event for California travel and tourism professionals. This year's conference is in downtown Sacramento. I can't wait for the interesting keynotes and seminars, the many great networking events, and the walking field trip they're offering. Naturally, I had to make my own California-themed necklace to wear to the conference. Affiliate links below. 


California Pride Necklace


Materials:


Steps: 


Paint the wood circle black. When it is dry, add a coat of Stickles to the front. Paint the California wood veneer in Treasure Gold. 

When the paint is completely dry, glue a jewelry bail to the back of the wood circle. Then glue California to the front. String the pendant onto a chain and wear it with pride.  

---------


If you're less of the do-it-yourself type or more of the buy-it-yourself type, check out these cute, ready-made California pride jewelry options in a range of price points. 

1/12/23

Hidden Money Gift: Necklace and Earring Set

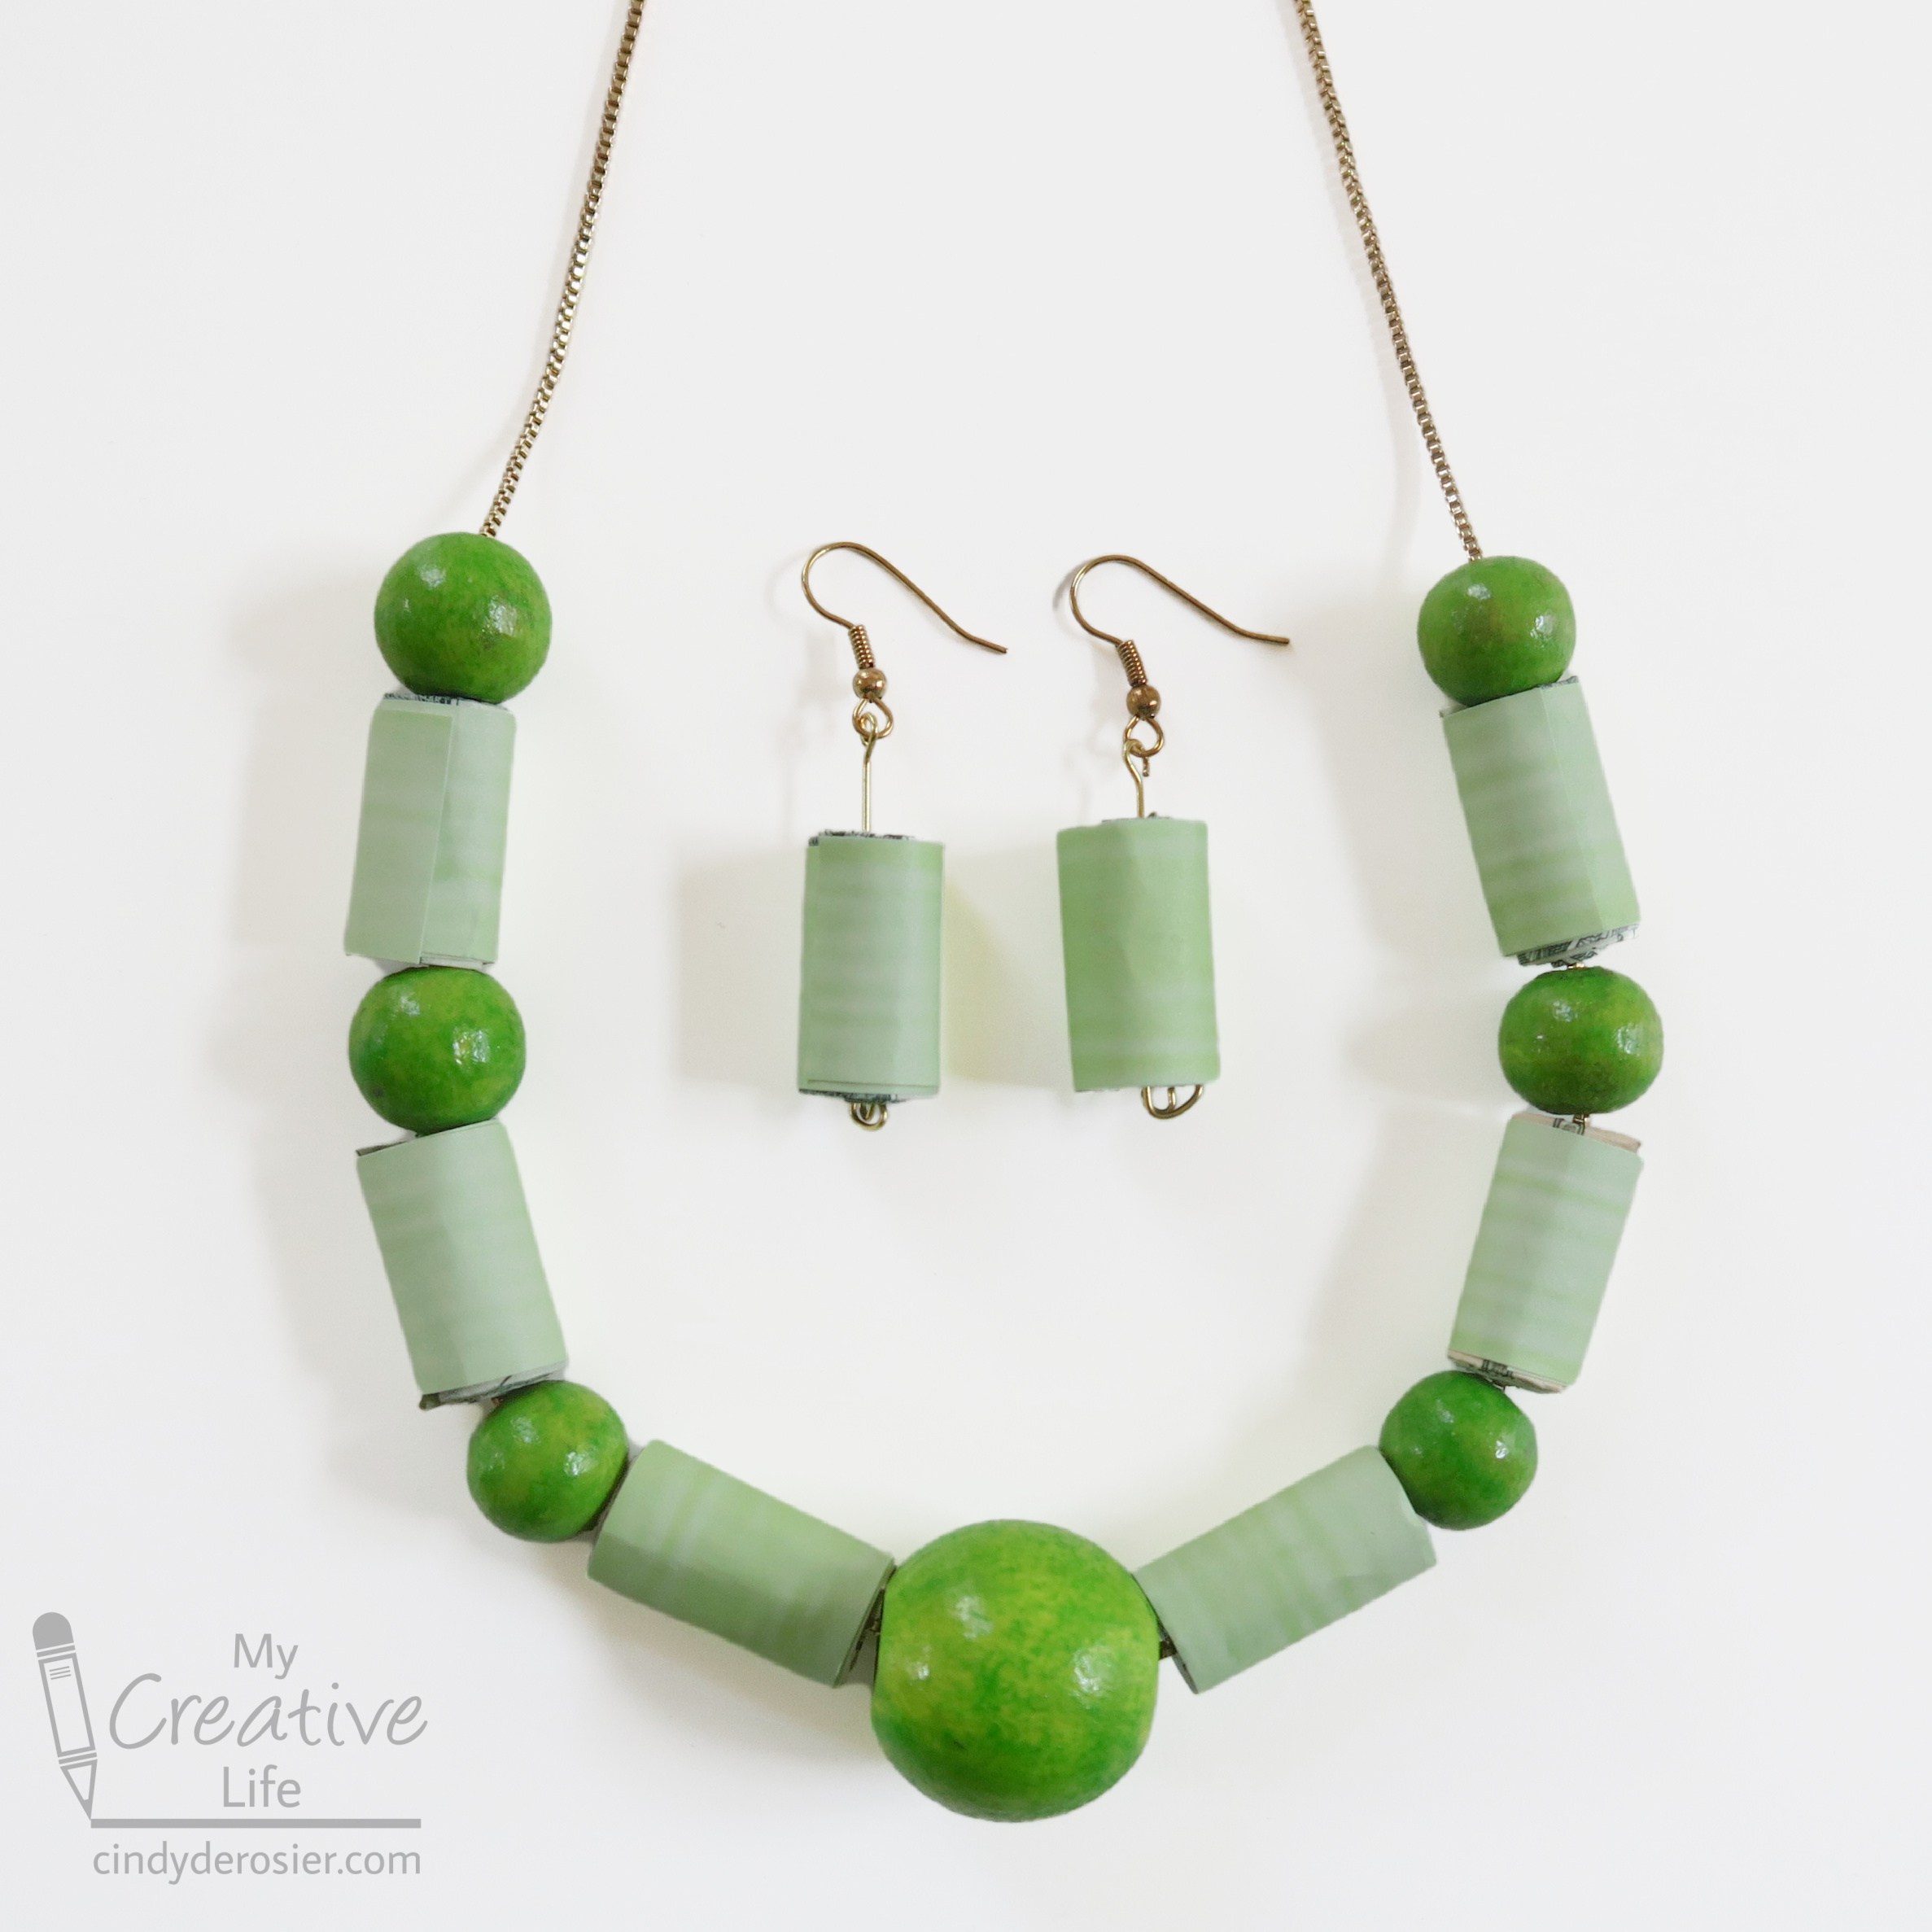
For Christmas, I made this necklace and earring set for my 22-year old nephew, Timothy. 


I haven't seen him for a couple of years, but as far as I know, he doesn't wear necklaces or earrings. In fact, I fully expected him to completely destroy this gift within 30 seconds of opening it. Why? Because he knows that every gift from me has hidden money inside. This one has 8 bills of varying denominations. Affiliate links below. 

---------


Hidden Money Gift: Necklace and Earring Set


Materials:


Steps: 

Paint the beads with acrylic paint. When the paint is dry, add Extreme Glitter. I found that putting the beads on a skewer and propping that up on paint bottles was the easiest way to paint them. 


Choose a patterned paper that coordinates with your beads. Cut 8 strips of paper, each slightly bigger than 3/4" wide by around 3" long. 

Working with one bill at a time, fold the bill lengthwise into thirds, creasing the fold well. Roll it into a tight bead. Wrap the patterned paper around it, adding glue only to the area where the paper overlaps itself. Don't get any glue on the money! Repeat for all 8 bills. 

In this picture, you can see the steps of prepping the money. The third bill is loose because I let go of it for the photo; you'll actually want it to be as tight as possible, as you can see with the finished bead on the right. 


Here's a look at a finished bead. 


To make the earrings, thread a bead onto an eye pin, then curl up the end to secure the bead in place. Use a jump ring to attach it to the earring hook. 

To make the necklace, arrange six paper beads (hidden money) and seven wooden beads in order. String them onto the necklace chain. Depending on the necklace and the beads, you may need to temporarily remove the clasp of the chain (if it's wider than the gap in the beads) and/or use a yarn needle to thread the beads. 


This is what the finished jewelry set looks like. 


Package your gift in an elegant jewelry gift box for an extra fun touch. Then wait and see how long it takes your recipient to notice that the necklace and earrings aren't actually the gift they think they are!

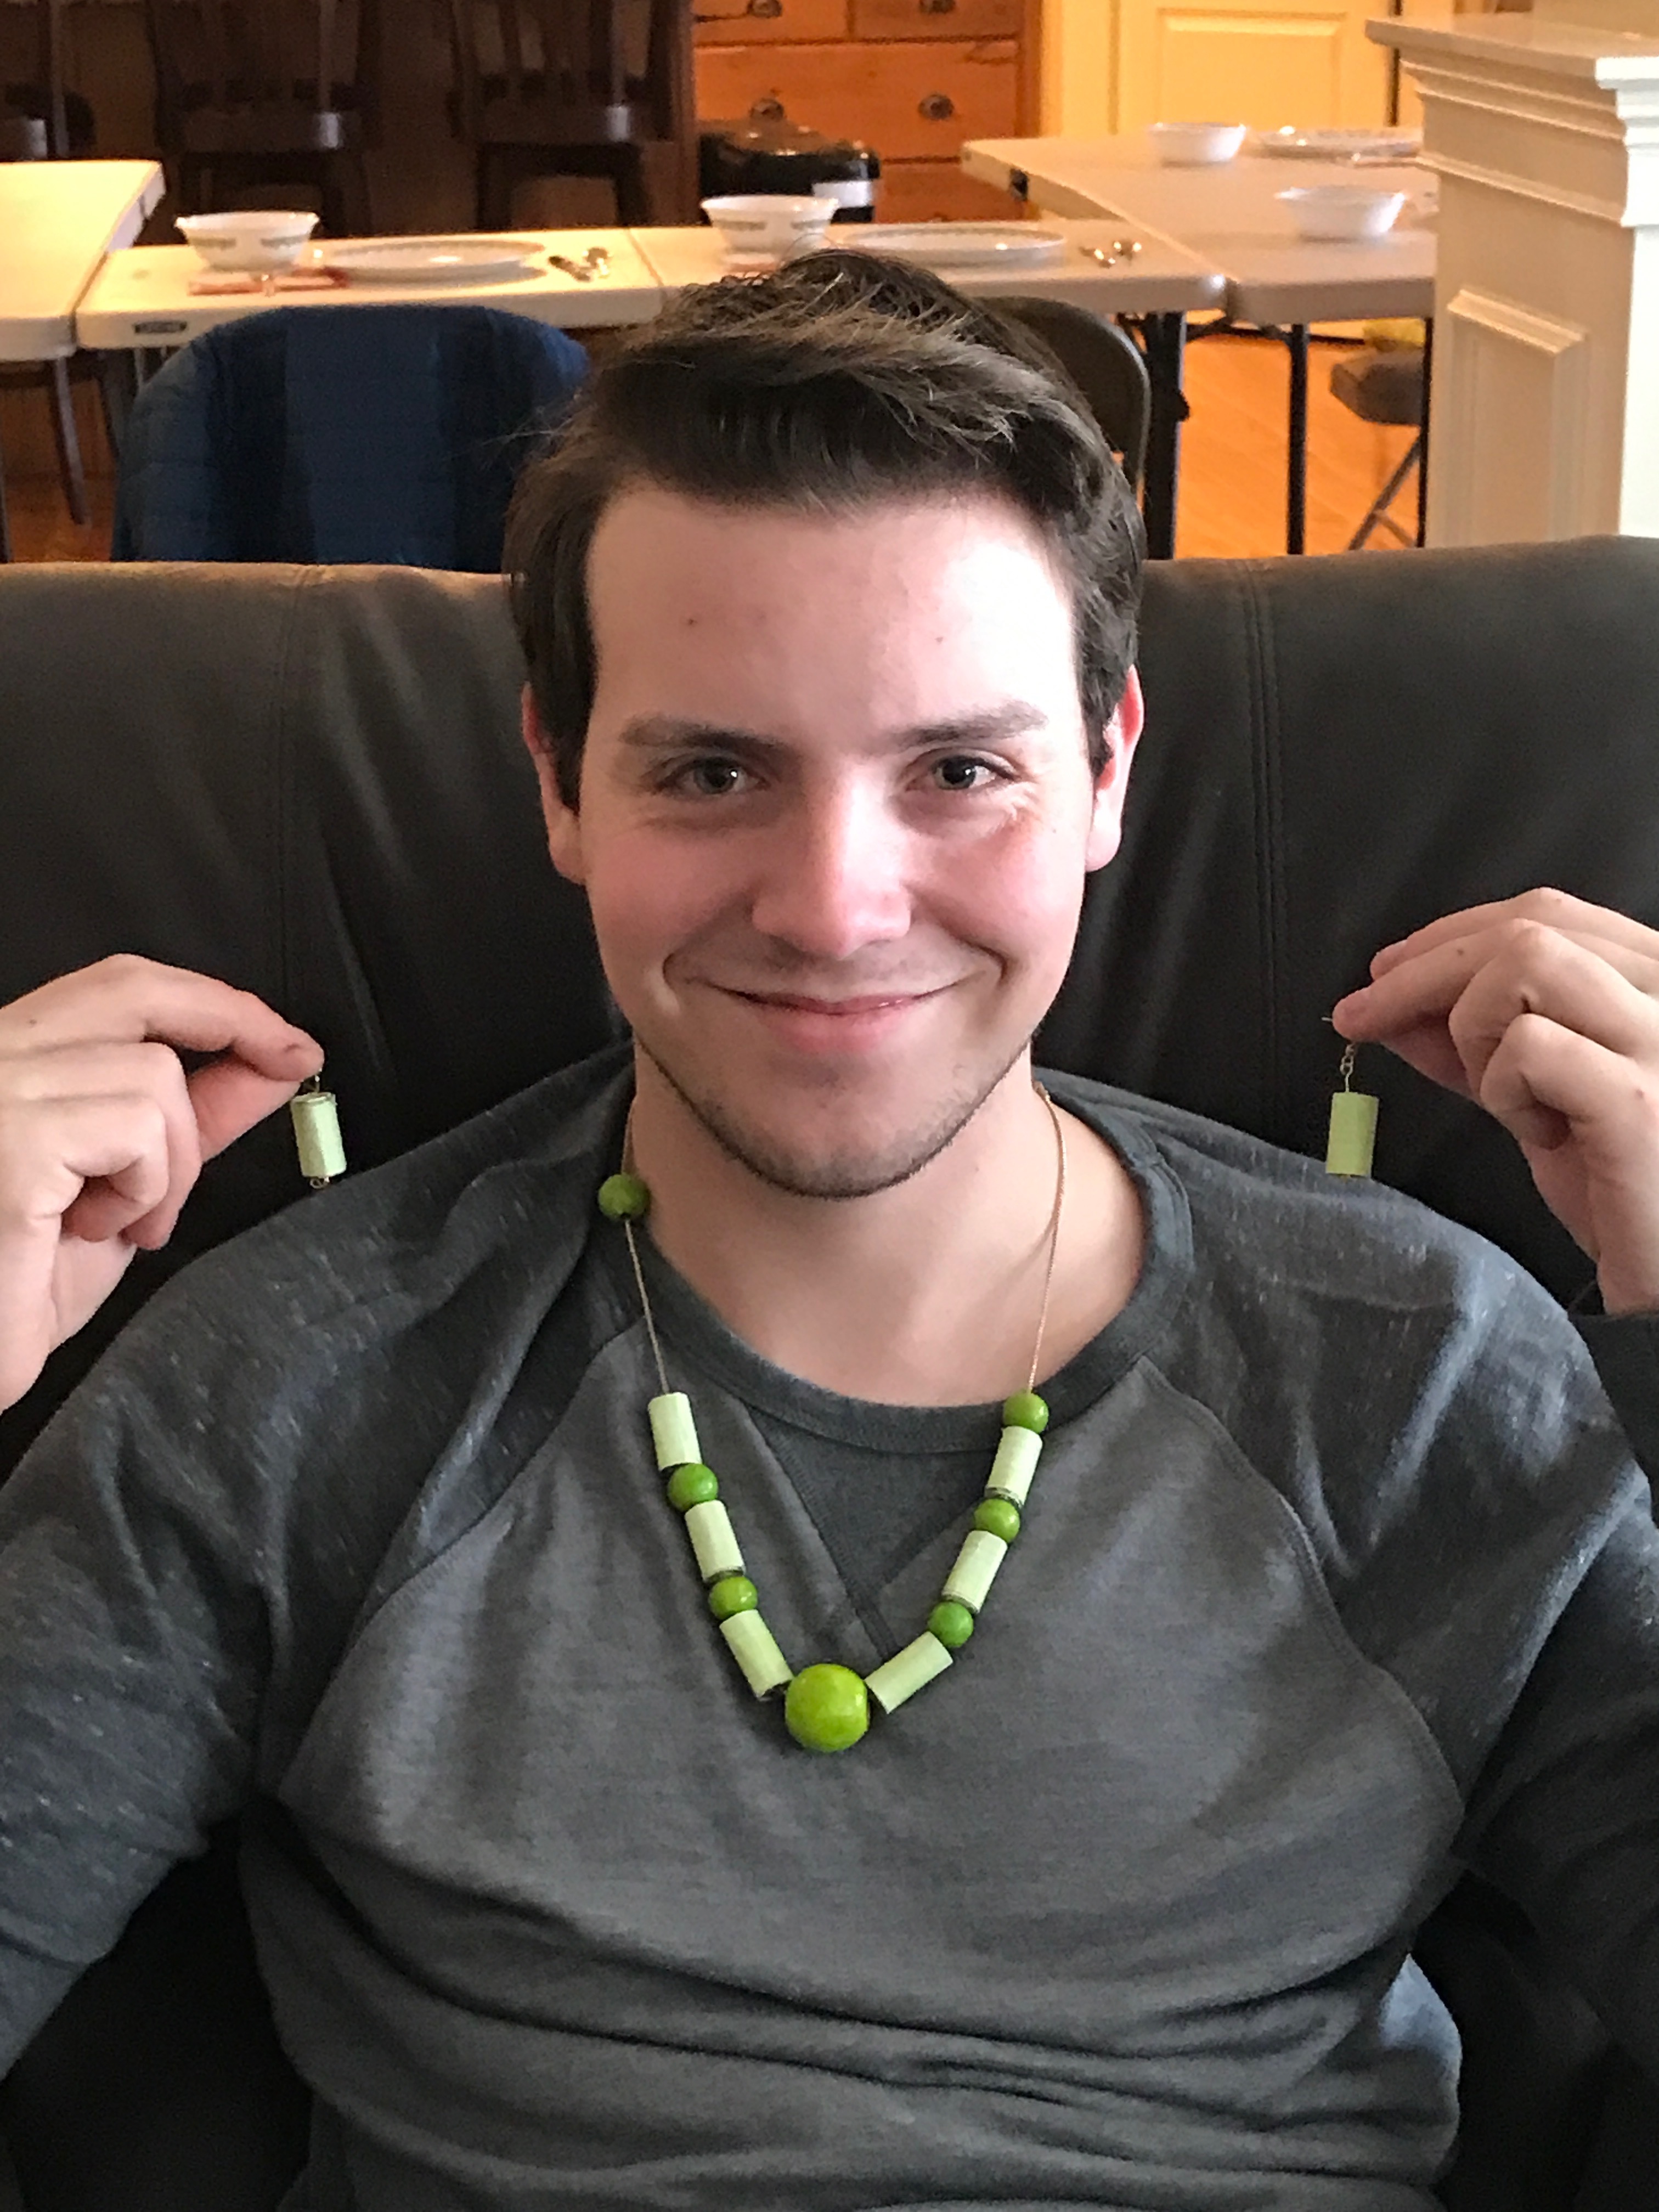
My sister sent me this photo of Timothy modeling his new jewelry (pre-destruction). I love it. 


Browse through the dozens of ideas for money gifts I've given to Timothy and others over the years. I love looking back at them. 

4/27/22

Multiplication Facts Bracelets: A Way to Teach Times Tables with Kids

Back in my teaching days, I used games and fun activities to help my students learn multiplication and division facts. One of my favorites, which worked beautifully for Trevor, is Tic Tac Toe Dice. Physical activities, like playing Steal the Bacon with products or coloring multiplication tables, worked for some kids, while songs and chants helped others. Regardless of the method, it's crucial for their future success that kids learn multiplication and division facts as soon as possible. When kids don't know 6x7 or 9x4 off the top of their heads, they're going to struggle with almost all of the math beyond third grade. 

I don't think I ever encountered a 5th grader who didn't know the 1, 2, 5, and 10 facts, and the vast majority of them also knew the 3's and 4's. But I had plenty of students each year who didn't know the 6, 7, 8, and 9 facts well enough to apply them to the more challenging math we did. I wish I'd thought of the idea of Multiplication Fact Bracelets idea back then, because I think these may have helped some of them. Making the bracelets is a useful way to practice facts, of course, but by wearing them and looking at them frequently, and even using them as a fidget device, I imagine some kids could become more confident with their times tables. Affiliate links below. 


Multiplication Facts Bracelets


Materials: 


Steps: 


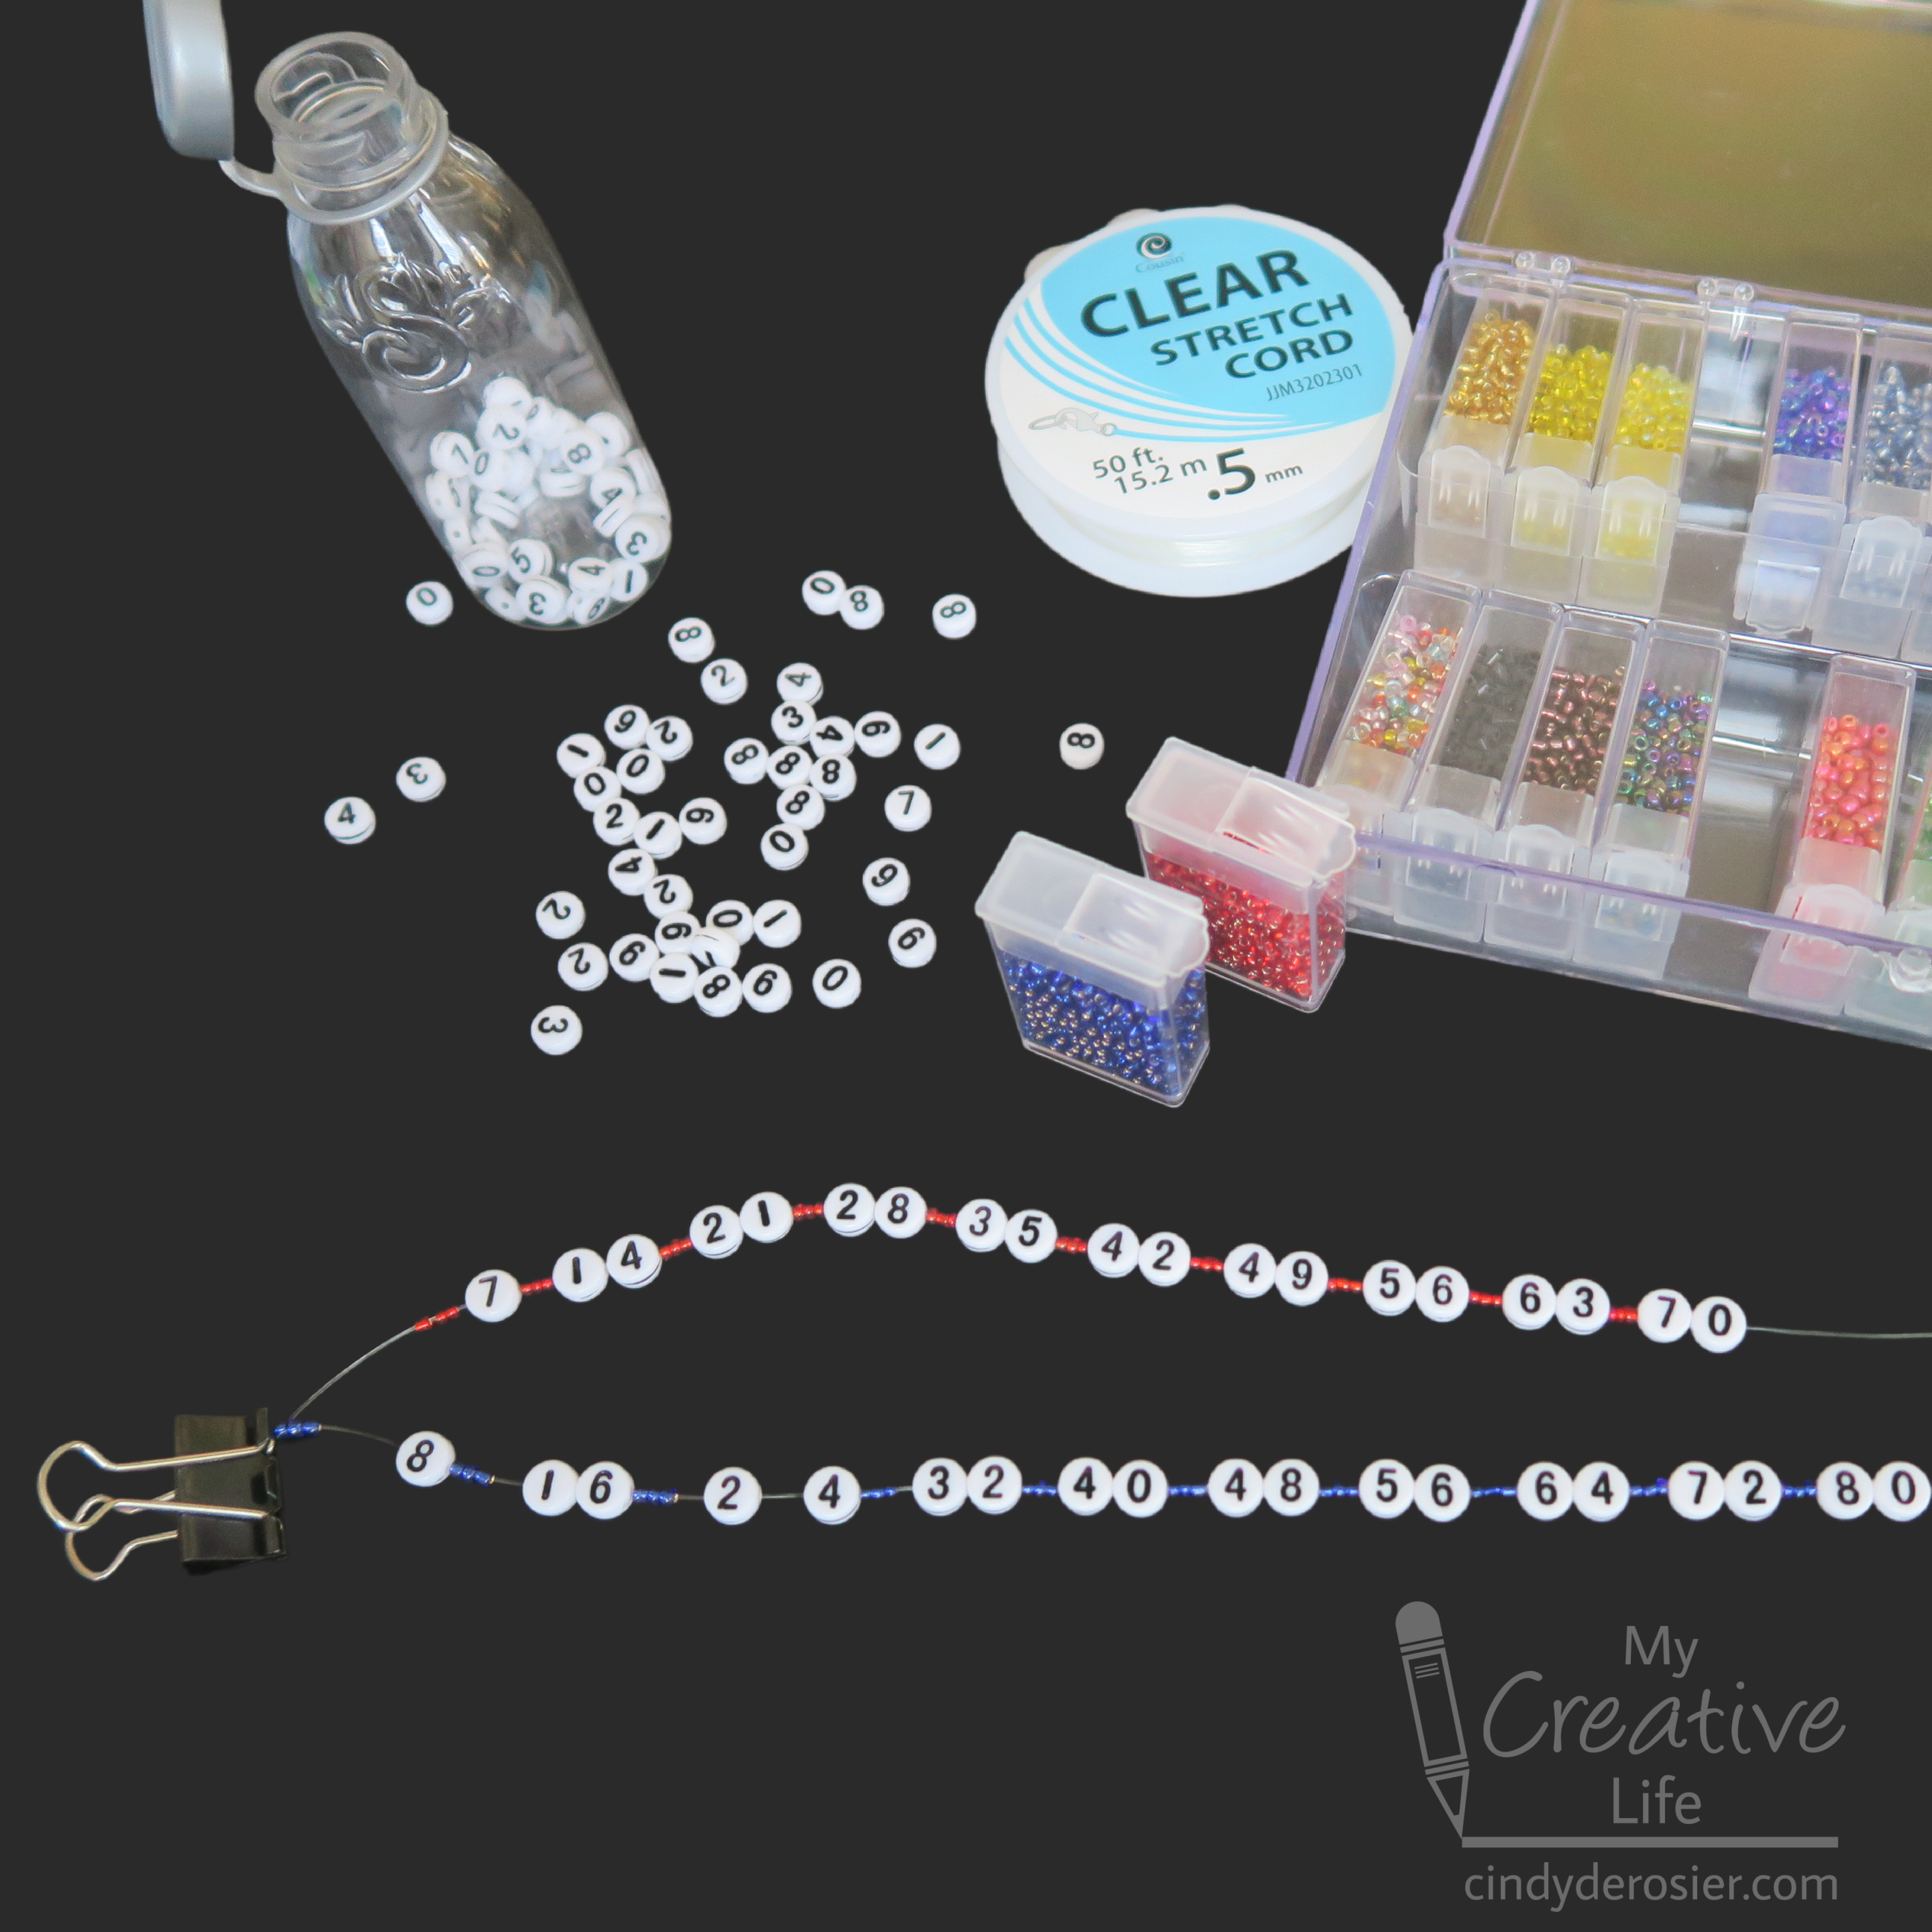
Cut a 12" length of stretch cord. This will leave you with plenty to tie off the bracelet when you're done beading. Attach a binder clip to one end of the stretch cord to keep the beads from falling off that end. 

Choose a single color of seed beads for each bracelet. I used yellow for the 6's, red for the 7's, blue for the 8's, and green for the 9's. If you're doing this in a classroom, have everyone make the same set of facts in the same colors, so that you can refer to the "blue 8's" bracelet without causing confusion or the inevitable, "My 8's are pink!" interruptions. I'll use the blue 8's for this tutorial; obviously, follow the same steps for the other bracelets. 

Begin by putting three blue seed beads onto the cord. The cord is sturdy enough that you can use it to poke into the hole of a bead to thread it. Then add the number 8. Add three more blue seed beads, then then 16. Three more blue seed beads, then 24. Make sure the numbers are all facing the same direction. There is no up and down for 0, 1, 3, and 8, but it matters for the others, particularly the 6 and 9. Continue this pattern until you reach 80.
  

Carefully remove the binder clip and then tie the ends together using a surgeon's knot. It's basically the same as the square knot they already know with an extra 'up and over' when you make it. 


Put the tied bracelets on a piece of parchment paper, then add a dot of glue directly onto the knot you just tied. Let the glue dry completely, then cut off the extra cord. 


The surgeon's knot and glue combination is strong, but to make sure your bracelet doesn't come apart when you're stretching it to put it on, hold onto the knot with one hand while you stretch the bracelet over the other. 


These bracelets are also fun for teaching the concept of Least Common Multiple. In the photo, you can see that 56 is visible on both the red (7) and the blue (8) bracelets and that 48 is visible on both the yellow (6) and the blue (8). Are these the LCMs of those pairs of numbers? Rotate the two bracelets to see if there's another lower number they both share!

2/4/22

Conversation Heart Candy Necklace

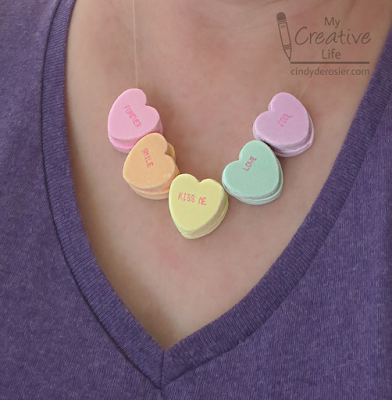
Whether you're a kid, or just a kid at heart, this Conversation Heart Candy Necklace is a really fun craft for Valentine's Day. To test its durability, I took mine on and off repeatedly, then left it on for hours. It held up surprisingly well. Give it a try! Affiliate links below. 


Conversation Heart Candy Necklace


Materials:


Steps: 


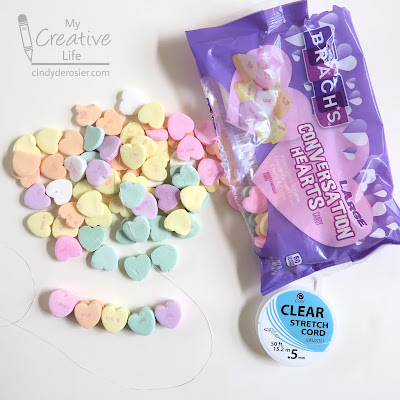
Cut a length of stretch cord large enough to fit around your neck with room to tie a knot. Select the five colors/messages you want for your necklace and set them aside. The necklace is reversible, so you're choosing two of each color (a total of 10 conversation hearts). 


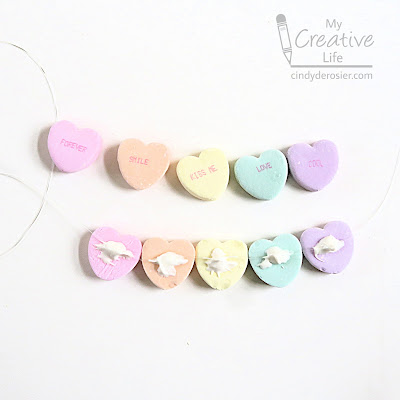
Put a few Candy Melts into a small container and melt them according to the package instructions. Arrange the hearts so that half of them are message-side down. Dab a small amount of melted candy onto each, then lay the stretch cord into the warm candy. 


Immediately press the matching candy on top, trapping the stretch cord inside. Allow the candy to set up completely (30 minutes at room temperature, or 10 minutes in the fridge), then tie it around your neck. Remember - it's reversible, so you can flip the candies around if you want to send a different message. Enjoy!

5/12/21

Clay Watermelon Necklace

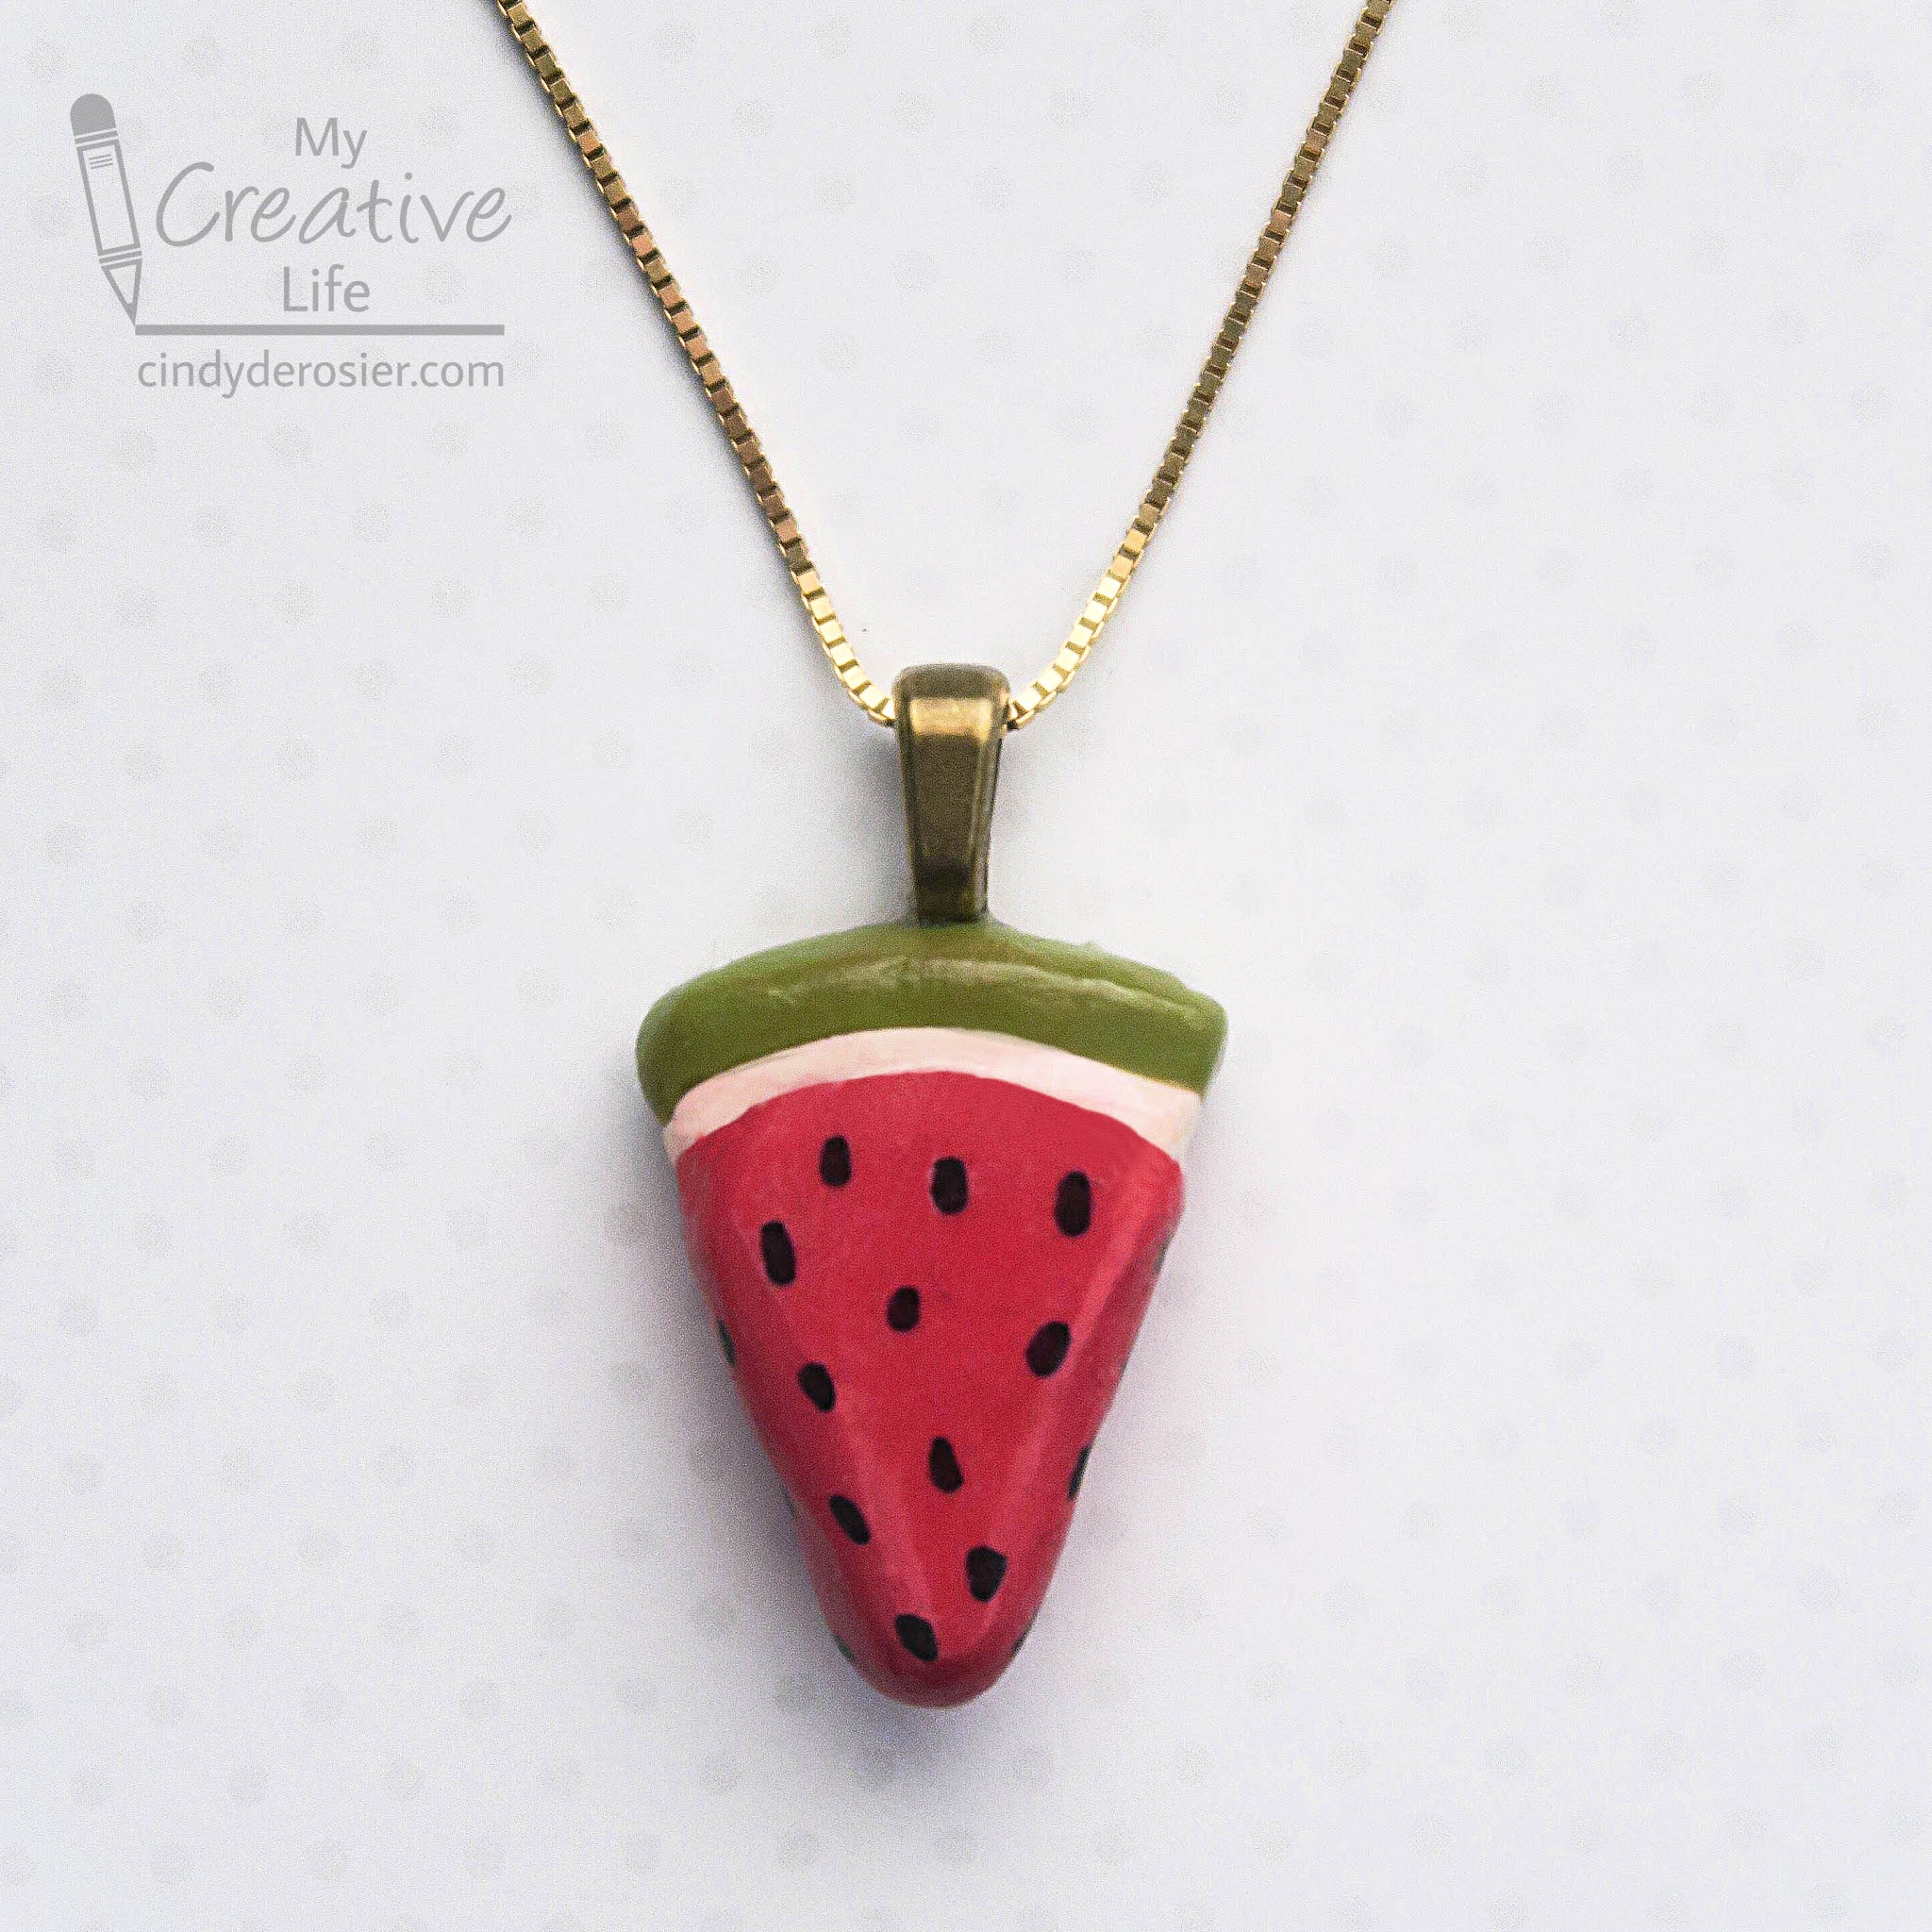
Check out my new necklace! It's easy enough for a child to do, which I know because that is about where my jewelry-making skills are. 


Watermelon Necklace


Materials:


Steps:


Condition the clay by working it until it is soft. Form the red clay into a wedge the size and shape of a slice of watermelon. Add a thin band of white clay across the top. 


Add a thicker band of green clay above the white. Smooth everything until you are satisfied, then bake the clay according to the package instructions. 

When the clay has cooled, use the Sharpie to draw seeds onto the red portion. Baked Sculpey does not need to be sealed, but I chose to add a coat of Mod Podge so that my watermelon would be glossy. Your choice. 

Adhere the bail to the back of the pendant. When the glue is dry, hang the pendant on the cord or chain of your choice.

4/20/20

Diamond Art Monogram Necklace

With the new Diamond Art Freestyle program by Leisure Arts, you can buy gems individually to get exactly the colors you want. There are over 400 colors of gems, including metallics, neon, aurora borealis, and even glow-in-the-dark. With so many colors of sparkly gems available and two different adhesives designed to work on practically any surface, you can now create any design you can dream up. 

Today's project is a simple monogram necklace. It is very easy and takes just minutes. I used Aegean Blue #5003, but any color would be beautiful. Affiliate links below. 


Diamond Art Monogram Necklace


Materials:


Steps:

Choose a letter and paint it with your desired color. When the paint is dry, add a coat of Freestyle adhesive. It will go on milky white. It is ready to use when it is clear, anywhere from 10-30 minutes depending on the temperature and humidity. 

Apply gems to the front of the monogram. Glue the bail to the back. When it is dry, measure enough embroidery floss for the length of your necklace, thread it through the bail, and tie it with a knot. 

1/28/20

King Cake Mardi Gras Necklace

The inspiration for today's craft is no mystery! I loved our time in New Orleans and couldn't wait to design something inspired by the colors and glitz of Mardi Gras. I'm really happy with my new necklace. It's super lightweight and comfy to wear. Can you tell what I used to make it? Affiliate links below. 


-------


King Cake Mardi Gras Necklace


Materials:


Steps:


Create three ropes of white Model Magic and place them side by side. 


Twist the bundle of ropes several times, then join the ends together to form a rough circle. If you're not happy with it, try again! Don't aim for perfection though - the irregularities make it look more authentic. 

Set your King Cake aside and let it dry for at least 24 hours. Flip it upside down and let it dry another 24 hours. 

Paint the King Cake with the Camel paint, then add highlights of Harvest Gold in the twists and on top to mimic the look of baked goods. When the paint is dry, use a Q-tip to glob white gesso on the top. Be sure to leave plenty of the 'cake' exposed beneath the 'frosting.'


When the gesso is dry, add Stickles. Alternate between green, yellow, and purple. Make the sections  different sizes like they’d be if you were dropping colored sugar on a real King Cake. 


Let the Stickles dry overnight. Glue the bail onto the back of the King Cake. When it is dry, add a chain and your King Cake is ready to wear!


If you want the real thing, you can make it yourself from scratch. Or, use a handy box mix that comes with everything you need, including the filling, frosting, and baby. This year, Mardi Gras falls on February 25, so you have plenty of time to prepare!

11/15/19

Diamond Art Scissors Hair Accessory

With my fabulously-organized stash of leftover Diamond Dotz, it's super easy to pull out exactly the colors I need to bedazzle just about anything. In this case, a pair of chipboard scissors.


But it's not just a pair of scissors - it's my new hair accessory, inspired by Fiskars beloved orange-handled scissors!


My original plan was to turn it into a necklace, but I already have a scissors necklace. Affiliate links below. 


---------

Diamond Art Scissors Hair Accessory


Materials:


Steps:


Paint the scissors (orange on the handles, silver on the blades). When the paint is dry, use craft glue to attach the dots to the scissors. Finally, use E-6000 to attach a bobby pin to the back of the scissors. Your masterpiece is ready to wear!


---------


You probably already know how awesome Fiskars scissors, trimmers, punches, and other craft tools are. But that's not all they make! Fiskars makes my favorite gardening tools as well. Check them out!

6/3/19

Scrabble Tile Pendants

I love to craft with friends, even when they're 3000 miles away! Jessie, my friend and roommate at Prime Con, lives across the country from me, but that didn't stop us from collaborating on a project: Crocheted Necklaces with Scrabble Tile Pendants. Read on to learn how I made the pendants (affiliate links below), then hop over to Jessie at Home to see how she created crocheted necklaces for each of the pendants I made! Here's a sneak peek of one of the completed necklaces.


---------


Scrabble Tile Pendants


Materials: 


Steps: 

Before getting started, invert your Diamond Glaze (with the lid still on) and set it in a narrow glass or something else that lets it sit upside down. Leave it for at least 30 minutes. Do not shake! 

Select your letters, then set them on a smooth, flat surface. Hold the tip of the Diamond Glaze just above the center of the tile and squeeze gently. Allow the Diamond Glaze to pool toward the edges. If you squeeze slowly, it should make a dome on the tile without spilling over the edge. 


If it gets too close to an edge and isn't reaching one or more of the corners, use a toothpick to gently guide it into place. 


Continue adding Diamond Glaze until you have a dome. Hopefully there are no bubbles (that's why we inverted the Diamond Glaze), but sometimes they show up for no good reason. If they do, gently poke each bubble with a toothpick. Sometimes I use a needle if I have one handy. 

Without moving, jostling, or otherwise disturbing the tile, let it sit for at least 24 hours. It will look opaque at first (like the letter V below) but will dry crystal clear. 


When your tiles are completely dry, turn them over and use Supertite glue to add jewelry bails. I used three different styles of bails for the pendants I made for Jessie and her twins, Kyla and Vada.


Now head over to Jessie at Home to learn how to turn these pendants into gorgeous beaded necklaces!

4/3/19

Using Leftover Diamond Dotz: Flower Necklace

Yesterday I went over the similarities and differences between diamond art kits. One more thing the brands all have in common is that they come with plenty of extra Dotz. Should you keep those leftover Dotz when you finish the kit? Absolutely! I'm going to be sharing lots of craft ideas for using your extra Diamond Dotz, starting with a simple (and very inexpensive) Flower Necklace. Affiliate links below. 


---------


Diamond Dotz Flower Necklace


Materials: 


Steps: 


Use the toothpick to spread a THIN layer of Supertite glue on the front of the bail. With the stylus, position 6 Diamond Dotz around the edges and a 1 of a contrasting color in the center. Gently nudge them until they're perfectly aligned. 


While you have the supplies out, make more than one. Each costs just pennies to make! 


 Let the glue dry completely. Then thread the bail onto a chain and your necklace is ready to wear!

6/3/16

Our Latest Jewelry Attempts: A Beaded Bracelet and Wire-Wrapped Earrings

Today is Trevor's last day of school. As is his tradition, Trevor made a beaded bracelet as an end-of-the-year gift for his 4th grade teacher. As is my tradition, I've done a terrible job photographing the bracelet. I think jewelry has got to be one of the hardest things to photograph ever. Major props to those who do it so well. 


You know what's even harder to photograph than a beaded bracelet? Faceted earrings. That's what I made while Trevor was making the bracelet. 

It was my first attempt at wire-wrapping. As with most things, wire-wrapping is more difficult than it seems. Still, I'm happy with how they turned out.

4/18/16

Olympics Bracelet

I'm not a sports fan by any stretch of the imagination, but I do love the Olympics. The Summer Games open in Rio in just over 3 months and I'm really looking forward to watching as much as I can. I *think* I have convinced Trevor to go with an Olympics theme for his birthday party this year. There are so many possibilities for fun crafts and activities.

I love the symbolism behind the Olympic flag. The five interlocking rings are said to represent the 5 continents that come together for the Oympics. The colors of the flag (blue, yellow, black, green, red and white) were the colors of the flags of all nations at the time it was designed (1912). Here's a really simple and inexpensive bracelet inspired by the Olympic flag that would work equally well as a party activity or a favor. Affiliate links below. 


-------

Olympics Bracelet


Materials:


Steps: 


Cut a piece of clear stretch cord about 2-3 inches longer than the desired wrist circumference. Attach to a binder clip to one end (to prevent the beads from fall off one end as you thread them on the other). Start threading the beads on the cord, beginning with 8 whites. Then add 1 each of blue, yellow, black, green, and red. Add 8 more whites and test the fit. Add or subtract white beads until the bracelet is the correct size.

To finish your bracelet, remove the binder clip and tie the ends together tightly using a normal overhand knot (the first step in tying a shoe). Tie a second knot using a surgeon's knot. It is basically the same thing as an overhand knot but you put the end through the loop an extra time. Pull tightly to secure it. Trim the excess cord or thread it back through the beads to hide the ends. You can add a drop of glue to the knot to make sure it's extra strong, but it's not necessary.

-------

I'll announce the winners of the giveaway later today. Good luck!

1/29/16

Birthstone-Inspired Pendants

I've always loved the concept of birthstones. I don't know why, but something about having an official stone to represents me is really cool. I made these simple, inexpensive faux-birthstone pendants for my friend Courteney and her daughters (my goddaughters, Kylinn and Ellia). 


Kylinn and Ellia are 9 and 6 respectively. This craft is easy enough that they could have done it themselves. For each, you need: a heart-shaped resin jewelry blank, a letter sticker, a rhinestone in the proper color, and Diamond Glaze. Kylinn and Ellia both have July birthdays, so the red rhinestone was perfect to represent the ruby. Courteney's birthday is in November, so I chose a topaz-colored rhinestone.

My letter stickers started out white, so I used a Sharpie to color them black. I stuck them in the blanks and added the rhinestones. 


Then I flooded each pendant with Diamond Glaze. You want enough to form a dome, but not so much that it spills. The Diamond Glaze looks cloudy when wet and dries clear.


When the pendant is dry, attach it to a necklace or bracelet. It also makes a fun keychain and zipper pull. It really couldn't be easier!

6/29/15

Book Review: Button Mania

Last November, I reviewed the first two kids' craft books written by my very talented and creative boss, Amanda Formaro. Trevor and I loved both Rubber Band Mania and Duct Tape Mania. If you haven't checked them out already, I strongly encourage you to do so! They are full of fun ideas for school-age boys and girls and would make a thoughtful and affordable gift.

 I don't know how she does it, but Amanda has written three more books since then! The publisher sent me advanced copies of all three. The first book I dove into was Button Mania: Buttons, Bottlecaps and Beyond! 


As before, I am reviewing this not out of obligation, but because I think you will love it as much as I do! This colorful book is chock-full of fun projects. I appreciate the clear directions and many step-out photos. Each project has a supply list and is marked with a difficulty level. Button-themed tips, trivia and jokes are sprinkled throughout the pages.    

The book arrived just before Trevor's baseball practice. I couldn't wait to try a project, so I grabbed supplies for the Button Bracelet and brought them along with me to the field. I invited my friends and fellow baseball moms, Jenny and Rebecca, to join me in making bracelets. 


We had a great time stringing buttons, chatting and watching our kids practice. Steve was very helpful, both in taking photos of our crafting and in trying on my completed bracelet.


I'd brought along different types of cording to see how they would work, as Amanda's supply list said to use twine or cord. Jenny used cream embroidery floss with green, turquoise, brown and cream buttons to create a beautiful, layered bracelet. I used black waxed laces (left over from a leatherwork project Trevor made) with alternating white, red and blue buttons to make a patriotic bracelet. Rebecca used a stretchy red cord with red and pink buttons for her bracelet.


Here's a closer look:


The three cords yielded different looks. The embroidery floss was much more difficult to string, but the way Jenny overlapped the buttons was very pretty. My black laces were easy to string and added a contrasting design detail to the buttons. Rebecca's stretchy cord was easy to take on and off, but curled up and had to be straightened to look right. 

We had a great time and the 90 minute practice time was over before we knew it. Thanks to Jenny and Rebecca for playing along! They were both very impressed with Button Mania. We only came up with one critique and that is that the first chapter (Stuff to Wear) is entirely projects for girls (earrings, bracelet, locket, etc). The remaining chapters (Stuff to Play, Stuff for Outside, Stuff for Noise, Stuff to Hang, Stuff for Fun, Stuff to Create and Stuff for Home) are great for both boys and girls. As the mom of a boy, if I were flipping through the book at the store and started at the beginning, I might not buy it, thinking it was mostly for girls. That is definitely not the case! Trevor has marked a dozen projects that he wants to try eventually.

Button Mania is available for pre-order on Amazon (affiliate link below) and will be in stores in August. Check it out! You won't be disappointed.

-------------


6/4/15

Another Homemade Bracelet

Today is Trevor's last day of 3rd grade. As has become his tradition, he chose to make a beautiful beaded bracelet as an end-of-the-year gift for his beloved teacher, Ms. Titus. 

In the car on the way to Beads on Main, we talked about observations Trevor and I had made. We noticed that Ms. Titus wears silver jewelry, not gold. She wears black and white a lot and seems to like purple. When we got to the store, Trevor went right to work selecting beads. He started with the black lava beads that are becoming his signature item. It took him a long time to carefully select just the right rosy-purple beads. He laid them out on the work mat and went searching for the rest of the beads he wanted to use. He must have tried at least 10 different silver spacers before settling on one style. He carefully strung the bracelet, chose the clasp, and then asked the store owner for help with the crimp beads and jump rings.


I stayed completely out of the way during the entire process, except to offer my wrist as a size guide for his bracelet. Here's another look at the bracelet:


I really like how it came out. I think Ms. Titus will like it too.