Showing posts with label newspaper. Show all posts

3/22/22

Torn Newspaper Giraffe

The fourth animal in my series made with painted and torn newspaper is a giraffe. Click to see the tiger, monkey, and lion


Painted Newspaper Giraffe


Materials: 

  • newspaper
  • acrylic paint (yellow, brown, black)
  • glue

Steps: 


Find three newspaper pages that have small text, like sports scores, stock information, or classifieds. Use a single coat of paint to color one sheet of newspaper yellow. Do not rinse your brush. Color a second sheet with brown. The yellow left on your brush will make a light brown. As the yellow runs out, you'll get a true brown. Paint half of a sheet black and leave the other half unpainted. 

When the paint is dry, tear out the giraffe's face from yellow. The basic shape is like a footprint. Tear slowly and carefully because newspaper tends to want to rip in just one direction. 

Tear the giraffe's muzzle from light brown, then glue it to the face. Tear two nostrils and a smile from black and glue them in place. 

Tear two outer ears, two ossicones, and some spots from the light brown. Then tear two inner ears and a mane from dark brown. To make the mane, I tore a rectangle, then carefully tore one short end into strips, leaving the other end intact to make it easier to glue.  

Finally, tear two eyes from the unpainted newspaper and two black pupils. Glue everything together. 


3/3/22

Torn Newspaper Lion

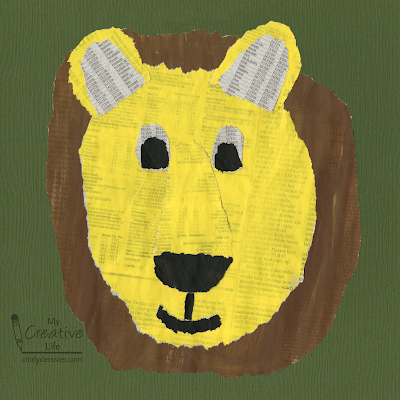
The third project in my painted and torn newspaper animal series is a lion. Click to see the tiger and the monkey


Painted Newspaper Lion


Materials: 

  • newspaper
  • acrylic paint (yellow, brown, black)
  • glue

Steps: 


Find three pages of newspaper that are predominantly small text, like sports scores, stock information, or classifieds. Using a single coat of paint, color one sheet of newspaper yellow and one sheet brown. Paint half of a sheet black and leave the other half unpainted. 

When the paint is dry, tear out a large brown circle for the lion's mane. Tear slowly and carefully because newspaper tends to want to rip in just one direction. 

Tear the lion's face, two outer ears, and the snout from yellow newspaper. Tear two inner ears and two eyes from the unpainted newspaper. Tear two pupils, a nose, the mouth, and a strip connecting the nose and mouth from the black.  

Glue everything together. 


2/25/22

Torn Newspaper Monkey

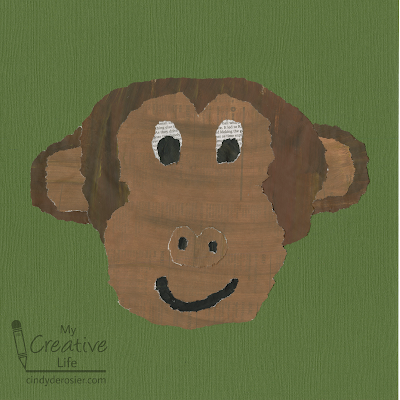
Do you remember the newspaper tiger I made? Now he has a monkey friend. 


Torn Newspaper Monkey


Materials: 

  • newspaper
  • acrylic paint (brown, tan, black)
  • glue

Steps: 


Find three sheets of newspaper with mostly small text, like the sports scores, stock information, or classifieds. Using a single coat of paint so that some of the text is showing through, paint one sheet of newspaper brown and one sheet tan. Paint half a sheet of newspaper black and leave the rest unpainted. 

When the paint is dry, tear out a large oval of brown for the monkey's head and two smaller ovals for the ears. Tear slowly and carefully, as newspaper wants to rip in just one direction.  

Tear the tan paper into a figure 8 for the monkey's face. Remove a notch from the top. Use the rest of the tan paper to tear two small inner ear ovals and a small figure 8 nose. 

Tear two oval eyes from the unpainted newspaper. Then tear two pupils, two nostrils, and a mouth from the black. 

Glue everything together, then mount it on background paper if desired. 


2/1/22

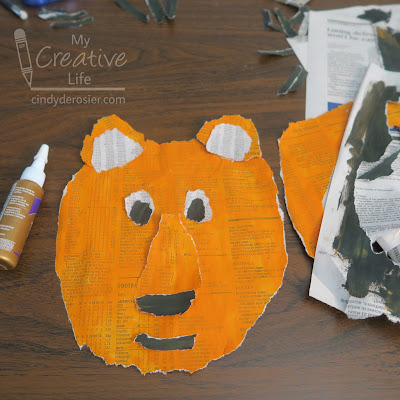
Painted Newspaper Tiger

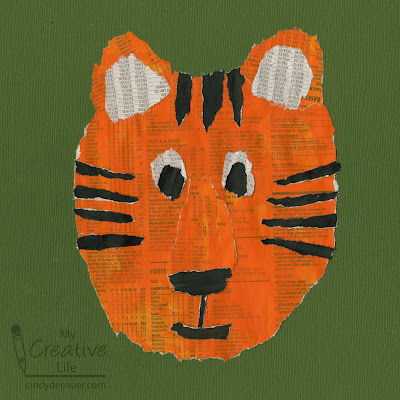
2022 is the Year of the Tiger! Here's a craft I think you'll enjoy, whether you need a project for Chinese New Year, as an activity for your 1st grade Cub Scouts, as decorations for a zoo-themed party, or to accompany a study of tigers. It starts with a pile of newspaper and is a great way to develop fine motor skills.     


Painted Newspaper Tiger


Materials: 

  • newspaper
  • acrylic paint (orange, black)
  • glue

Steps: 

For each tiger, paint one sheet of newspaper orange and one sheet black.  Leave one sheet white. You won't need that much, but it's better to prepare extra. Try to pick a page with just text, like the sports scores, stock information, or classifieds. Just add one coat of paint - part of the charm of the project is seeing the text showing through. 

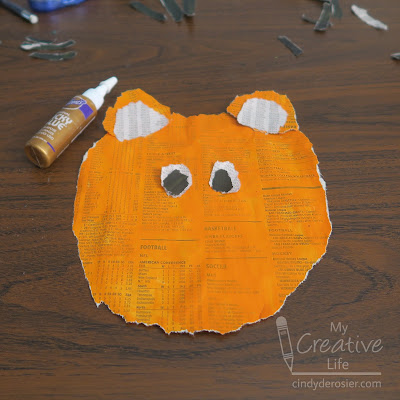
When the paint is dry, tear out a large circle for the tiger's face and two small circles for the tiger's ears. Tear slowly and carefully; newspaper tends to want to rip in just one direction, so you'll have to direct it the way you want it to go. If you mess up, no problem. That's why you painted extra. 

Tear two inner ears and two eyes from white, then two small pupils from black. 


Add a triangular orange muzzle, and a black nose and smile. Glue all the facial features into place. 


Tear strips of black to make the tiger's stripes. I used three thicker stripes along the top of his heat and four thinner stripes on each side of his face. Glue them in place. Add one very thin stripe to connect the nose to the mouth.  You can hang your tiger as is, or mount it onto contrasting paper like I did. 


Obviously, you can use this technique to make all sorts of animals. I may just do exactly that!


9/10/21

Found Poem: September 11, 2001

September 11, 2001 was a Tuesday. I had just woken up and started getting ready for work when my phone rang. A call at 6:00 am is never good news. And this was as bad as news gets. My friend Brenda told me to turn on the TV immediately. What I saw was horrifying.

The drive to work was strange. The roads were empty and I wanted to turn around and go home. But I couldn't. I needed to be there for a class of fifth graders whose parents might or might not have told them what was going on before dropping them off at school. When I got to work, we had strict instructions not to talk about what was going on, to offer brief reassurances only as needed, and to keep the day as normal as possible. It was very difficult for me to stay in the cocoon of my classroom with absolutely no information about what was going on beyond those walls. We had no internet in the classrooms and this was long before smart phones, so we teachers had to wait until recess and lunch to learn anything. 

The drive home was even stranger than the drive to work.  

The following day at school was even more difficult. By then, all the students knew what had happened. Many had seen graphic images over and over on TV. They were scared, they were upset, and they had a thousand questions. There was no hope of having anything approaching a normal school day. To complicate matters, each Wednesday we got a class set of newspapers. The kids and their parents knew that Wednesdays meant newspapers and current events homework. I couldn't just casually send home these papers with their screaming headlines and disturbing photos, expecting them to pick an article and summarize it. 

During my lunch break, I used the paper to make this found poem. 


At the end of the day, I read my poem to them. I announced that homework was canceled, then invited only those students who wanted to take a paper to do so. I gave them an optional homework assignment to create their own found poem, ideally working with parents and older siblings. I received five poems, all beautiful. 

It's hard to believe 20 years have passed. I have not forgotten. 

6/1/21

Craft Materials Name Art

 More name art! I love name art


---------

Craft Materials Name Art


Materials:


Steps:


Use the craft materials list to determine what material to use for each letter in your name. If you have a duplicate letter, you can either do the same thing twice or use a second material that starts with that letter. 

Glue each word to a strip of colorful cardstock. Mount the strips in order on a separate piece of cardstock so that they spell out your name vertically. 


4/20/21

Newspaper Math

Last week's edible factor trees reminded me of a math activity I used to have my students do. Using a newspaper, they cut out numbers and glued them to a piece of paper in order to create six grade-appropriate math problems: one each of addition, subtraction, multiplication, division, fractions, and percents. I stressed "grade-appropriate" because single digit addition, for example, is not something most 5th graders need to practice. My expectations would be much different for younger or older children. 

This is what I would expect of a typical 5th grader:


The first step was to cut out 15-20 numbers from which they could generate the six problems. If students had trouble finding numbers, I would direct them to advertisements. You can usually find dollar amounts, phone numbers, percents, model year numbers (cars), and other useful numbers there. Once they had their numbers, they needed to arrange them on the paper so that they made sense (no dividing by zero) and so that they can be solved (no fractions that can't be simplified). With the problems set, they needed to leave enough space between the problems to solve them before gluing them down. 

While some may question how much solving six problems of their choosing could possibly be of much benefit to students, there's actually a whole lot more going into this assignment than just solving six math problems. Students become familiar with the layout of a newspaper, practice scanning (critical for reading proficiency), use fine motor skills to cut out small numbers, think about how to solve six types of math problems, judge the difficulty level and their own capabilities, develop spatial awareness, and learn to apply the correct amount of glue (another fine motor skill, and something 90% of kids need to practice more often). All this before they ever solve the math problems. Best of all, most of my students really enjoyed this activity that was packed with (hidden) learning.  

Here's how the completed assignment looks:


Six little math problems, scissors and glue, and a whole lot of learning. 

9/3/20

Newspaper Hat for the Kentucky Derby

Ever since touring Churchill Downs and visiting the Kentucky Derby Museum, I've thought it would be a lot of fun to take part in Derby Day. Not in person (I hate crowds), but from the comfort of home, with the hats and the burgoo and mock mint juleps and Derby Pie. However, the Kentucky Derby is traditionally held the first Saturday in May, which is also National Scrapbook Day... and you can guess which one matters more to me.

Enter COVID-19. Back in the spring, when I heard that the Derby would be postponed from May to September, I decided we'd be hosting a Derby party. Silly me, thinking back then that everyone would follow the rules and we'd have squelched the pandemic by now. We're still having our party, but we aren't having any guests. deRosier, Party of Three!

We aren't the only ones without guests. Churchill Downs recently announced that, for the first time ever, the race will be run without fans present.

One of the most important rules for the Kentucky Derby is that all women must wear a hat. Not just any hat, but a dressy, showy, and/or over-the-top hat. I'm not a hat person (and when I do wear a hat, it's my Mickey Mouse ball cap), so I made my own fancy hat out of newsprint and a bunch of other things from the craft room. 


How to Make a Newspaper Hat


Materials:

  • newspaper or newsprint
  • masking tape
  • Folk Art paint
  • ribbon, faux flowers, pipe cleaners, etc. 

Steps:

Separate the newspaper or newsprint into individual pieces, then center 3-4 sheets on your head. Press down to smooth them, then ask a helper to tape around the paper, just above your ears. Go around at least twice. 

(I'm smiling in this picture.)

Remove the paper from your head. Tightly roll the edges of the paper up toward the top of the hat to form the brim. It will hold in place. In this picture, you can see that I've started to roll the section by my hand, but haven't done anything with the rest. 


Once the brim is formed, you can gently shape the hat. Then add a coat of paint. Allow the paint to dry thoroughly. Now it's time to decorate! Anything goes. I started with a sprig of faux roses, then tucked in the ribbon. I curled silver pipe cleaners around a pencil, then added them. I hid the ends with faux ivy leaves.  


I'm ready for the Derby! 


I don't know anything about horse racing, but it's still fun to try to pick a winner. It's no fun betting on the favorite though; I want to root for an underdog. (Underhorse?) Based entirely on the name and the jockey's silks, I'm going with....


There are all sorts of official Derby events and contests taking place online, leading up to the 146th Running of the Kentucky Derby on Saturday at 7:00 pm EST. Go, Thousand Words!

6/26/20

Cereal Box and Newspaper Tree

Some of my favorite crafts are those made with materials reclaimed from the recycle bin. This tree is made entirely of painted cereal boxes and newspaper. 


Cereal Box and Newspaper Tree


Materials:

  • cereal boxes
  • newspaper
  • Folk Art paint
  • scissors
  • glue


Steps:


Open up the cereal boxes to expose the insides. Paint one box with shades of blue to make a sky and another with shades of green for the leaves. Paint some newspaper with shades of brown.


Cut a rectangle from the blue cereal box to use as the background. Layer a piece of green on top to make the grass. Cut a tree shape from the newspaper. Glue the trunk in place, leaving the branches free. 


Cut a bunch of rounded shapes from the green cereal box. Layer the largest ones under the branches, gluing them in place. 


Finally, glue the smaller green pieces on top of the branches, anchoring them. 


I've started hoarding cereal boxes because I have a bunch of ideas for additional projects. Expect to see some coming soon!

Adult Coloring Books

5/7/20

Collage Workshop for Kids: Painted Newspaper Row of Colorful Houses

A few years ago, I learned that there is an Eric Carle museum in Amherst, MA. It's been on my must-visit list ever since. Eric Carle is my favorite artist and the idea of an entire museum devoted to picture book art makes me so happy.

I received a promotional copy of the Carle Museum's Collage Workshop for Kids: Rip, Snip, Cut, and Create with Inspiration from The Eric Carle Museum (affiliate link here and below) and I love it so much. It's full of neat ideas for kids to make interesting collages. The projects use everyday materials in unique ways. I combined the ideas from two different workshops to create this collage featuring a row of colorful houses. I'm so happy with how it turned out!


Painted Newspaper Row of Colorful Houses


Materials:


Steps:


Add red, blue, and yellow paint to the Frisbee with a good amount of space between them. Add a small amount of water between each puddle of paint. (While you could use a regular paint palette for this project, I highly recommend a Frisbee. Not only for the reasons in this post, but because it contains the water much better than a palette.)

Use the paintbrush to draw some yellow paint into the water to thin it, then apply it to the newspaper. You want to be able to see the text through the paint, but there should be plenty of color. Do the same with the red paint, without cleaning the brush. Continue with the blue paint. This process will create orange, green, and purple. Paint each of these onto the newspaper. 


Mix and blend until you've made all the colors you want. So pretty!


I knew I wanted to make a row of colorful houses, so while the paint dried, I looked online for inspiration. The paint dried much more quickly than it took for me to look through all the beautiful photos!


Cut the colorful newspaper into rectangles. I kept all of the text running the length of the rectangles. Arrange them on the construction paper. 


When you are happy with the arrangement, glue them in place. I added a sliver of sun to the top right. Use the black colored pencil to add windows, doors, and other decorations to the buildings. 


This was such a fun project! If you have kids in your life, I highly recommend the Collage Workshop for Kids: Rip, Snip, Cut, and Create with Inspiration from The Eric Carle Museum

12/12/19

Holiday Found Poem

Have you ever created a Found Poem? You take printed material, like a newspaper or magazine article, cut out words ransom-style, arrange them to form a poem, and use a glue stick to attach them to plain paper. Back in my teaching days, we got newspapers in the classroom once a week and I'd occasionally assign a Found Poem. I loved seeing the poems my students would create. Even though they were using the same newspaper, their poems were always completely different.

Our local newspaper ran a story about the Christmas at the Waterfront event, with photos from the Lighted Boat Parade. Our family loves attending and seeing the creative ways that people light up their boats. I thought it would be a fun challenge to make a Found Poem about our family traditions. I cut out the photos and a bunch of random words from the headlines in that day's paper, but as I arranged and rearranged them, my poem went a different direction.


Christmas Memories


Preserve family tradition: 
songs, treats, and making wreaths.
More important:
Including Christ this season.


Most of the words in my poem came from headlines that have absolutely nothing to do with Christmas. That's half the fun and it really challenges your creativity. If you've never done a Found Poem, I encourage you to give it a try!