Showing posts with label googly eyes. Show all posts

11/26/20

Standing Cardboard Tube Moose

As the Editor of Fun Family Crafts, I spend a fair amount of time looking at cardboard tube crafts submitted by our readers. I love all the creative things people do with this humble item. My latest contribution to this category of recycled crafts is a standing moose. Can you guess material what I used so that the moose can stand upright?


If you said craft sticks, you're right! I left the sticks exposed for this picture, but you can cover them for a more finished final product. Affiliate links below. 


Standing Cardboard Tube Moose


Materials:


Steps:


Cover the cardboard tube with brown construction paper and set it aside. 

Using a craft stick as a guide, cut out two front legs and two back legs (double each if you want to hide the craft sticks on your finished moose). Then cut out the head, a pair of antlers, a pair of ears, the 'beard' (actually a dewlap), and the tail. Save a scrap that is around the same size as the face.

Use a black pen to color in the hooves, nostrils, and inner ears. 


Glue one craft stick on the back of each leg. (If you want to cover the craft sticks so they don't show, now is the time to glue each duplicate leg in place, sandwiching the craft stick between the two pieces of construction paper.)

Glue the legs onto one side of the moose's body. These should be straight up and down. Let the glue set for a few minutes, then glue the legs onto the other side of the body. These will be slanted. Make small adjustments until they are balanced. Hold them in place for a minute or two. Then glue the tail in place. 

Add the eyes, ears, antlers, and dewlap to the head. Accordion-fold the scrap to make a neck. Hold it behind the head, making sure the scrap isn't visible from the front. (If it is, trim it so that it is hidden behind the head.) Glue one end to the back of the head and one end to the body. 

7/14/20

Construction Paper Shark Craft

Every once in a while, you have to drop everything and make a construction paper shark. (No? Just me?)


I get ideas for crafts from the usual sources of inspiration- magazines, nature, blogs, Pinterest, etc. but today's craft was inspired by the laundry. Specifically, this:


I did eventually get the laundry folded and put away, but only after my shark craft. 


---------


Construction Paper Shark


Materials: 

  • construction paper
  • scissors
  • glue
  • black Sharpie


Steps: 


Set one piece of blue construction paper aside to use as the background. Tear a second piece into strips, which you'll layer to make the water.

Cut the shark's head from white, light blue, or light grey construction paper. Save the scraps, as they'll become the shark's teeth.

Cut a piece of black construction paper to make the shark's mouth. It's basically the shape of a cupcake and should be almost as wide as the shark's head.

Use the light scraps to make two lines of bottom teeth. You'll layer these when you assemble the shark. Then cut individual teeth that will go across the top of the mouth. They should be larger in the center and smaller on the ends.


To assemble the shark, glue the upper teeth into place. Layer the rows of bottom teeth and glue them to the mouth. Position the shark's head so that it sticks up above the top of the background paper a couple of inches, then glue it into place. Gently roll back the torn bits on the ocean pieces, then layer them on top of each other, working from top to bottom. 


Glue the mouth into place, then use the Sharpie to add details. I started with the eyes, then did the lines around the eyes and across the nose. Then I added the dots along the top, near the eyes, above the mouth, then down at the water line. 


10/4/19

Owl in a Cardboard Tube Tree

My favorite crafting material is obviously scrapbook paper (both cardstock and patterned paper), but my second favorite crafting material is probably cardboard tubes. I love turning an empty tube into something fun. Today, an owl in a tree. 


---------

Owl in a Cardboard Tube Tree


Materials:

  • cardboard tubes
  • scissors
  • glue gun
  • Folk Art paint (brown and black)
  • foam brush
  • construction paper or cardstock (brown and yellow) 
  • googly eyes


Steps: 


Use the scissors to open up a paper towel tube by cutting it lengthwise. Cut an oval hole about 2/3 toward one end on the opposite side of the opening. Cut a toilet paper tube in half lengthwise, then cut one end of each piece on an angle. 


Water down some black paint and use the foam brush to apply it to the inside of the cardboard tube. The moisture will loosen the fibers and relax the curve of the tube. You still want some curve so that your tree will stand upright on its own, so don't soak it. Let the paint dry. 


Meanwhile, cut an owl shape from brown construction paper or cardstock. Add googly eyes and a triangle beak. 


Now it's time for the glue gun. Glue the two toilet paper tube pieces to opposite sides of the paper towel tube to form branches. Then, draw lines of glue vertically along the length of the tree trunk. Vary their lengths and spacing to mimic tree bark. Do the same with the branches, making sure that the glue lines travel the length of the branches, rather than vertically, which would look unnatural. (Speaking of unnatural, look at my index finger. At any given time, there's a 50% chance I have paint on my hands.) 


 Add a coat of the watered-down black paint and watch the texture emerge like magic!


Use undiluted brown paint to add highlights and accents to the tree. Use as much or as little as you want. When the paint is dry, glue the owl in the opening in the tree.


I love how the tree looks against the dark background, but it looks pretty good in the light as well. If I were making these in the classroom, I'd do a black bulletin board with the moon shining down over a whole bunch of owl-filled trees. 


Some of you may be wondering about using glue guns in a classroom setting. I taught 9-11 year olds, who are certainly old enough to use them without direct supervision. Obviously, I always went over safety considerations and making smart choices and the consequences that would result from behaving carelessly or stupidly, but in 11 years I never had a problem. If I were doing this project with younger children, I'd find a parent volunteer to closely supervise.


8/30/17

Bendable Bats

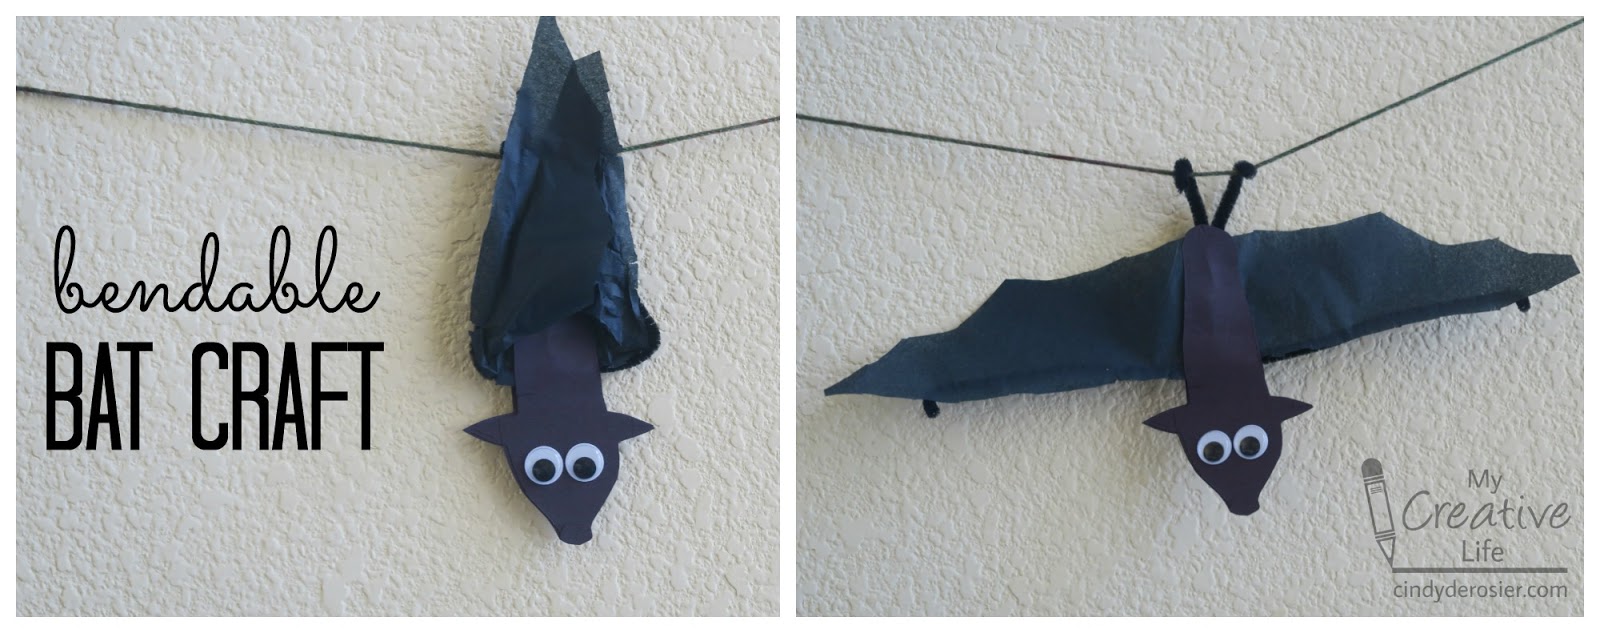
After viewing the spectacular bat flyout, I was eager to try some bat crafting. This bendable bat is inspired by our bendable monkeys. Affiliate links below. 


Bendable Bat Craft


Materials:


Steps:


Hold one pipe cleaner horizontally and bend the tips up. These will be the wings. Take the second pipe cleaner and twist it around the center of the first pipe cleaner. Continue twisting about halfway down, then bend the tips out. These will be the feet. 


Layer two pieces of black cardstock. Holding the pieces together, cut out a bat's body. You basically want a tapered cylinder with pointy ears and a blunt nose. Glue the googly eyes to one of the body pieces.


Cut a piece of black tissue paper to make the wings. It should be about 2 inches longer than the pipe cleaner arms and the same width as the twisted portion of the body pipe cleaner.

Glue the pipe cleaner structure to the plain body piece. Add the tissue paper wings, then top them with the body piece with the eyes.


Hang the bat by bending his pipe cleaner toes around a length of yarn. Your bat has his wings outstretched and is ready to take flight.


Gently bend the wings up to show that your bat is relaxing.


Bend the wings all the way up when it's time for your bat to go to sleep. 


I should have added eyelids... do bats have eyelids? Google says yes. Here are some other fun facts I learned about bats:
  • The surface of their wings have touch-sensitive receptors on small bumps called Merkel cells, which are also found on human fingertips. (Source
  • Bats have one-way valves in their arteries that prevent blood from flowing backwards. This is why they can hang upside down without blood rushing to their heads. (Source)
  • When bats relax, their body weight keeps their talons closed. If bats die while roosting, they will continue to hang upside-down until something shakes them loose. (Source)
  • While others can glide, bats are the only mammals capable of continued flight. (Source)
  • Some bats can fly as fast as 50 miles per hour! (Source)

Bats are incredible!

3/21/14

Bunny Donuts (Bunny Week, Day 5)

It's the last day of Bunny Week 2014! If you've missed any of my rabbit-related posts from this year's Bunny Week, last year's Bunny Week, or anything in between, you can find them here.

Today's project is inspired by this fabulous project at Jean's Craft Corner. When I saw her bunnies, I knew that Trevor and I would have a lot of fun making our own versions. The first step was finding the mini donut packs without printing on them. After looking at multiple stores, we couldn't find the brand she mentioned or an appropriate substitute. Eventually, we found an 8-count box of chocolate and powdered mini donuts at Walmart without printing. We set the chocolate ones aside for a different project and started brainstorming supplies for our white bunnies.

After some trial and error, we made our bunnies with the following supplies: powdered donut packs, white craft foam, pink craft foam, scissors, googly eyes, a Sharpie, pom poms, and a hot glue gun.


We cut outer ears and a tummy from the white foam, inner ears and a nose from the pink foam, glued everything in place, and then drew on a mouth. Of course, the tail is a pom pom. The tummy is there to cover the small printed serial number.


Here's Trevor's bunny:


As you can see, I've photographed these packages standing on their end. Of the four in the box, two were able to stand on end and the other two wouldn't. Just FYI, if you're planning to make these.  

I wanted to wrap up Bunny Week with a cute video of Trouble's antics. This video is about two years old, but I haven't shared it before. It perfectly illustrates Trouble's personality, particularly his curiosity.


Happy Bunny Week!