Showing posts with label ocean. Show all posts

3/30/26

Harbor Seal Easter Egg

I enjoy coming up with creative ways to decorate Easter eggs. This year, I'm challenging myself to decorate my eggs using state symbols. First up, a harbor seal. 

In 2016, the harbor seal was adopted as the official state marine mammal of Rhode Island. Did you know that harbor seals can weigh up to 300 pounds and live up to 30 years? Females give birth to a single baby between March and May. Babies weigh around 20 pounds at birth and can swim and dive within hours of birth. They gain almost a pound a day during the 4-6 weeks their mothers nurse them. Harbor seals eat a variety of seafood; they will swim more than a hundred miles upstream in large rivers in search of migrating fish. Affiliate links below. 


Harbor Seal Easter Egg


Materials:


Steps: 

Paint the egg grey. When the paint has dried completely, orient the egg with the pointy end facing you. Rub some chalk on your finger (or on a cotton ball) and apply it to where the seal's eyes and cheeks will be. 

Use a black paint pen to draw the seal's eyes, nose, and mouth. Add random spots around the body, then add lots of tiny dots where the whiskers go.  

Cut six (or more) short pieces of fishing line for the seal's whiskers. Add dots of glue and press the whiskers in place. You'll need to hold them for 30 seconds or so while the glue sets up. 

3/5/26

Decoupage Tissue Paper Dolphin

I'm going to go out on a limb and guess that you like dolphins. Everyone likes dolphins, right? Three states like dolphins enough to have named them as their official State Saltwater Mammal (Florida), State Water Mammal (Mississippi), and State Marine Mammal (South Carolina). Read on for how to make a cool dolphin craft using tissue paper. Affiliate links below. 


Tissue Paper Dolphin


Materials:


Steps: 


Prepare the Bristol vellum. You will need a total of two sheets: a full sheet for the light blue and a half-sheet each for the dark blue and silver. 

Cut or tear a piece of light blue tissue paper so that it is slightly larger than the full sheet. Set it aside. Tear thin strips of dark blue tissue paper. Don't cut them; you want them to be irregular to mimic the movement of the ocean. (Remember - tissue paper has a grain!) Cut a piece of silver tissue paper that is slightly larger than the half-sheet of paper. 

Pour some Mod Podge into a cup and dilute it with a little bit of water (about 3 parts Mod Podge to 1 part water). Spread a coat of the watered-down Mod Podge onto a half-sheet of paper. You want it to be moist but not puddly. It is important that it is completely covered. Carefully lay the silver tissue paper onto the moist paper. Load the brush with more Mod Podge and paint a coat over the top of the tissue paper. Use the brush to smooth any wrinkles as best you can. Don't worry about any overhanging tissue paper. 

Use the same technique to apply the light blue tissue paper to the full sheet of paper. Wrinkles are probably going to happen; gently smooth them out if possible. Don't overwork the tissue paper or you'll risk tearing it. 

To make the water, it is easiest to work on one area at a time. Paint a coat of Mod Podge onto the bottom inch of the paper, lay down a strip of tissue paper, then paint over that to seal it. Again, don't worry about overhanging tissue paper. Add Mod Podge to the next section of the paper, then add the tissue paper, slightly overlapping the previous piece. Seal it. Repeat until you've covered the entire half-sheet. 

When all three colors are completely dry, use scissors to trim the excess tissue paper from all four sides of the light blue and from three of the four sides of the dark blue. Tear or cut the fourth side in the shape of waves. Glue the dark blue paper onto the light blue. (I trimmed mine down to a square because I like squares, but you don't have to do that.)

Draw or trace a dolphin on the back of the silver paper, then carefully cut it out. Make a dot for its eye. Apply foam mounting squares to the back of the dolphin, then position it onto the paper. 

7/14/20

Construction Paper Shark Craft

Every once in a while, you have to drop everything and make a construction paper shark. (No? Just me?)


I get ideas for crafts from the usual sources of inspiration- magazines, nature, blogs, Pinterest, etc. but today's craft was inspired by the laundry. Specifically, this:


I did eventually get the laundry folded and put away, but only after my shark craft. 


---------


Construction Paper Shark


Materials: 

  • construction paper
  • scissors
  • glue
  • black Sharpie


Steps: 


Set one piece of blue construction paper aside to use as the background. Tear a second piece into strips, which you'll layer to make the water.

Cut the shark's head from white, light blue, or light grey construction paper. Save the scraps, as they'll become the shark's teeth.

Cut a piece of black construction paper to make the shark's mouth. It's basically the shape of a cupcake and should be almost as wide as the shark's head.

Use the light scraps to make two lines of bottom teeth. You'll layer these when you assemble the shark. Then cut individual teeth that will go across the top of the mouth. They should be larger in the center and smaller on the ends.


To assemble the shark, glue the upper teeth into place. Layer the rows of bottom teeth and glue them to the mouth. Position the shark's head so that it sticks up above the top of the background paper a couple of inches, then glue it into place. Gently roll back the torn bits on the ocean pieces, then layer them on top of each other, working from top to bottom. 


Glue the mouth into place, then use the Sharpie to add details. I started with the eyes, then did the lines around the eyes and across the nose. Then I added the dots along the top, near the eyes, above the mouth, then down at the water line. 


5/13/20

Ocean Week: Fish Hat and Sign

Time for another stroll down Memory Lane back to my teaching days! 

When I was teaching 4th/5th grade, we had a school-wide Ocean Week every year. Each grade level studied a different ocean habitat (4th grade was Kelp Forest and 5th grade was Open Ocean). We decorated our classrooms and worked our study of the ocean into all our curricular areas. The kids made fish print t-shirts and we hosted an amazing Ocean Night for the community. The week culminated with a parade. 

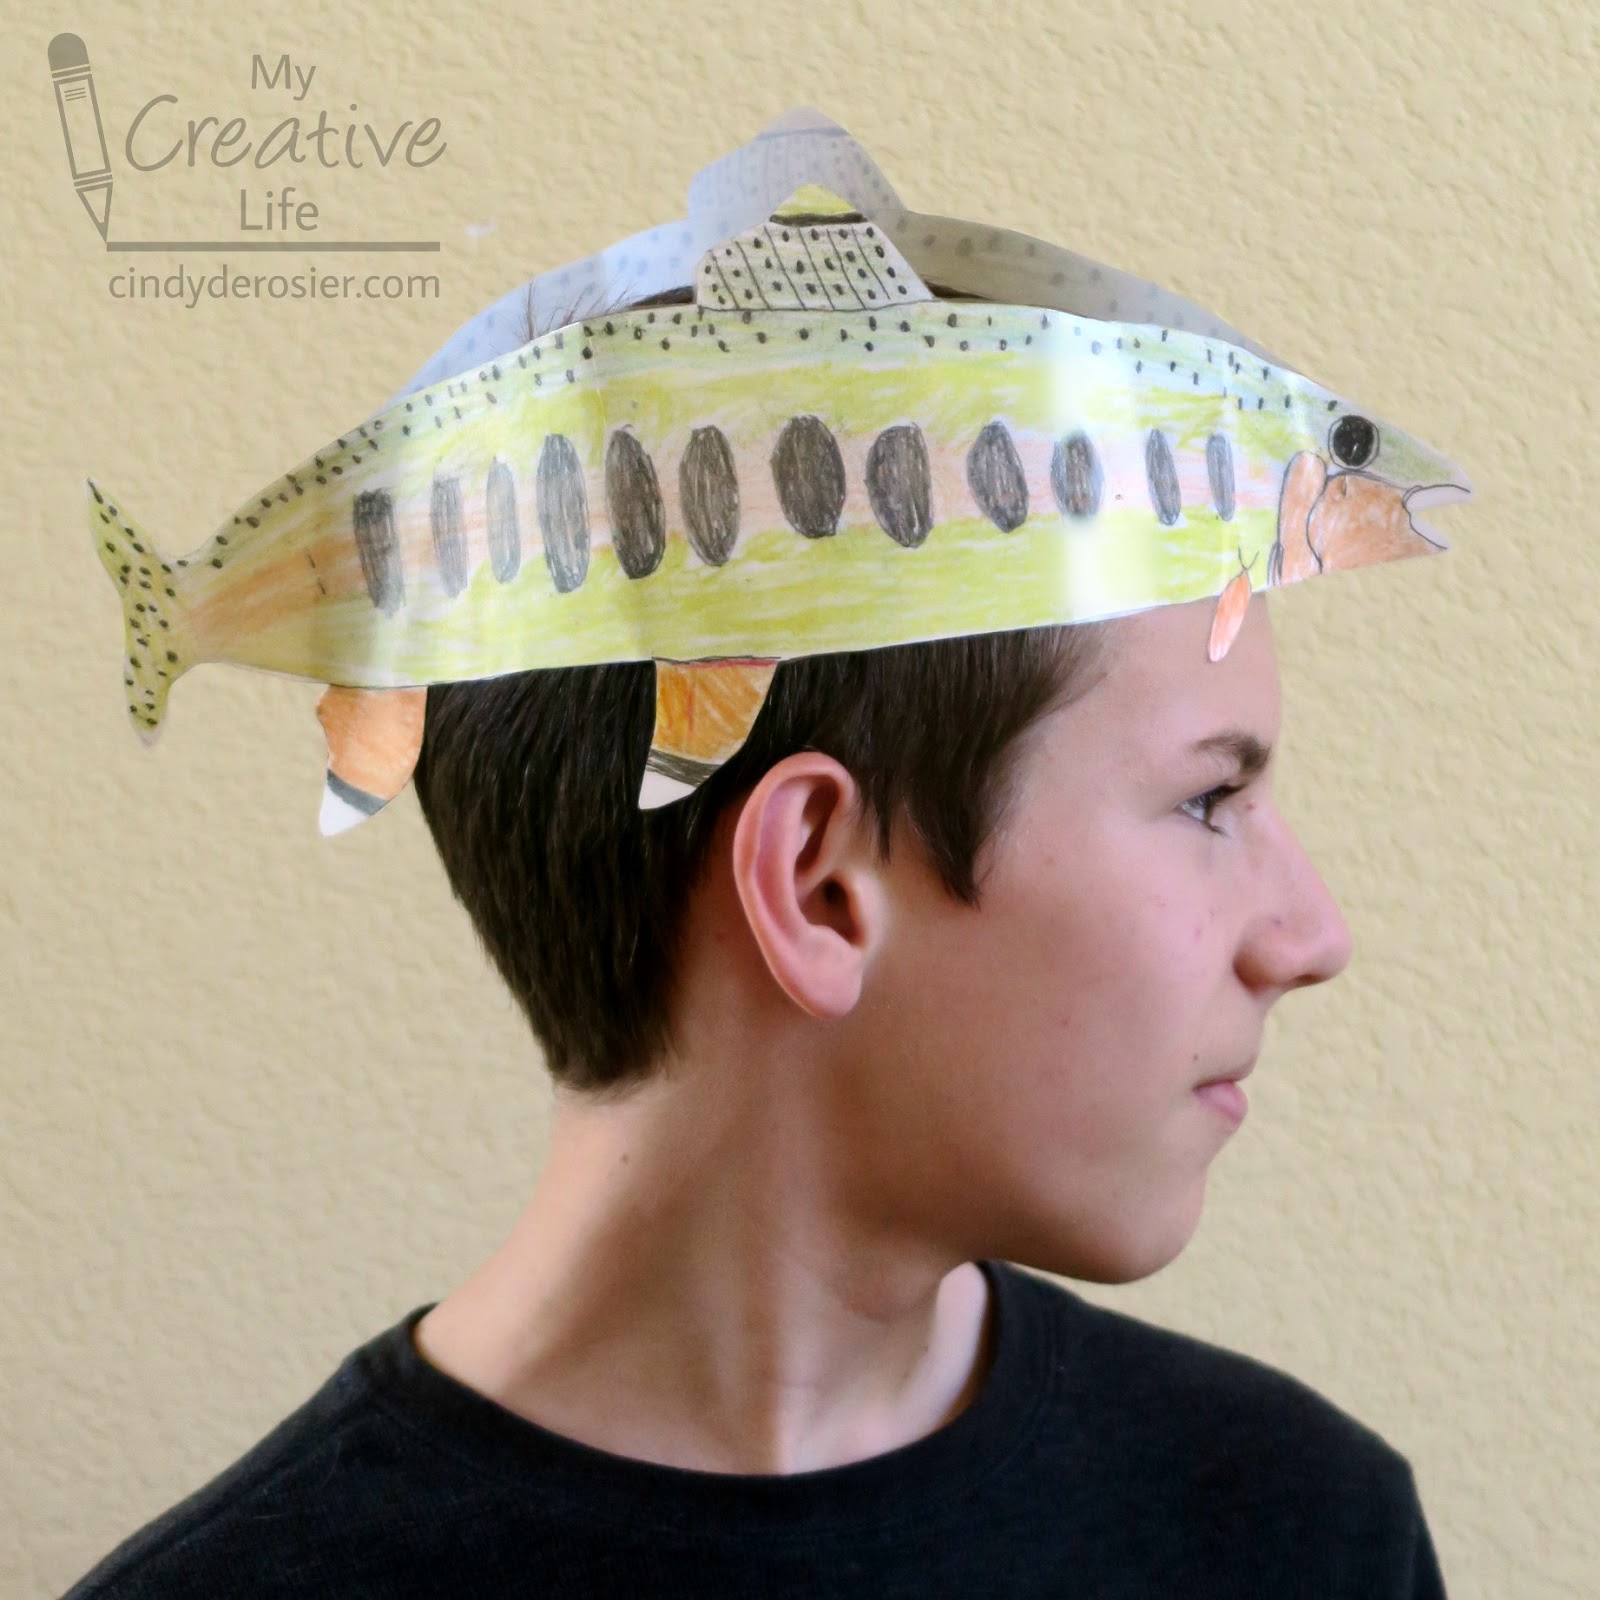
Early in the week, each student in my class picked a different fish to study, focusing on its habitat, predators/prey, and the body structures that helped protect it or aid it in surviving in its environment. We then made fish hats and signs to wear around our necks. My students wore these to visit younger classrooms to present oral reports about their chosen fish, then wore them for the parade. Sadly, I have no photos of my class dressed up as fish from the kelp forest or the open ocean. What I wouldn't give to go back and get pictures of all the cool things we did! Fortunately, I saved a few samples (including the sea bass outfit I made and wore), which Trevor was kind enough to model.  

Picture a whole class dressed up like this, each with a different fish. It was awesome.


You don't have to celebrate Ocean Week to make your own fish hat and sign. Make your own hat based on your state fish

---------

State Fish Hat


Materials: 


Steps: 


Lightly sketch the fish's body on one sheet of paper. It should extend most of the 18" length in order to be big enough to fit on your head. When you are happy with the size and shape, add the major details - an eye, gills, spots, stripes, etc. 

Use paperclips to attach the second piece of construction paper to the first. Carefully cut around the fish you've drawn, moving the paperclips in as you cut away scraps. You should end up with two identical fish shapes, paperclipped together. 


Hold the paperclipped fish up to a window with the blank side up. Trace the eye, gills, and other features so that you now have two fish pieces that are a perfect mirror image of each other. 


Remove the paperclips and color in the fish.


Finally, staple the fish pieces together at the head and the tail to make a hat. 


This is a cutthroat trout, the state fish of Idaho, Montana and Wyoming. Four more states (Colorado, Nevada, New Mexico and Utah) have particular subspecies of cutthroat trout as their state fish. 


Here's a sample done by one of my students, Catherine S., back in the day (modeled by Trevor, the most cooperative 13-year old boy of all time). 


It is California's state fish, the golden trout. 


---------

I checked out "fish hat" on Amazon to see what was out there and it did not disappoint. This light-up angler fish hat is awesome. I like the shine on these 'luau fish' hats, but I'm trying to understand why they only come in packs of six. And speaking of trying to understand, I don't understand this fish hat at all. It is just plain creepy. 

6/12/19

Plaid's Let's Paint Live: Under the Sea

I love painting, but don't do it often enough. Sure, I frequently use paint on cardboard tubes and other kids crafts, but it's not the same as actually painting something representational. But now that I am a Plaid Ambassador, I receive the supplies to paint along with Plaid's Let's Paint Live events, which means I'm more motivated than ever to get out the paints and play! 

Plaid sponsors Let's Paint Live nights on the first Thursday of each month. It's just like the Paint and Sip events that are so popular, but you don't have to go anywhere (a major plus for me) and you don't have to pay (another major plus). Sipping is optional. I've done two now, and they've both been great. And the best part is that if you can't attend when they're live, just watch the recording when it's more convenient and paint along then! 

June's painting was this starfish. 


I knew it would be a great challenge for me, because I'd never done impressionistic painting or intentionally left visible brushstrokes on a project. And I'd never used Floating Medium (affiliate link), so it was particularly fun to try a totally new-to-me product in a structured way. I'm a fan. That stuff is really cool. I can't wait to play with it again.

I tend to be a fairly quick painter, almost always waiting for the next instructions when painting in a group setting, so I decided to doubly challenge myself. In addition to creating a painting where I followed the directions closely, I'd paint a second version simultaneously with a more blended style. Same design, same colors, same brushes, both done following along with the live instruction. 


Trevor painted also. Here's the proud artist:


A closer look:


In addition to Let's Paint Live, Plaid has two other Let's Paint series. I am dying to do some of those projects, particularly Lemons and Luau Pineapple (I like to paint fruit.) If you are local to me and are interested in painting with me, let me know! I'd love to host a lemon- or pineapple-themed paint night. If you aren't local, consider hosting your own event. Plaid makes it so easy!

9/20/17

Boardwalk Craft

This post contains affiliate links. 

I know summer is behind us, but I have boardwalks on my mind. I'm deep into planning our next big trip, which will take us east to several states that are famous for their boardwalks. I don't think we'll actually be visiting those boardwalks on this trip (as I'm already packing in way more activities that a reasonable person would even consider), but we will definitely go to at least one Atlantic beach. 


Boardwalk Craft 


Materials:


Steps:


Cut or tear the water patterned paper approximately in half and layer it on top of the sand patterned paper. Glue it in place. 

Lay the skewers horizontally across the paper. They should reach from end to end without extending beyond the paper. If the skewers are too long, trim them. If the skewers are shorter than the papers, trim the papers so they are exactly the same as the skewers. 

Pull fluffs from the cotton balls to mimic the surf. Glue them in place.  


Put the skewers down parallel to one another on your work surface. Arrange the mini craft sticks across the skewers so they look like a boardwalk. Completely fill the skewers, then glue them in place. 


This gives you a sense of scale for the mini craft sticks. 


When the boardwalk is dry, turn it over and add glue along the length of the skewers, then glue them to the sand portion of the paper. 

Decorate the beach with stickers, such as a shovel and pail, a sandcastle, or a sea star.