Showing posts with label tissue paper. Show all posts

3/27/26

Tissue Paper Crafts for Kids

I am a tissue paper hoarder. Not only do I save the used tissue paper from all the presents our family receives, but if I go to a party and it looks like the recipient is going to throw out their tissue paper, I jump in and save that too. I've been doing this for decades and I manage to stay in equilibrium - I use as much as I bring in. How? Tissue paper crafts! 

There are so many fun things you can make with tissue paper. Over the years, I've shared more than 40 different tissue paper crafts. You can find them all using that link. Below are some of my favorites. 


Tissue Paper Cardinal
     This project is one of my all-time favorite bird crafts. I love cardinals and this one is so cute. 

Paper Taco
    Tissue paper acts as the lettuce in this all-paper version of a taco. 

Decoupage Flower Bouquet
     These colorful flowers are so much fun to make!     

Tissue Paper Stained Glass
     It's amazing how much tissue paper resembles stained glass in this project. 

Paper Plate Salad
     Once again, tissue paper plays the role of lettuce. This time, it's in a salad. 

Tissue Paper Ocean Art
     The secret to this project is bleeding tissue paper. 

Fall Tree with Tissue Paper Leaves
     Celebrate fall with this tree craft, featuring tissue paper leaves in yellows, greens, reds, and oranges. 

Volcano Art
     Tissue paper acts as lava in this unique craft. 

Strawberry Piñata
     Homemade piñatas are so much fun! This strawberry is beginner-friendly. 

3/24/26

Decoupage Backgrounds for Cards

Recently, I've shared how to make flowers, a dolphin, and a cross using decoupage. You can use the same techniques to make backgrounds for cards. Affiliate links below. 


Decoupage Backgrounds for Cards


Materials:


Steps: 


For each card, cut a piece of Bristol vellum in half to make two pieces that are 8.5" x 5.5".  Fold one of the halves in half in order to make a 4.25" x 5.5" card base. You'll use the other piece for the decoupage. 

You can decoupage with sheets, strips, or torn pieces tissue paper. You can mix colors or use just one color. If you are going to use strips or pieces, tear those before moving on to the next step. 

Pour some Mod Podge into a cup and dilute it with a little bit of water (about 3 parts Mod Podge to 1 part water). If you're using an intact piece of tissue paper, paint a coat of the watered-down Mod Podge onto a half-sheet of paper. Carefully lay the tissue paper onto the moist paper. Load the brush with more Mod Podge and paint a coat over the top of the tissue paper. Use the brush to smooth any wrinkles as best you can. Don't worry about any overhanging tissue paper. If you are using strips or torn pieces, work on one area at a time. Paint a coat of Mod Podge onto the bottom inch of the paper, lay down a strip or piece of tissue paper, then paint over that to seal it. Add Mod Podge to the next section of the paper, then add the tissue paper, slightly overlapping the previous piece. Seal it. Repeat until you've covered the entire half-sheet. 

When the decoupage is completely dry, trim the decoupaged sheet to make a 4" x 5.25" piece. Adhere it to the card base. Decorate with stickers. 


* For the Happy x 3 card, I used Gloss Mod Podge and stickers from Happy Planner - Celebrate


* For the unicorn card, I used Matte Mod Podge and stickers from Echo Park's Birthday Girl


* For the make a wish card, I used Sparkle Mod Podge and stickers from Echo Park's Happy Birthday Boy

3/20/26

Puzzle Piece Flower Bouquet

Puzzle pieces make beautiful flowers. This is a fun craft for your guests to make during a puzzle themed party, or you can make them ahead of time as decoration. Affiliate links below. 

Paint a coat of gesso on to the puzzle pieces. When it is dry, add a coat of acrylic paint. Use a colored pencil to add lines that mimic the veins and ridges of petals. Then glue a pom pom in the center of the flower. 


Twist the pipe cleaners to form leaves. I made two leaves with stems and two without. I recommend making all the leaves with stems, as you can always cut them off later. Add a coat of glue to each leaf and lay it on top of tissue paper. 


When the glue is dry, cut around each leaf. Twist the stems of the flowers together. 


Twist the stems of the leaves around the flower stems. (I did that with the two I had, then glued a third leaf in place. I didn't use the fourth leaf.) Arrange the flowers in the vase. 


I love how my puzzle piece bouquet turned out! It's going on display next to my Lego flowers

3/13/26

Tissue Paper Flower Bouquet

I've shared dozens (and dozens) of flower crafts over the years and I never get tired of making them. I've made so many flower crafts that I actually had enough to put together a round-up of just my favorite edible flower crafts! Today's project isn't edible, but I'm happy to add it to my collection of flower crafts. It's so pretty. (And did you notice the colors I used?) Affiliate links below. 


Decoupage Tissue Paper Flower Bouquet 


Materials:


Steps: 


Choose the colors of tissue paper you want to use for your bouquet. Tear the tissue paper you're using for the vase into irregular pieces. Pour some Mod Podge into a cup and dilute it with a little bit of water (about 3 parts Mod Podge to 1 part water). Working on one area at a time, paint some of the Mod Podge onto the paper, then place a piece of tissue paper onto the moist area. Paint over the top to seal it. Repeat the process, overlapping the pieces as much (or as little) as you want. 


Cut or tear the remaining colors of tissue paper so that they are slightly larger than the paper they'll be covering. Working with one color at a time, spread a coat of the watered-down Mod Podge onto the paper. Carefully lay tissue paper onto the moist paper. Load the brush with more Mod Podge and paint a coat over the top of the tissue paper. Use the brush to smooth any wrinkles as best you can. Don't worry about any overhanging tissue paper. Repeat the process until you have prepped the papers for the three flowers, the leaves, and the flower centers. 

When everything is completely dry, cut out a vase, two flowers from each color (total of six), three flower centers, and three leaves. It is easiest to draw the shapes you want on the back of the paper before cutting. 


Arrange the two layers of flowers so the petals are off-set and glue them together. Glue the flower centers in place. Adhere the flowers to the vase, starting with the one in the center back. Finally, add the leaves. 


You might have noticed that my purple flower is sparkly. I experimented with Sparkle Mod Podge, which gives the flowers some extra dazzle. The choice is totally up to you and the look that you want!

3/6/26

Decoupage Tissue Paper Cross

Easter crafts are some of my very favorites. Over the years, I've shared 60+ ideas for crafts related to bunnies, chicks, and eggs, as well as dozens more crafts featuring flowers, butterflies, and rainbows. I've been making an effort over the past few years to add more religious Easter crafts to my blog. Last year's Palm Sunday project and kid-friendly Crown of Thorns were popular; today I'm adding another classic cross to the collection of Easter projects. It's made with tissue paper and Mod Podge. Affiliate links below. 


Decoupage Tissue Paper Cross


Materials:


Steps: 


Cut a piece of Bristol vellum into a 8.5" square. This will be the background. The 8.5" x 2.5" piece is for the cross. Tear thin strips of light blue and light green tissue paper. Remember - tissue paper has a grain! Cut a piece of brown tissue paper that is slightly larger than the small piece of paper. 

Pour Mod Podge into a cup and dilute it with a small amount of water (approximately 3 parts Mod Podge to 1 part water). Spread a coat of the watered-down Mod Podge onto the smaller paper - you want it to be moist but not puddly. Carefully place the brown tissue paper onto the moist paper. Load the brush with more Mod Podge and paint a coat over the top of the tissue paper. With the brush, smooth any wrinkles as best you can. Set it aside to dry. 

To make the background, work on one area at a time. Add a coat of Mod Podge to the bottom inch of the paper, lay down a strip of light green tissue paper, then paint over that to seal it. Add Mod Podge to the next section of the paper, then add the tissue paper, slightly overlapping the previous piece. Seal it. Repeat until you've covered half of the paper, then switch to light blue tissue paper. When the whole sheet is covered, set it aside to dry.  

Use scissors to trim the excess tissue paper from the background paper. Cut two 1" strips from the brown paper, one longer than the other, to form the cross. Glue the cross to the background.

3/5/26

Decoupage Tissue Paper Dolphin

I'm going to go out on a limb and guess that you like dolphins. Everyone likes dolphins, right? Three states like dolphins enough to have named them as their official State Saltwater Mammal (Florida), State Water Mammal (Mississippi), and State Marine Mammal (South Carolina). Read on for how to make a cool dolphin craft using tissue paper. Affiliate links below. 


Tissue Paper Dolphin


Materials:


Steps: 


Prepare the Bristol vellum. You will need a total of two sheets: a full sheet for the light blue and a half-sheet each for the dark blue and silver. 

Cut or tear a piece of light blue tissue paper so that it is slightly larger than the full sheet. Set it aside. Tear thin strips of dark blue tissue paper. Don't cut them; you want them to be irregular to mimic the movement of the ocean. (Remember - tissue paper has a grain!) Cut a piece of silver tissue paper that is slightly larger than the half-sheet of paper. 

Pour some Mod Podge into a cup and dilute it with a little bit of water (about 3 parts Mod Podge to 1 part water). Spread a coat of the watered-down Mod Podge onto a half-sheet of paper. You want it to be moist but not puddly. It is important that it is completely covered. Carefully lay the silver tissue paper onto the moist paper. Load the brush with more Mod Podge and paint a coat over the top of the tissue paper. Use the brush to smooth any wrinkles as best you can. Don't worry about any overhanging tissue paper. 

Use the same technique to apply the light blue tissue paper to the full sheet of paper. Wrinkles are probably going to happen; gently smooth them out if possible. Don't overwork the tissue paper or you'll risk tearing it. 

To make the water, it is easiest to work on one area at a time. Paint a coat of Mod Podge onto the bottom inch of the paper, lay down a strip of tissue paper, then paint over that to seal it. Again, don't worry about overhanging tissue paper. Add Mod Podge to the next section of the paper, then add the tissue paper, slightly overlapping the previous piece. Seal it. Repeat until you've covered the entire half-sheet. 

When all three colors are completely dry, use scissors to trim the excess tissue paper from all four sides of the light blue and from three of the four sides of the dark blue. Tear or cut the fourth side in the shape of waves. Glue the dark blue paper onto the light blue. (I trimmed mine down to a square because I like squares, but you don't have to do that.)

Draw or trace a dolphin on the back of the silver paper, then carefully cut it out. Make a dot for its eye. Apply foam mounting squares to the back of the dolphin, then position it onto the paper. 

9/17/25

Rainbow Heart Sun Catcher

Check out my latest tissue paper project! This sun catcher really brightens a room and it makes me smile with all the little patterned hearts sprinkled on the larger heart. And because I used Mod Podge Gloss, it has a delightful shine when it catches the light. Affiliate links below. 


Rainbow Heart Sun Catcher


Materials: 


Steps: 


Cut a large heart from scratch paper, then use it as a tracer to draw a heart on a piece of 12x12 cardstock. Set it aside. 

Choose your colors of tissue paper, then tear a small corner of each piece. Tissue paper has a grain, so you'll notice that one direction tears cleanly and one direction tears with lots of jagged bits. 


Use a ruler to help you tear straight pieces of tissue paper, making sure the grain is going the correct direction. The edges will be a bit ragged, but that's not a problem. . 


When all the strips are ready, apply a thin coat of Mod Podge to the cardstock and lay the strips in place. I chose to overlap them slightly. When all the strips are in place, paint another coat of Mod Podge over the top to seal them. 


When the Mod Podge is dry, it will look like this. 


Punch tiny hearts from the patterned paper. Add another coat of Mod Podge to the base heart and arrange the tiny hearts on top. Place them strategically to cover any particularly jagged edges, or scatter them randomly. Seal the hearts with a final coat of Mod Podge. 


Hang your sun catcher in the window and enjoy the beautiful color and patterns of the rainbow heart.

8/6/25

Summer Creative Retreat: Mini Journal From a Single Sheet of Paper

The second project I completed from Summer Creative Retreat was making an 8-page mini booklet from a single sheet of paper. I used to make these little booklets with my students back in the day, but it's been a long time since I've made one. The instructor, Jules of Jules' Art Bender, had some really fun ideas for dressing them up using paint and other art materials. I especially liked her idea of taking apart a napkin and adhering the printed ply to the front and back covers. I tweaked her idea a bit and decorated my mini book with tissue paper and stickers. I picture kids filling these little booklets with wallet-sized photos of their best friends. 


Here is Jules' book that inspired my project, decorated with a napkin: 


To make your own mini book, start with a single sheet of paper. I used Bristol Vellum (affiliate links here and below). There's no need for me to duplicate the thousand tutorials out there; instead, check out Savannah Storm's outstanding illustrated step-by-step guide to making a Zine Booklet

Open up the booklet so that the front and back covers are facing up. Working on one section at a time, paint a very thin coat of Mod Podge onto the paper, then add colorful tissue paper confetti. Allow the circles to hang off the edge so that the entire area is covered. 


Carefully paint a thin coat of Mod Podge over the top of the confetti to seal it in place. I used matte, but there are some fun glitter options

When the Mod Podge is dry, apply gold letter stickers and a dimensional star sticker to make the title. Then fill it with pictures, autographs, journaling, memories, or anything else!

12/12/24

Fireplace Christmas Ornament

Part Two of my Pinterest challenge was to make a craft inspired by something on my Christmas Crafts and Gifts Pinterest board. I chose a super cute fireplace ornament by I Heart Crafty Things. I made a few tweaks and came up with this:
 

This is the original: 


As you can see, the basic concept is the same. I replaced the cardstock logs with mini craft sticks, which I decorated to look more like logs. I colored the main part of the fireplace like bricks and left the mantel wood. I shrunk the stockings significantly, added a third, and wrote in names: Trevor and his cousins, Timothy and Allison.

Below you'll find a tutorial that includes the changes I made. Definitely check out I Heart Crafty Things' detailed tutorial; Caroline includes a video plus photos for almost every step. And, of course, she is the original artist who came up with the idea. Affiliate links below. 


---------


Fireplace Christmas Ornament


Materials: 


Steps:


Paint three of the regular craft sticks and all of the mini craft sticks brown. Paint the remaining five regular craft sticks red. 

While the paint is drying, cut out the cardstock. Cut a black square that is approximately 4" and set it aside. Cut out however many stockings you want. Write the names on the stockings with the Posca pen, then glue white trim to the main part of the stocking. Tear the tissue paper to make flames. 

When the paint is dry, use the white Scribe-All pen to draw three lines down the length of each of the red craft sticks. The lines don't need to be perfect - freehand is fine. Then draw short vertical lines to represent the mortar between the bricks. Use the brown colored pencil to draw arcs at the ends of the mini craft sticks, as well as woodgrain along their length. 

Arrange four of the brick-painted craft sticks vertically to form the sides of the fireplace. Lay the final brick-painted stick across the bottom of those sticks and glue it in place. Then glue the remaining standard craft sticks side by side across the top. Allow the glue to set for a few minutes.

Glue the black cardstock to the back of the fireplace, then glue the tissue paper in place. Arrange the mini craft sticks over the tissue paper at the bottom of the fireplace. Glue the stockings to the mantel. 

Cut a length of twine and glue it to the back of the ornament to make a hanger. 

1/11/24

Grieving Tree Craft

While I was in Idaho, I got an email from a psychologist who runs a group for parents who have lost a child. He came across my fall tree with tissue paper leaves, which gave him the idea for a project he and his fellow grieving parents could make. He envisioned writing phrases along the branches that represent the things about their children that are still growing. Along the ground would be the things they feel they've lost forever. He asked me for advice about what papers, ink, and glue to use that wouldn't smudge or hide the written words. 

I was honored that my simple craft inspired such a meaningful project. Rather than just make an educated guess about which materials would work best, I wanted to make an actual sample to be sure the parents' projects would be successful. He shared the seven things about his daughter, Ali, that are still growing, along with the five things he feels he has lost. I used them to make this:


As you can see, I used six phrases on the branches. I wrote the seventh (I love you always) repeatedly up the trunk of the tree. I'm calling this project a Grieving Tree. I've listed the exact materials I tested in the materials list below; feel free to use other items, but test them first to be sure your words don't smear. Affiliate links below. 


Grieving Tree Craft


Materials:


Steps: 


Sketch a tree on a piece of watercolor paper. I did mine lightly in pencil, traced over the lines with the pen, then erased the pencil. Draw your own, or feel free to use my image below as a template. Print it at the size you want, then either cut it out and trace around it, or use this graphite transfer method


I tested multiple pens on a scrap piece of watercolor paper to find one that did not smear and wrote legibly and smoothly on the irregular surface of the watercolor paper. The Zig 0.8 worked beautifully. 


Next, watercolors. Notice that there are a few places where my colors blended a bit (above "sharing old stories" or I went over the lines ("I know you still exist"). This totally doesn't matter. Embrace imperfection, our most universal human quality. Besides, you can cover mistakes with leaves later. 


While the paint is drying, cut out leaves. I folded up tissue paper into 8+ layers before cutting. 


When the paper is completely dry (overnight is best), glue the leaves in place. I used a toothpick to spread glue onto one small area at a time, then placed the leaves by hand so they wouldn't cover the words. Use all five leaf colors in the tree. 


After the tree is full of leaves, glue leaves to the ground surrounding your words. Don't use the shades of green, as those wouldn't have fallen yet. 


What a privilege to make this tree in Ali's memory. I hope this project is meaningful to her father and his patients, as well as to any of you who might have come across this randomly. I am so, so sorry for your loss. 

9/25/23

Paper Plate Apples with Peekaboo Seeds

 Tis the season for apple crafts! 


Paper plate make great apples and they're even more fun when they're hiding a surprise inside! Those are real apple seeds, arranged just the way they were in the apple they came from. Affiliate links below. 


Paper Plate Apples with Peekaboo Seeds


Materials:


Steps:

Carefully cut an apple in half horizontally and observe the star pattern that the seeds make. Remove the seeds. Rinse them and set them aside to dry. 

Choose the color(s) for the apple(s) you're making. I made a solid red, a solid green, and a solid yellow, but you can mix colors to mimic different varietals. You can see examples of that with this apple craft, which uses the same tissue paper technique. 

Tear the tissue paper into strips. Use a paintbrush to moisten the back of a paper plate (the non-eating side) with a little bit of undiluted Sta-Flo, then place a piece of tissue paper on it. Paint over the top with more starch. Repeat until the back of the plate is covered. Set it aside to dry. Glue the apple seeds to the front (eating side) of a second paper plate. 

When everything is dry, carefully trim off any excess tissue paper from the apple and then cut it in half. Arrange those pieces on top of the plate with the seeds. Use a craft pick (adults only!) to poke a hole through the bottom of each side of the apple, then use a brad to attach each piece.  


Cut apple stems from brown cardstock and glue them to the back of the apple. Fold a piece of green cardstock in half, then cut an arched shape (rainbow, hilltop, etc) along the fold. Open it up and glue the leaf to the back of the apple. 

Pair this craft with fun and educational children's books about apples!

5/26/23

Pipe Cleaner Cake Sun Catcher

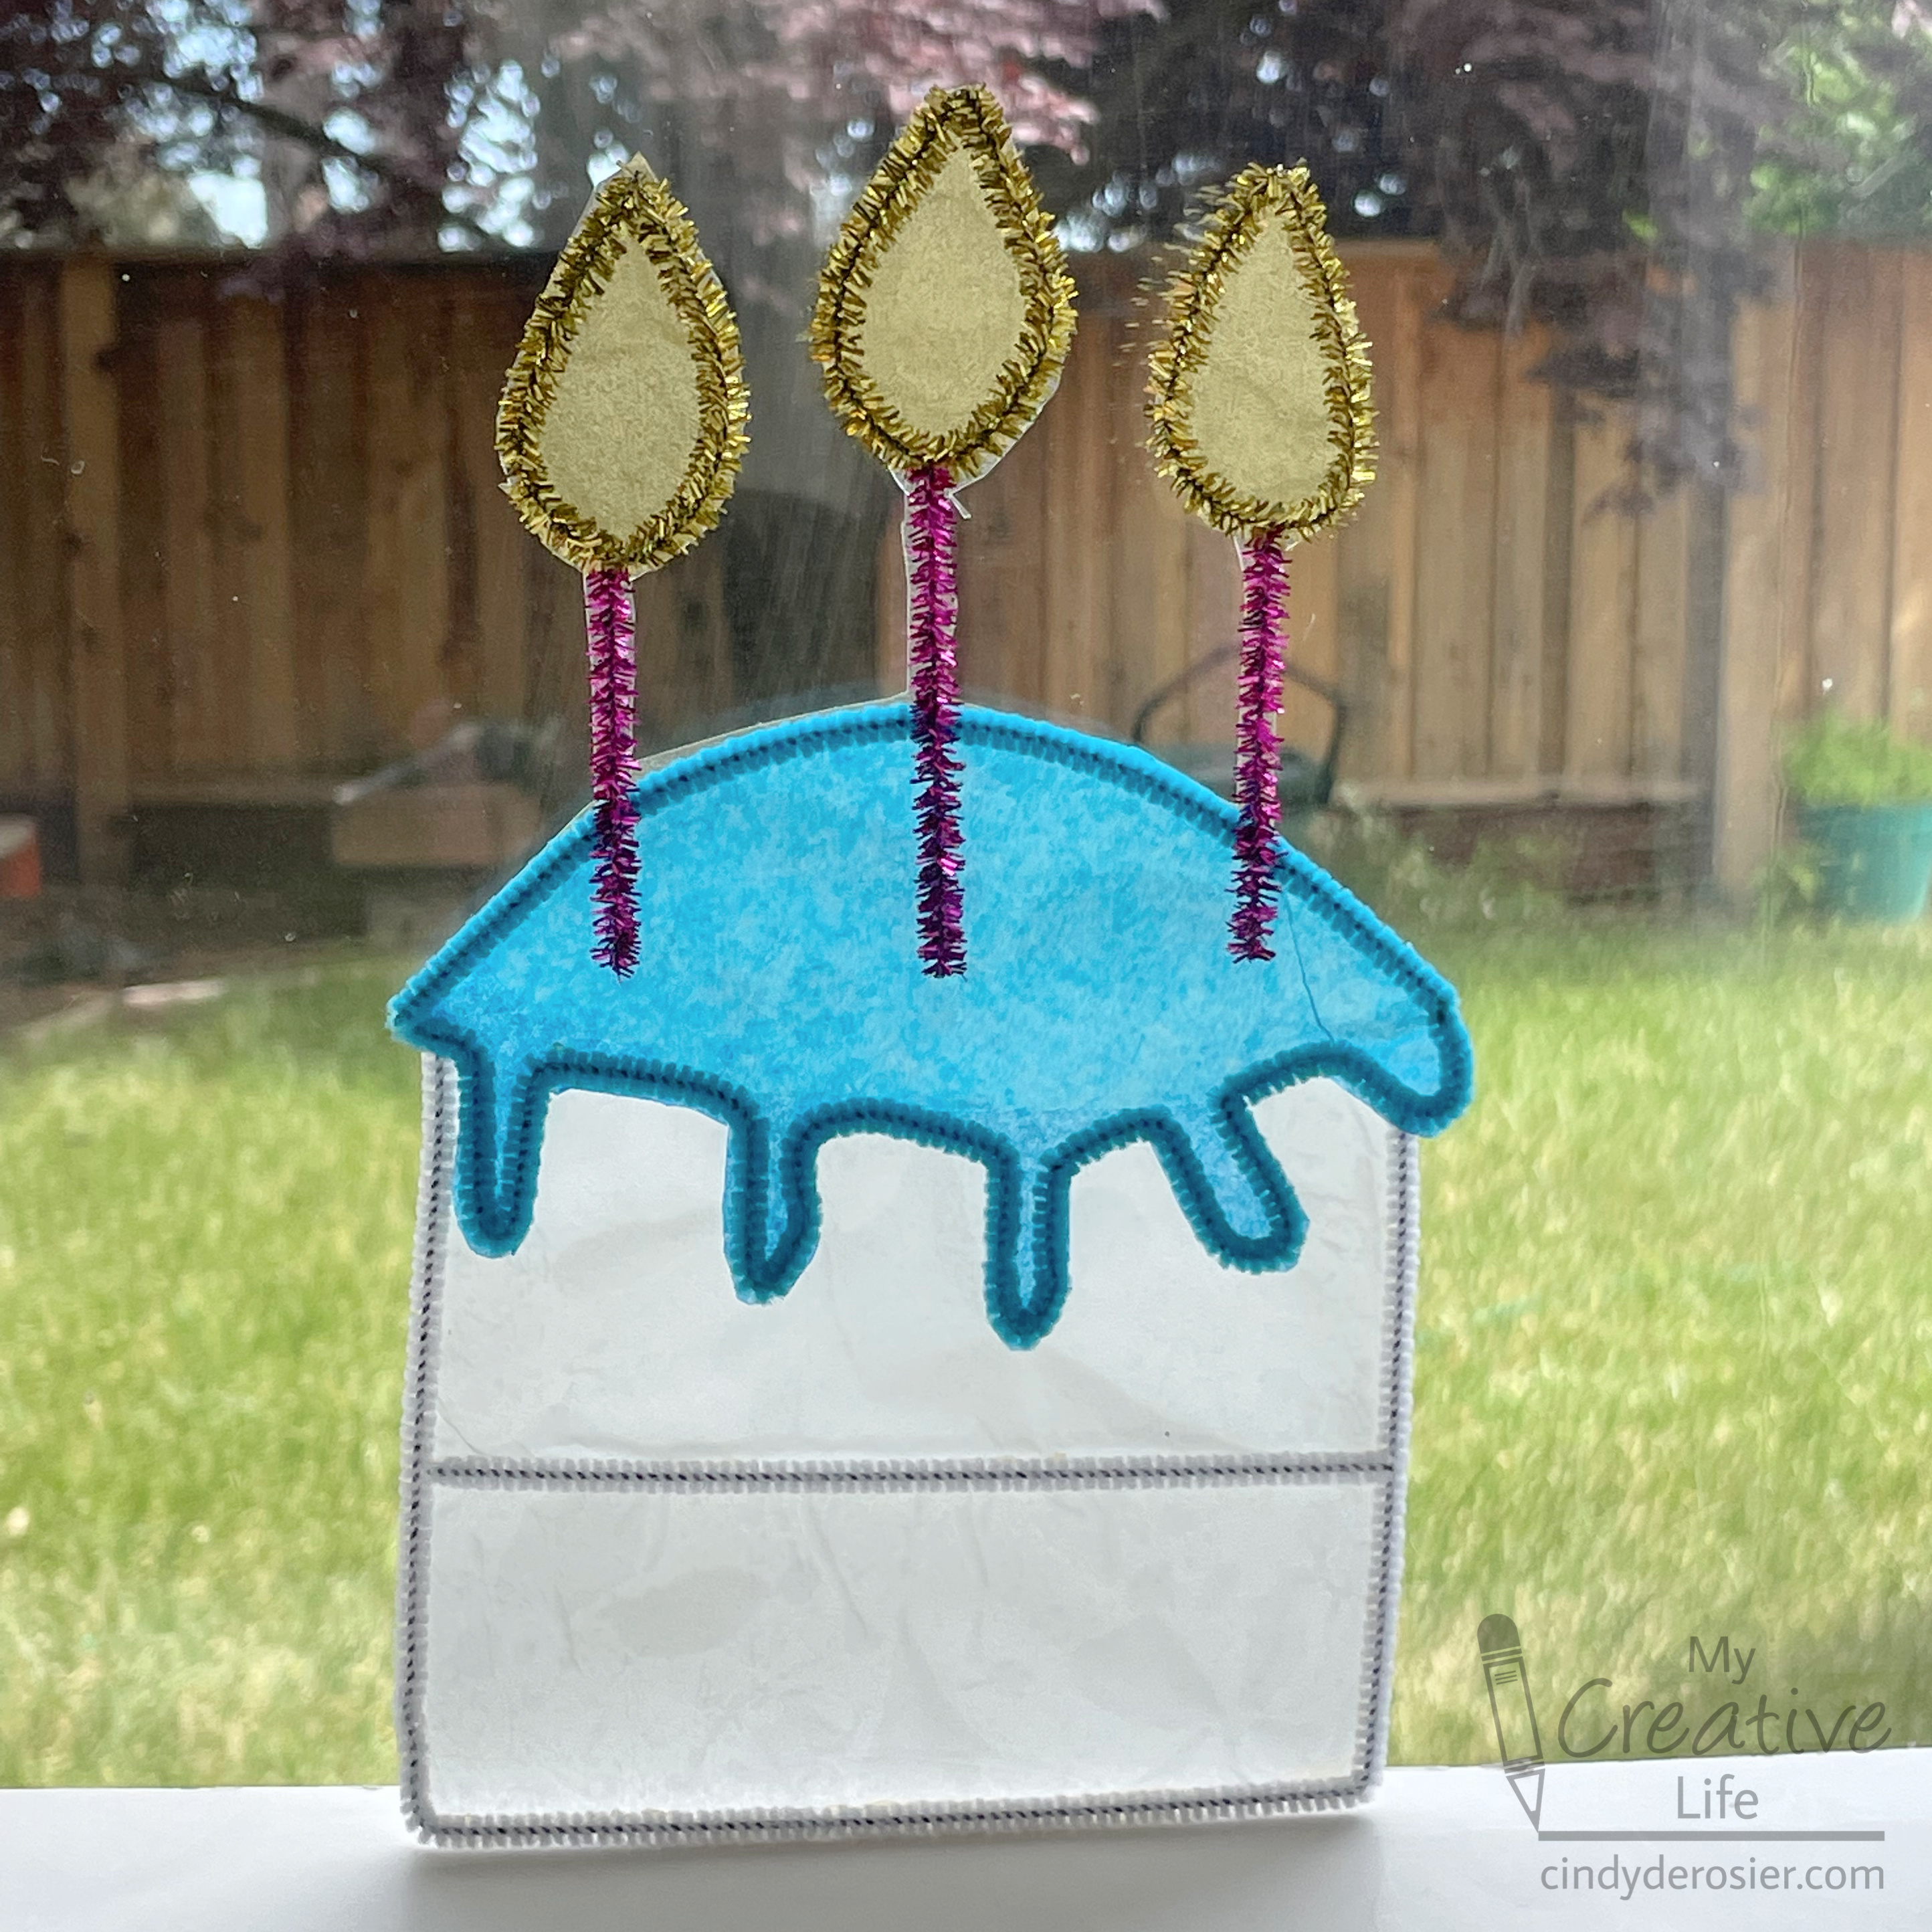
It is so satisfying when I try something new and it works. It took some experimenting to make this sun catcher out of pipe cleaners and tissue paper, but I'm really happy with the results. It looks so pretty sitting in the window. Affiliate links below.


Pipe Cleaner Cake Sun Catcher


Materials:


Steps:


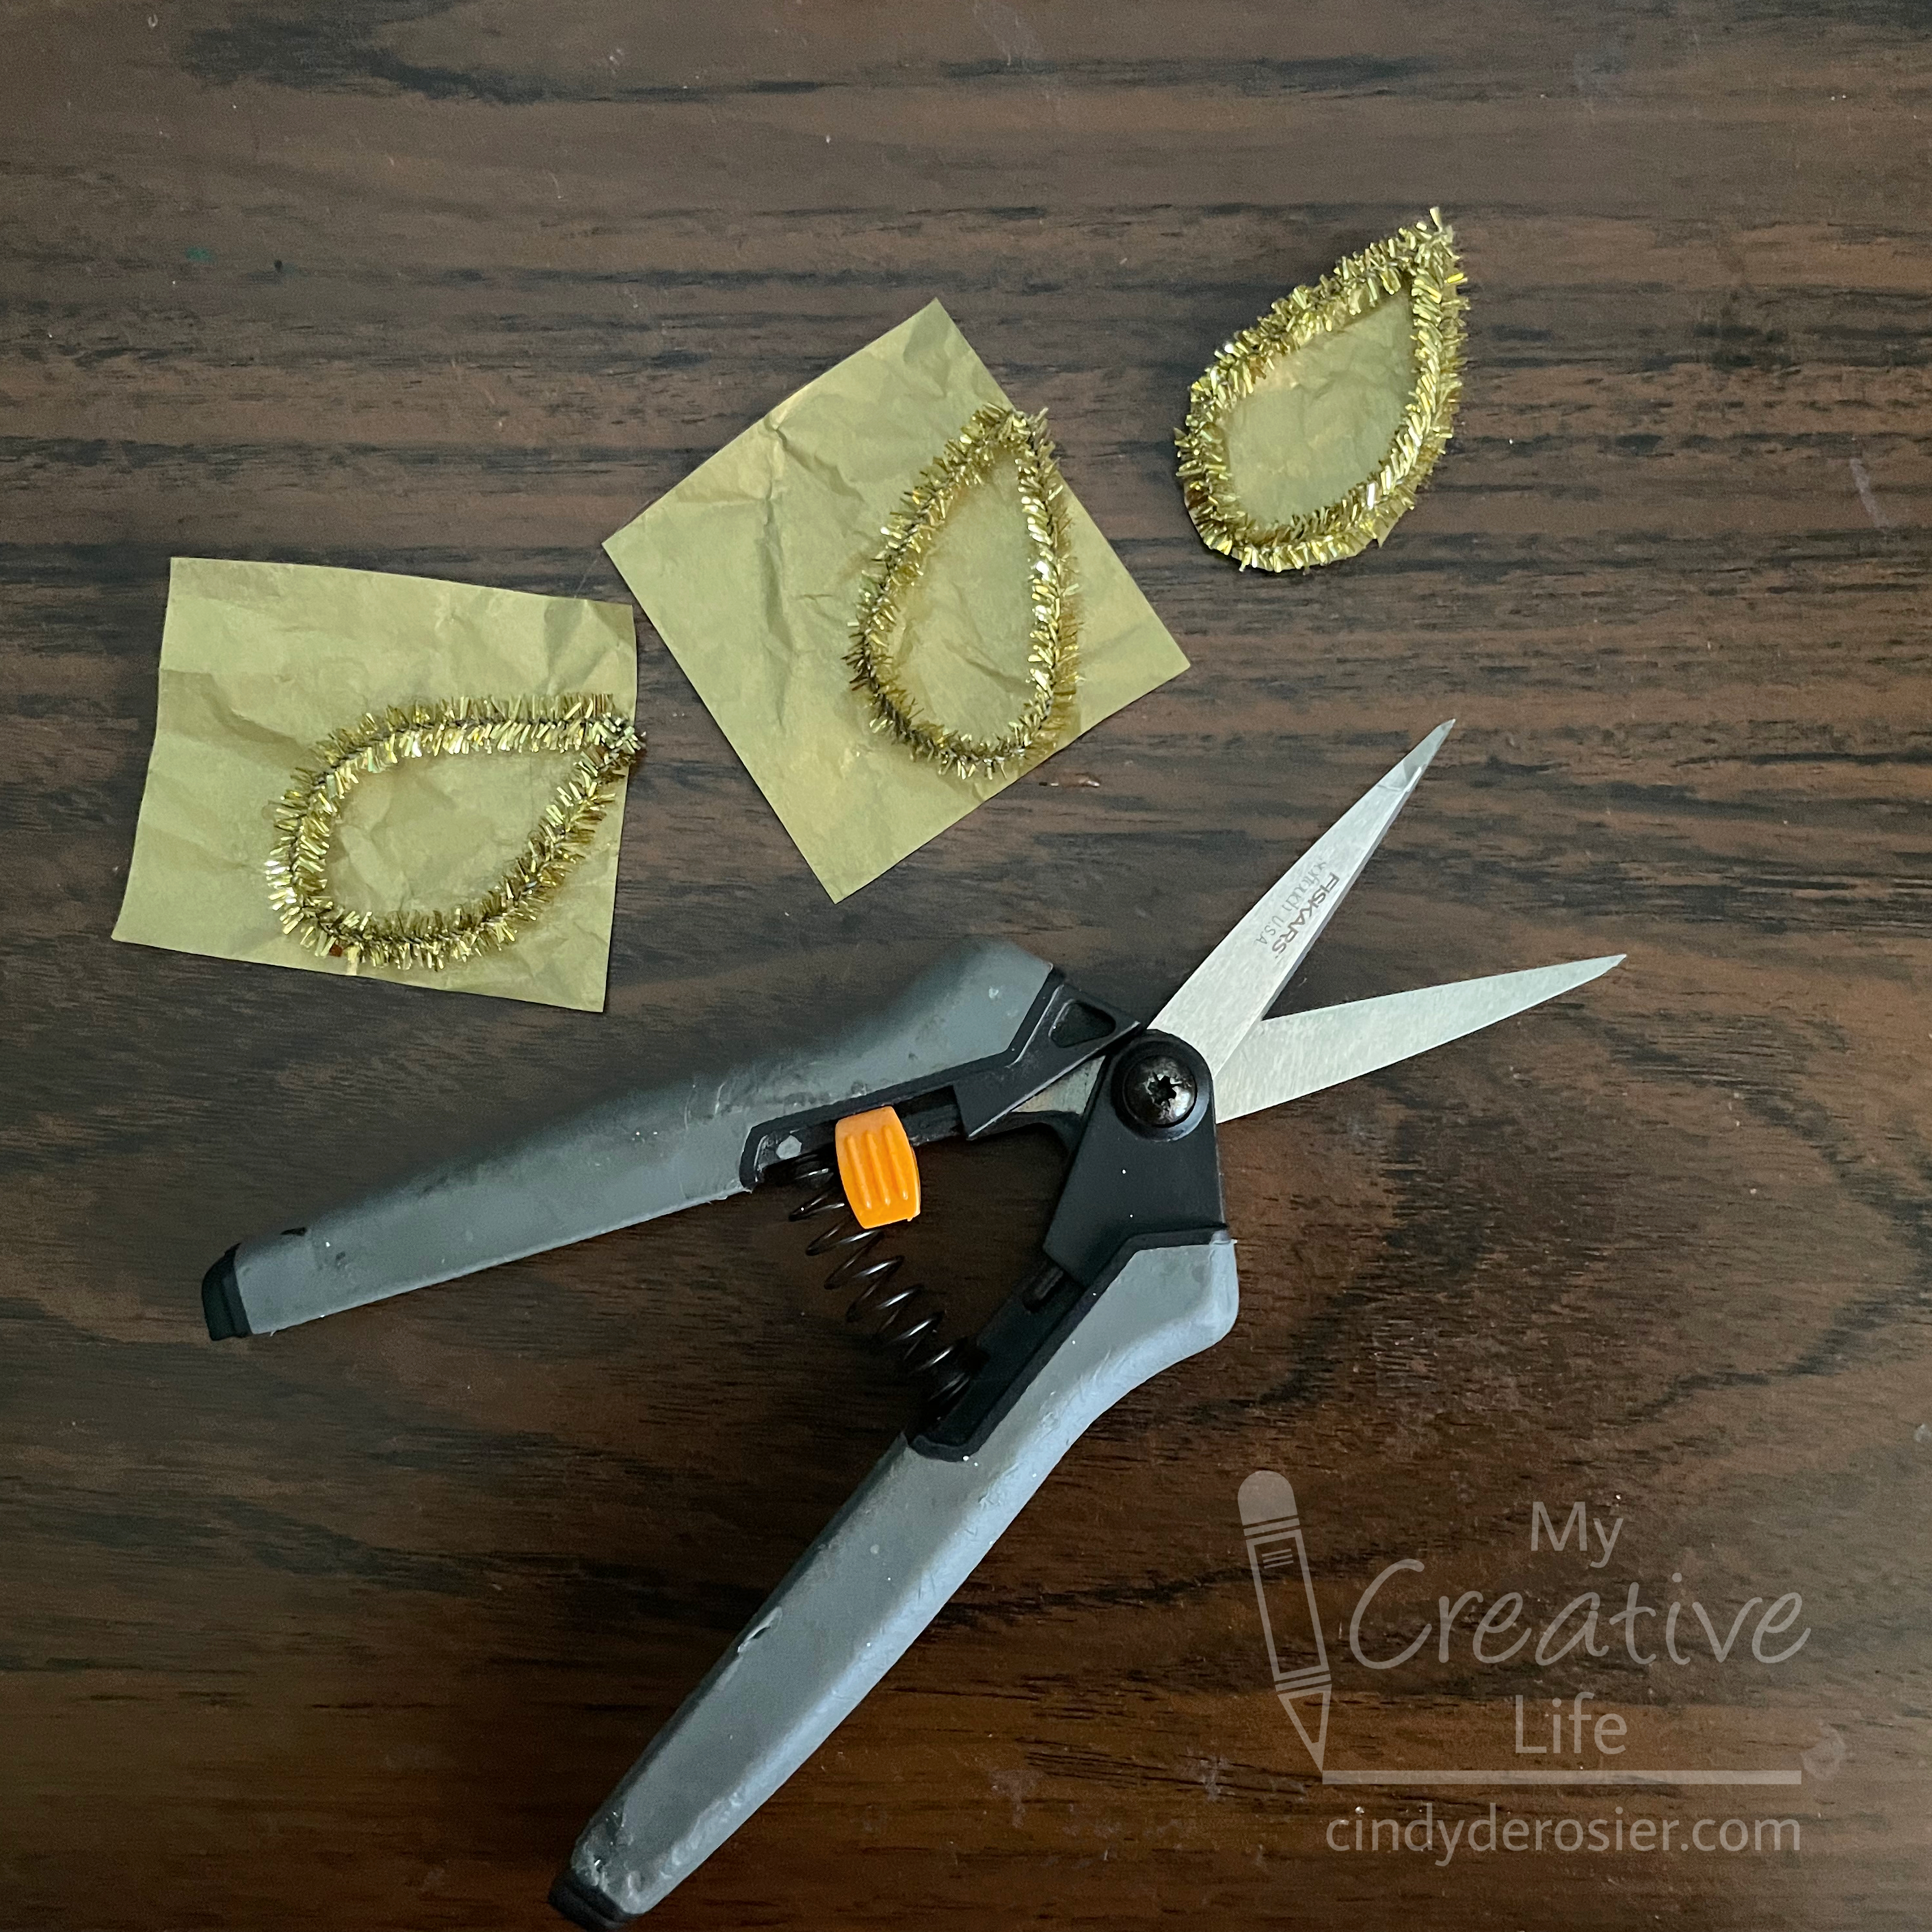
I started with the easiest part of this project, the flames of the candles. Cut a gold pipe cleaner into thirds (use the wire cutters - don't ruin your scissors), then bend each to form a teardrop shape. There's no need to twist the ends together; the bend should hold. You can put a drop of glue between the ends if you want. Put glue onto one side of each teardrop, then place them on pieces of gold tissue paper. Hold them in place for a minute to let the glue set. When the glue is dry, carefully trim away the excess tissue paper. 


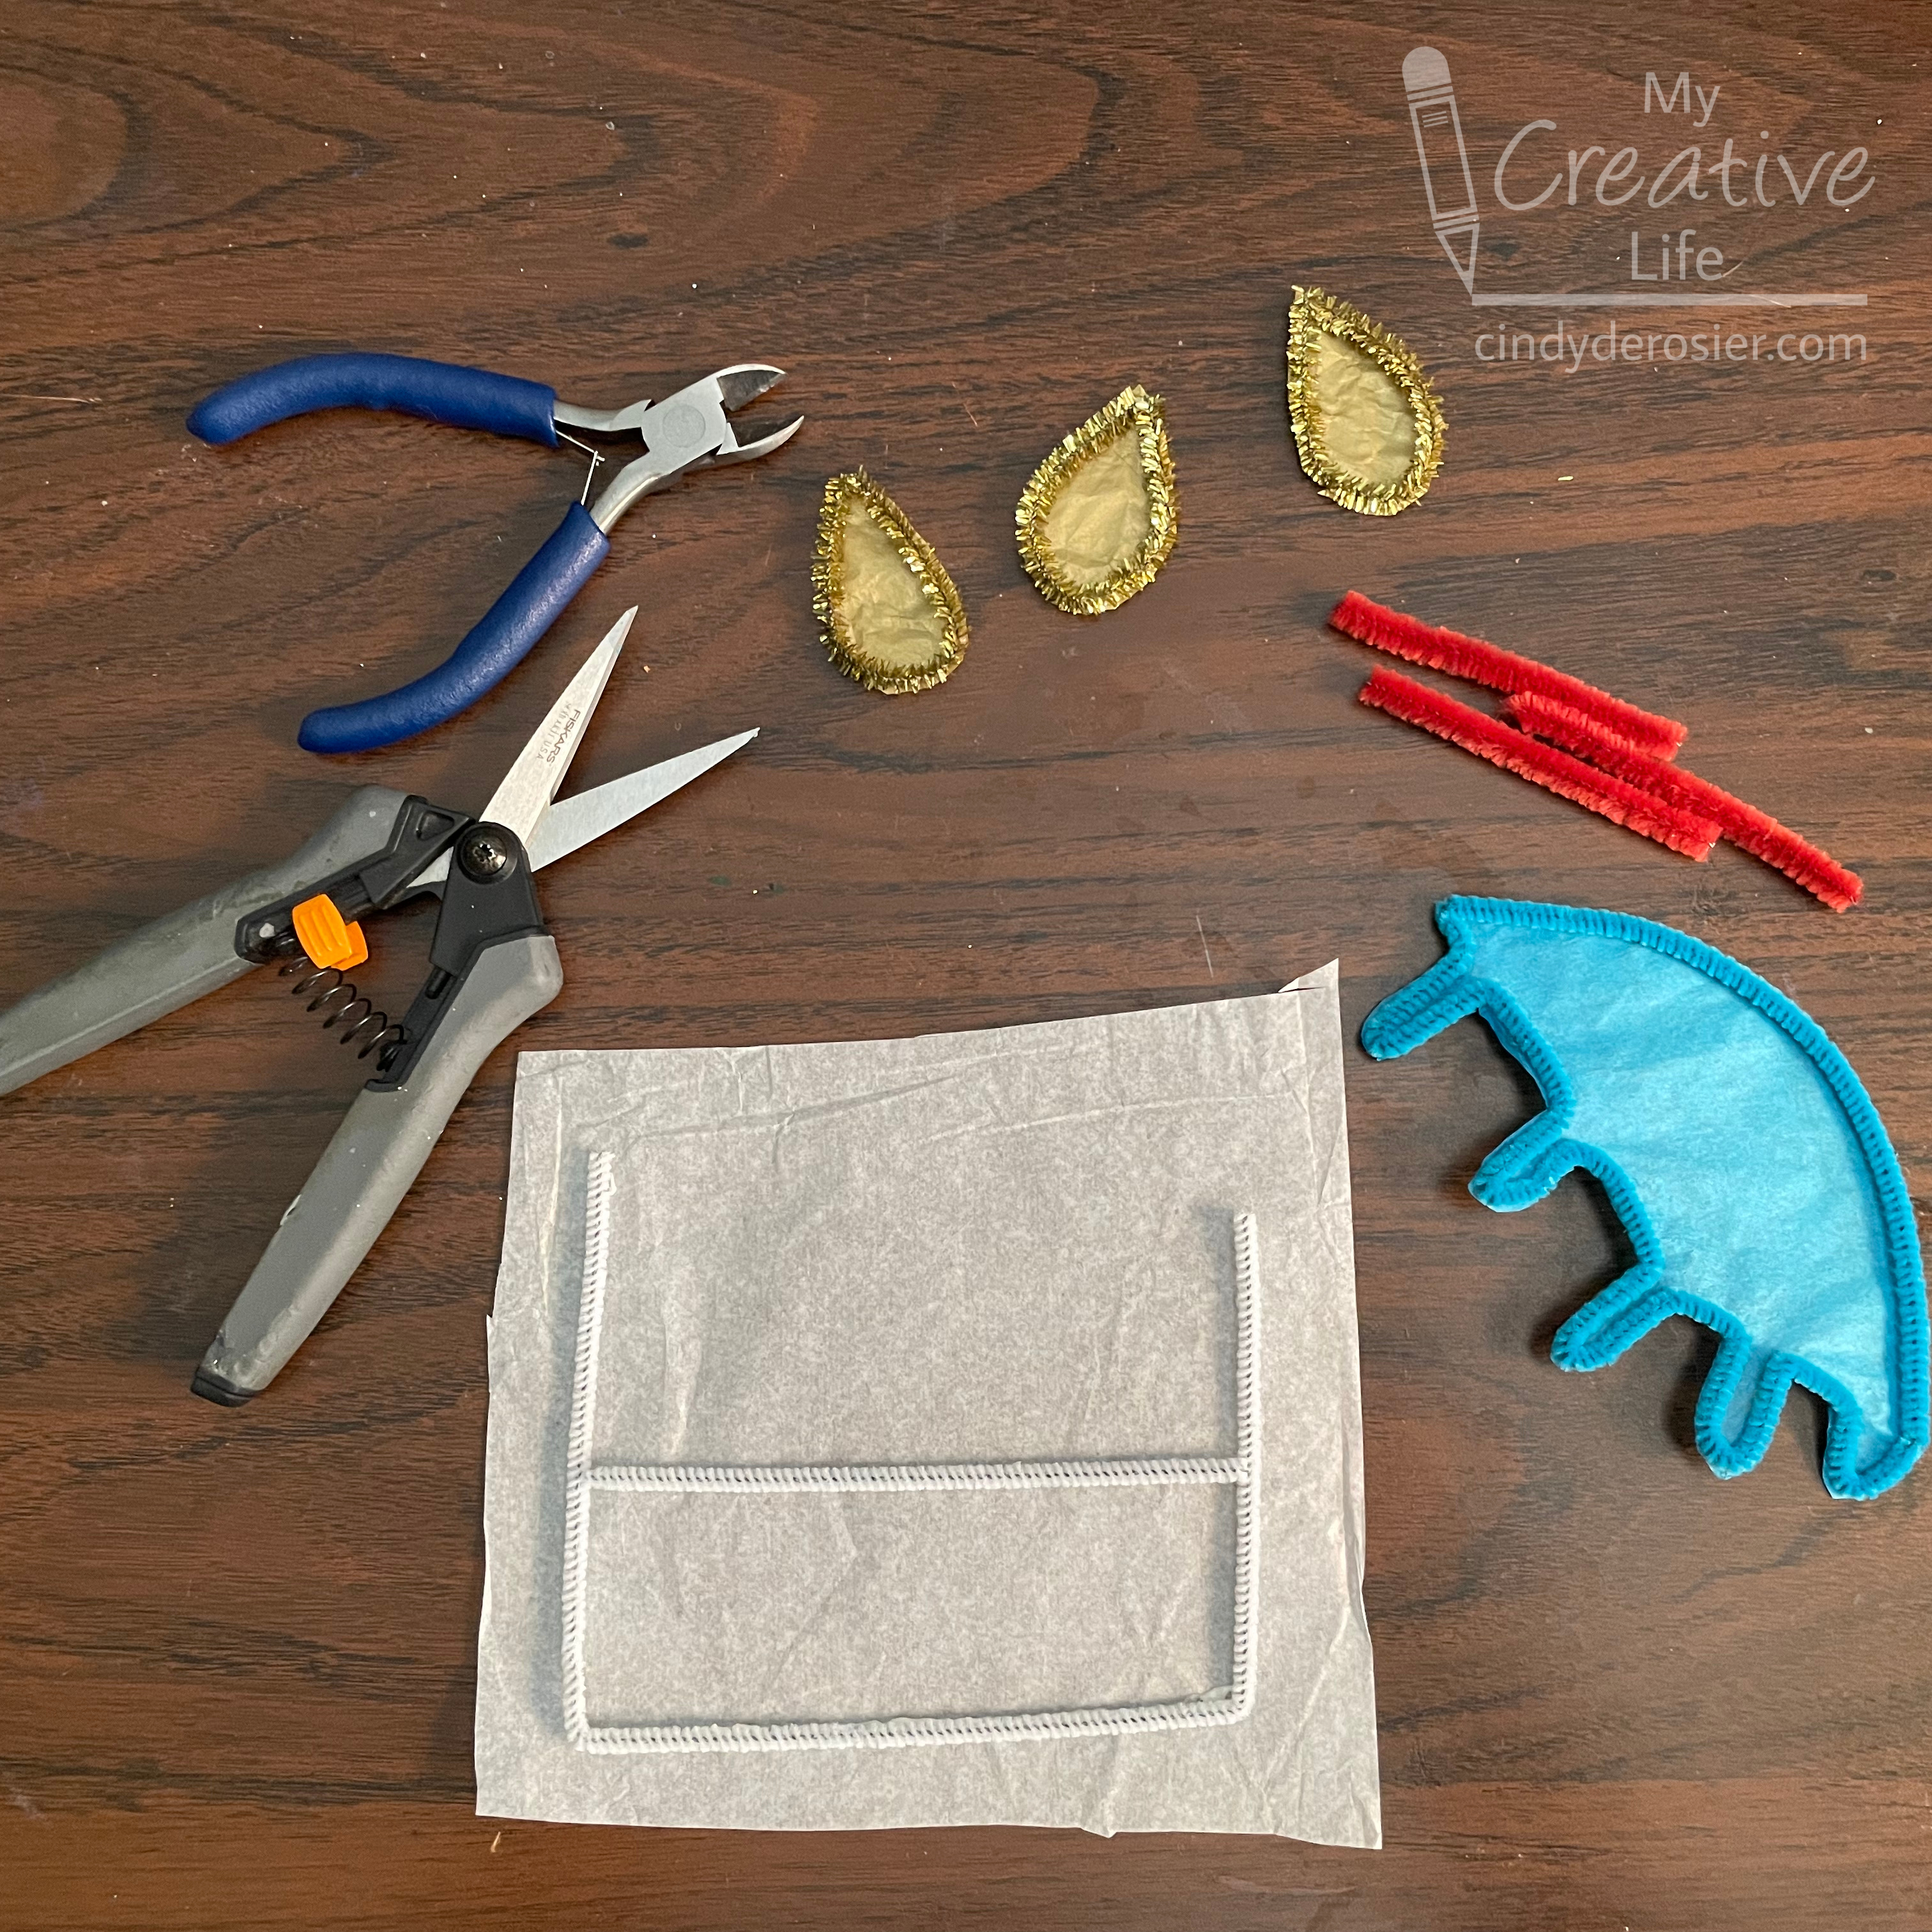
Use the same technique for the base of the cake and the frosting. For the cake, bend one white pipe cleaner into rough thirds to make a U-shape. Glue this to a piece of white tissue paper. Use a second white pipe cleaner to cut the piece that forms the layer of the cake. Glue it in place. 

Bend one blue pipe cleaner into an arc that will be the top of the frosting. Use a second pipe cleaner to make the frosting drips. Unless you are extremely lucky or skilled, the frosting won't fit perfectly on the cake the first time you try. Just make adjustments until it's correct, then glue it to blue tissue paper. Again, hold it in place for a minute while it sets so that it doesn't spring out of position.


Cut three lengths of pipe cleaner for the candles. As you can see above, I originally planned to use plain red pipe cleaners. I decided purple glitter candles would look better. 

Trim the cake and frosting. Fit everything together on the table, then cut a piece of contact paper that is slightly larger than the width and height of the assembled project. Peel away the paper backing with the sticky side of the contact paper facing up. Move the cake base to the contact paper and press it down firmly.    


Put glue along the edges of the frosting drips, since they will be touching the cake and not the contact paper. Put the frosting in place. Add glue to the bottom portion of the candles (where they will be touching the frosting) but not to the upper portions (where the contact paper will hold them) and place them where they belong. Then adhere the flames to the contact paper. Let the glue dry completely. 

Not all designs will require this, but because the candles have such narrow attachment points, they could flop forward if not better supported. Through experimentation, I found that adding a second layer of contact paper eliminated the problem without affecting the translucency. Do this by peeling away the backing paper on a second piece of contact paper and placing the assembled cake on top of it. 
 
Carefully cut away the excess contact paper.  


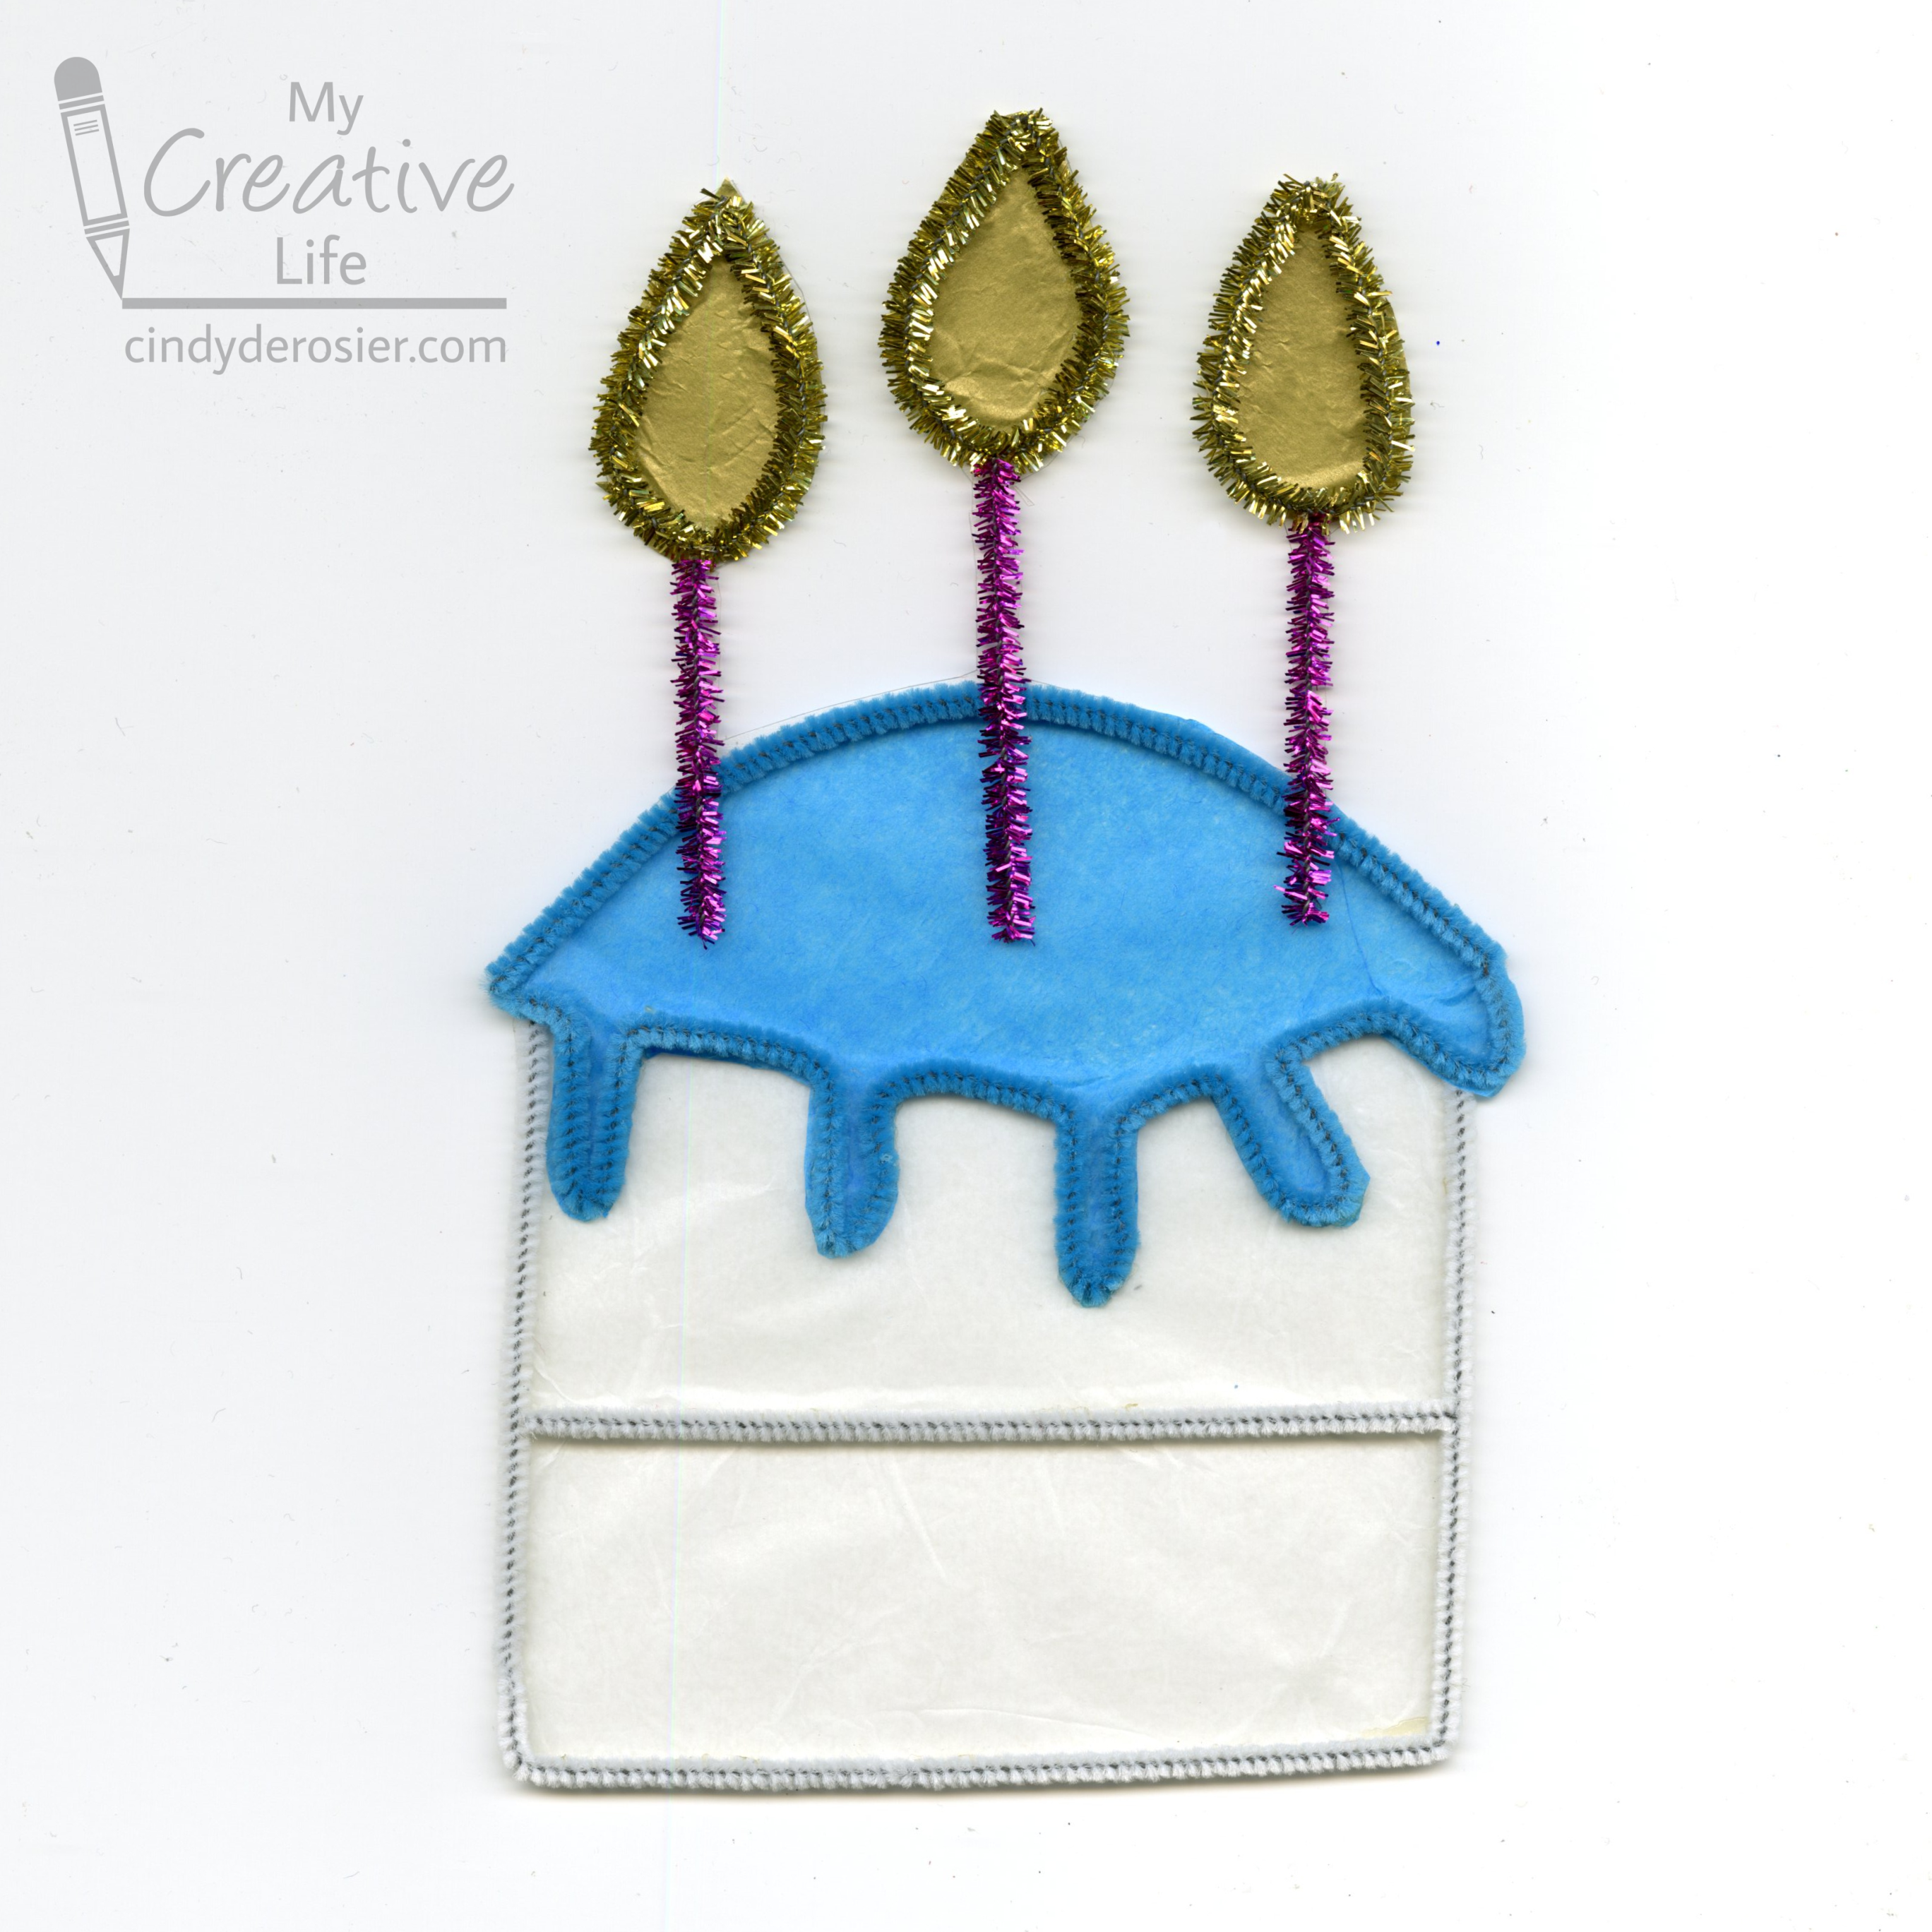
I showed you what it looks like in a window at the top of the post. This is how it looks against white paper.


Obviously, you can use the same technique for any design. I have some ideas I'm eager to try!

5/22/23

Decoupage Watermelon Flower Pot

I don't know why, but I have an abnormal love of things that look like food but aren't actually food. While the flower pot I made is a bit small for growing an actual watermelon plant, you can use the same technique for a larger pot, preferably at least 7 gallons. Affiliate links below. 


Decoupage Watermelon Flower Pot


Materials:


Steps: 


Paint the entire clay pot, inside and out, with a coat of gesso. When that is dry, paint the pot red and the saucer green. 


Tear the two shades of green tissue paper into strips. Put a coat of Mod Podge on the inside of the saucer, then add strips of light green radiating out from the center. Paint each strip in place with more Mod Podge. Then add dark green strips to fill gaps between the light green. 


As an aside, you'll see classic Gloss Mod Podge in the photo above. A few minutes after I took this picture, I realized that a flower pot needs to be waterproof. So I switched to Outdoor Mod Podge for the rest of the project. 

Speaking of Mod Podge, this beloved craft supply turned 56 on Friday! Since I'm 51, it's no wonder I feel like Mod Podge has been around forever. On Friday, I took a quick photo of my paint shelves and discovered I have 17 different types of Mod Podge within easy reach. Believe it or not, there are more bottles in my craft closet. 


When you have decoupaged the inside of the saucer, let it dry completely and start covering the inside of the pot with red tissue paper. I like to put projects on these paint stands while they're drying. 

Use the same process as before to decoupage the underside of the saucer and the outside of the pot. You can add as many (or few) layers of tissue paper as you want. Use scissors to cut teardrop shapes from the black tissue paper and decoupage them around the rim of the pot. Let everything dry completely, then add an additional coat of Outdoor Mod Podge to make sure it is completely sealed. 


Since my watermelon flower pot is too small for growing healthy watermelons, how will I use it? It'd be great for growing smaller plants, like flowers or herbs. Or, it would make an adorable container to hold plastic silverware or whatnot for an outdoor BBQ or party. I made a piñata for a strawberry-themed party years ago; this could be the inspiration for a watermelon-themed party. Lots of possibilities!

3/30/23

Washington Monument Cherry Blossoms Craft

The cherry blossoms in Washington D.C. are iconic. I have several friends who live in the D.C. area who post photos when the blooms are at their peak. One such photo inspired me to make this craft featuring the Washington Monument. Affiliate links below. 


Washington Monument Cherry Blossoms Craft


Materials:


Steps: 

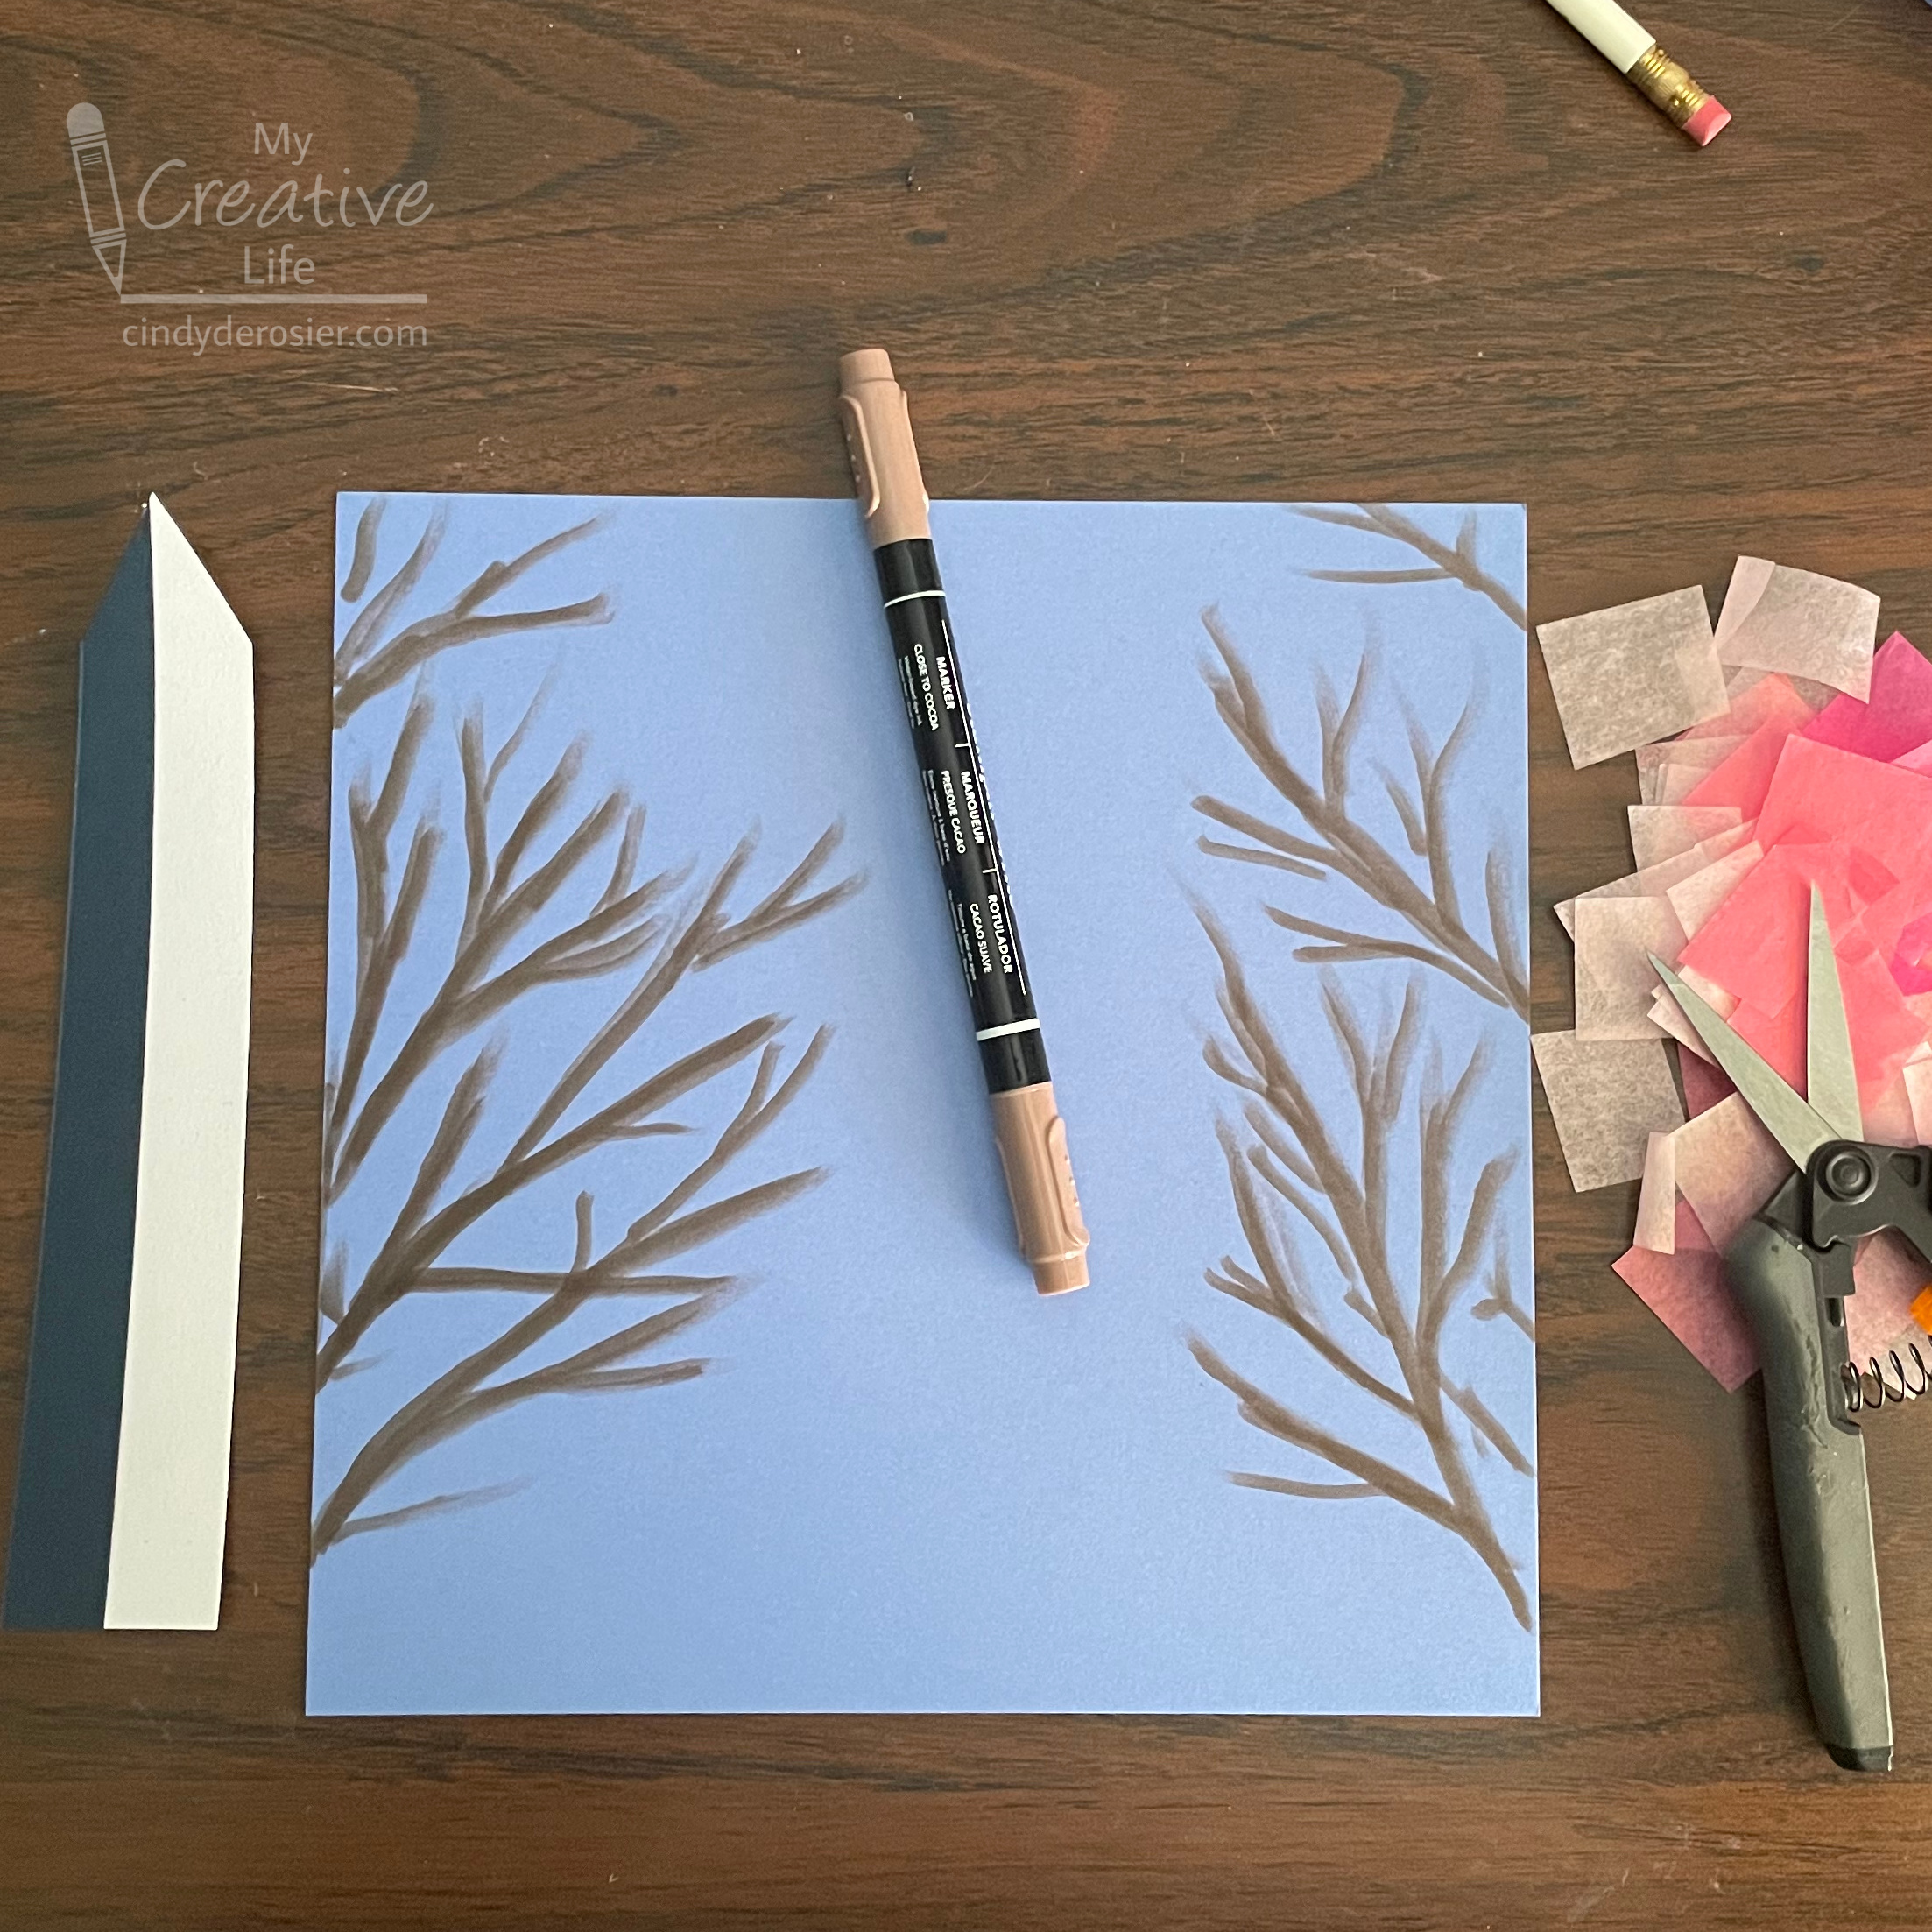
Use the brown marker to draw branches and twigs on either side of a piece of blue cardstock. They'll largely be covered with blossoms. 

Cut a narrow rectangle from the white and black (or dark blue) cardstock. Glue them together so that half of each color shows. With scissors, trim the top of each color to make the point of the Washington Monument. Then, on each side, cut a slight taper from the top of the rectangular part to the bottom. 

Cut shades of pink and/or white cardstock into 1" squares. 


Glue the Washington Monument onto the blue cardstock. Put a dot of glue onto one branch, then crumple up a square of tissue paper and stick in to the branch. Repeat this process until you've filled the branches. You might find it easier to do all the crumpling and then all the gluing. I worked in batches of about 10 blossoms at a time. 


In researching this project, I came across these fun facts about the Washington Monument, courtesy of the National Constitution Center. We visited in 2017 and LOVED it. I hope to return someday. George Washington will still dwarf Trevor, but not by nearly as much!