Showing posts with label craft stick. Show all posts

6/18/26

Corn Dog Craft for Kids

What do Oregon and Indiana have in common? Corn dogs! This beloved fried food is popular in every state that has a fair, ballpark, or frozen food section in the grocery store, but Oregon and Indiana have special corn dog claims-to-fame. Corn dogs were invented in Rockaway Beach, Oregon in 1939. Follow this link to learn more about the birth of corn dogs. Make sure you scroll down far enough to see the mechanical corn dog. Indiana is not the birthplace of corn dogs, but the small town of Bristol (population 1600) is called the Corn Dog Capital of the World. They produce 80% of the world's corn dogs. Bristol is also home to the annual Corndog Festival. (Note: Both corn dog and corndog are acceptable spellings.) 

Celebrate the corn dog with a fun and easy craft. Affiliate links below. 


Corn Dog Craft


Materials: 


Steps: 


Use yellow, orange, and brown watercolors to paint a piece of watercolor paper the color of a corn dog. When you are happy with the color, let the paint dry completely. 


Cut the paper into the shape of a corn dog, approximately 6.5" x 1.75". Obviously, exact size doesn't matter. Glue the corn dog to a craft stick. Add a squiggle of glue down the length of the corn dog, then yarn on the glue. Trim the excess yarn, then let the glue dry completely. 


Steve likes his corn dogs with mustard. I prefer mine plain, or occasionally with ketchup. 


I had a lot of fun with this corn dog craft. Give it a try!

9/3/25

Craft Stick Pencil, Crayon, and Colored Pencil Back-to-School Craft

In celebration of back-to-school season, today's craft has students make a craft stick pencil, colored pencil, or crayon and use it to write advice on how to be successful during the new school year. It's a fun way to encourage kids to start the year off on the right foot. Back in my teaching days, I had my students write letters of advice at the end of the year for the students who would be sitting in their desks the following year. It was always a delight to see what they wrote. Affiliate links below. 


Craft Stick Pencil, Crayon, and Colored Pencil


Materials: 


Steps: 


Use the scissors to trim the one end of each craft stick to make a rounded point. There two things to note: 
  1. Cutting craft sticks generates sharp wood pieces that can potentially go flying. Teachers should prep the sticks ahead of time rather than having students do this step in class. 
  2. It is easiest to cut if you put the craft stick all the way in toward the fulcrum of the scissors.


You can cut the other end of the craft stick straight across if you wish. I did that for my colored pencil and crayon but left the pencil with a rounded end. Totally up to you. When you are done cutting, sand the craft sticks so there are no rough edges. 


Paint the craft sticks. I started by painting the wood part of the pencil and colored pencil, but in retrospect that seems like an unnecessary step since the craft stick is already wood. So I'd skip that. I used green for the body and tip of my colored pencil. For my crayon, I used orange for the ends, then mixed in a little bit of coral to lighten the paint to make the wrapper. For my pencil, I painted the eraser pink, the body yellow, and the tip dark grey, then added the silver paint. 


When the paint was dry, I used a pencil to subtly define the edges between colors. Then I drew parallel lines on the silver paint to mimic the texture of the ferrule. Finally, I used the Sharpie to add the tips for being successful in school. 


Maybe it's just me, but I think it would be fun (if impractical) to tape a real pencil to the back and use this for writing.  


I really enjoyed making this craft, even though my back-to-school days are behind me. I wish all of the students reading this a successful and enjoyable school year. Ask questions! Study for tests! And do your homework!

6/18/25

Minnesota and North Carolina Craft Stick Flag Coasters

As promised, here are two more coasters featuring state flags. Today I'm sharing coasters featuring the flags of Minnesota and North Carolina. I'm especially happy to share the Minnesota project, since it is the most recently adopted of the 50 state flags. (Maine, I'm still disappointed.) Affiliate links below.   


Minnesota and North Carolina Flag Coasters


Materials: 


Steps (Minnesota): 


Arrange seven standard size craft sticks on a piece of painter's tape. Use a ruler and pencil to draw lines to mark the Minnesota-shaped dark blue field. Paint the field navy and the rest of the area light blue. When the paint is dry, remove the sticks from the tape and paint the edges. They will show through in your finished coaster. The back won't show, so painting that is optional. Let the paint dry. Return the sticks to the painter's tape. 

I used a white colored pencil to freehand the 8-pointed star, but it would have been infinitely easier to print and cut a template, then trace that. Use a white paint pen to fill in the star. 


When the paint is dry, seal the sticks with Outdoor Mod Podge and let that dry completely. 

Arrange three mini craft sticks vertically on your work surface and add glue. One by one, transfer the painted craft sticks onto this base. 


Steps (North Carolina): 


Arrange seven standard size craft sticks on a piece of painter's tape. Paint the left third of the sticks navy blue. Paint the right two-thirds of the top three sticks red and the bottom three sticks white. The middle stick is split, half red and half white. I recommend labeling the sections in pencil to help you. 


Remove the sticks from the painter's tape and paint the edges, as these will show. When the paint is dry, return the sticks to the painter's tape. 

It took quite a bit of trial and error to figure out the best way to do the details on this flag. I suggested starting with the N☆C, using yellow and white paint pens. Use the yellow paint pen to draw the banners above and below. When the paint is 100% completely dry, add the text using a ballpoint pen. 

Seal the sticks with Outdoor Mod Podge and let that dry completely. 

Arrange three mini craft sticks vertically on your work surface and add glue. One by one, transfer the painted craft sticks onto this base. 


You may have noticed that I didn't make coasters from amongst the Excellent state flags for crafting but instead chose flags from the Acceptable group. They were more challenging than I'd expected, so I'd steer clear of anything in the Terrible group. I have high hopes that at least some of them will update their flags eventually, like Minnesota did. 

6/17/25

Georgia and Indiana Craft Stick Flag Coasters

I'm trying to diversify the set of crafts I have made inspired by each state, so that people who visit each individual state's page have a wider variety of projects to choose from. I decided to make four more craft stick coasters, similar to the United States flag coaster and California's Bear Flag Coaster that I've previously posted. Today I'm sharing coasters featuring the flags of Georgia and Indiana. Affiliate links below.   


Georgia and Indiana Flag Coasters


Materials: 


Steps (Georgia): 


Arrange seven standard size craft sticks on a piece of painter's tape. Paint the sticks with a blue field and red, white, and red stripes. I recommend using a ruler and pencil to draw the lines and label the sections before painting. 

When the paint is dry, remove the sticks from the tape and paint the edges. They will show through in your finished coaster. The back won't show, so painting that is optional. Let the paint dry. 

Return the sticks to the painter's tape. Use a white colored pencil to draw where the stars will go and a yellow colored pencil to draw a simplified version of the coat of arms. Trace over each with paint pens. 

When the paint is dry, seal the sticks with Outdoor Mod Podge and let that dry completely. 

Arrange three mini craft sticks vertically on your work surface and add glue. One by one, transfer the painted craft sticks onto this base. 


Steps (Indiana): 


Paint seven standard size craft sticks navy blue. Be sure to paint the edges, as these will show. When the paint is dry, line up the sticks on a piece of painter's tape. 

Print a copy of the Indiana flag, sized to 4.5" x 3" (the approximate size of the finished coaster. Scribble on the back of the design with a white colored pencil. Place the printed flag, correct side up, on the taped craft sticks. Trace the basic lines of the design and put a dot where each star goes. This will transfer white guide lines to the navy-painted sticks. 


Trace over each of the lines with a yellow paint pen, then draw stars over each dot. Use a very sharp yellow colored pencil to write INDIANA near the top. 

When the paint is dry, seal the sticks with Outdoor Mod Podge and let that dry completely. 

Arrange three mini craft sticks vertically on your work surface and add glue. One by one, transfer the painted craft sticks onto this base. 


Tomorrow I'll share the other two coasters I made. 

4/8/25

Palm Sunday Craft for Kids

Palm Sunday has special meaning for me as a mom. When Trevor was little, Palm Sunday was his absolute favorite church service of the year. He loved proceeding into the sanctuary waving palm fronds, then spending the rest of the service weaving palms together. He would ask for months when "Pom" Sunday was coming. It was so cute. When it came time to choose a date for Trevor's confirmation, we chose Palm Sunday.    

I wish I had thought of today's craft 15 years ago or so. Trevor would have loved it. But hopefully there's another young child who loves Palm Sunday that will enjoy this craft. Affiliate links below. 


Palm Sunday Craft for Kids


Materials: 


Steps: 


While the glue gun is heating, arrange the small craft sticks on one of the large craft sticks to look like a palm frond. Leave enough space at the bottom so there is a "handle" to hold onto the palm. Glue each stick in place. 


Paint the palm frond green. While it is drying, learn about the word 'Hosanna.' 


Write 'Hosanna' on white cardstock and glue it to the second large craft stick. Now put your sign in one hand and your palm frond in the other and practice for Palm Sunday!

12/12/24

Fireplace Christmas Ornament

Part Two of my Pinterest challenge was to make a craft inspired by something on my Christmas Crafts and Gifts Pinterest board. I chose a super cute fireplace ornament by I Heart Crafty Things. I made a few tweaks and came up with this:
 

This is the original: 


As you can see, the basic concept is the same. I replaced the cardstock logs with mini craft sticks, which I decorated to look more like logs. I colored the main part of the fireplace like bricks and left the mantel wood. I shrunk the stockings significantly, added a third, and wrote in names: Trevor and his cousins, Timothy and Allison.

Below you'll find a tutorial that includes the changes I made. Definitely check out I Heart Crafty Things' detailed tutorial; Caroline includes a video plus photos for almost every step. And, of course, she is the original artist who came up with the idea. Affiliate links below. 


---------


Fireplace Christmas Ornament


Materials: 


Steps:


Paint three of the regular craft sticks and all of the mini craft sticks brown. Paint the remaining five regular craft sticks red. 

While the paint is drying, cut out the cardstock. Cut a black square that is approximately 4" and set it aside. Cut out however many stockings you want. Write the names on the stockings with the Posca pen, then glue white trim to the main part of the stocking. Tear the tissue paper to make flames. 

When the paint is dry, use the white Scribe-All pen to draw three lines down the length of each of the red craft sticks. The lines don't need to be perfect - freehand is fine. Then draw short vertical lines to represent the mortar between the bricks. Use the brown colored pencil to draw arcs at the ends of the mini craft sticks, as well as woodgrain along their length. 

Arrange four of the brick-painted craft sticks vertically to form the sides of the fireplace. Lay the final brick-painted stick across the bottom of those sticks and glue it in place. Then glue the remaining standard craft sticks side by side across the top. Allow the glue to set for a few minutes.

Glue the black cardstock to the back of the fireplace, then glue the tissue paper in place. Arrange the mini craft sticks over the tissue paper at the bottom of the fireplace. Glue the stockings to the mantel. 

Cut a length of twine and glue it to the back of the ornament to make a hanger. 

1/25/24

Cardboard Tube Bobsled

We have to wait two more years for the next Winter Olympics, but this is as good a time as any for crafts inspired by winter sports. I challenged myself to see if I could turn a cardboard tube into a bobsled. I modeled it (loosely) on the 2022 USA bobsled design. It was definitely a challenge. Affiliate links below. 


Cardboard Tube Bobsled


Materials: 


Steps: 


Start by cutting out a triangle from one end of the cardboard tube. This is going to be the front of the bobsled. Overlap the two pieces so that they form a flat, narrow front. 


Glue this front portion closed, using a binder clip to hold it in place while the glue dries. I ended up also wrapping washi tape around the end to hold it snug while it dried. 

When the glue is dry, cut the tube to your desired length, then remove the portion where the passengers sit. 


Now it's time for painting. Use True Blue on the bobsled. Use Silver for the four runners. While you are waiting for the paint to dry, punch out white stars. When the paint is dry, glue one pony bead to each runner. Put the flag sticker on the front of the bobsled, then write USA with the paint pen. Glue the stars on each side of the bobsled. 


Finally, glue the runners to the bobsled. When the paint is dry, pick your crew. I went with Gandalf, Wyldstyle, Harry Potter, and Plain Blue with Red Hat from 1978


Harry can't see over the top. Good thing he's not steering.


I had a lot of fun making my bobsled. And obviously I had fun photographing it (other than the lack of light... all these rainy days are terrible for photos). I learned a lot about bobsleds, bobsledding, and bobsledders in the process. For example, I learned that bobsleigh and bobsled can be used interchangeably and the one that you use probably says something about where you live. I also learned more about the differences between bobsled, luge, and skeleton, as well as the Olympic history of the bobsleigh. And the history-making Tunisian bobsled team! Such a fun story. Makes me want to watch Cool Runnings again!

6/27/23

California Bear Flag Coaster

I made another flag coaster to go with my United States flag coaster. This one features California's bear flag, which has a fascinating history. Affiliate links below.   


California Bear Flag Coaster


Materials: 


Steps: 


Paint six craft sticks white and one red. Let the paint dry completely. Use a pen to write CALIFORNIA REPUBLIC centered on one of the white sticks. Draw or trace the grizzly bear on a piece of scratch paper, cut it out. Line up the craft sticks and position the bear where it belongs on the flag. Add the star sticker on the left of the second stick from the top. 


Trace around the bear, being careful not to move any sticks out of place. 


Paint the bear and the grass he's standing on. 


When the paint is dry, seal the sticks with Outdoor Mod Podge and let that dry completely. 

Arrange three mini craft sticks vertically on your work surface and add glue. One by one, transfer the painted craft sticks onto this base. 


This is a fun project that can be adapted for many other states and countries. 

6/19/23

Popsicle Stick Puzzle Craft

Trevor is 17, so it's been a long time since I stuffed my purse full of things to keep him entertained when we left the house. But I remember those days well. The biggest challenges were at meetings where he needed to stay quiet and entertain himself independently while I was busy. If you're still at that stage, today's craft is for you. Affiliate links below. 


Popsicle Stick Puzzle


Materials:


Select the images you want to use for your puzzle. What you choose will determine the difficulty, so keep that in mind based on the age of the child. The size of the puzzle will also impact the difficulty level. When you've selected an image, lay out craft sticks onto it to determine how many will fit. Here you can see that I've put 7 mini craft sticks onto the beach image. 


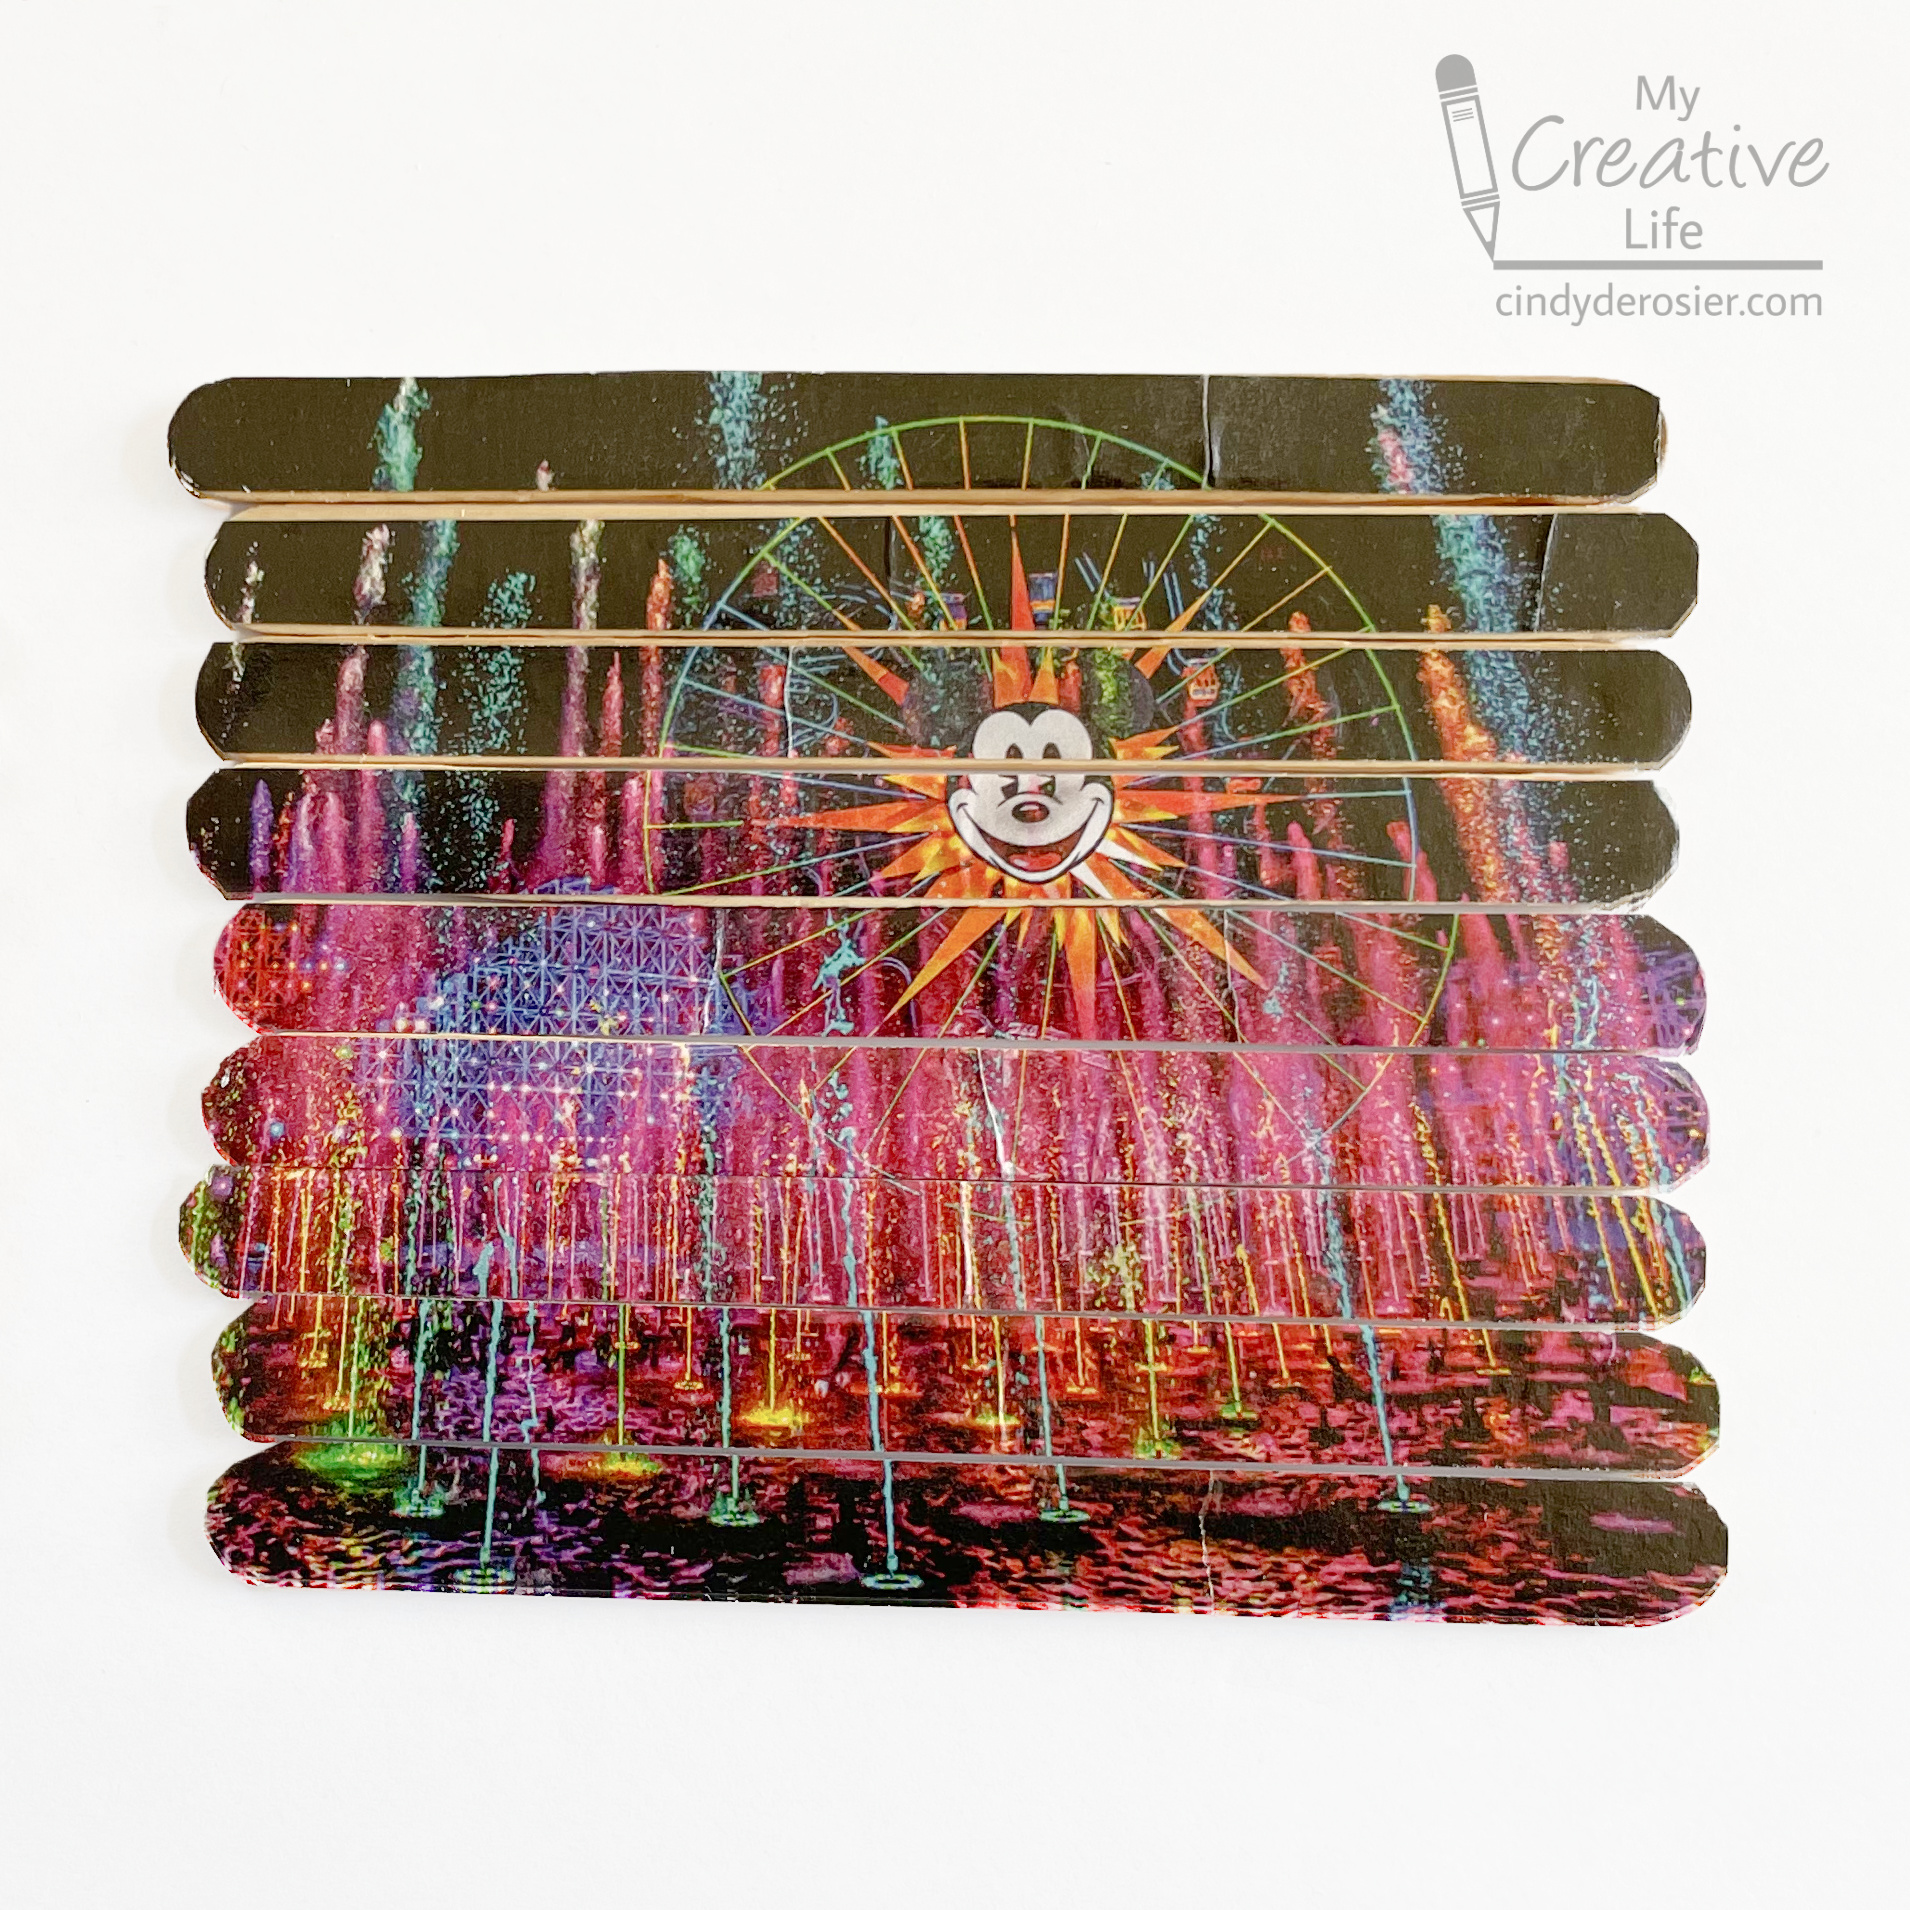
When you've figured out how many craft sticks you puzzle will have, cut the image into strips using the paper trimmer. The strips should be as close to the width of the craft sticks as possible and slightly longer, as you'll be trimming away the excess to round the corners later. Here you can see nine strips of Disneyland's World of Color ready for nine standard-sized popsicle sticks. 


Coat each stick with a thin layer of Mod Podge and smooth the strips in place. Let them dry completely. When they are dry, round off the excess paper from the ends. The microtip scissors make this much easier than with regular scissors. 

Add a coat of Mod Podge over the top of the image to seal it in place. When it's dry, your puzzle is ready. 


Store each puzzle in a zip-top treat bag. 


I used magazine images, but family photos would be great. This is also a fun way to use completed coloring pages. Just make sure whatever image you use gives you enough clues to solve it. Enjoy!

6/14/23

Patriotic Craft Stick Flag Drink Coaster

It's Flag Day here in the United States. The Second Continental Congress passed the Flag Resolution on June 14, 1777, giving us a flag with thirteen alternating red and white stripes and thirteen white stars in a field of blue. It's changed 26 times since then. Our current 50-star version, adopted in 1960, is the 27th official US flag and the longest-used version. 

In honor of Flag Day, I created a cute flag drink coaster, perfect for Independence Day or other patriotic parties. The flag isn't accurate, as it is missing 6 stripes and 32 stars. If you're looking for an accurate flag craft, you can find some on my Patriotic Crafts page. Affiliate links below. 


Patriotic Craft Stick Flag Coaster


Materials: 


Steps: 


Paint the craft sticks. One will be entirely white and two are 2/3 white. Two are entirely red and two are 2/3 red. The four partially painted craft sticks are 1/3 blue. Let the paint dry completely, then seal the sticks with Outdoor Mod Podge. 

Glue small rhinestones to the blue portions of the sticks. I used five on the blue/red sticks and four on the blue/white sticks. 

Arrange three mini craft sticks vertically on your work surface and add glue. One by one, transfer the painted craft sticks onto this base. 


That's all there is to it. Enjoy your patriotic drink coasters!

10/12/22

Paper Plate Football Fan

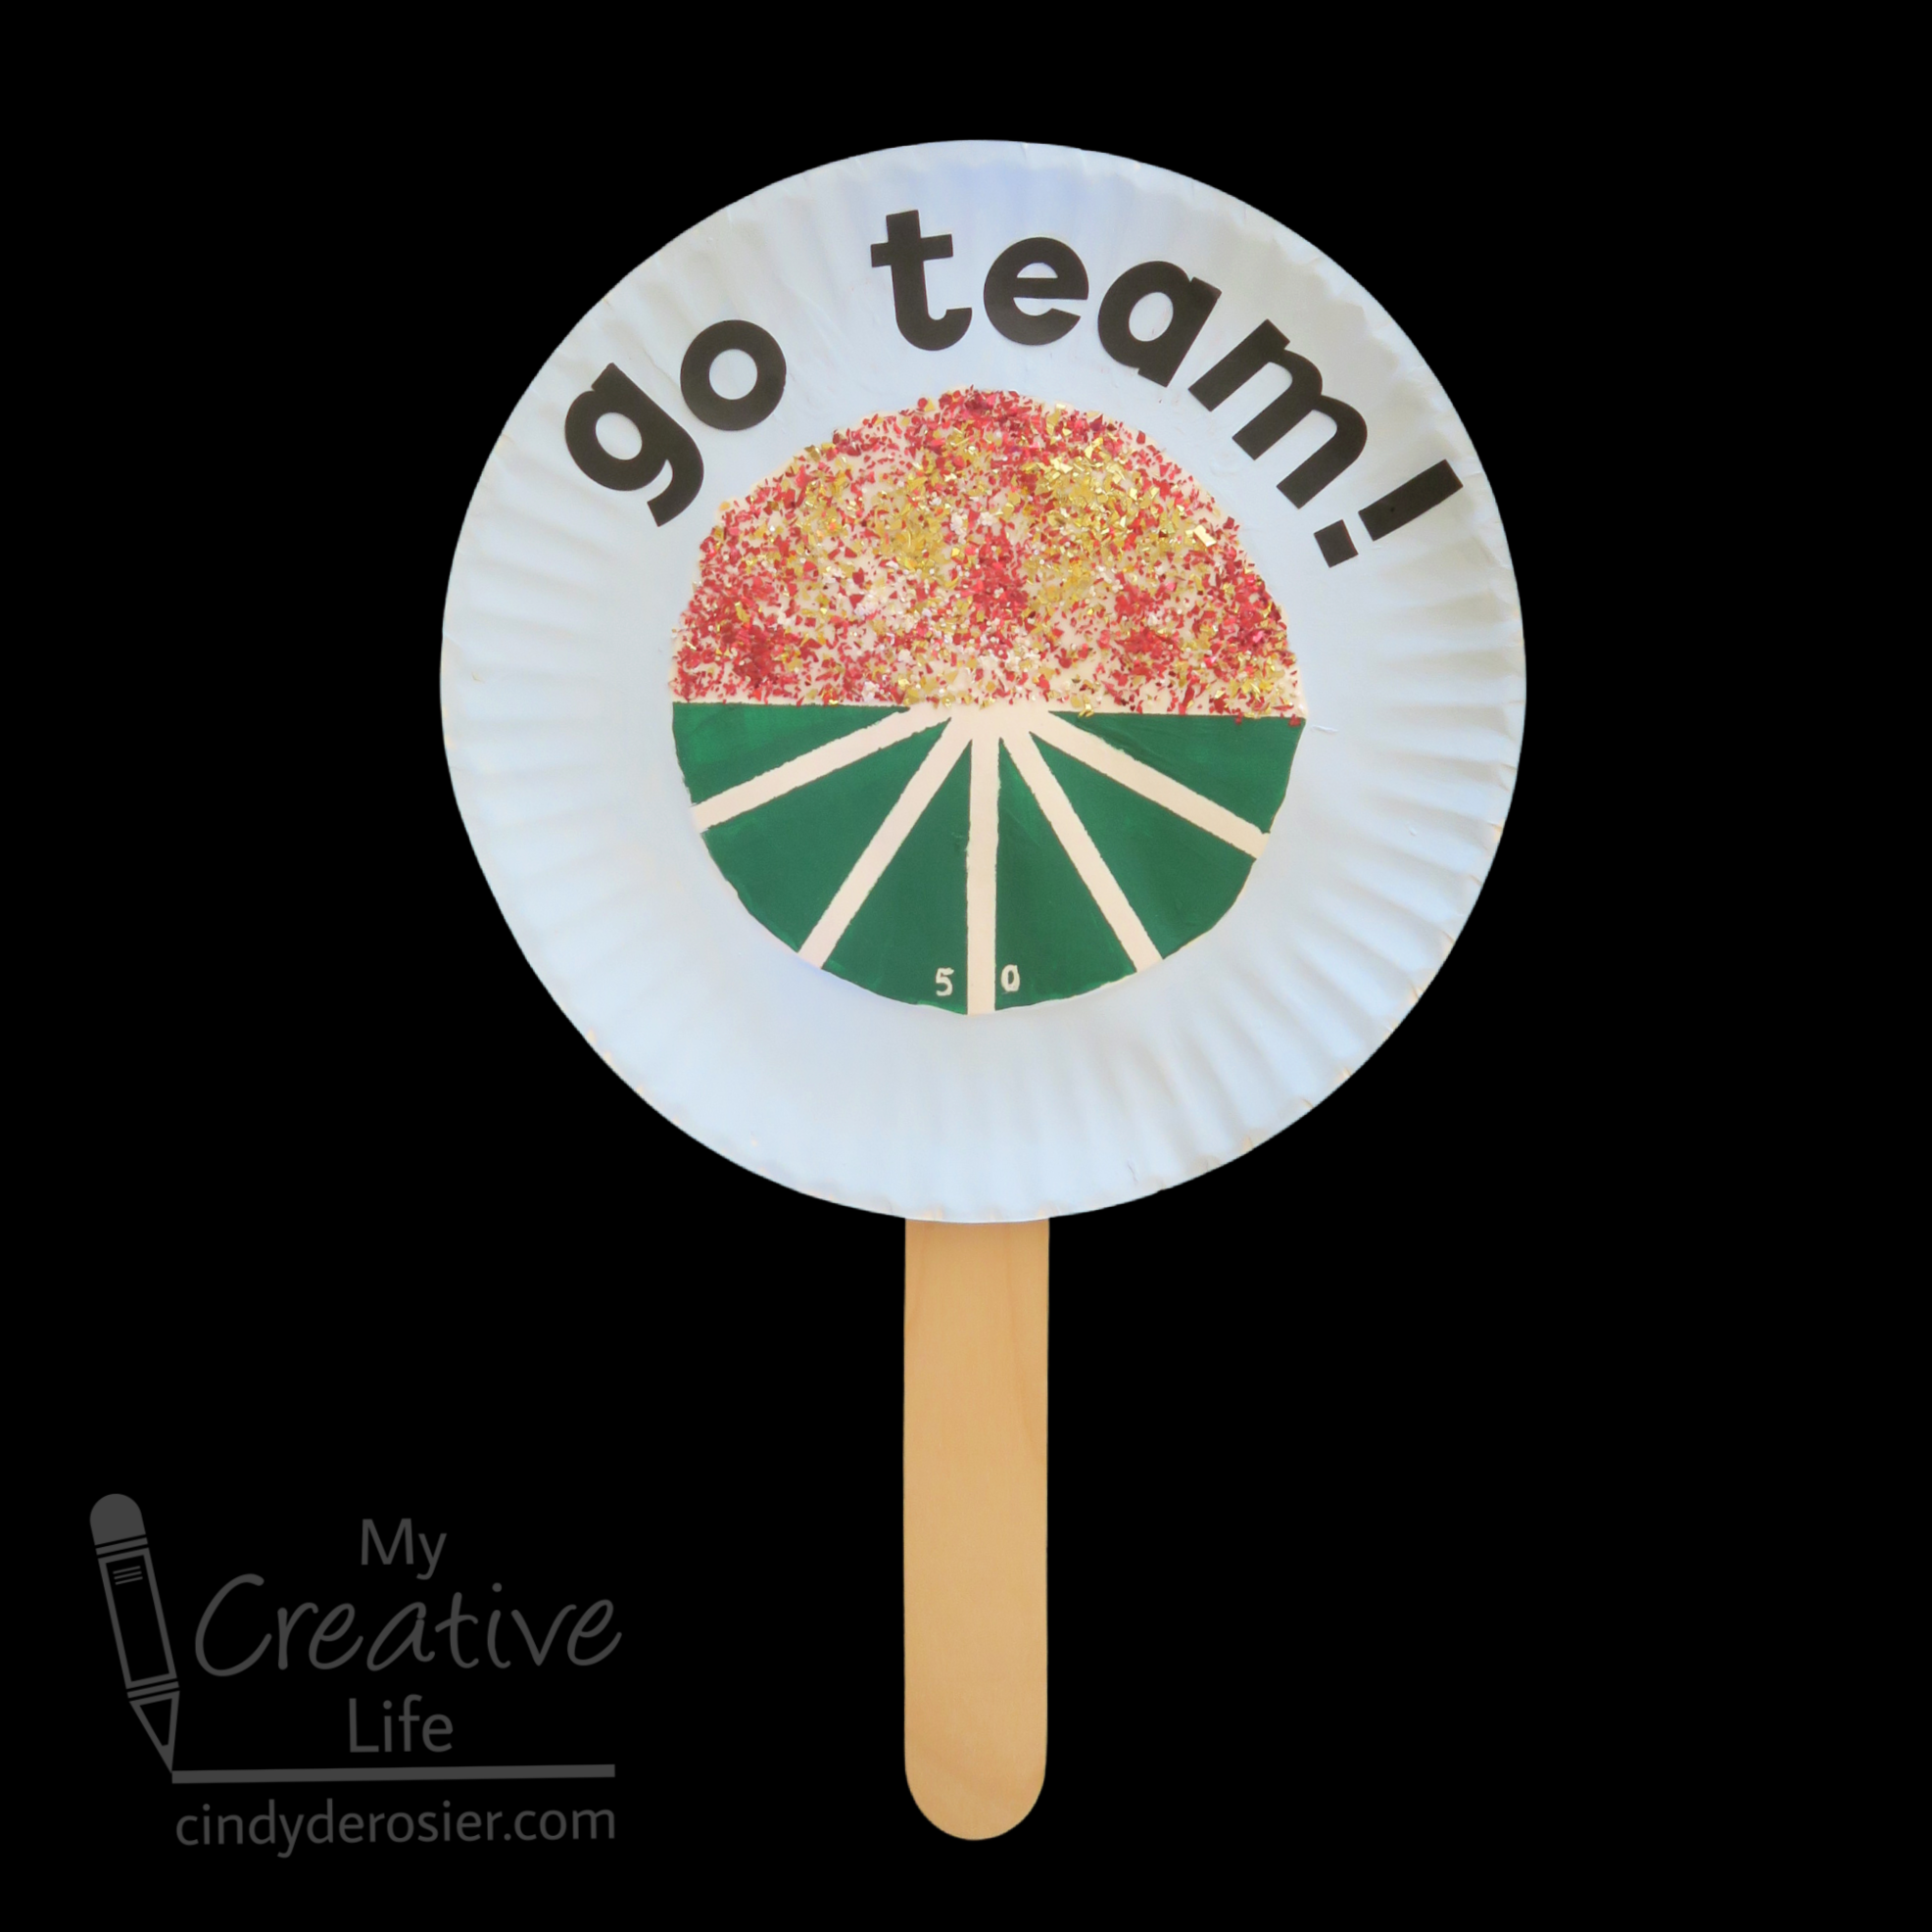
Have you seen the football field cookies that are so popular? They're the inspiration for my project,  a football fan for a football fan! Affiliate links below. 


Paper Plate Football Fan


Materials: 


Steps: 


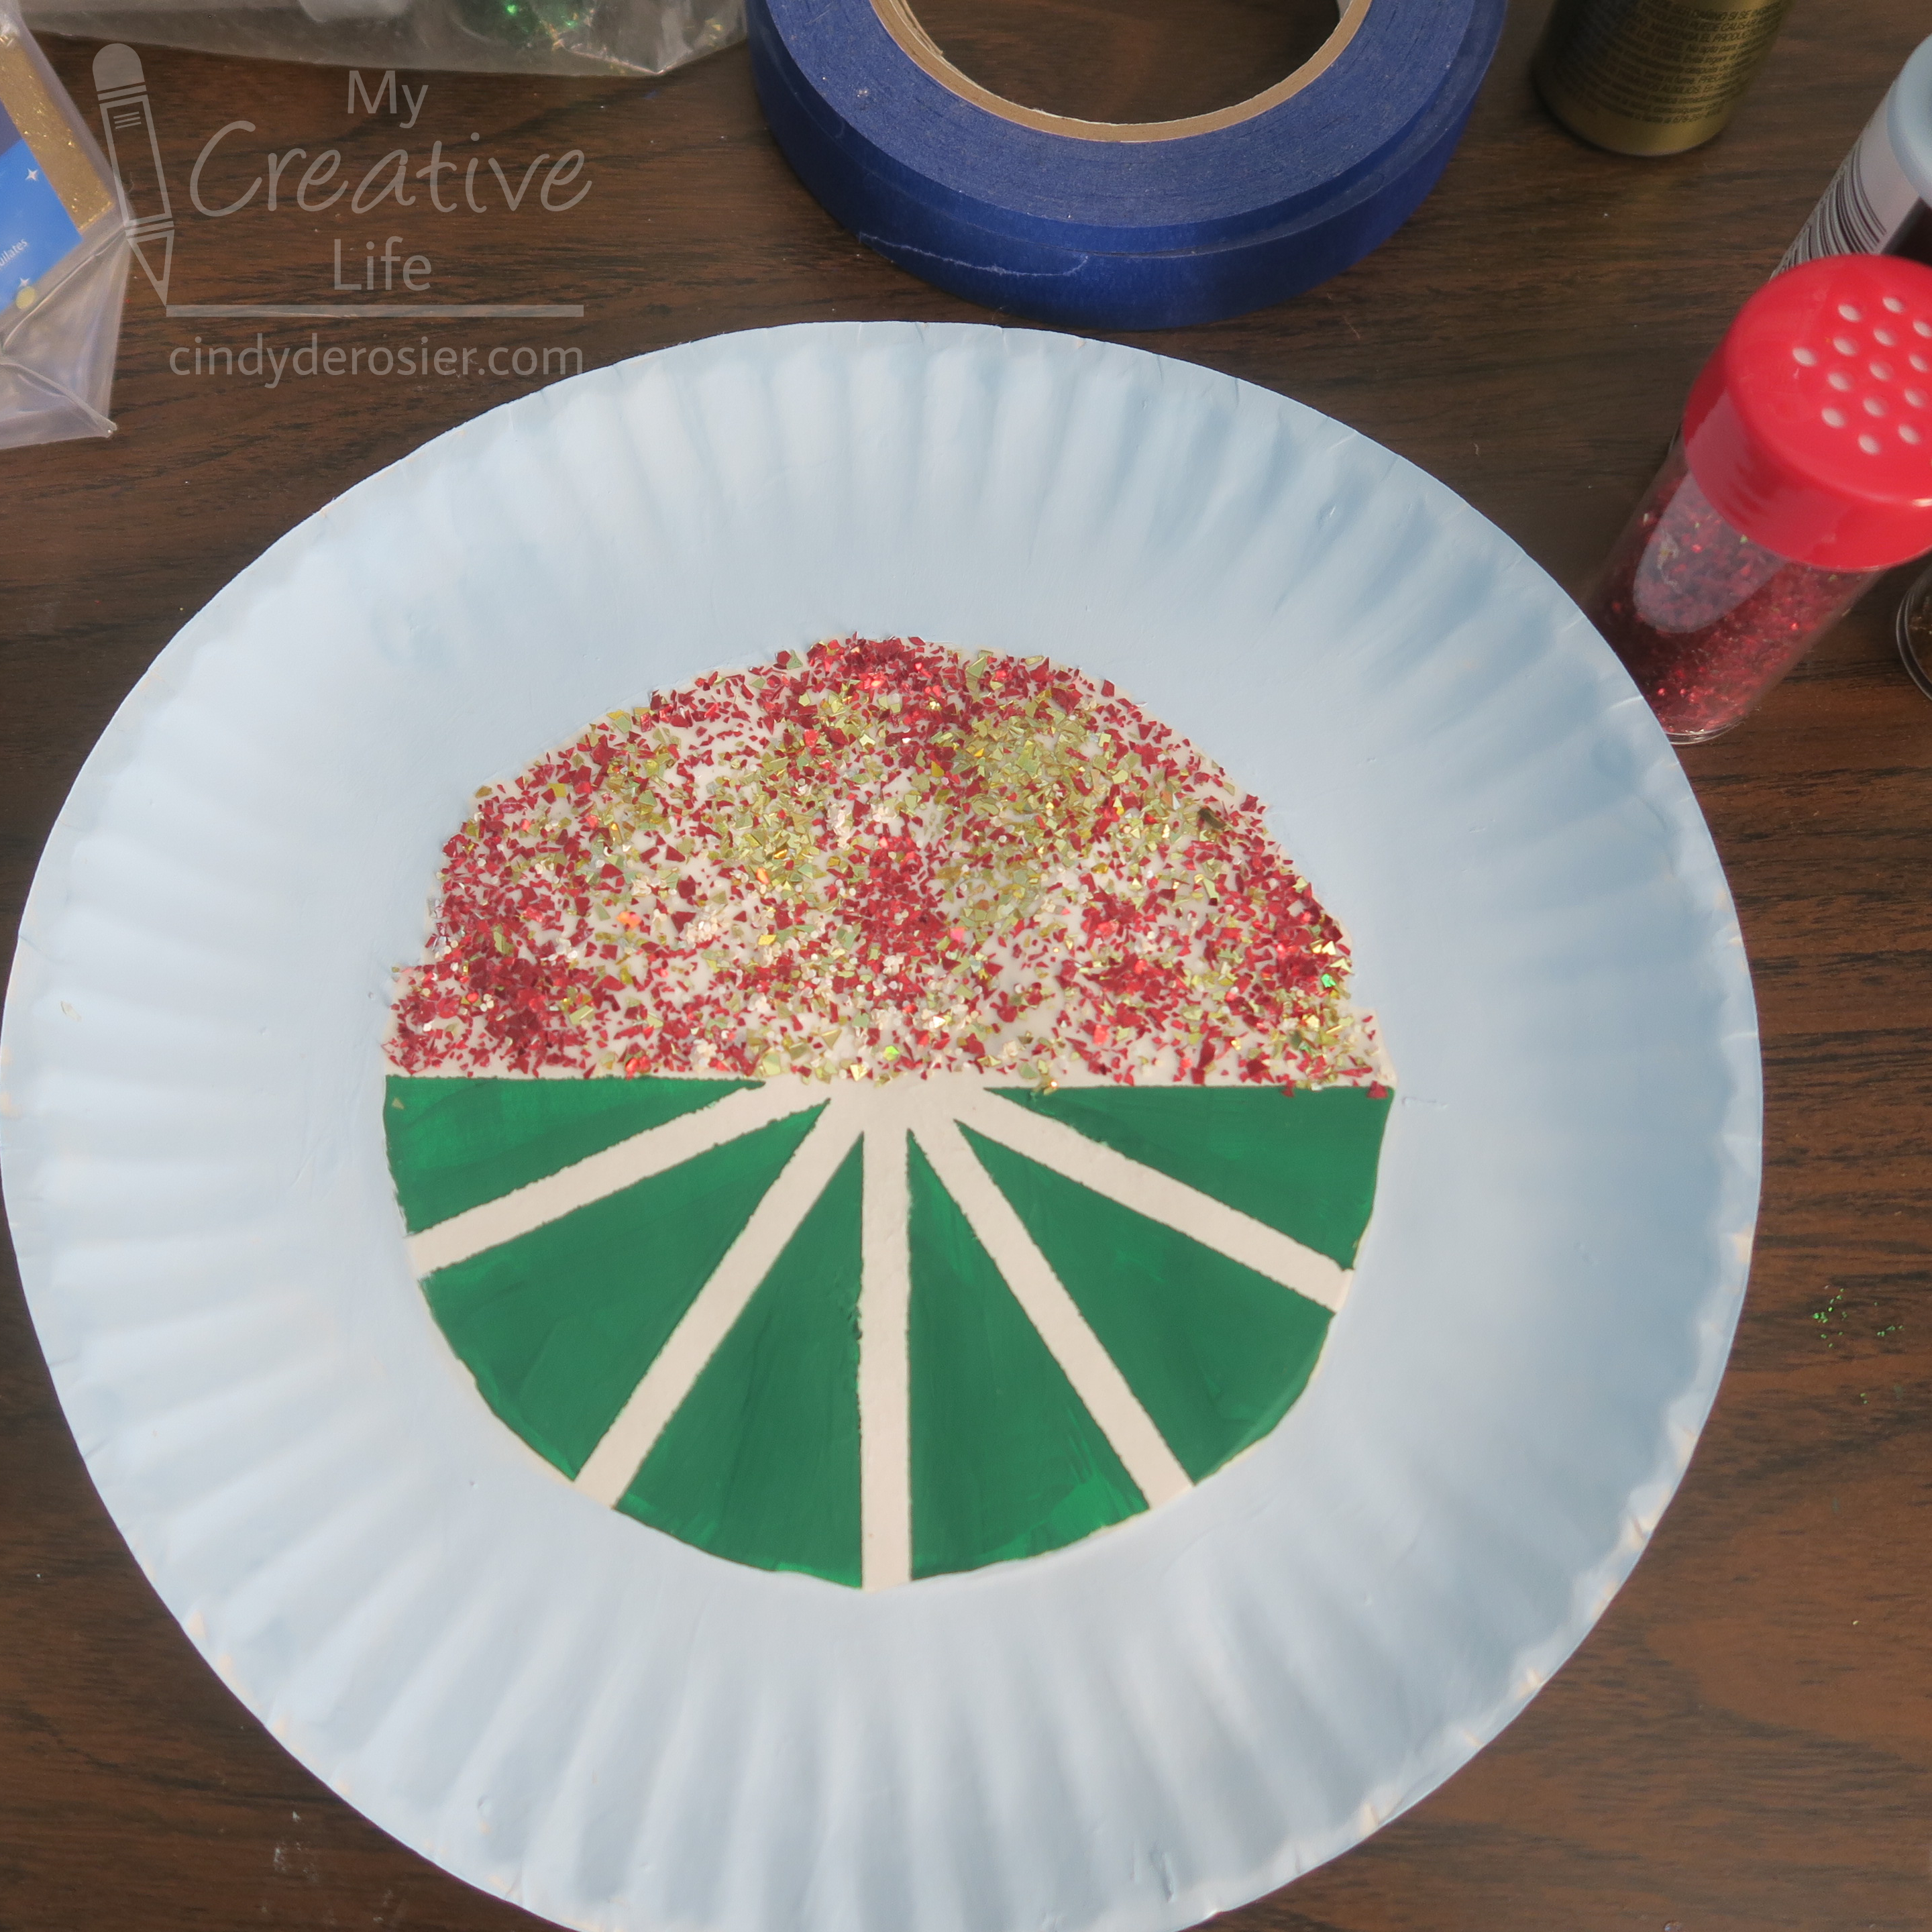
Apply a piece of painter's tape across the middle of the paper plate to establish the horizon. Add five pieces of 1/4" painter's tape radiating down from the center of the plate to form the yard lines.  


Paint the smooth section below the horizon line with green paint. Remove the tape. Paint the bumpy perimeter of the paper plate with light blue paint. 

When the paint is completely dry, rub a thin, even coat of tacky glue to the smooth section above the horizon line. Sprinkle on glitter in your team colors, covering the gluey area. Allow the glue to dry. 


Use a white pen to mark the 50-yard line. 


Add letters to spell out a message on your fan. You can put, "Go team!" like I did, or use the specific name of the school, city, or mascot. 

Glue a 10" craft stick to the back. Now you have a football fan that will help any football fan stay cool while supporting their team!

12/15/21

Paddle Spoon Reindeer Ornament

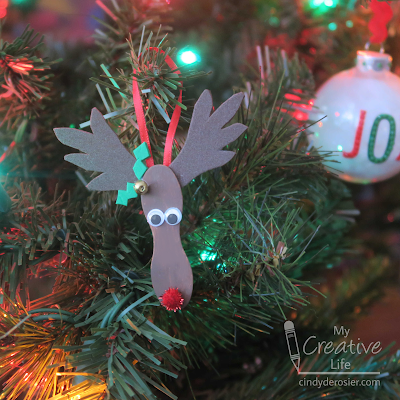
This is my latest homemade ornament, which I'm calling a Paddle Spoon Reindeer because "paddle spoon" is the search term that finally worked when I tried to figure out what to call the mini wavy craft stick that makes up the reindeer's face. It's hanging right by my Diamond Dotz Joy ornament. Slowly but surely, the homemade ornaments are crowding out the store-bought ones on the tree (as it should be). Affiliate links below.    


Paddle Spoon Reindeer Ornament


Materials:


Steps: 


Paint the paddle spoon brown and set it aside. Cut the brown craft foam to make a pair of antlers, then cut the green craft foam to make two teeny holly leaves. Cut a length of ribbon to make the hanger.

Glue the antlers behind the paddle spoon, then glue the eyes, pom pom, holly leaves, and bell in place. When those are dry, glue the ribbon hanger to the back. 

11/2/21

Rainbow Halloween Costume for Three

For Halloween, our family of three dressed as a rainbow. 
 

Even though I am completely incompetent with the sewing machine, this costume was easy enough that it only took me a few hours to make. I made some mistakes along the way, so you get to benefit by learning from my errors.

The biggest error? That image above is a lie. I digitally flipped it to get the colors in ROYGBIV order. The actual photo has us in VIBGYOR order. Even though I actually thought about how to get the colors with red at the left and purple at the right, I still messed it up. Sigh. Affiliate links below. 


Rainbow Halloween Costume for Three


Materials:


Steps:


Fold each t-shirt in half as precisely as you are able. Mark the center with clips or pins, then carefully cut the each shirt in half. 


After all the shirts are cut, pair them together red-orange, yellow-green, and blue-purple. Here's where I went wrong. I chose the wrong half of each shirt. I should have red and yellow on the left sides, and orange and green on the right sides.  


I strongly recommend you lay out all the shirts in order to make sure you are using the correct sides. You might luck out and get a t-shirt brand where the front and back are symmetrical, but ours had a dip in the front with a very high back that would have been weird to wear backwards. 

When you are sure you have the correct order, it's time to sew. Carefully match the fronts of the shirts together and clip one of the sides in place. 


Sew that seam, being sure to backstitch at the hem and the neck to secure the seam. Clip the second seam together. Sew that seam, then turn the shirt right-side out. Repeat the process for the other two shirts. 

To make the rain cloud, cut a cloud shape from chipboard and paint it grey. Glue it to a jumbo craft stick. Tie glow beads onto pieces of silver thread and tape them to the back of the cloud so that they dangle like raindrops. 


To make the sun, cut 8 triangles of chipboard to make the sun's rays. Paint them and the backs of two paper plates yellow. Glue one plate to the craft stick, then glue the rays to the front of that plate. Glue the second plate on top to sandwich the rays between the two plates. 


Then you just have to make sure you stand next to each other in the correct order through the entire costumed celebration! 

This was a fun costume and so easy. Half of each shirt is leftover, so in theory I could either sew up the correct rainbow, mix-and-match the colors to make random two-tone shirts (opposites on the color wheel?), or come up with other way to use the fabric. I'm open to suggestions!


I hope you all had a wonderful Halloween!