Showing posts with label paper bag. Show all posts

10/19/22

Fall Leaf Luminarias

Luminarias looks so pretty lining a path at night. Use fall leaves to make make your own luminaries to display during autumn. They're particularly nice to set out for Halloween to welcome the trick-or-treaters. Affiliate links below. 


Fall Leaf Luminarias


Materials: 


Steps: 


Spread out the paper bags and arrange the leaves on top of them. I made my luminarias two at a time and used a box to contain the spray. 


Spritz the spray ink over the leaves until the visible white area is mostly covered. If you leave visible white, there won't be contrast when you remove the leaves.  


You can remove the leaves immediately and set the bags aside to dry while you spray the next batch. Continue until you've decorated enough bags to line your walkway. 

Fill the bags with an inch or so of dried beans (or rice or pebbles). You want enough to keep the bags upright and in place. Nestle the tea lights into the beans and arrange the luminarias. Beautiful!
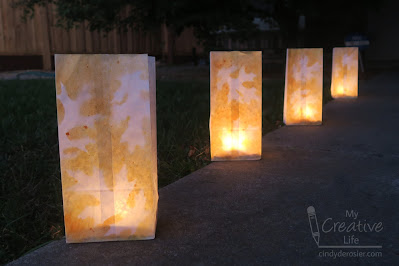

I made these for fall, but luminarias are even more common for the Christmas season in places like New Mexico. I found this fascinating article about the difference between luminarias and farolitos that you might enjoy. You can make a winter version by following the same steps. Try using different elements from nature (holly leaves and berries, for example). You can also use different colors. 

 

4/21/22

Decoupage Scout Sign from a Paper Bag

I take a fabric tote with me every time I shop, no matter what I'm buying. I have dedicated totes that are only for groceries and others for non-food items. Each time I bring a tote shopping, that's one fewer paper or plastic bag that will ultimately be thrown out. 

When paper or plastic bags do enter our house, I do my best to reuse them as many times as possible. And occasionally, they become part of a craft project, like this bag from the Scout Shop. Obviously, you could use any design or logo from your favorite store for this project and you could put it onto lots of different surfaces besides the wood panel that I used. Affiliate links below. 


Decoupage Scout Sign from a Paper Bag


Materials: 


Steps: 


Paint the wood panel black. While the paint is drying, use the microtip scissors to carefully cut out the design, which in this case was the BSA fleur-de-lis. Apply a thin coat of Mod Podge to the panel where you'll be putting the design, then add a thin coat to the back of the design. Carefully position the design and let the Mod Podge dry, approximately 15 minutes. Add a coat of Mod Podge over the entire surface to seal it. If you'll be hanging this, one coat is fine. If you'll be using it as a desktop tray or something similar, add at least one more coat of Mod Podge after the previous one dries. 

9/7/21

Paper Bag Bison

As promised, here is the bison project I made. The entire thing is made with a single paper bag. Affiliate links below. 


Paper Bag Bison


Materials:


Steps:


Carefully open a paper lunch bag. You should be able to peel it open without cutting it. I'm reusing one I got from the store when I bought bagels. It's wrinkled, but that totally doesn't matter because you'll be adding even more wrinkles!


Use scissors to cut out the bison's body from an edge of the paper bag. Then remove the head from the template and use it to cut an extra head. Cut the remaining portion of the paper bag into two long rectangles. 


Trim the horns and beard off the full-body bison. Crumple and then flatten each piece, as shown below. 


Paint one large rectangle with light blue, then add streaks of white to make the sky. Paint the other rectangle golden. Paint the back half of the bison's body light brown and the front half (including the head) dark brown. Paint the horns white. 


When all the paint is dry, glue the pieces together. 


I'm really happy with my bison project! 


8/8/18

Badger Paper Bag Puppet

There's a holy trifecta in kids' crafts, which include: the paper plate craft, the cardboard tube craft, and the paper bag puppet. Name just about any animal or character that is popular with kids and you'll be able to find tutorials to make them using a paper plate, a cardboard tube, and a paper bag. Part of my job as Editor of Fun Family Crafts is to make sure we have a variety of craft tutorials on our site. We don't need another paper plate ladybug, as we already have three good ones. But when I notice that we are missing one of the trifecta for a particular animal or character, I'll either look for it or make it myself. Hence, my Badger Paper Bag Puppet. Affiliate links below. 


Badger Paper Bag Puppet


Materials:


Steps:


Position the paper bag so that the flap will be the badger's mouth. Cut a few inches off what is now the bottom of the paper bag. Cut two triangular ears from that piece.


Paint a black V on the badger's face. Paint the ears black, leaving a white edge on each.


Paint an oval belly on the badger. Without reloading the brush, make short, dragging motions to add a second, wider V on the badger's face. You're trying to get the look of fur. 


Here's a closer look. Ignore the nose. You should just have V's on the face at this point.


Use very light strokes to add a bit of paint to the badger's body. Glue the eyes and the ears in place. Fold the corners of the bag under to suggest the badger has a pointy snout. 


I don't like how the nose looked, so I ended up painting over it with white. Then I cut out an oval, painted it black, and glued it vertically. Much better. 


Enjoy your badger puppet!

7/30/18

Roundups

Ready to see more of the roundups I've been creating for Fun Family Crafts?

Let's start with my favorite... pineapples! I love the taste and the look of pineapples. I had great fun choosing the images to use in this roundup. I played around with using one of the ten images in the title block and love how it turned out. 


Picnic Crafts was a fun one too. I love the mosaic in the upper right. And those hot dog cookies. And the ants. So obnoxious at a picnic, but so cute as a craft. 


One of these Paper Bag Crafts is mine. It should be no surprise which one that is. I'd say any roundup which includes a pirate, a peacock, and Frankenstein is a success, so I feel good about this one.


We have more football crafts than all the other sports combined, so I had to work to find a good variety for this roundup. I'm happy with how it turned out.


Here's the roundup I made for the special days in July (and the horizontal version for Facebook). I hope you celebrated Macaroni Day (7/7), Barn Day (7/14), and National Camping Month.


Mark your calendars for the special days in August. You won't want to miss Snoopy's birthday (8/10), Play in the Sand Day (8/11), National Aviation Day (8/19), or National Dog Day (8/26). 


As always, I made all the graphics with PicMonkey. I find it ridiculously fun. Do you have any suggestions for roundups I should make? I have a huge list going, but I'd be happy to pop your ideas to the top if there's something you'd like to see.