Showing posts with label wood. Show all posts

8/31/26

Little Dipper Constellation Ornament

There is only one state which has named an official state constellation. Do you know which state it is? Here's a hint. The constellation they selected is the Little Dipper, to honor their nickname as the North Star State. Read here to discover which state it is, then learn how to make an ornament inspired by this constellation. Affiliate links below. 


Little Dipper Constellation Ornament


Materials: 


Steps: 


Mix a drop or two of paint with water to make a wash. Use a sponge to stain the wooden ornament. You should still be able to see the rings of the wood. 


While the paint dries, draw the constellation on a piece of scratch paper, cut to fit onto the ornament. Select rhinestones for each star of the constellation. It's a nice touch to use larger rhinestones for the larger stars.  


Set the rhinestones aside and turn your constellation upside down. Use the pencil scribble transfer technique to make a pattern on the wood ornament. 

Trace the pencil lines with the white Posca. Add tiny white dots randomly on the ornament, then glue the rhinestones where they belong on the constellation. Tie a loop with the silver cord and your ornament is done. 


While I made the Little Dipper because it's the state constellation of Minnesota, this project can easily be adapted to make any constellation. Try zodiac signs for especially nice ornaments; they make a wonderful gift.

-------


While researching constellations, I came across an absolutely fascinating blog post called Visualizing cities as constellations in the night sky. Check it out!

8/28/25

State Seal Glass Magnets

Today's project is a state-themed twist on a classic Mod Podge craft: glass magnets. Instead of using photos, magazine images, or ephemera for the design, use your state seal. Affiliate links below.  


State Seal Glass Magnets


Materials: 


Steps: 


Paint the wood circles black, then set them aside to dry. Center the sticker on the wood circle. Add a coat of Mod Podge to the back of a glass gem, then position it onto the sticker. Let the Mod Podge dry completely. Adhere a magnet to the back. 

When you use the magnet, pull it by the wooden part and not by the glass gem. 

*Learn from my mistake: Use slightly more expensive glass gems that are specifically made for crafting. I used the cheap ones I had on hand. Not only were they very irregular, but many of them were not crystal-clear. I tried to pick out the best ones for the project, but it's easier to use the better-quality gems to begin with. 


It's really interesting to me what each state has on their seal. Other than those states who have put their seal on their flag (ugh), I wasn't really aware of the details on most state seals. I don't think I have it in me to color all 50 state seals like I did with the state quarters, but I might pick a few of the more interesting ones and color those. 

8/22/25

Football Helmet Refrigerator Magnet Craft

If you have a football fan in your life, you're going to love this football helmet craft! It's fun to do as a team activity, at a sports-themed party, or to make as gifts for football players and fans. You can customize the helmet however you want. Make a replica of the helmet from an NFL, college, or high school team, or design your own from your imagination! Affiliate links below.  


Football Helmet Refrigerator Magnet Craft


Materials: 


Steps: 


Use a flat brush to paint the base coat for each helmet you are making. 


When the paint is dry, you can draw your design freehand. Or, if you need a little help getting the proportions of the logo just right, print out an image of the actual helmet that is the same size as the wooden helmet. Cut around the edges, then use this transfer technique to get the design onto your wooden piece. 


Use the liner brush to paint the logo onto the helmet, then paint the facemask in the appropriate color. 


The facemask continues onto the body of the helmet. I painted mine freehand, but you can sketch it out first or use the transfer technique again. 

If you are going to be putting your magnet on the refrigerator or somewhere else where it could get wet, use the Mod Podge to seal it as soon as the paint is dry. You can skip that step if your magnet is going onto something like an office filing cabinet, where it's very unlikely to get splashed. Finally, apply a magnet to the back of the helmet. 

Here's a closer look at each of the helmets I made: 

Indianapolis Colts


Cincinnati Bengals


Minnesota Vikings


Green Bay Packers


Cleveland Browns... who famously don't have a logo 


As I was painting these, I was thinking about other things you could do with them besides turn them into magnets. Drill a hole into the top and turn them into ornaments. Link them together to make a banner. Or write names on them to use as place settings at a team banquet or party. Lots of possibilities!

6/27/25

Justinthetrees: Woodworking with a Twist

I am a big fan of Justin Davies, of Justinthetrees. He is a talented woodworker, but that's not reason enough for me to share his videos here. It's the fact that he includes two of my passions in his woodworking: US geography and cooking. 

This is a poster Justin sells in his store, based on the actual United States of Trees wood map that he made. I love it. 


This is the compilation video from the 50 projects that make up the map. It's long, but super interesting (to me, at least!). 


He's made a second US map, this time based not on state trees, but rather on native trees. 

I mentioned Justin combines cooking with woodworking, which is even more interesting to me than the maps. You're probably assuming he makes cookware, as opposed to actual cooking, but you'd be wrong. There are many super fun videos where he makes tree-flavored ice cream, gelato, cake, candy, and more. I would love to try them. And then there's the time he made bread from sawdust. 
 

I hope you enjoy Justinthetrees as much as I do!

11/18/24

Western Meadowlark Diamond Art Ornament

I liked my wood slice American Robin ornament so much that I made one for the Western Meadowlark. It is the state bird of Kansas, Montana, Nebraska, North Dakota, Oregon, and Wyoming and is easily recognized by the black V-shaped bib on its yellow breast. Beautiful! 

As with the robin, you can make this with leftover drills from previous diamond art projectsbuy a bunch of colors, or get just the colors that you need. I used a variety of greys to make my bird since that's what I had on hand. Affiliate links below. 


Western Meadowlark Diamond Art Ornament


Materials: 


Steps: 


Paint a thin coat of DOTZ Stick onto the wood slice, following the package directions. Don't use too much or the moisture can cause your ornament to crack. 

When the adhesive is ready, apply the drills. The stars on my pattern mark the center of each axis, so the plus sign is the center of the whole design. 


In order to center the meadowlark, put the center drill onto the center of the ornament. Then fill in the rest of the drills around that central one. 

Ordinarily, I'd suggest sealing your diamond art, but since these ornaments can crack with too much moisture, I wouldn't risk it. Instead, rub cornstarch or baby powder over the uncovered area of the wood. That will eliminate the tackiness of any extra adhesive not covered by drills. 


-------


Have you seen the Aububon Birds stuffed animals from Wild Republic that feature a realistic call? I love them! There are over 30 different birds. This is the Western Meadowlark


Interested in learning more? Read about the Western Meadowlark and hear its calls at Audubon.com

11/13/24

American Robin Diamond Art Ornament

I've been wanting to make a bird ornament using my copious supply of leftover drills from diamond art for a long time. I'm so happy with how this robin turned out! Don't have leftover diamonds in the correct colors? Not a problem! Substitute with what you have, buy a bunch of colors, or get just the colors that you need. Affiliate links below. 


American Robin Diamond Art Ornament


Materials: 


Steps: 


Paint a thin coat of DOTZ Stick onto the wood slice, following the directions on the package. If you use too much, your ornament can crack from the moisture. 

When the adhesive is ready, apply the drills. This is the pattern I made. The stars mark the center of each axis, so the plus sign is the center of the design. 


In order to center the bird on my ornament, I put the center drill onto the center of the ornament... as best I could. The wood slices I used are quite irregular. In retrospect, I could have moved my starting drill over a hair to the left to better center the design. It didn't bother me much, so I left it that way.

Fill in the rest of the drills around that central one. 

Ordinarily, I'd suggest sealing your diamond art, but not on wood like this. Instead, rub cornstarch or baby powder over the uncovered area of the wood to eliminate the tackiness of any extra adhesive not covered by drills. 

-------

The American Robin is the state bird of Connecticut, Michigan, and Wisconsin, making this a great activity for kids (or adults!) in those states. But it's equally great no matter where you live. This interesting songbird is one of the most recognized and most widespread in North America. Pair your craft project with a shaped puzzle featuring the American Robin, then check out these fun facts about this beloved bird. 

5/6/24

Fingerprint Heart Magnet for Mother's Day

On Friday, I shared an idea for a homemade Mother's Day heart magnet for one child to give to Mom. Today's idea, featuring fingerprint hearts, can be made by a group of siblings (for Mom) or cousins (for Grandma). Or, you can do like I did and include Mom and Dad to make a family heart. Affiliate links below. 


Fingerprint Heart Magnet for Mother's Day


Materials:


Steps: 


Paint the background - a blue sky and green grass. 


When that is dry, add fingerprint roses floating above the grass. To make the rose, add one fingerprint at a 45° angle to the left, then add a second fingerprint at a 45° angle to the right. It is easiest to do with a pointer finger. Use a pinky finger if you need smaller hearts to fit in more people. 


When the fingerprints are dry, paint stems and leaves under each flower. Then use a Sharpie to write each person's name above their flower. I added a dashed border around the edges to finish my heart. 


The final step is adding magnet tape to the back. Display your art on the refrigerator for everyone to enjoy. 

5/3/24

Fingerprint Flower Magnet for Mother's Day

Every mom I know loves gifts that are handmade by their children. This heart-shaped refrigerator magnet features a child's fingerprints, turned into roses. Affiliate links below. 


Fingerprint Flower Magnet for Mother's Day


Materials:


Steps: 


Paint the background of the heart with your desired colors. I made a blue wall and a white tabletop, but you can choose whatever colors you want. Then add a vase toward the right side of the heart. Mine is yellow.

When that is dry, add fingerprint flowers in the space above the vase. If a young child is doing this, they can use their pointer finger. If the child is older with fingers that are less petite, you might want to use the pinky finger. Then use a brush to paint a heart onto the vase.


When the fingerprints are dry, paint medium green leaf shapes in and around the flowers. Don't fill in all the spaces at first. Leave room to add dark green shapes. While I was waiting for the green paint to dry, I added a grey shadow and some texture to the tabletop. This is optional. 

When all the paint is dry, write "Happy Mother's Day!" on the left side using a Sharpie. I added a dashed border around the edges as a final touch. Then turn the heart over and add a strip of magnet tape.


This project is easily adapted for many other holidays and occasions. Birthdays, Valentine's Day, and even graduation come to mind. Just change out the message!

4/4/24

State Flag Wood Slice Ornaments

Crafting with friends is always better than crafting alone, so when Jonna came over we worked together to tackle my state craft goal, We brainstormed a bunch of ideas, then jumped right in with these wood slice ornaments, inspired by state flags. I made Alabama, Arizona, and New Mexico. Jonna made Colorado and Alaska. Affiliate links below. 


State Flag Wood Slice Ornaments


Materials: 


Steps: 


Use a pencil and a centering ruler to sketch your design on the wood slice. Here I'm working out the stripes on the Arizona flag. If I were teaching this to students, I'd use the opportunity to pull out the protractors and practice those skills. 


Color your design with acrylic paint. Getting into those small areas was challenging with Arizona. I did all the yellow stripes, then all the red stripes. I filled in the blue area, then finished with the orange star.  


When the paint is dry, add a loop of twine so you can hang your ornament. 


For Alabama, I wanted more of a whitewashed look so that it was obvious the base was a wood slice. I watered down the white paint before painting it onto the ornament, then set it aside to dry. Apparently I watered the paint down too much, because the ornament swelled and cracked. However, once it was completely dry, the swelling went away and the crack is barely visible. You can see it around 4:00 below if you look carefully. I used undiluted red paint to add the stripes, then added the twine hanger.   


I used the same whitewashing technique for my third ornament, New Mexico. At this point, I hadn't seen that Alabama had swollen and cracked, so I didn't adjust the amount of water. This ornament has a much more visible crack, located at 7:00. I like that the woodgrain shows through, so if I were to do this again, I’d still want to do a whitewash. (Yellowwash?) I would experiment with using either less water... or a whole lot more water. I’m thinking that soaking the entire wood slice first (versus just wetting the front) might let it swell evenly and prevent cracking, but I’m not sure. Here is my finished ornament.


Jonna started with Colorado. I think she used a pen cap and a paint bottle as tracers for the circles. In the classroom, I'd pull out the compasses to give the kids practice. Kids LOVE compasses.  


This is Jonna's second ornament, Alaska. After the blue background dried, she used the back of the paintbrush to make the yellow stars. 


There aren't many other state flags that would work well for this project. Most of the rest have tiny details or type that would be way too difficult to paint without drastic modifications. For our next project, Jonna and I switched to markers, which let us make projects with more fine detail. I'll share those tomorrow. 

11/20/23

Ornaments for the Four Sundays of Advent

Advent is a time of preparation for the coming of Christ, both the celebration of his birth (Christmas) and his promised second coming. The first Sunday of Advent is the first day of the liturgical year. It can fall any day between November 27 and December 3. In 2023, Advent starts on December 3. That gives you plenty of time to make your own wall hanging featuring the four Sundays of Advent. 

Starting on December 3, hang one ornament each Sunday. When all four are hanging, you'll know that Christmas is next! Affiliate links below. 


Advent Ornament Wall Hanging


Materials:


Steps: 


Write the four words representing the four Sundays of Advent on the wood slices. You can write freehand or use this transfer technique if you prefer. 


Add some Stickles to the ornaments. I like just a hint of glitter toward the outside edge, but you can add as much as you want. 

Cut four 8-inch pieces of twine. Tie them into loops, then thread them through each of the ornaments to make the hangers. 


Twist three holly berries together and set them aside. Repeat this for each of the ornaments (12 berries total).

The holly leaves I bought come attached in threes, but if you use them intact, they block the words on the ornaments. I cut them apart, stacked two leaves together, and then used a craft pick to poke a hole in them. 


Put the trio of berries into the hole you just created. Then poke those wires through the hole of the ornament. Snip off any excess wire, then use tape to cover the wires. 


Cut four 8-inch pieces of gold wire. Wrap them tightly around the branch four times, then bend up the ends to make hooks. If your branch is significantly thicker than mine, cut your wire longer than 8". 


Now cut an 18" piece of twine. Tie it to the ends of the branch to make a hanger. That's all there is to it!


Here's a close-up of one of the ornaments so that you can see the glitter:


I taught this craft yesterday to a group at church. We had a lot of fun making them and everyone's turned out great. Now we wait... for the season of waiting!

5/25/23

I Love Cats Photo Frame

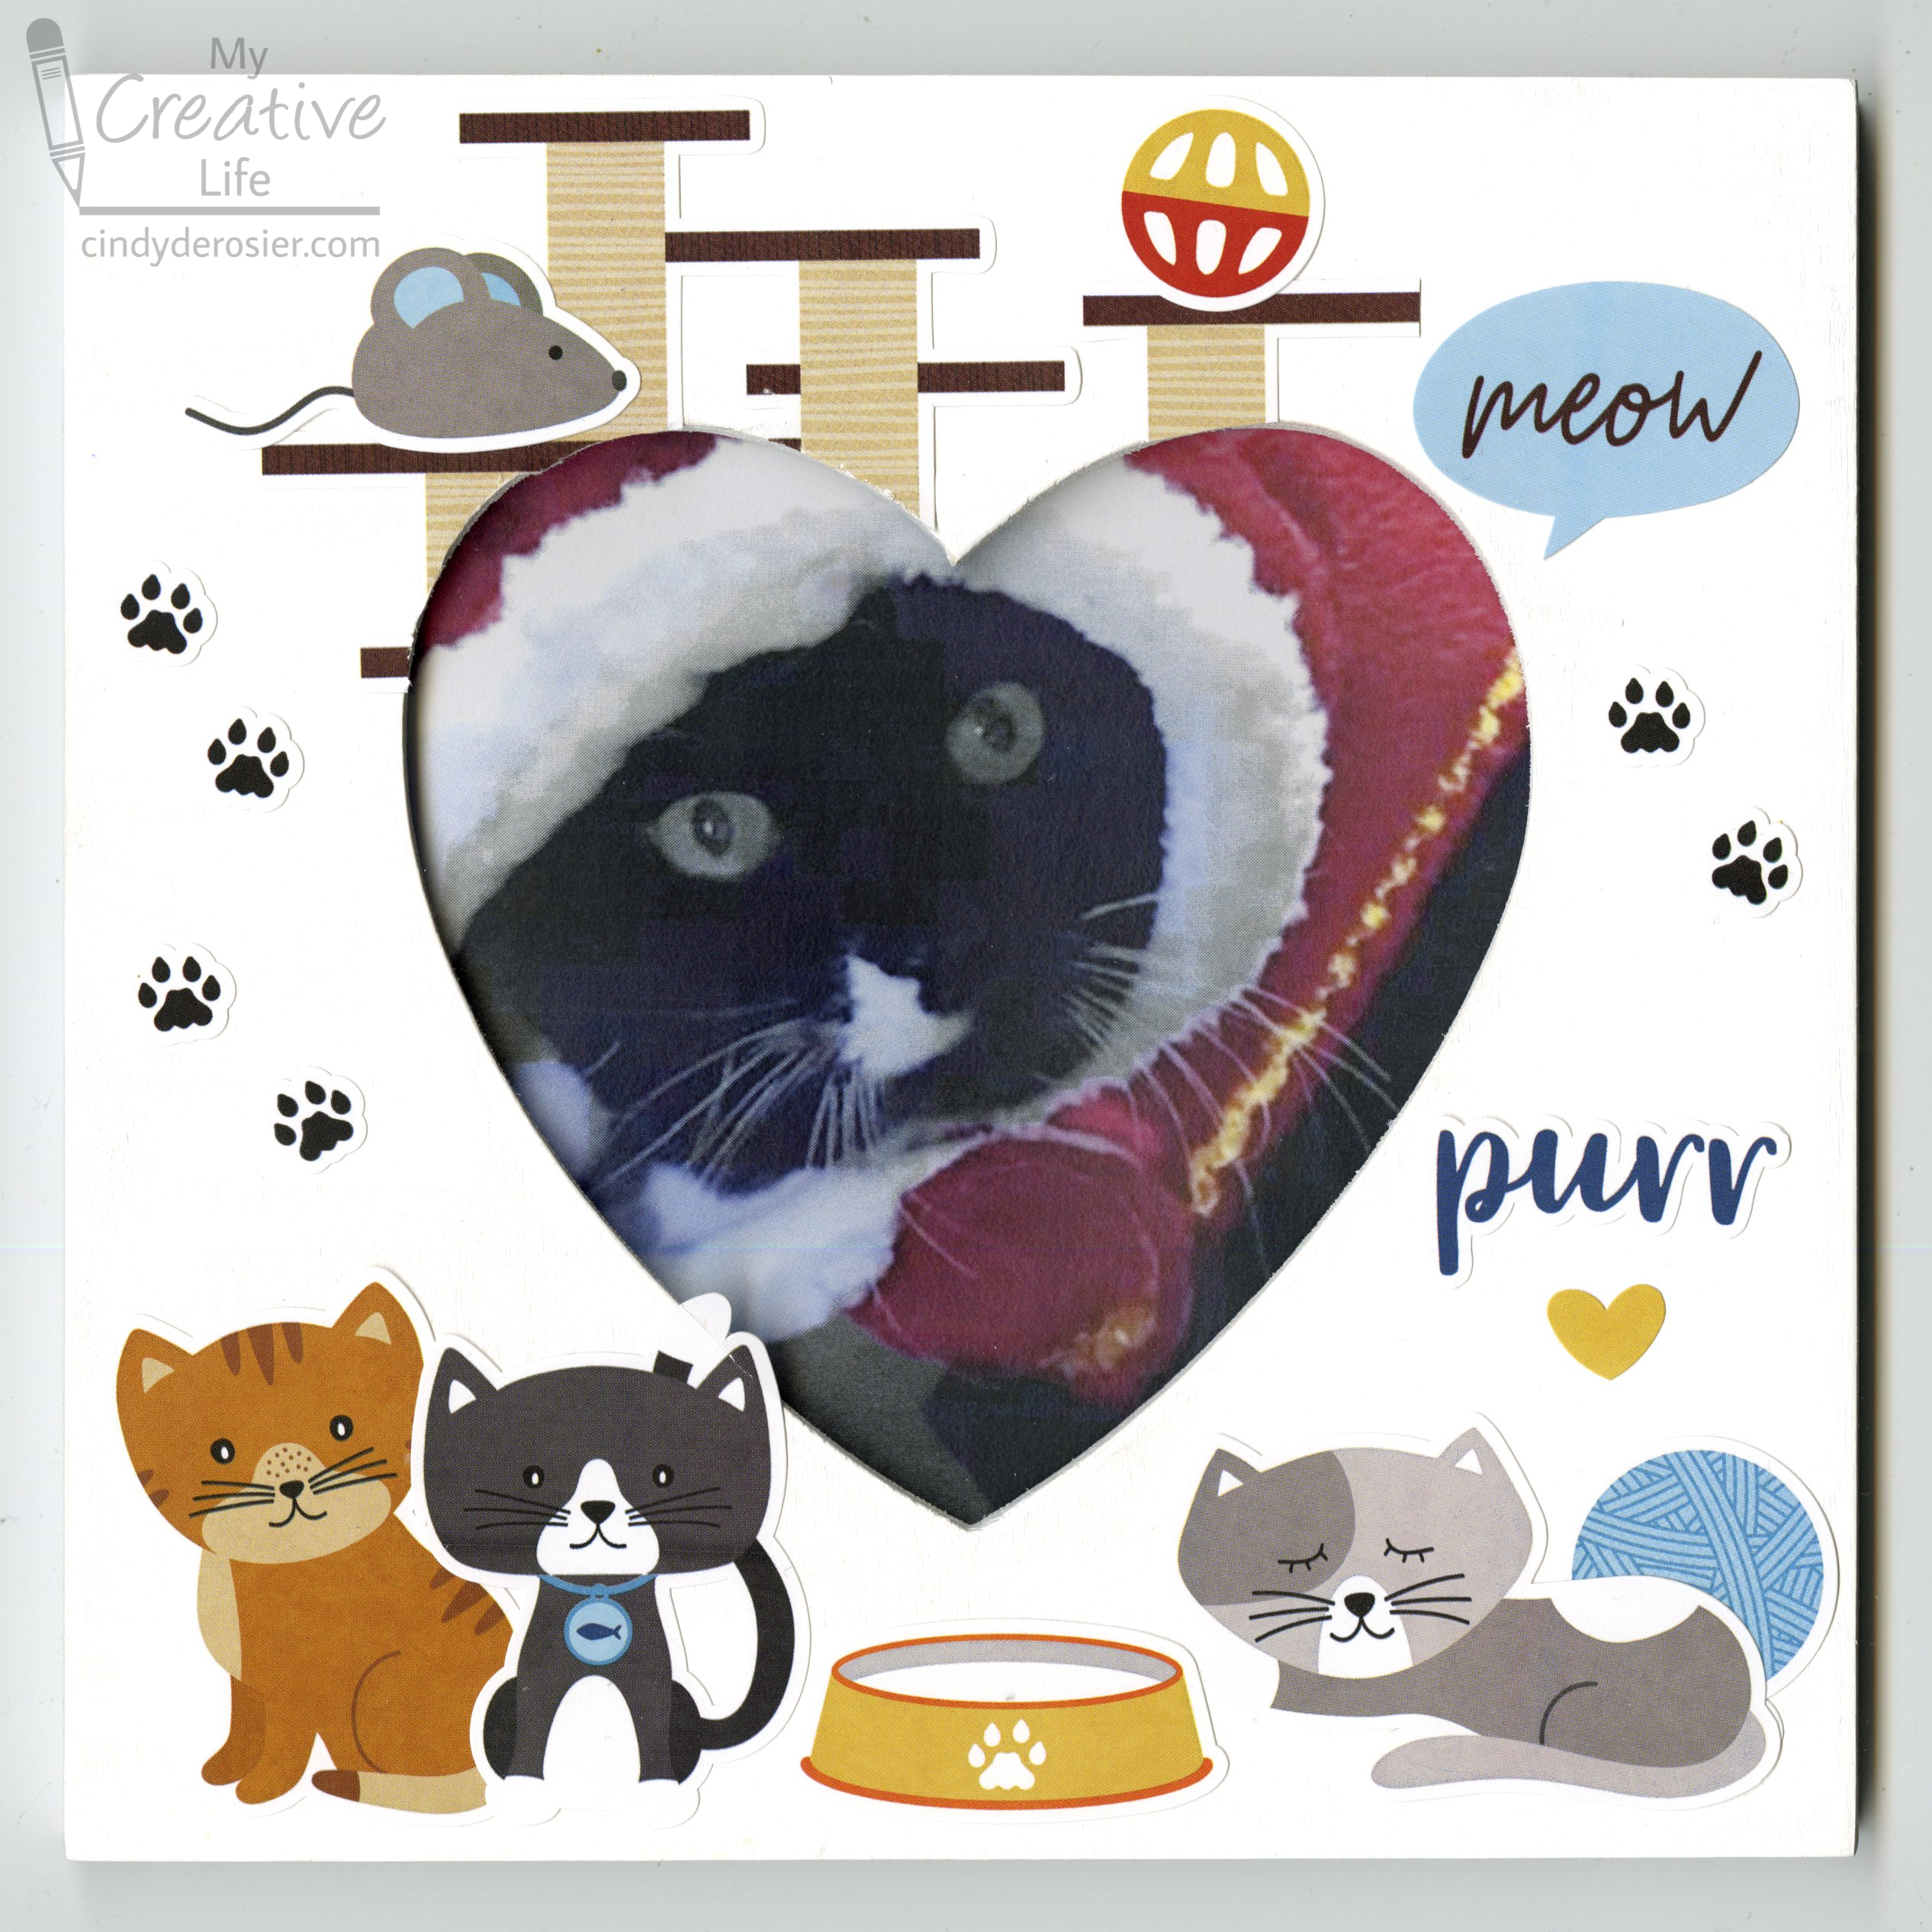
Today's project is a cat-themed photo frame with a heart-shaped opening. I'm calling it the "I Love Cats Photo Frame," but I feel compelled to say that I don't love cats. I don't hate them or anything, but I don't love them. For starters, they're not nearly as awesome as rabbits

Evidence: 
  • Rabbits never bring you dead stuff like cats do. 
  • Cats eat cat food, which is one of the worst smelling substances ever, while rabbit food smells like a fresh-cut lawn. 
  • Cats have the uncanny ability to cough up hairballs in the worst places. Rabbits physically can't vomit.   

Despite the clear superiority of rabbits, there are plenty of people who love cats. My niece, Allison, is one of them. I made this frame for her, featuring a photo of her favorite cat, Tips. Tips does not belong to Allison, but that doesn't stop her from dressing her up. Affiliate links below. 


I Love Cats Photo Frame


Materials:


Steps: 


Paint a thin coat of gesso on the wood frame. Let it dry completely, then use a very fine grain sandpaper over the whole surface. You could technically skip this step, but it makes all the difference in having a smooth surface for adhering stickers. Wipe the frame clean so no dust remains, then paint it white. 

When the paint dries, adhere the stickers. I started with the cats at the bottom, then positioned the cat tree at the top, to make it look like it's in the background. I had to do some minor snipping to fit it in, which you can see by comparing my results with the original sticker sheet. I added the toys next, then the word bubbles, then filled in the extra space with paw prints. 

Because I used high quality stickers on a perfectly smooth surface, I didn't bother to seal the finished frame. If I had, I would have done a test of Mod Podge Ultra on an extra sticker to make sure it would hold up before spraying the actual frame. 

3/9/23

California Wood Slice Ornament, Made with the Scorch Pen

Welcome to Day 4 of California Week!

I've wanted a California ornament to hang on our Christmas tree for awhile now. Our family had entered a promotional contest where you had to do X-number of things to win one of various prizes. We did all the things, because that's who we are, qualifying for the top-tier prize. I wanted the much-less valuable ornament with California on it and asked nicely if I could substitute a lesser-tier prize for the more expensive one we'd won. For reasons that didn't make sense to me then and still don't now, the answer was no. We'd done X-number of things, so we had to take the best prize. We could only have the worse prize if we'd skipped a bunch of the tasks. We didn't know that ahead of time and there was no way to undo the tasks we'd done. Maddening. 

Fortunately, I am a crafter and am perfectly capable of making my own ornament. It literally took five minutes. 


My ornament would look a lot better if I'd been able to photograph it on a Christmas tree, but it is March and we don't have a Christmas tree right now. My sister does. They keep theirs up all year, changing out the decorations for all the holidays and birthdays. Unfortunately, she lives in Idaho, so I couldn't photograph my ornament on her tree. Now that I think about it, I should make her an ornament with Idaho on it, in case they want to decorate for Idaho Statehood Day (July 3). Affiliate links below. 


California Wood Slice Ornament


Materials:


Steps: 


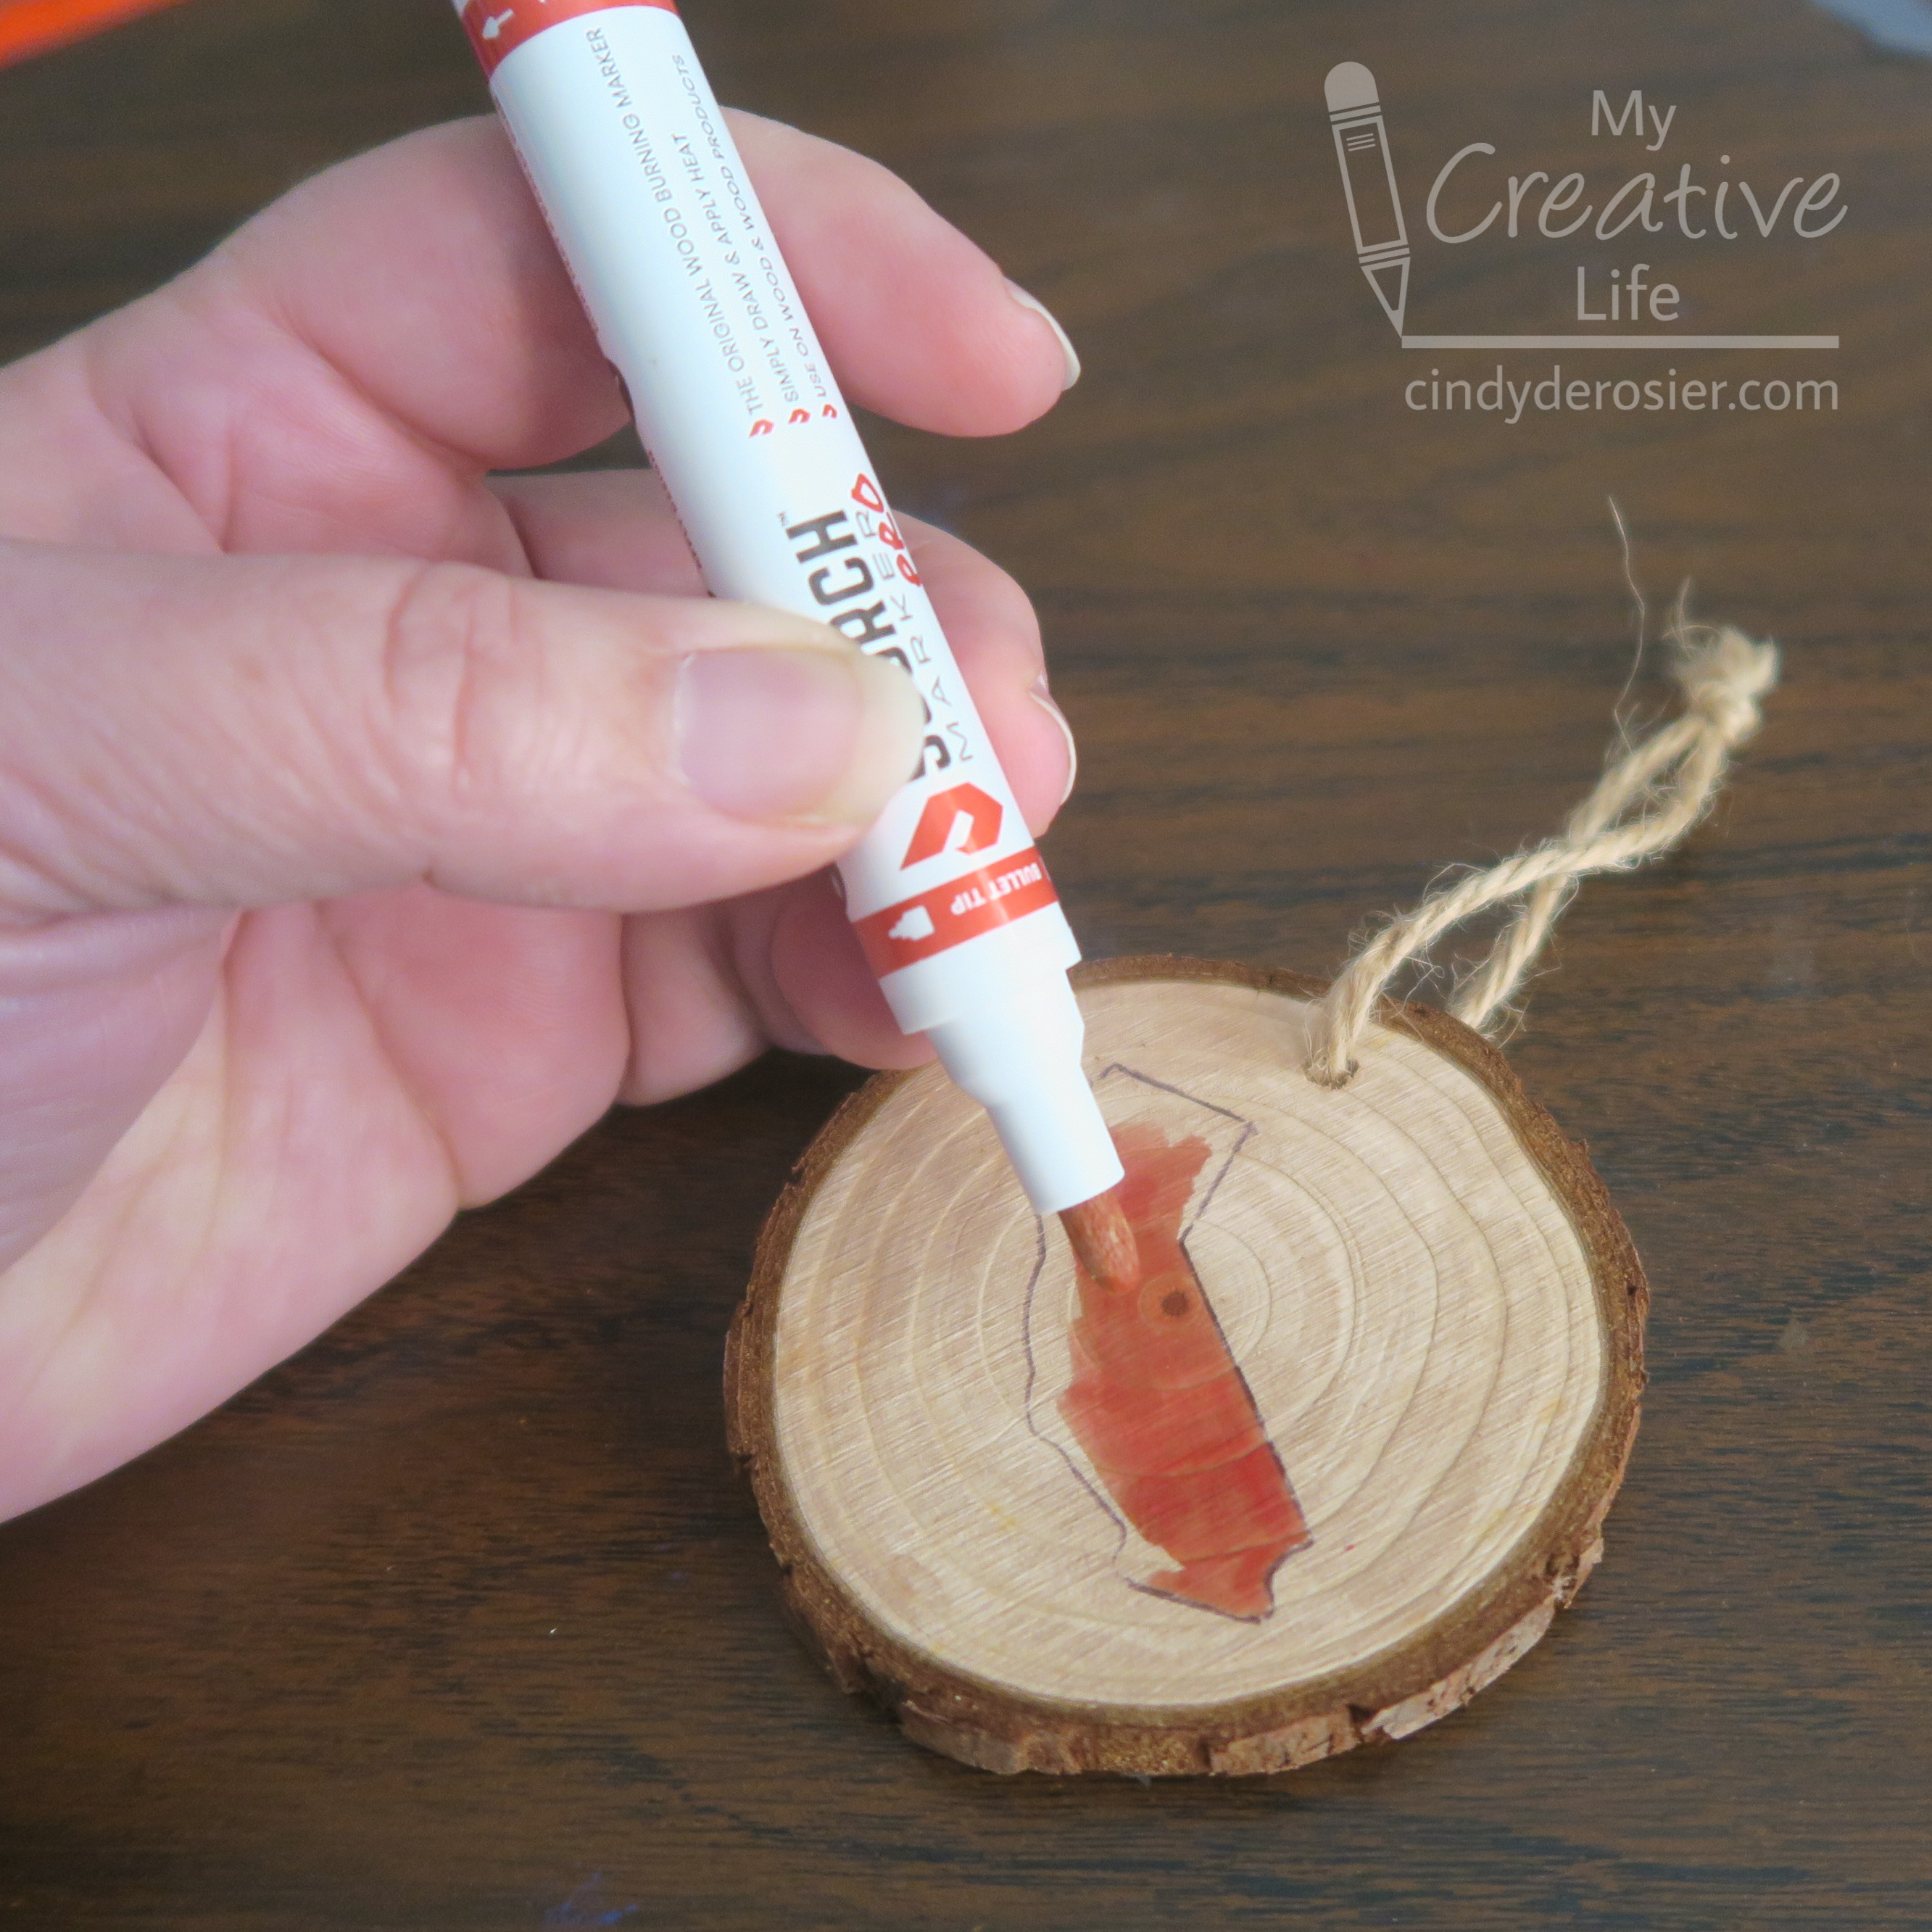
Trace the outline of California onto the wood slice. Color it in with the Scorch Marker Pro. 


Move the heat gun back and forth over the design until it scorches to your desired level. You'll (probably) still want to be able to see the grain. It just takes a minute or two; you'll begin to smell burning wood. 

I've been having so much fun with California Week! Come back tomorrow for another project.