5/8/20

Edible Roses on Ice Cream for Mom

I love edible crafts. These candy melt roses are a fun and easy ice cream topper that will make Mother's Day (or any occasion) extra special! Affiliate links below. 


---------


Edible Roses on Ice Cream


Materials:


Steps:


Make ice cream (I recommend Lazzberry). Scoop it into the ramekins and freeze until firm. 

Spread a piece of parchment paper on your work surface. Then follow the directions on the package to prepare the yellow candy melts. I use a glass container and do 45 seconds on 50% power and then stir until they're completely melted, but every microwave is different. 

Use a spoon to drop a dollop of candy melts onto the parchment, then swirl the spoon through the candy to make circular patterns. The candy is very forgiving. You can keep working it for quite awhile. If you mess one up, wait a few minutes until it is set, peel it up, re-melt it, and try again!


Prepare the green candy melts. Using about half the amount as you used for a rose, pour a small dollop. When almost all of the candy has landed on the parchment, move your hand to form a tip, then let the last bit fall back on the leaf to form the vein.  


Let the candy set up. It only takes a few minutes in a cool house, or you can speed the process up by putting the sheet of parchment into the refrigerator or freezer. When the candy has set, peel it from the parchment paper, then arrange it on top of the ice cream. 


Happy Mother's Day to my mom and to all of you moms who are reading this! I hope you have a wonderful day and lots of ice cream. 

5/7/20

Collage Workshop for Kids: Painted Newspaper Row of Colorful Houses

A few years ago, I learned that there is an Eric Carle museum in Amherst, MA. It's been on my must-visit list ever since. Eric Carle is my favorite artist and the idea of an entire museum devoted to picture book art makes me so happy.

I received a promotional copy of the Carle Museum's Collage Workshop for Kids: Rip, Snip, Cut, and Create with Inspiration from The Eric Carle Museum (affiliate link here and below) and I love it so much. It's full of neat ideas for kids to make interesting collages. The projects use everyday materials in unique ways. I combined the ideas from two different workshops to create this collage featuring a row of colorful houses. I'm so happy with how it turned out!


Painted Newspaper Row of Colorful Houses


Materials:


Steps:


Add red, blue, and yellow paint to the Frisbee with a good amount of space between them. Add a small amount of water between each puddle of paint. (While you could use a regular paint palette for this project, I highly recommend a Frisbee. Not only for the reasons in this post, but because it contains the water much better than a palette.)

Use the paintbrush to draw some yellow paint into the water to thin it, then apply it to the newspaper. You want to be able to see the text through the paint, but there should be plenty of color. Do the same with the red paint, without cleaning the brush. Continue with the blue paint. This process will create orange, green, and purple. Paint each of these onto the newspaper. 


Mix and blend until you've made all the colors you want. So pretty!


I knew I wanted to make a row of colorful houses, so while the paint dried, I looked online for inspiration. The paint dried much more quickly than it took for me to look through all the beautiful photos!


Cut the colorful newspaper into rectangles. I kept all of the text running the length of the rectangles. Arrange them on the construction paper. 


When you are happy with the arrangement, glue them in place. I added a sliver of sun to the top right. Use the black colored pencil to add windows, doors, and other decorations to the buildings. 


This was such a fun project! If you have kids in your life, I highly recommend the Collage Workshop for Kids: Rip, Snip, Cut, and Create with Inspiration from The Eric Carle Museum

5/6/20

Pandemic Questing: The Virtual Version of Urban Adventure Quest

If you've read pretty much any of my US Travel posts, you'll know that our family LOVES Urban Adventure Quests. UAQ is a mobile phone scavenger hunt that takes you on a walking tour of the best parts of a city and challenges you to learn more and look deeper. So far, we've completed Quests in Sacramento, Salt Lake City, Santa Fe, Albuquerque, San Jose, Phoenix, Philadelphia, Baltimore, Portland, Indianapolis, San Francisco, Austin, Boise, Chicago, and New Orleans. There are 72 locations, with new ones being added all the time, so we're not in danger of running out of Quests any time soon!


Obviously, no one is doing any Quests during the COVID-19 pandemic. While waiting for travel to resume, the wonderful people at UAQ (who've likely seen their income drop to nothing, like pretty much everyone in the travel industry) have designed FREE virtual Quests that can be done from your living room. They are releasing a new game every week or so. We've had a great time playing them together as a family and anxiously await the release of the next virtual Quest!

The free virtual Quests are similar to the full-length, in-person Quests in that you are given a series of clues to answer questions that move you (virtually, in this case) to the next destination. The questions are challenging, educational, and fun.

I don't have any relationship with UAQ other than devoted fan (which led to being an unpaid beta tester for the San Francisco and San Jose Quests), so my interest in promoting UAQ is not financial. Rather, it is selfish - I want them to keep making new Quests for us to do during our travels! I want this small family business to thrive and for all of you to give Questing a try and fall in love with UAQ like we have. Give a FREE virtual Quest a try today!

5/5/20

Mommy and Baby Construction Paper Elephants

Have you ever watched a baby elephant hold onto its mommy's tail as they walk? It's absolutely adorable. This simple construction paper craft is fun for Mother's Day or as a card for a baby shower. 


---------


Mommy and Baby Construction Paper Elephant Card


Materials:

  • construction paper
  • scissors
  • grey chalk
  • q-tip
  • glue
  • black pen


Steps:


Choose a piece of sky blue paper for the background. Leave it flat or fold it to make a card. Tear off a strip of green construction paper. With the torn side facing up, glue it to the bottom of the blue background.

Cut out the mommy elephant and baby elephant from grey construction paper. Each elephant has three parts - the body, the ear, and the tail. 


Use a q-tip to rub grey chalk along all the edges of the elephant body parts.  


Glue the ears and tails to the elephants, then add the eyes with a pen. Position the elephants so that Baby is holding Mommy's tail, then glue them in place. Add a message if you wish. 


A few fun facts about elephants:

  • Elephants plaster themselves in mud and throw dirt on themselves (known as dusting) to protect their skin from sunburns, to prevent overheating, and to repel bugs.
  • An elephant's large ear acts as a cooling system. When it is hot, they flap their ears and heat escapes through the large blood vessels on the backs of their ears.
  • For centuries, we thought there were two types of elephants (African and Asian). In 2011, scientists discovered that African Savannah and African Forest elephants are actually two different species. 
  • Elephant brains weigh 11 pounds, much more than any other land mammal. 
  • An elephant's eyelashes can grow up to 5 inches long. 

Elephants are amazing!


5/4/20

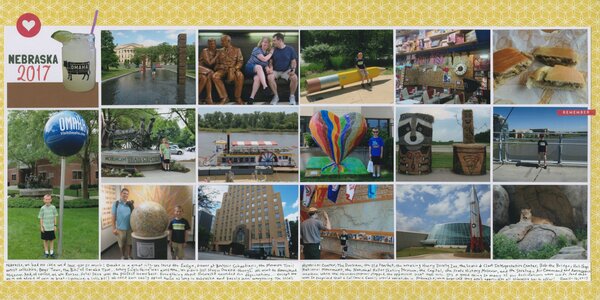
Nebraska 2017

I hope you all had a fun National Scrapbook Day! 

When I think back on all the traveling we've done over the past few years, a few trips stand out. Our June 2017 trip to Nebraska is one of them. Nebraska exceeded our expectations in every way. (Except the frequent thunderstorms and blistering heat. I'm not a fan of midwest weather.) We packed so much into our five days. There's no way I could have included everything we did onto one layout, but I did my best to pick photos that show the highlights.  

Nebraska 2017 (affiliate link)

I'm looking forward to when we can start traveling again, but in the meantime I'm really enjoying scrapbooking prior trips that hadn't made it into the albums yet. Fortunately, I have no shortage of trips that still need scrapping!