Showing posts with label fish. Show all posts

5/16/25

Underwater Scene: Paint Markers on Aluminum Foil

When I reviewed the new Ohuhu Nahuku Acrylic Markers, I was impressed by how well they color on paper, plastic, and metal. Ohuhu sent me a different set, the Kakaako Acrylic Markers, to try and I was eager to see if they performed as well. I'm happy to report that they impress me too. I'm not surprised, as Ohuhu's products are consistently high quality and a pleasure to use. Affiliate links here and below. 

The Kakaako set includes 30 double-ended acrylic markers: 15 basic colors, 9 metallics, and 6 fluorescents. Unlike the Nahukus with their brush nibs, the Kakaakos are what I think of as a traditional paint pen. To activate the paint, you shake the pen, then press down on the round or fine tip until the color is flowing. These pens are made to color on a wide variety of surfaces, including: paper, plastic, glass, ceramic, rocks, wood, fabric, and more. I decided to test "and more" with a more unconventional surface: aluminum foil. 


I cut an 8" square of aluminum foil, then colored the background with patches of color from four different blue pens. The paint dries fairly quickly, but there is enough open time that you can fingerpaint if you want to. I used my index finger to soften and blend the background in some places. I intentionally let the foil show through in many spots. You can't tell on the scan, but it's super shiny in real life. 


I used the round tip to add a sea floor, kelp, coral, and fish. Then I went in with the fine tips to add a bit of detail. The paint layers nicely if you let the base coat(s) dry first. 


Here's a look at the full color palette and how each looks on white and black cardstock. You can also see how the coverage is with a single coat. 


Just like the Nahukus, I definitely recommend Ohuhu's Kakaako Acrylic Markers but once again feel that using them on paper would be a waste. Try them on a wide variety of surfaces, including aluminum foil!

4/7/22

That's A Moray

hate eels. So naturally, my sister sent me this delightful meme on my 50th birthday (and implied she'd sent me a box of live eels, which THANK GOODNESS, she did not).
 

Even though I hate eels, I love the combination of clever wordplay and trivia. This is the kind of thing my brain loves to do (when I'm supposed to be doing something else, naturally). So over the past few weeks, I've come up with four new verses of my own. 

  • When a "snake" sports some gills and surprises its kills, that's a moray.
  • When an eel's 30 pounds and is yellowish brown, that's a moray.
  • When an eel can't see well and it hunts using smell, that's a moray.
  • When it hunts from sea rocks like a jack in the box, that's a moray. 

Lest anyone thinks that the secret to liking eels is knowing more about them, let me assure you that the more I learn, the creepier I think they are. We are talking about a double-jawed 30 POUND yellowish-brown beast that lurches from the darkness in hopes of eating you. That's the stuff of nightmares. That's a moray! 


2/24/22

Heart Tropical Fish Cookie

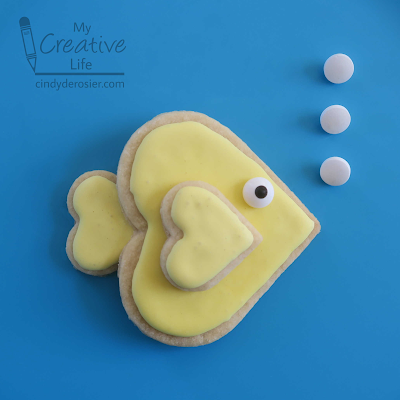
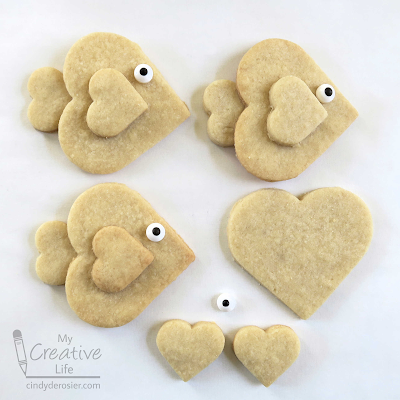
Heart-shaped cookie cutters get most of their use around Valentine's Day, but there are so many other things you can do with hearts. One large heart and two small hearts make an adorable tropical fish. This project gave me a great excuse to make my own royal icing for the first time! Affiliate links below. 


Heart Tropical Fish Cookie


Materials:


Steps: 


Prepare your cookie dough, either from scratch (my preferred recipe linked above) or purchased. For each fish, cut one large heart and two small hearts. Bake the cookies and let them cool completely. Set the cooled cookies and the candy eyeballs on a piece of parchment paper.


Make royal icing and color it as desired. Put it into a piping bag and cover each cookie, leaving a small edge around each cookie. Use the scribe tool to pop any bubbles or drag the icing as needed. Let the icing harden. 

To assemble the cookies, use a bit more royal icing to 'glue' one small heart onto the large heart to make the fin. Add the eyeball above that, then 'glue' the tail fin behind the large heart. Let the icing set before moving the cookies. 


I'm so happy with how these came out! I kept the fish really simple for my first time making my own royal icing, but you can use a variety of colors, or add spots, stripes, or other designs to your fish. There are endless possibilities! I will definitely be experimenting again in the near future.

10/6/21

Roundups: Owls, Scarecrows, Fish, Beans, and Halloween

I've finished another batch of roundups for Fun Family Crafts. First, owls. We have 93 owl crafts and recipes on Fun Family Crafts... and 13 of them are mine. I was surprised that I had so many. I chose three of mine for the roundup. Can you spot them?


Scarecrows are another fall favorite. Of the 31 scarecrow projects at Fun Family Crafts, 3 are mine. One is in the roundup. 


Next, Fish Crafts and Recipes. We have 141 fish crafts on Fun Family Crafts and it was really hard narrowing down which to features. One of mine is on the graphic below; you can see all of my fish crafts here. 


Next I did Bean Crafts. This one was tough because a lot of bean crafts don't have visible beans (such as bean bags and noisemakers). I tried to pick the best mix of visible and hidden beans. One item on the graphic is mine. 


Finally, Halloween Crafts. We have over 1000 crafts, recipes, and costume ideas, so no matter what you're looking for, it's probably there. I used two of mine for the graphic. 


I'm constantly going through our crafts to make roundups that I think will appeal to our readers. If you have any ideas for roundups I should add, let me know in the comments!

11/16/20

X is for X-Ray Fish

Another major project completed! With today's x-ray fish, I now have a kid-friendly animal craft for each letter of the alphabet.  
 

Creating an x-ray fish was a bit of a challenge. Step 1 was learning more about this interesting fish. Step 2 was deciding what media to use to show the translucent skin of the x-ray fish. Once I settled on vellum, it was just a matter of sketching, coloring, and layering. Affiliate links below. 


X is for X-Ray Fish


Materials:


Steps:


Start by finding a picture of an x-ray fish to use as a reference. On a piece of scratch paper, sketch the body shape, along with the position of the eye, backbone, and internal organs. 

Cut out your sketched fish, then trace it onto a piece of vellum. Cut it out and set it aside. Use the vellum scraps to cut a backbone. I used the microtip scissors, but using scalloped pinking shears is faster, easier, and more effective. Next, cut out the the fish's organs. Treat the brain, digestive tract, and everything else in there as one piece. Finally, cut out an eye. 

By the way, I didn't notice that I'd shaped the caudal fine (tail) incorrectly until after taking this photo. Fortunately, it was a very easy fix. 


Use a yellow colored pencil to add a band of color to the fins, as shown below. Then, use a black colored pencil to color in the center of the eye, the bans on the fins, and the small spot on the body behind the eye. With a white colored pencil, color in the outer portion of the eye and the tips of the fins. Then lightly draw ribs and the lines on the tail. Finally, use a brown colored pencil to lightly add shadowing between each of the vertebrae. 


Now, adhere the pieces together. I recommend vellum adhesive or a spray adhesive. If you don't have either one, spread a very small amount of liquid glue with your fingers. It will show through vellum, so try to keep it to areas where it will best be hidden (behind the eye, fins, backbone, etc). 


The slightly darker areas you can see on my x-ray fish are actually fingerprints, not adhesive. They weren't visible until I put the pieces onto true black cardstock and scanned (as opposed to the poorly lit photo of the pieces sitting on cheap black construction paper). The fingerprints don't really bother me, but if you want a pristine x-ray fish (or just want to feel extra fancy), consider wearing these. Or, if you ever need to surreptitiously collect someone's fingerprints, encourage them to make an x-ray fish and then abscond with the finished project. 

5/20/20

Design a Fish Project

When I pulled out the student samples of the fish hat I shared last week, I found another fun fish project I wanted to show you. As part of the assessment following Ocean Week, I challenged my students to use their knowledge of fish structures and adaptations to design a made-up fish that is perfectly suited for a specific habitat. This is my sample, the Diversion Fish. I used colored pencils on white drawing paper, then cut it out. 


Here is the text that goes with it. I wrote it in front of the students to demonstrate the assignment. 
"The diversion fish lives in the open ocean, where he must face numerous predators. His silvery blue color, with a darker upperside and lighter colored belly, allows him to blend in to the colors of his habitat. Because he is not a very fast fish, diversion fish has another method of escaping predators. His large caudal fin makes him appear to be a much larger, more vicious fish. Instead, he is really a harmless plankton eater. While his body shape is fusiform, his fins are rounded, which do not allow him great speed."
I hope I made a new index card later to add something about the deceptive coloration on his sides that give the illusion of gills and fins; if so, I didn't save the updated index card.


Unfortunately, I don't have any student samples, which means that the students wanted to keep their own work. Understandable, and common for creative projects like this. However, I am absolutely kicking myself for not photographing the display of all of the creative fish they dreamed up. What I wouldn't give now to be able to go back and take pictures of all the awesome things we did my classroom. To any teachers reading this: Learn from my mistake and take photos of all the wonderfully creative things your students make!

5/13/20

Ocean Week: Fish Hat and Sign

Time for another stroll down Memory Lane back to my teaching days! 

When I was teaching 4th/5th grade, we had a school-wide Ocean Week every year. Each grade level studied a different ocean habitat (4th grade was Kelp Forest and 5th grade was Open Ocean). We decorated our classrooms and worked our study of the ocean into all our curricular areas. The kids made fish print t-shirts and we hosted an amazing Ocean Night for the community. The week culminated with a parade. 

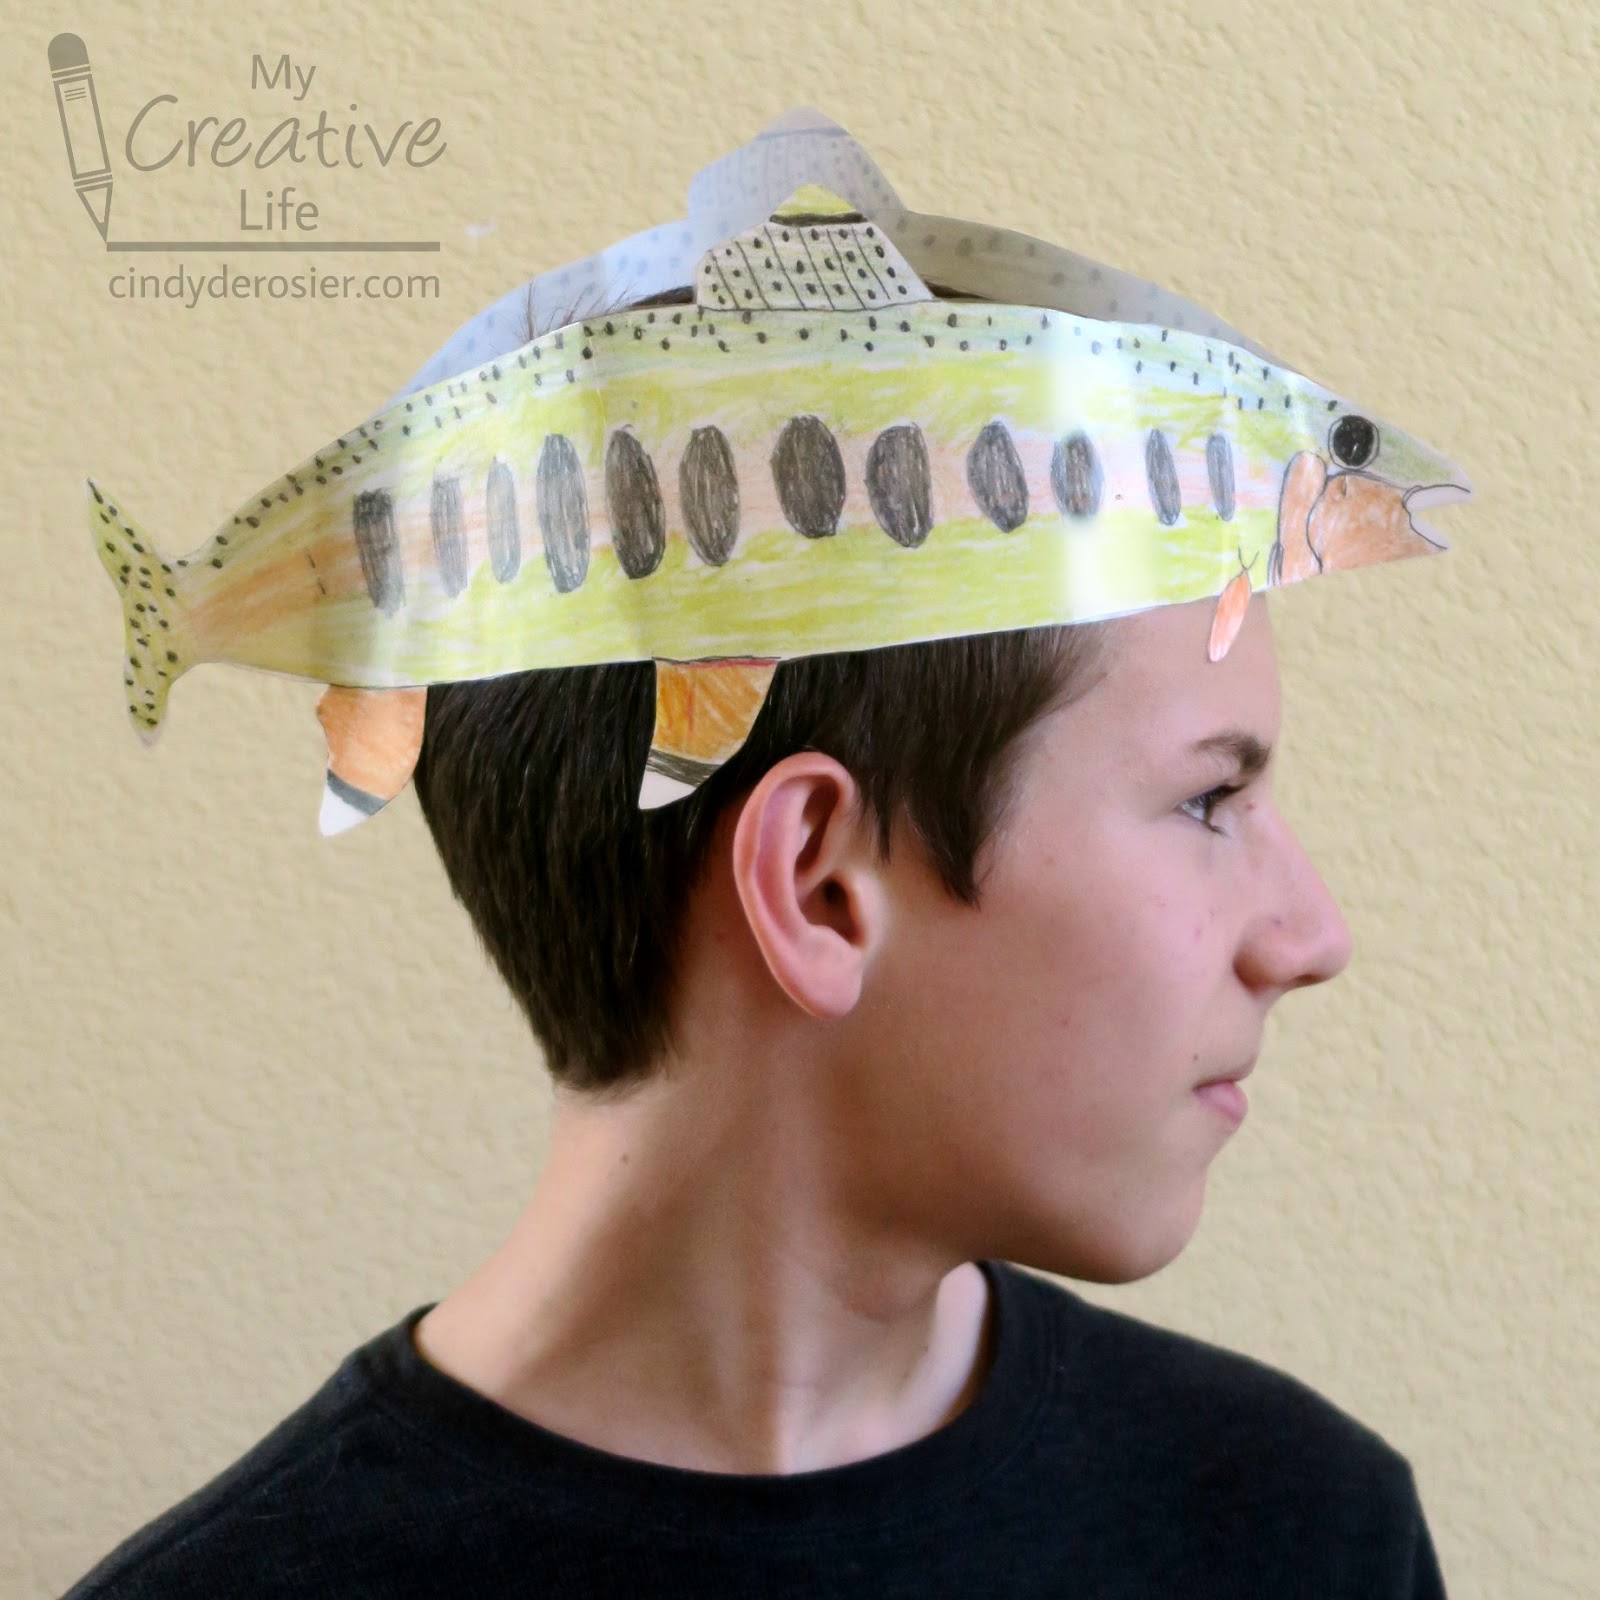
Early in the week, each student in my class picked a different fish to study, focusing on its habitat, predators/prey, and the body structures that helped protect it or aid it in surviving in its environment. We then made fish hats and signs to wear around our necks. My students wore these to visit younger classrooms to present oral reports about their chosen fish, then wore them for the parade. Sadly, I have no photos of my class dressed up as fish from the kelp forest or the open ocean. What I wouldn't give to go back and get pictures of all the cool things we did! Fortunately, I saved a few samples (including the sea bass outfit I made and wore), which Trevor was kind enough to model.  

Picture a whole class dressed up like this, each with a different fish. It was awesome.


You don't have to celebrate Ocean Week to make your own fish hat and sign. Make your own hat based on your state fish

---------

State Fish Hat


Materials: 


Steps: 


Lightly sketch the fish's body on one sheet of paper. It should extend most of the 18" length in order to be big enough to fit on your head. When you are happy with the size and shape, add the major details - an eye, gills, spots, stripes, etc. 

Use paperclips to attach the second piece of construction paper to the first. Carefully cut around the fish you've drawn, moving the paperclips in as you cut away scraps. You should end up with two identical fish shapes, paperclipped together. 


Hold the paperclipped fish up to a window with the blank side up. Trace the eye, gills, and other features so that you now have two fish pieces that are a perfect mirror image of each other. 


Remove the paperclips and color in the fish.


Finally, staple the fish pieces together at the head and the tail to make a hat. 


This is a cutthroat trout, the state fish of Idaho, Montana and Wyoming. Four more states (Colorado, Nevada, New Mexico and Utah) have particular subspecies of cutthroat trout as their state fish. 


Here's a sample done by one of my students, Catherine S., back in the day (modeled by Trevor, the most cooperative 13-year old boy of all time). 


It is California's state fish, the golden trout. 


---------

I checked out "fish hat" on Amazon to see what was out there and it did not disappoint. This light-up angler fish hat is awesome. I like the shine on these 'luau fish' hats, but I'm trying to understand why they only come in packs of six. And speaking of trying to understand, I don't understand this fish hat at all. It is just plain creepy. 

5/31/19

Folded Surprise Fish

Have you ever tried making a Folded Surprise animal? They're totally a thing and they're awesome. I think the fish is the original, but I've seen many clever interpretations. Basically, the folded artwork looks like a benign animal, but when you unfold the paper, there's a surprise inside. 


You can make these as large or small as you want, using whatever art materials you'd like to add color. I painted mine, which made it easy to blend some fun colors. Affiliate links below.

---------

Folded Surprise Animal


Materials:


Steps:

Fold the paper in half to make a valley. Keeping the paper folded, fold each side down, making two mountains. 


Flatten the paper so that the two mountains touch. The valley portion will be hidden in the back. Draw an animal on the folded paper.


Open up the paper. Using the lines you've already drawn, create the hidden portion of the animal. (You can tell I took these pictures out of order, because I have the eyeball and gills in the photo above. I'd forgotten to take a picture of the folded fish.)


Now paint your artwork! I only used three colors. The orange comes from blending Daffodil Yellow and Fire Coral. I made the polka dots with the handle of a paintbrush. 


Don't fold your painted fish until it is completely dry.


Try making your own Folded Surprise Fish! Or challenge yourself to make another Folded Surprise animal. They're a lot of fun.

1/25/19

Fish Crafts for Kids

My page of Fish Crafts for Kids is now live! It came together quickly, since there are only 11 tutorials. Going through all my animal crafts has been enlightening. I had no idea I had more than four times as many bird crafts as fish crafts.


Things have been a bit crazy for me since returning from Creativation. Instead of diving right into playing with my craft supplies and telling you about all the fabulous stuff I saw, I've been trying to get caught up with life. And I've been preparing to teach hands-on chemistry using household items to Cub Scout leaders on Saturday (which is also Steve's birthday). My plan is to have Creativation posts up for you starting on Monday. 

10/19/16

Yarn Aquarium

I'm calling my latest kids' craft a Yarn Aquarium. It hangs low on the wall where preschoolers can reach to feel the yarn and place felt fish throughout the 'water.'


Materials: 
  • Yarn (I used the Deborah Norville Everyday Print "Pond")
  • Scissors
  • Wooden dowel (mine is approx 16" long)
  • Craft glue
  • Fishing line
  • Felt
  • Sharpie
  • Adhesive tabs

Steps:

Cut the yarn into lengths approximately 2 feet long. You'll need a lot of them, but I recommend cutting them in batches of about 20. 

Tie the yarn onto the dowel. You can do the strands individually, but I sped things up by doing two at a time. Either way, fold the yarn in half and set it behind the dowel with the loop at the top. Gather the ends and put them through the loop, then pull to tighten. 


Keep adding strands until the dowel is about 2/3 full. 


If there is a section that is heavy with one shade, simply slide the yarn over to make space to add more of a different shade. In this case, I ended up with too many blues in one area and wanted to add more greens amongst them. 


Much better. The colors are more even and balanced.


Add glue to the exposed ends of the dowel and wrap single strands of yarn around them to make a finished look. 


Tie fishing line to each end and hang your aquarium. You can trim the ends to make them even if you want. I chose to leave them irregular. 


Cut simple felt fish shapes in a variety of colors. Add a black dot for an eye, then attach an adhesive tab to the back.


Now add the fish to the aquarium! The tabs hold well for about 20 uses before they start to lose their stickiness. Just add another tab when that happens. The tabs don't damage this high-quality yarn at all. 


Speaking of yarn, I want to thank the fine folks at Premier Yarns for giving me this pretty yarn. I still have a lot left, so expect to see this shade again because I love it! 

Also, don't forget that I have a coupon code for you to save on Premier Yarns through October 31! For those who prefer to buy in-store, their gorgeous Sweet Roll Yarns will be at JoAnn Fabric starting next week. It's already in-store at AC Moore, for those of you on the East Coast. 


8/2/13

Kidding Around: Make a Splash

Day 17 of Kidding Around was called "Make a Splash." The prompt was to play in the water and then make a watercolor painting. Trevor wasn't in the mood to do watercolor painting since it didn't seem special or new to him. So I suggested that we use water in a different way.

Back in my teaching days, our school celebrated Ocean Week each year. I suggested to Trevor that we do a simplified version of one of the projects my 5th graders used to do. He loved the idea. Affiliate links below. 


 Tissue Paper Ocean Art


Materials: 


Steps: 


Begin by placing squares randomly on the paper. They should overlap somewhat, but not completely. After you have about 10 squares on the paper, use the eyedropper to drip water on top of the squares. The tissue paper should be moist, not puddly.  

 
Continue adding squares and dripping water until the entire paper is covered. You'll see the color bleeding out from the tissue paper.

 
Let your paper dry for about an hour. Pick up your paper by one end and the dry tissue paper squares will fall off. If they don't fall off, give it more drying time. It will look like this:


Once our papers were completely dry, we trimmed them to fit in our journals and glued them in place, then added writing on the opposite page. We used cardstock scraps to make some fish. Trevor decorated his fish with Stickles and then drew a picture of his shoe flying when he put it in the water feature at the park.

 
Here's mine. I added some Stickles waves to mine.


Another fun Kidding Around assignment!