Showing posts with label reindeer. Show all posts

12/17/25

Peeking Reindeer Painting

I made a companion piece for the Peeking Snowman. It's a Peeking Reindeer!


Peeking Reindeer


Materials: 


Steps: 


Cut the paper to the size and shape you want the window to be. With a wet brush, moisten the area where the sky goes, then brush a small amount of light blue paint horizontally onto the paper. Let the paint dry completely. 

Use a pencil to sketch the outline of the reindeer. Paint the reindeer brown, with tan for his inner ears and muzzle. Paint the hat red. Add green trees. 

When the paint is dry, outline the reindeer and his hat with a black pen. Add eyes, a nose, and a mouth. 

Use the brown paint pen to make a window sill by coloring each edge of the paper. Then use the ruler to mark the center of each edge. Draw a vertical and a horizontal line through those center points to finish the window. 

Look how cute the two paintings look together!


 Who else can you imagine peeking in the window? Let me know in the comments!

12/15/21

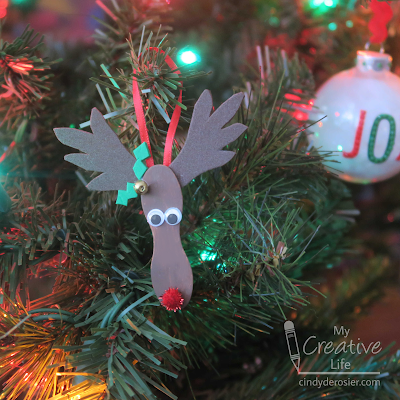
Paddle Spoon Reindeer Ornament

This is my latest homemade ornament, which I'm calling a Paddle Spoon Reindeer because "paddle spoon" is the search term that finally worked when I tried to figure out what to call the mini wavy craft stick that makes up the reindeer's face. It's hanging right by my Diamond Dotz Joy ornament. Slowly but surely, the homemade ornaments are crowding out the store-bought ones on the tree (as it should be). Affiliate links below.    


Paddle Spoon Reindeer Ornament


Materials:


Steps: 


Paint the paddle spoon brown and set it aside. Cut the brown craft foam to make a pair of antlers, then cut the green craft foam to make two teeny holly leaves. Cut a length of ribbon to make the hanger.

Glue the antlers behind the paddle spoon, then glue the eyes, pom pom, holly leaves, and bell in place. When those are dry, glue the ribbon hanger to the back. 

11/18/19

Cardboard Tube Reindeer Gift Packaging

When you're a craft blogger, literally everything is a potential craft supply. Even the cut-off sleeves from a reindeer costume. In this case, those sleeves became gift wrap that looks like a reindeer and hides fun surprises inside. Affiliate links below.


Cardboard Tube Reindeer Gift Packaging


Materials:


Steps:


Cut the sleeve into two pieces. Set the piece without the seam aside and cut the seamed piece into half. 

Gather holiday washi tapes, candies, and other small gifts. Test that everything fits into the cardboard tube. 


Wrap the non-seam piece tightly around the cardboard tube. Stuff the excess material into the tube on both ends. This will secure the fabric in place. No glue needed!


Wad the two extra piece of sleeve material into the two ends of the tube. This prevents the items from falling out. Cut roughly 1/3 off each pipe cleaner. Take that cut piece and twist it around the larger piece to form 3-pronged antlers. Slide the antlers into the tube. Still no glue needed. The material will hold it in place. 


Stand the reindeer upright. Use the Supertite to glue googly eyes and a pom pom nose to the reindeer. Now nestle the reindeer among the other gifts under the tree.


Quick and easy, and so super cute!

11/6/19

Pez Dispenser Halloween Costume

This year, Trevor dressed as a Pez dispenser for Halloween. 


Specifically, he was this reindeer Pez dispenser. 


A perfect resemblance, no?


I made 95% of the costume during the power outage. No glue gun, sewing machine, or artificial light for me! Given the choice, I recommend electricity. Affiliate links below. 


---------


Pez Dispenser Halloween Costume


Materials:


Steps: 


Remove the sleeves from the t-shirt. Print out PEZ and put it under the t-shirt on the light table. Carefully trace the letters onto the shirt. (Yea, electricity!)


Cut the styrofoam so that it has the same proportions as a package of Pez. Ideally, you should use a foam cutter. I used a steak knife, which is really messy. (As an added bonus, you can't vacuum without electricity and trying to sweep up staticky bits is impossible. I shouldn't have done this indoors, but hindsight is 20-20.) 

Wrap the ends with duct tape. 


Wrap the felt around the middle of the Pez package, leaving the silver edges exposed. Glue it in place with the FabriTac. Print out PEZ in blue, cut out the letters, then glue them to the fabric. Use the Sharpie to write the other information onto the Pez package. I wrote exactly what was on the actual Pez container, except I changed the net weight to the weight of the styrofoam prop.

Measure a piece of ribbon to fit around your neck, add an extra inch, then cut. Sew the snaps onto the ends, then sew the bells to the front center.

After you're dressed, add a red reindeer nose using face paint. (Fun fact: This is the very first time Trevor has worn face paint. All his life, he has refused face paint, temporary tattoos, and anything similar. I only put the tiniest amount on to give him a red nose. He hated it, but was cooperative for the pictures.)


Due to the insanity that was our life last week, Trevor tried on his costume for the first time about 30 minutes before his friends showed up to trick-or-treat. If he'd tried it on sooner, I would have made some changes. I would have altered the shirt to make it narrower to more closely mimic the shape of the Pez dispenser, plus added a rigid piece to define the rectangular shape. Brown sweatpants would have helped the look too. But even without those improvements, both Trevor and I were happy with how it turned out. And we all had an awesome Halloween. 

12/19/12

Puzzle Piece Reindeer

Last Christmas, I bought Trevor a "Can You See What I See?" puzzle. He loves Walter Wick's books (affiliate link here and below) and he loves puzzles, so he was really excited when he unwrapped it. When he dumped out the pieces, we were both shocked by what we saw. Dozens of bent pieces. Many pieces with the picture de-laminated from the back. Pieces that looked like they'd been stepped on.

This was not a cheap dollar store puzzle. It was not a thrift store find. This was a brand-new, perfectly packaged $10.99 puzzle. This was a puzzle that should have lasted for decades. Instead, it was utter garbage.

I immediately contacted the manufacturer, an American company who I won't name (though I will say it begins with a C, so that no one mistakenly thinks I'm referring to any of the many awesome puzzle manufacturers). They offered to replace the puzzle. And then I didn't hear anything for over a month. I contacted them again. After 8 more weeks, the new package arrived. We opened it... um, wow. Instead of a 300 piece "Can You See What I See?" puzzle, Trevor received a 150 piece puzzle with pastel cats on it.  

Now, I'm sure there are school-age boys who like pastel cats, but Trevor isn't one of them. I called the company again and demanded a refund. They ignored me. I called, emailed, and mailed a copy of my email to their office. At that point, they told me that they only do wholesale, so they can't issue refunds. The store where I bought it wouldn't do a refund either. Eventually (when they realized I wasn't giving up), the company offered a replacement puzzle. Again. In May, 5 months after Trevor had opened his Christmas gift, he was finally able to do the puzzle I'd bought him.

So what's my point? Well, when I finally received a satisfactory replacement puzzle, the company told me to keep the damaged puzzle. I weeded out the 80+ pieces that were completely mauled and put the remaining ones into a Christmas tub so that we could use them for crafting. Today I'm sharing our first puzzle piece craft. 


Puzzle Piece Reindeer


Materials 


Steps: 


Sand the front of each piece to remove the shiny gloss. The piece on the left has not been sanded; the one on the right is perfect.

 
Paint the pieces brown and let them dry. It will probably take two coats. Glue the border piece on top of the two inner pieces.  

 
Add googly eyes and a pom pom nose. Glue the cord in the back between the two antler pieces.

 
Here it is, hanging on the tree.

 
I love our finished reindeer. At least some good came from one of the worst customer service experiences of my life!