Showing posts with label fabric. Show all posts

4/15/26

Fabric Applique Wall Hanging

After making the stuffed cross ornament, I tried another idea using the same fabric. This basic applique project is a great introduction to hand sewing and makes a cute wall hanging. Obviously, you can use a cut-out design from any fabric; it doesn't need to be a cross. The link in the materials list goes to some adorable forest animals. Affiliate links below. 


Fabric Applique Wall Hanging


Materials: 


Steps: 


Cut out the image you're going to applique, leaving a 1/2" border around the edges. Fuse the interfacing to the fabric, then cut out the image precisely. Cut the background fabric about 2" larger than the diameter of the embroidery hoop. Put the background fabric into the hoop, then position the applique piece where you want it. 

Cut a length of embroidery floss in a matching or contrasting color. Choose a hand stitch for your project. I debated blanket stitch but decided to go for the simpler whip stitch. Sew all the way around your shape. 

If your applique is not perfectly centered in the hoop, loosen the embroidery hoop slightly to adjust the background fabric until it looks good. Tighten the hoop, then trim the excess background fabric, leaving 1/4". Glue that to the back of the hoop. 

4/9/26

Stuffed Cross Ornament

Our quilt group has been receiving a lot of fabric donations recently, which we appreciate so much. As we go through the donated fabrics, we sort by color, and occasionally by theme. We also pull out any fabrics that cannot be used on LWR quilts. This includes any prints with religious, patriotic, or military symbols, language, or messages. 

We can't use this fabric for our quilts, so our leader suggested I come up with a craft using it that congregational members could potentially do after church one Sunday. The four different crosses read love, faith, peace, and joy. Each is about 5" tall. 


My first idea was to make ornaments. I cut out two of the yellow joy crosses, put them with the right sides together, then sewed around the edges, leaving the top open. I turned the fabric inside out, stuffed it with Polyfil, added a loop of gold cord, and then used craft glue to close the opening (affiliate links). 


It came out fine, but it's not going to be a great option for the congregation members who usually come to our craft sessions. I have another idea for a project using this fabric that might be a bit easier and less fiddly for the very young and very old who attend. Stay tuned. 

3/26/26

My First Potholders

I learned a lot while making my first quilt. One of the most important things I learned is that I really need to improve my sewing skills. Technically, I already knew that. But while making the quilt, it was painfully obvious that I should practice using the sewing machine a bit before jumping in to make my next quilt. 

A few weeks ago, my quilt group taught an easy potholder craft after church. First we shared a video about the mission of Lutheran World Relief, then we helped the attendees sandwich batting between two squares of material and hand-tie them to make potholders. In preparation (and to get in some sewing practice), I made my first-ever potholder. And then I made two more. 


This is my first potholder. I cut two 11" squares of the same Christmas fabric and two 9" squares of heat-resistant batting (affiliate links here and below), layered them together, and then hand-tied them with red embroidery floss in the center and near each corner. Then I folded up each edge, clipped them in place (so much better than pins!), and sewed. 


For a first attempt, it's not bad. It doesn't look square, but it actually is close. My stitching wasn't quite straight, but that wasn't the problem. The issue is that I cut my fabric squares without paying attention to the checked pattern in the background. I should have made sure those were straight before cutting. Lesson learned. 

This is my second potholder. I cut the fabric correctly, so this time the crookedness isn't an optical illusion. It is definitely not square. As you can see, I machine-quilted this one rather than hand-tying it. I went to great effort to make sure my lines of stitching were as straight as possible and things were looking pretty good until I did the binding. I thought I could just fold up the edges, clip, and sew and it would be fine. Nope!


For my third potholder, I clipped the edges then machine-quilted the layers together. My lines were straight and everything looked great. I did the binding on two of the sides and it still looked good. Then I tried repeatedly to get the other two sides straight. As you can see, I did not accomplish that goal. 
 

Now I know that I should have basted the layers together with pins to prevent them from shifting, which happens during machine quilting. Just clipping the edges in a few places was not adequate. After quilting, I should have squared up the block before attempting to bind it. I'll try those next time. I've also learned about the importance of a walking foot. I assume I wasn't using that, based on the problems I had binding my quilt and the fact that now my potholders look like the problem she outlined in the video. 

Overall, I'm satisfied with my first attempts at potholders. They're recognizable as potholders - a low bar, sure, but that's where beginners start! I'm more than willing to accept imperfection, especially for something utilitarian like a potholder. But I hope that my next attempts show at least a little bit of progress. 

6/12/25

Recycled Jeans Artist Roll

Artist rolls are fabric containers used to organize and transport pencils, pens, and other art materials. You can buy them in many different sizes and styles, but you can also make your own. This simple version for kids is made with a recycled jeans pocket and is easy enough for beginners to sew. Affiliate links above and below. 


Here's what it looks like when you untie it.  


While this project is intended for kids, I recommend using adult-sized jeans so that you can fit more into your artist roll. Kids' jeans pockets can be really small. 


Recycled Jeans Artist Roll


Materials:


Steps: 


Remove the pocket from a pair of jeans by cutting as closely to the seams as you can without actually cutting the seams themselves. All seams need to be intact for this project. Cut a strip of denim from one of the legs that is approximately 10" x 2". 

Use a ruler and the dressmaker's pencil to draw a vertical line in the center of the pocket. Draw two more vertical lines to the right and the left, dividing the pocket into four sections. Sew along the marked lines. 

Fold the strip of denim in half lengthwise, with the right sides facing in. Sew along the edge to make a tube. Turn the tube right-side out. I used the safety pin method, but there are other even easier methods you might want to try. 


You can sew the edges of the tube, but I chose to seal mine with Mod Podge.  

Now fill your artist roll and tie it closed. 


You're ready to take your pens and pencils with you wherever you go!

6/11/25

Denim Monogram Ornament

I had to retire a pair of jeans that were too threadbare to wear anymore, so I salvaged what denim I could and made a monogram ornament. I had a wooden T on hand, but have completely run out of C's. So this ornament is for Trevor. Since he doesn't read my blog, I can save it for Christmas and surprise him. Affiliate links below.  


Denim Monogram Ornament


Materials: 


Steps: 


Paint the monogram letter navy blue. 


Cut out a piece of denim about a half inch larger than the monogram in all directions. Cut a second piece of denim that is about a quarter inch smaller than the monogram in all directions. Set that second piece aside. 

Place the first piece of fabric upside down on a piece of wax paper. Add a coat of Mod Podge to the monogram, then place it sticky-side-down on the fabric. Press it firmly in place and let it dry for a few minutes. 

Starting with a straight edge (if your letter has one), spread Mod Podge on the edge, then pull the fabric tightly over that space. Use more Mod Podge to secure it to the back. When you get to a curved area, snip the fabric so that you can round the curves without it looking bulky from the front. 


Cut a length of twine for the ornament hanger. Glue it to the back of the ornament. Add a coat of Mod Podge to the back of the ornament and glue the second piece of fabric to it. Not only will it make the back look a bit more finished, but it will help hold the hanger in place. Let the glue dry completely. Then decorate with holly berries and leaves. 


One pair of jeans has enough fabric for a lot of monograms, so go ahead and make a bunch! I only made the one ornament, but I did use another part of the jeans for a different project. I'll show you that tomorrow. 

11/4/22

Spaghetti and Meatballs Crazy Hair Day

I love costumes, but I wasn't planning to dress up for Halloween this year. Trevor didn't want to wear one, so I hadn't prepared a family costume like I usually do. Then Halloween came and I was bummed to not dress up. Around noon, I decided to make myself a quick and easy costume.

This costume takes advantage of the fact that my hair is blonde and really long right now. While it was my Halloween look, I think it's better described as a fun idea for Crazy Hair Day. Affiliate links below. 


Spaghetti and Meatballs Crazy Hair Day


Materials:


Steps: 

Put your hair into a high, tight ponytail. Ideally, you want it directly on top of your head. Cut an X in the bottom of the plastic bowl, then thread it onto the ponytail until it is resting against your head. It should be comfortable and completely secure. Arrange your hair inside the bowl to resemble spaghetti. Pin it if necessary. I just left mine loose. 

Cut apart the brown socks (avoiding the toe seam, the cuffs, and any threadbare heels) and use them to cover the styrofoam balls. Stretch the fabric tightly and glue it in place, then trim any excess. As you can see, my first meatball (in the background) has a toe seam in it. I didn't end up using it. 


Glue a bobby pin to each meatball, covering the place where the fabric is gathered. When the glue is completely dry, attach the meatballs to your hair. Then poke a fork into your hair. I used a real fork, which was not ideal. It slumped a bit and I had to readjust it a couple of times. It's much better to use one of the metallic-looking plastic forks. 

Cut a triangle from a long side of an 8.5" x 11" piece of chipboard. Lay it on top of the checked fabric. Cut the fabric so that it extends 3 or 4" beyond the chipboard in each direction. Glue the fabric to the chipboard, then cut a slit in the fabric on the side with the missing triangle. The slit should extend all the way to the point of the triangle. 


With the slit facing you, gently slide the fabric-covered chipboard onto the top of your head. It will sit under the bowl and be very secure. Other than the fork slipping, the whole thing was very comfortable and stayed in place for the 8+ hours that I wore it.   

Steve will wear whatever I tell him to (yet another of the many things I love about him), so I brainstormed a coordinating costume for him to wear. The hay was Steve's idea. Can you tell what we are, standing next to each other and "reading" our outfit from left to right? 


We're a spaghetti western. Clever, right?! 

Hopefully I can talk Trevor into dressing up with us next year, but if not, I'm going to plan something for Steve and me. Halloween is fun no matter what, but I love it even more when I'm dressed up. 

9/30/22

Scarecrow Mason Jar

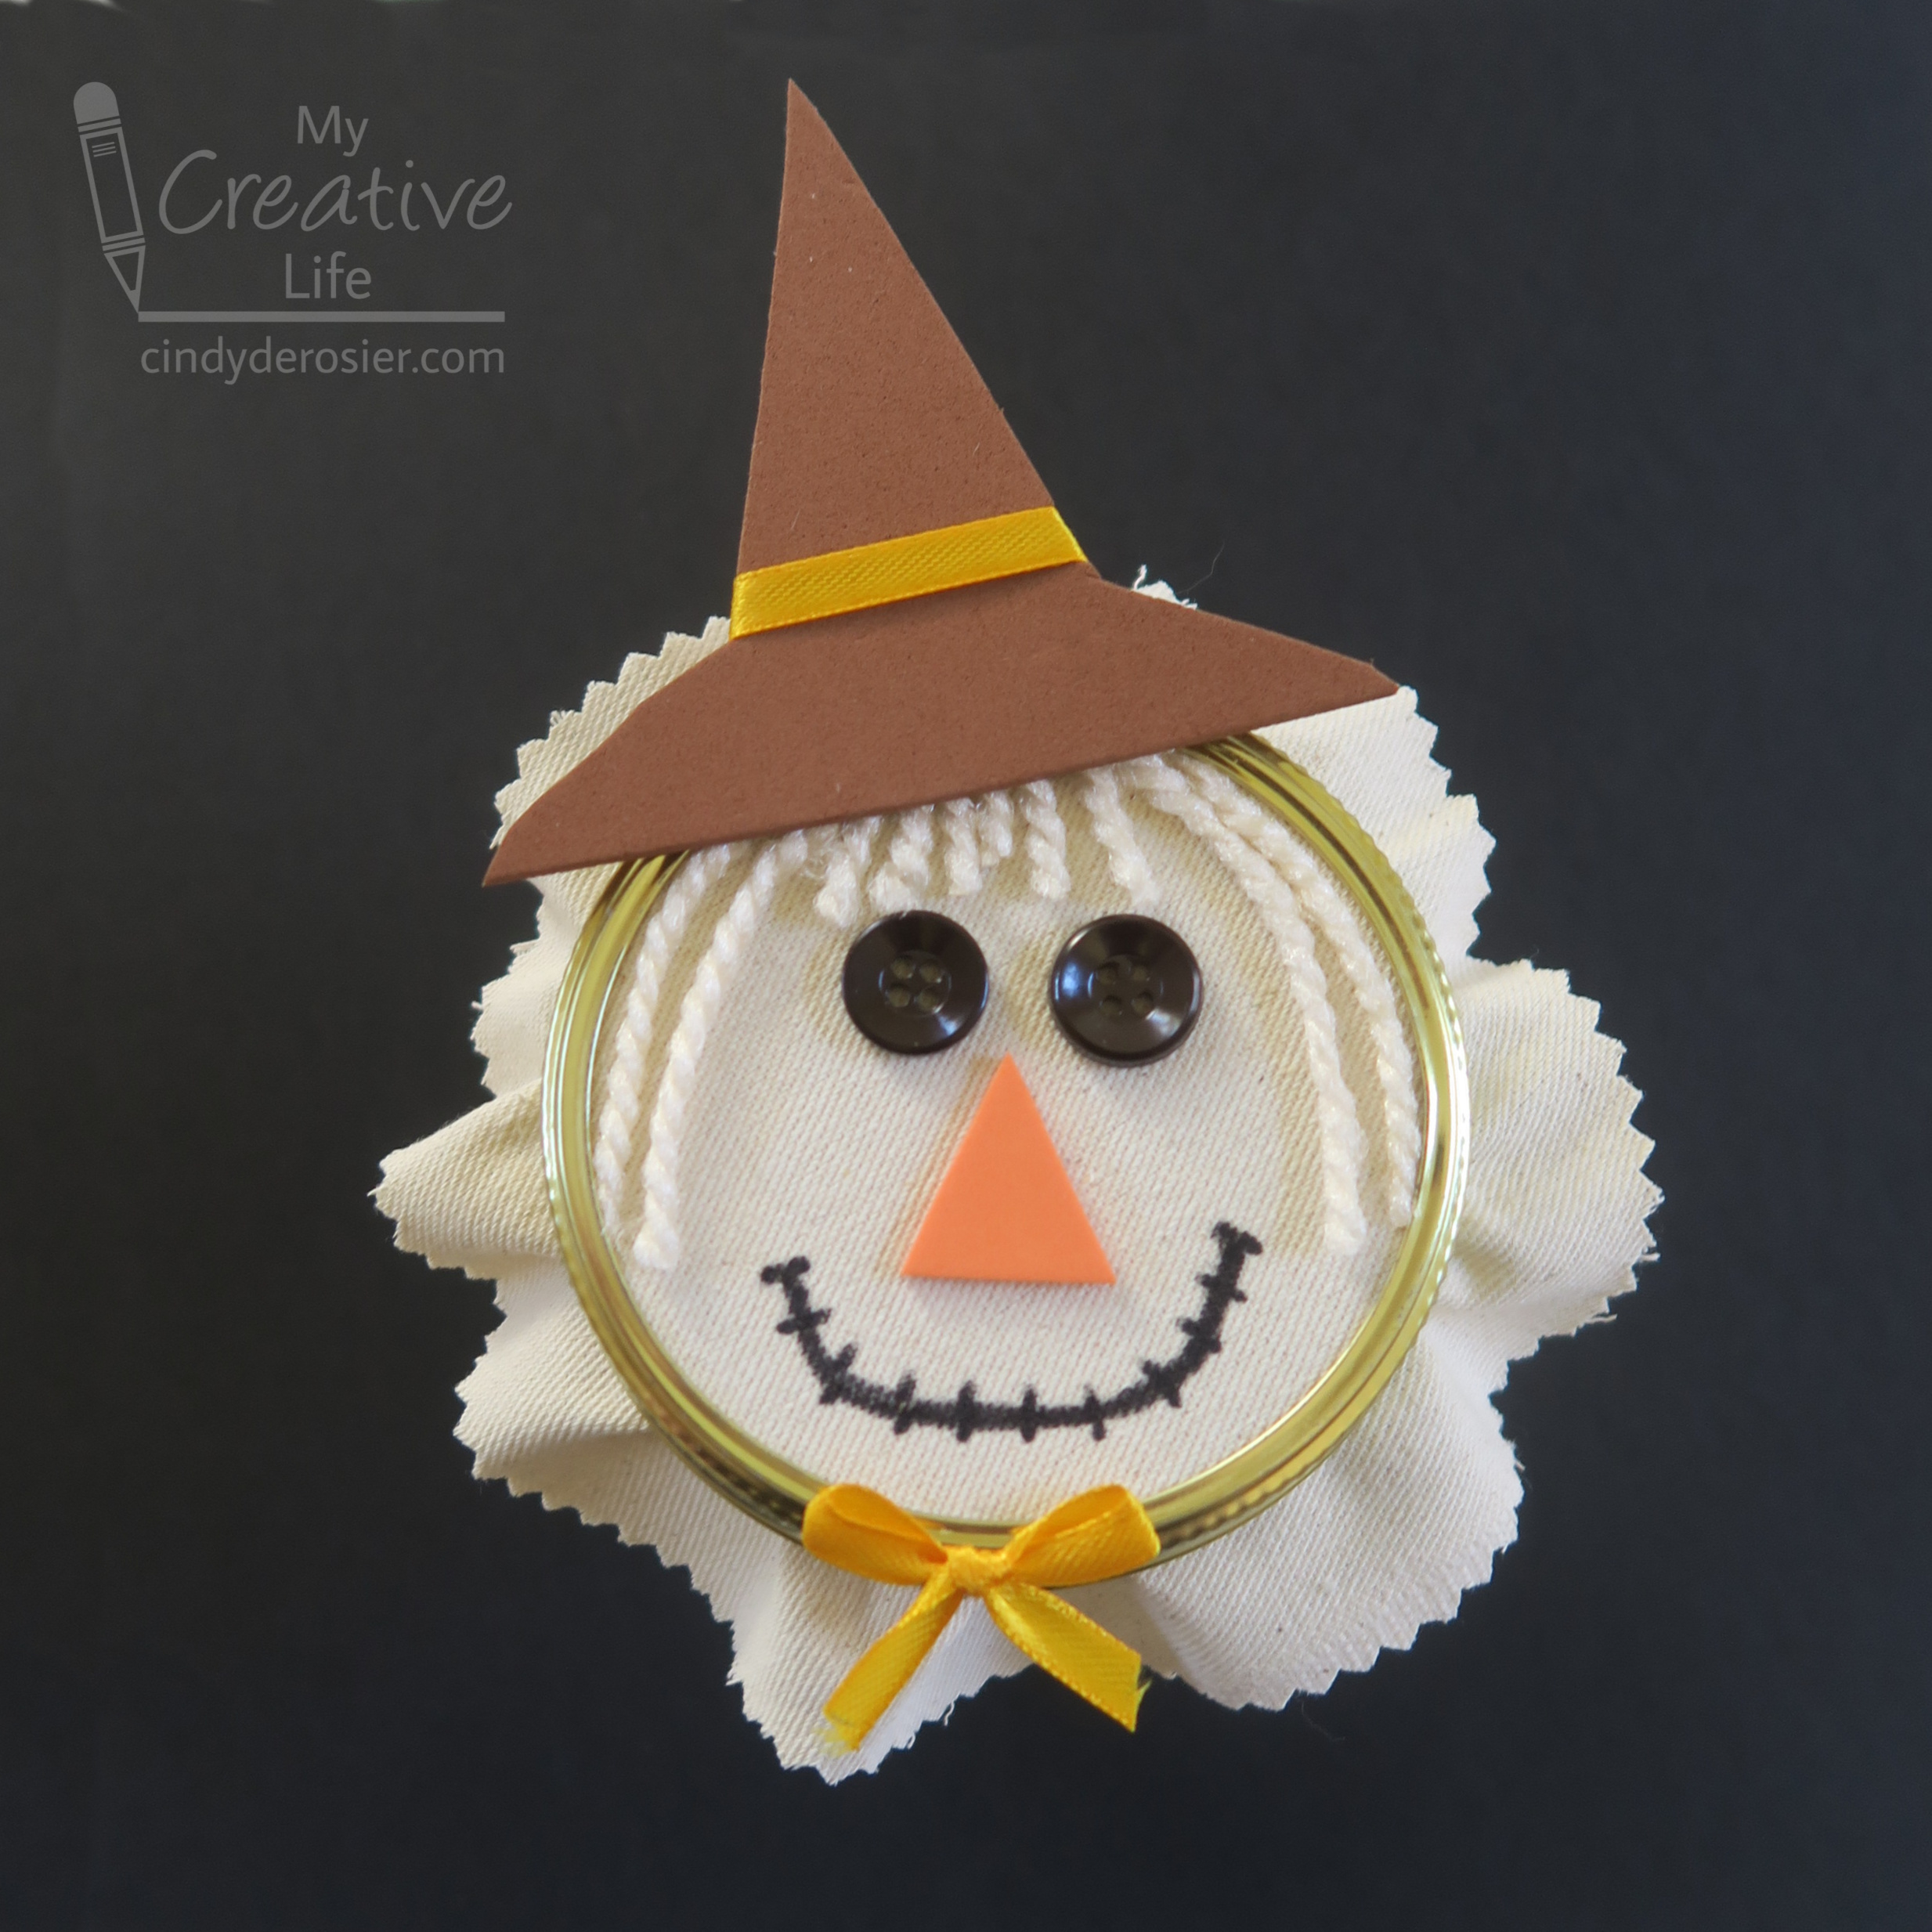
This Scarecrow Mason Jar is such a fun way to share a fall treat with friends! You can fill it with anything you want, but I designed it with Cinnamon Spice Caramel Apple Popcorn in mind. Affiliate links below. 


Scarecrow Mason Jar


Materials:


Steps: 


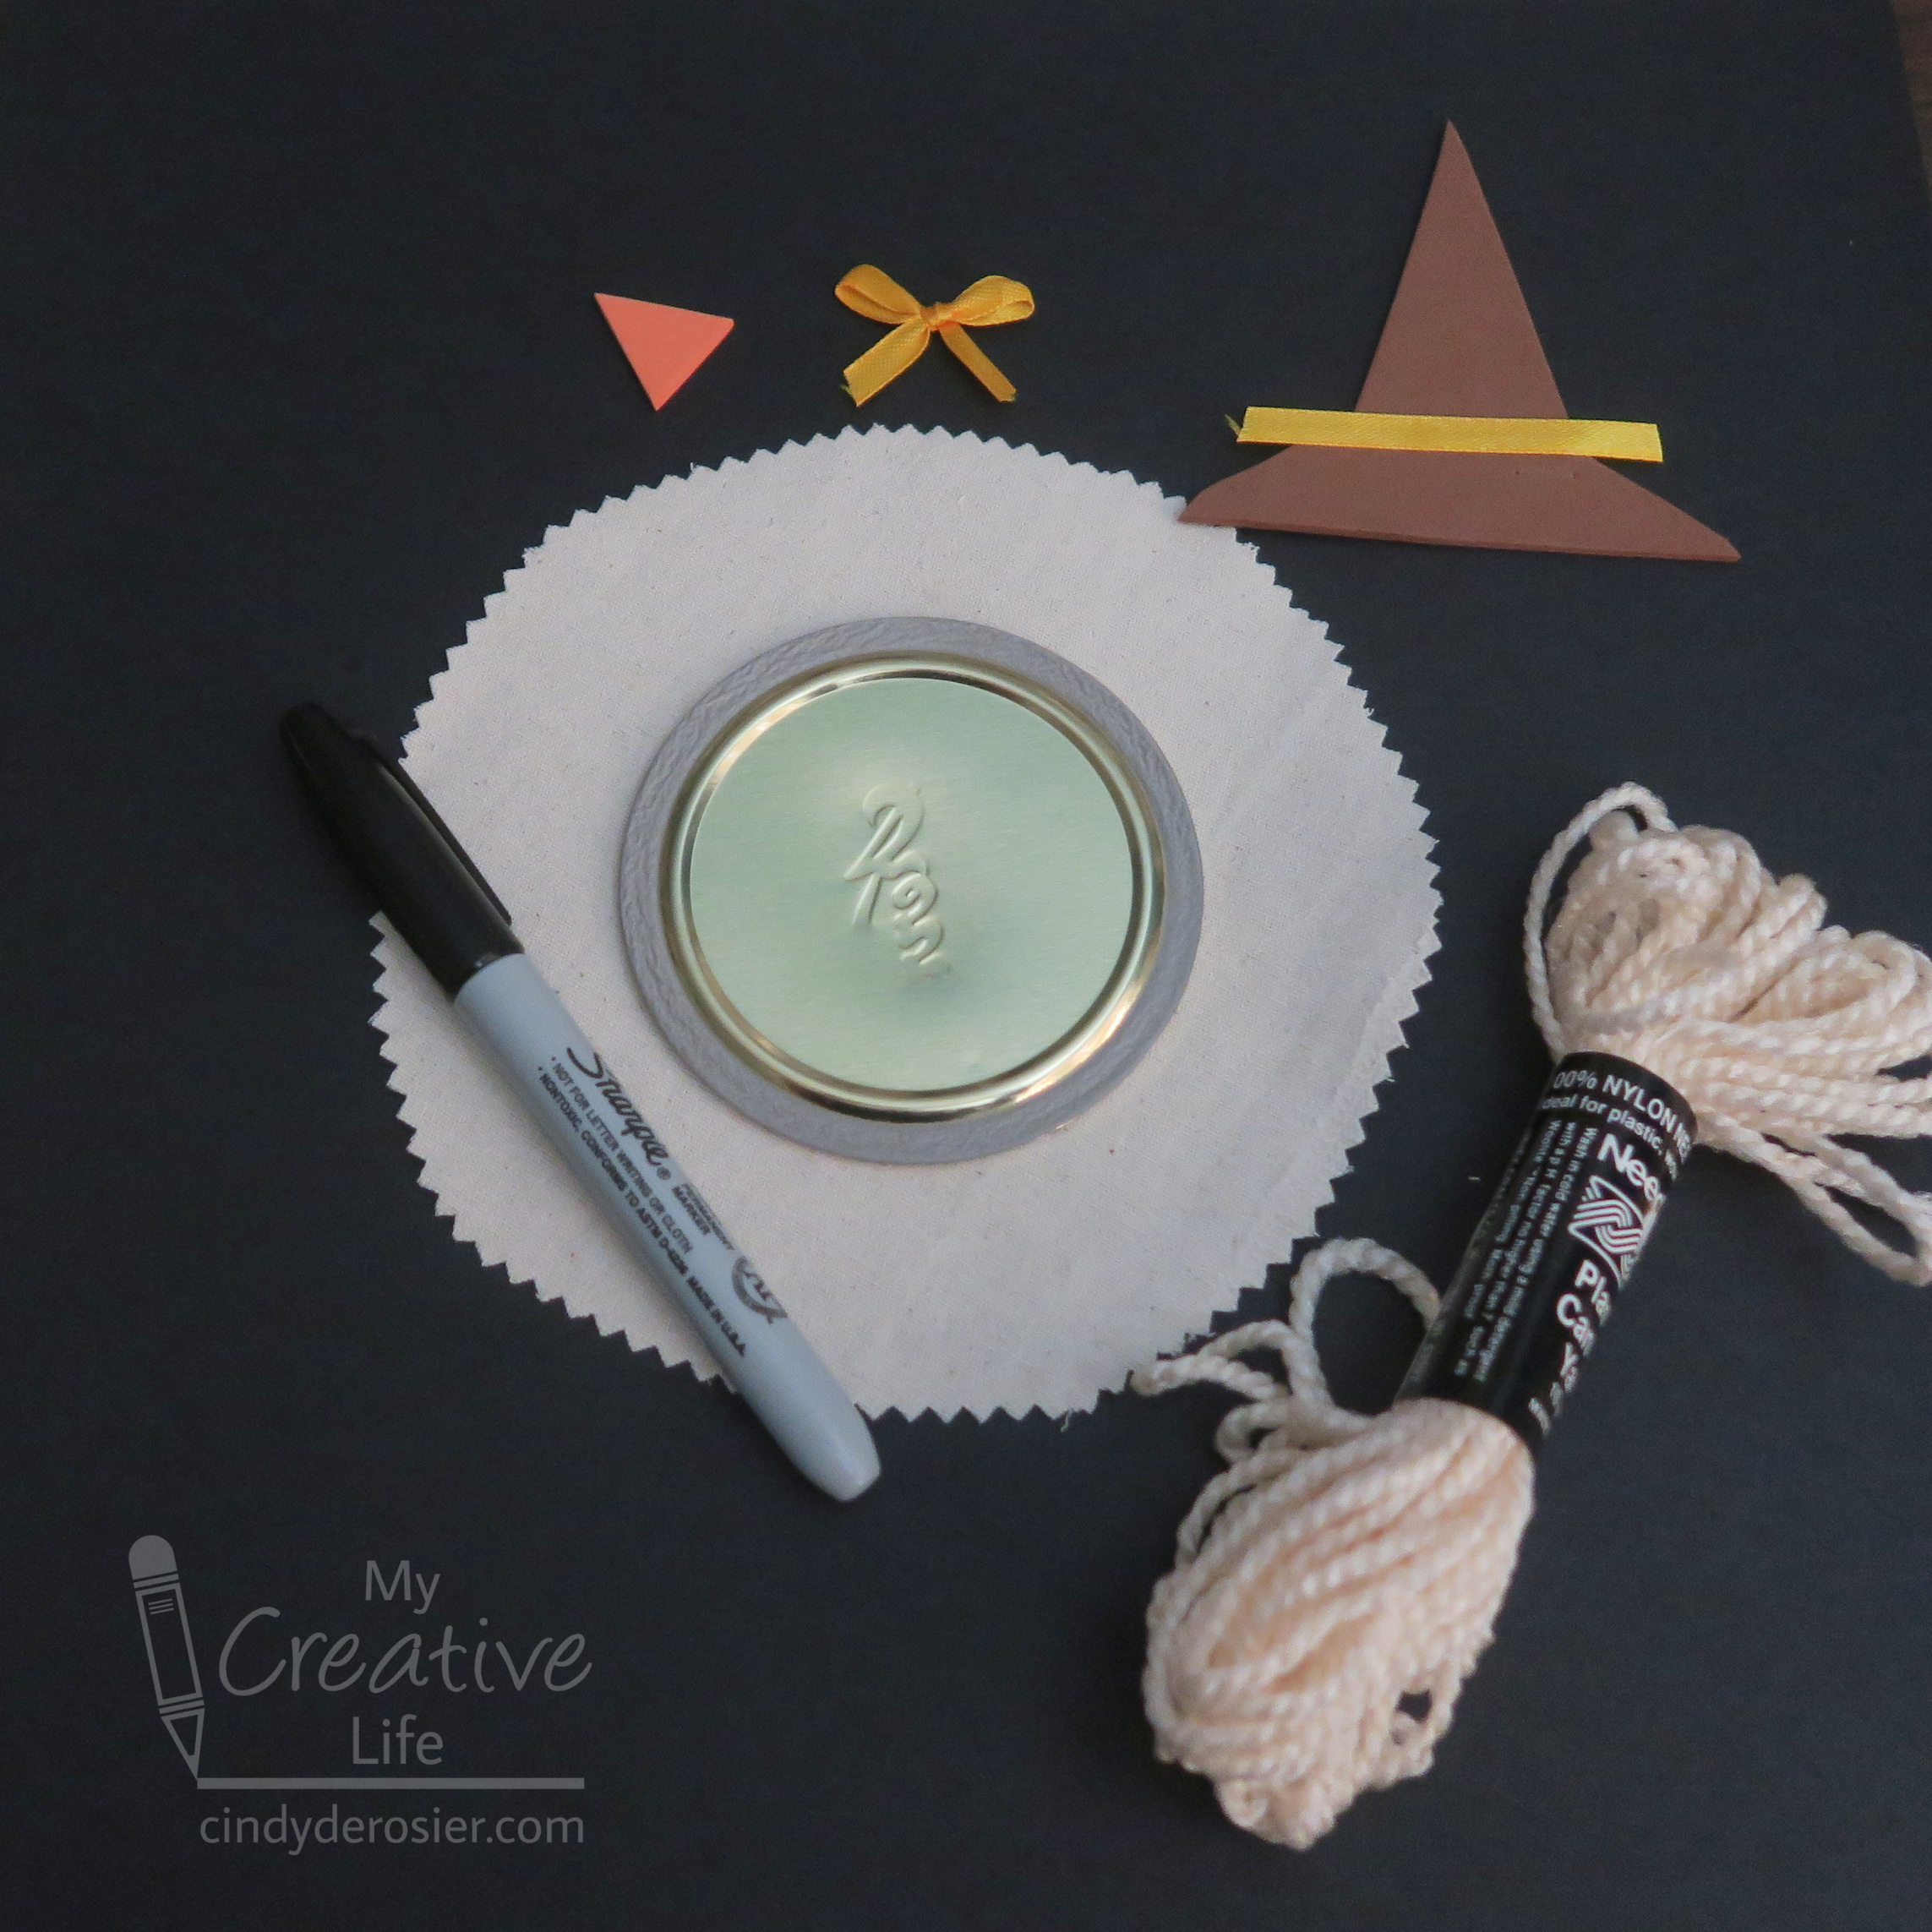
Use the pinking shears to cut a circle of fabric approximately 6" in diameter. Glue the lid to the center of the fabric. 

Use regular scissors to cut lengths of yarn for the scarecrow's hair. Then cut a triangle nose from orange craft foam and a pointy hat from brown craft foam. Cut a length of ribbon to make a hat band, then tie another piece of ribbon into a small bow. 


Fill the mason jar with the popcorn or other treat, then add the lid. Screw on the ring tightly. 

Glue lengths of hair to the scarecrow, trimming as necessary. Glue the hat on top. Glue the eyes, nose, and bow into place. Use the Sharpie to draw the scarecrow's mouth. 

6/6/22

Patriotic Denim Heart

When I get a hole in the knee of my jeans, I move them from my Wear-in-Public pile to my Only-While-Gardening pile. When I get a hole anywhere north of the knee, I see what I can salvage for a craft. Today's project, a flag-inspired stuffed heart, uses a leg. 


I worked on this for a few minutes here and there over about a week, never spending more than 10 minutes at a time. While it's not my usual style, I like the rustic, handmade look for this project. Embrace imperfection, right?! Affiliate links below. 


Patriotic Denim Heart


Materials:


Steps: 


Make a heart pattern on scratch paper. When you are happy with your pattern, pin it directly to a pant leg, making sure the side seam is out of the way. Cut out the heart. You will have two identical pieces with their right sides already facing out. Do not separate the pieces. Add Wonder Clips around the outside so that they don't shift. 

Cut the hem off the denim pant leg and set it aside. 

Thread a needle with all six strands of red embroidery floss. Remove the clips closest to the point of the heart, leaving the ones nearer the top in place. Flip the back piece of denim backward so it is out of the way. Starting at the point of the heart, use a backstitch to sew a horizontal stripe through ONE piece of denim. Leave a tiny seam allowance on each side of the stripe. Continue moving up the heart until you have red stripes that go from one side to the other on the bottom half of the heart. I have four stripes, but the number you have will depend on the size of your heart and how close together you sew them. If you want it to be flag-accurate, make three stripes. I was winging it; if you want to plan ahead or don't trust that you can sew in a straight-ish line, you can use tailor's chalk pencils to draw guidelines.  

 Here, I'm finishing up my final full-length red stripe. 


Start the next red stripe in the middle of the heart and continue to the right edge. Do the same for the remaining red stripes. As you can see, I left clips on the upper left. You can also see the hem that I cut to length. I eventually pulled out the gold thread since it didn't go with my project. 


Next, using all six strands of white embroidery floss, sew a white stripe between each pair of red stripes. 


Move the clips to the right side. Still using all six strands of the white embroidery floss, sew French knots in the blue field. I ended up with 18 instead of the actual 50 on the flag. (Fun fact: The 18th state is Louisiana, which we visited in 2019.) 


Move the clips back to the left. Fold the hanger (hem) in half and place it at the top between the layers. Thread the needle with blue, then backstitch through all the layers to secure it in place. When the hanger is secure, switch to a whip stitch and sew clockwise around the edge of the heart. Stop at the top row of white stars. Stuff the heart with fiber fill, pushing it into the point.  


Sew the opening closed by continuing the whip stitch until you reach the hanger. Switch back to the backstitch and sew across the hanger once more to reinforce it. 


The edges of the heart will naturally fray. If it's unevenly frayed, you can trim the too-frayed areas or scratch at the not-frayed-enough areas. Have fun sewing!

11/2/21

Rainbow Halloween Costume for Three

For Halloween, our family of three dressed as a rainbow. 
 

Even though I am completely incompetent with the sewing machine, this costume was easy enough that it only took me a few hours to make. I made some mistakes along the way, so you get to benefit by learning from my errors.

The biggest error? That image above is a lie. I digitally flipped it to get the colors in ROYGBIV order. The actual photo has us in VIBGYOR order. Even though I actually thought about how to get the colors with red at the left and purple at the right, I still messed it up. Sigh. Affiliate links below. 


Rainbow Halloween Costume for Three


Materials:


Steps:


Fold each t-shirt in half as precisely as you are able. Mark the center with clips or pins, then carefully cut the each shirt in half. 


After all the shirts are cut, pair them together red-orange, yellow-green, and blue-purple. Here's where I went wrong. I chose the wrong half of each shirt. I should have red and yellow on the left sides, and orange and green on the right sides.  


I strongly recommend you lay out all the shirts in order to make sure you are using the correct sides. You might luck out and get a t-shirt brand where the front and back are symmetrical, but ours had a dip in the front with a very high back that would have been weird to wear backwards. 

When you are sure you have the correct order, it's time to sew. Carefully match the fronts of the shirts together and clip one of the sides in place. 


Sew that seam, being sure to backstitch at the hem and the neck to secure the seam. Clip the second seam together. Sew that seam, then turn the shirt right-side out. Repeat the process for the other two shirts. 

To make the rain cloud, cut a cloud shape from chipboard and paint it grey. Glue it to a jumbo craft stick. Tie glow beads onto pieces of silver thread and tape them to the back of the cloud so that they dangle like raindrops. 


To make the sun, cut 8 triangles of chipboard to make the sun's rays. Paint them and the backs of two paper plates yellow. Glue one plate to the craft stick, then glue the rays to the front of that plate. Glue the second plate on top to sandwich the rays between the two plates. 


Then you just have to make sure you stand next to each other in the correct order through the entire costumed celebration! 

This was a fun costume and so easy. Half of each shirt is leftover, so in theory I could either sew up the correct rainbow, mix-and-match the colors to make random two-tone shirts (opposites on the color wheel?), or come up with other way to use the fabric. I'm open to suggestions!


I hope you all had a wonderful Halloween!

11/18/19

Cardboard Tube Reindeer Gift Packaging

When you're a craft blogger, literally everything is a potential craft supply. Even the cut-off sleeves from a reindeer costume. In this case, those sleeves became gift wrap that looks like a reindeer and hides fun surprises inside. Affiliate links below.


Cardboard Tube Reindeer Gift Packaging


Materials:


Steps:


Cut the sleeve into two pieces. Set the piece without the seam aside and cut the seamed piece into half. 

Gather holiday washi tapes, candies, and other small gifts. Test that everything fits into the cardboard tube. 


Wrap the non-seam piece tightly around the cardboard tube. Stuff the excess material into the tube on both ends. This will secure the fabric in place. No glue needed!


Wad the two extra piece of sleeve material into the two ends of the tube. This prevents the items from falling out. Cut roughly 1/3 off each pipe cleaner. Take that cut piece and twist it around the larger piece to form 3-pronged antlers. Slide the antlers into the tube. Still no glue needed. The material will hold it in place. 


Stand the reindeer upright. Use the Supertite to glue googly eyes and a pom pom nose to the reindeer. Now nestle the reindeer among the other gifts under the tree.


Quick and easy, and so super cute!

10/25/18

Fabric-Covered Frame

If you have some leftover fabric, say from the drawstring bags you recently made, use that fabric to cover an inexpensive frame. I used beaver-print fabric to make a frame for Steve to display a photo of his Wood Badge patrol, but I can think of a lot of other applications. Need to hem a prom dress or other special occasion fabric? Use the scraps to cover a frame that will hold a photo of the special event. Making a quilt or blanket for a new baby? Make a matching frame. Outgrown a Halloween costume? Use the fabric to make a frame to display Halloween photos.

Note that this project takes a LOT of drying time. Ideally, you'll let multiple layers of Mod Podge dry completely between applications, then let the whole project cure for 3+ weeks. In other words, don't get started on December 23 thinking you'll have Christmas gifts ready in time for family and friends.


--------

Fabric-Covered Frame


Materials:


Steps:

Remove the backing and the insert from the frame. If it has glass, remove that too. Place the fabric upside down on your work surface and lay the frame on top. Cut around the frame, allowing about 0.5" of extra fabric on all four sides.

Use the brush to apply a thin coat of Fabric Mod Podge to the front of the frame. Carefully set it facedown on the upside-down cut out piece of fabric.

Flip it so it is face up and let it dry for 15 minutes.

Working with one side at a time, apply Mod Podge to that side and back of the frame. Gently pull the fabric over smoothly and press it in place. Do the same thing on the opposite side. Now move on to the top and bottom sides. You'll do the same technique of Mod Podge and gently pulling and pressing the fabric into place, but you'll need to tuck any extra fabric at the corners underneath.

Cut an X in the fabric covering the opening from corner to corner. Trim the fabric so that there is enough to cover the inner edge of the frame when you wrap it toward the back but not so much that it gets in the way of the tabs that hold the photo. After trimming, apply Mod Podge to the wood and press the fabric into place.


At this stage, it will look something like this. As you can see, I didn't worry too much about making the back look good.


Let the frame dry overnight. At this point, you can either put a second coat of Mod Podge on to really seal it well, or leave it as is. Either way, now you need to let it cure for at least 3 weeks. 

After it is cured, add the photo, then cut a piece of cardstock to cover the back and glue it in place using craft glue. It protects the photo, but can be removed without harming the fabric if you ever want to switch out the photo. If you want to use the included dowel to prop up the frame, punch a hole in the cardstock before you glue it in place. 


Alternately, you could add a sawtooth hanger. Steve's frame will sit in a picture rail, so I didn't do either of those.


As long as you plan ahead to allow for the long curing time, these make very nice gifts. They take very little active time and cost very little to make. Give it a try!