2/4/21

Money Valentine Cards

I was invited to play along with the 7th edition of the Creative Crafts Collaboration. This time, the theme is Last Minute Valentine's Day. My mind immediately went to a money-themed valentine. I've created dozens of money gifts over the years, but never one for Valentine's Day. Time to change that! I designed two valentines using dollar bills. 


Money Valentine Cards


Materials:


"You're the 1 I Love" Card


Cut a rectangle of red cardstock and punch a 1/2" heart on one side. Fold the dollar bill with the 1 facing out and position it so that it is completely hidden by the cardstock. Secure it with a Glue Dot. 


Add letter stickers to spell "YOU'RE THE" and "I LOVE." 


Use the tape runner to put adhesive on the back of the red square, JUST around the edges (not on the money). Attach it to a card base, right of center as shown. Punch two additional hearts and adhere them to the left side. Punch a border from black cardstock and line it up with the left edge of the red rectangle. 


"I Think You Are ONE-derful!" Card


With the back of the dollar bill facing you, fold the top portion down toward the back so that the word ONE is at the top of the bill. Fold the bottom portion of the bill backward. It will extend slightly over the top, leaving a little pocket to place the heart. Fold the left and right portions backward so that only the word ONE shows in the front. 


Cut a piece of red patterned paper slightly smaller than the card front. Cut a piece of pink patterned paper slightly smaller than the red one. Use Glue Dots to secure the dollar bill to the pink paper. 


Glue the red cardstock to the card base, then the pink cardstock on top of that. 

Punch a large red heart and two dark pink hearts. Adhere the two pink hearts on either side of the money as shown below. Write "I THINK YOU ARE" on the red heart and tuck it into the pocket formed by the money (add a Glue Dot if you'll be mailing the card). Add "DERFUL!" in letter stickers beneath the money and to the right. 


These are just two ideas- the possibilities are endless. Change out the denomination to tell someone, "You're a Perfect 10!" or "There's a 100% Chance I Love You!" And no matter what denomination you use, you can always tuck extra money inside the card. 

Creative Crafts Collaboration is hosting a Rafflecopter giveaway of all sorts of cool items for your crafty stash. Enter now to win all of this: 


Then, return on Saturday to see a roundup of all the fun ideas for quick Valentine's Day projects!


Happy Valentine's Day!

2/3/21

"You Are Priceless, Valentine" Heart Art, Inspired by Famous Painters

I had an idea to make a valentine inspired by Piet Mondrian's famous Composition in Red, Blue, and Yellow. I had so much fun that I ended up making three more, featuring works by Vincent Van Gogh, Jackson Pollock, and Wassily Kandinsky. Each is made with different media. I love how they looked grouped together, so I mounted them on black cardstock to display. 

I call this grouping You Are Priceless, Valentine. Affiliate links below. 


"You Are Priceless, Valentine" Heart Art


Materials:


---------


Mondrian's Composition in Red, Blue, and Yellow 


Use pencil to trace the heart template onto a square of paper. With the ruler, LIGHTLY draw horizontal lines on the heart, varying the distance between them. Draw vertical lines (and erase horizontal lines as necessary) to divide the spaces into squares and rectangles. Leave 2/3 of the shapes white and color the rest with red, yellow, blue, and black. Trace the pencil lines in black. 


---------

Van Gogh's The Starry Night


Use a pencil to trace the heart template onto a square of paper. With short bold strokes, use the light yellow pastel to rough in the location of the stars, the wind, and the horizon line. Fill in around these features with blues, always using short bold strokes. Add white to the outer edges of the stars and yellows and oranges to the centers and to make the moon. Add black to the shadowy areas, then add white to the wind. Continue layering colors to mimic the look of Van Gogh's work. You may wish to use a spray fixative after you finish to prevent smearing. 

(Put down newspaper before using pastels. I had to scrub my table pads afterward.)

---------

Kandinsky's Squares with Concentric Circles


Use a pencil to trace the heart template onto a square of paper. With the ruler, divide the heart into squares. I made a lot more than in Kandinsky's work, but you can be more authentic if you prefer. Use watercolor pencils to fill in each square with a different arrangement of concentric circles. When they are all filled in, use a small brush to blend the colors, working around each circle and rinsing the brush frequently. 


---------

Pollock's Composition with Pouring II


I did a bunch of research and discovered, among other things, this fascinating article on the fluid dynamics behind Pollock's paintings. Armed with that knowledge, I experimented with a variety of different techniques to achieve a similar look. Feel free to do your own exploration! I recommend placing a sheet of paper into a deep cardboard box, then drizzling thinned acrylic paint onto the paper. After letting the paint set for about 30 minutes, I pressed with with a piece of newspaper to remove the excess paint, then let the painting dry completely. I traced the heart template around my favorite part of the artwork and cut it out, then mounted it to a clean square of paper. 


---------

To complete your study, label each piece of art with the artist who inspired it. Then mount the hearts onto black paper. 


This was such a fun way to learn more about these four artists and try out new techniques. I encourage you to give it a try! If you have suggestions for other famous paintings that would be awesome as heart art, leave them in the comments.

2/2/21

Raspberry Hot Cocoa

I used to be a hot cocoa purist - the darker and more chocolatey, the better. But I was playing around with my LorAnn oils and discovered how AMAZING raspberry hot cocoa is. These little candy hearts are tasty on their own and make the perfect delivery system for just the right amount of raspberry in a mug of hot cocoa. Mmmmm!! Affiliate links below. 


Raspberry Hot Cocoa


Materials:

Steps:


Prepare 3 oz. of Candy Melts following the instructions on the package. Add three drops of Raspberry flavor. The candy will thicken slightly, but this is fine as long as you get it in the molds relatively quickly. Only fill the molds about halfway, as thinner hearts will melt more effectively in your hot cocoa. 


After the candy has set (approximately 10 minutes), pop the hearts out of the mold. Serve 4 hearts with each 8 oz. mug of piping hot cocoa. 

2/1/21

Kentucky 2018

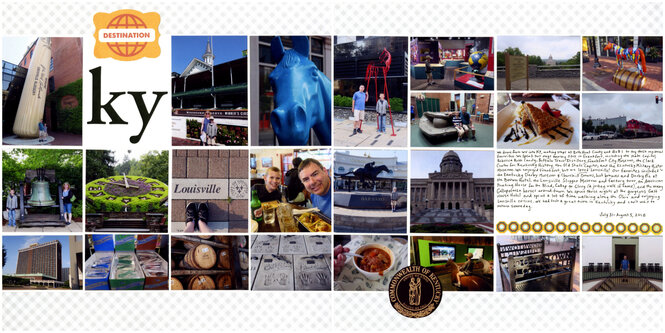
Louisville ranks #2 on my list of Unexpectedly Awesome Cities for Family Vacations. We had such a great time there, as we did during all our travels in Kentucky. I tried to choose a good mix of photos, though it might be a bit horse-heavy. I spy 6 photos with horses... and the picture of Trevor and me in the winner's circle at Churchill Downs isn't one of them!

Kentucky 2018 (affiliate link)

I only have one more layout to make from our epic 17-day Midwest adventure - Ohio, currently at the top of my need-to-scrap list. As you can see on that list, I'd originally budgeted only one page for Kentucky, but ended up with a double-pager. That means that Ohio needs to be a single pager... or I need to add a page protector and do three Ohio pages in order to avoid leaving a blank spot. As annoying as that is, I'm glad I gave Kentucky its due. 

1/29/21

Cardboard Tube NFL Referee (Standard and Pandemic Versions)

It's that time of year when searches for football crafts explode. Most of the crafts out there are based on the field, goal posts, stadium, and the ball itself. I went a different direction and made a referee out of a cardboard tube. 

This is the pandemic version:


His mask is removable, if you prefer the pre-COVID version. Affiliate links below. 


Cardboard Tube NFL Referee


Materials:


Steps:


Paint the cardboard tube. The top 1/3 should be your skin tone of choice (I used Camel) and the bottom 2/3 should be white. Paint a tiny scrap of cardstock with your skin tone color. You'll be cutting it out to make ears. 

While the paint dries, cut a circle of black cardstock with a diameter about 1" larger than that of the cardboard tube. Make cuts in the circle from the outside toward the center (like you're cutting pizza slices), stopping 1/2" from the center. This will be the top of the hat. Set it aside for now. 

Use a black Sharpie to draw a collar and stripes on the referee's shirt. Draw a rectangle where his pocket goes, then color the red and blue of the NFL logo with the ultra-thin Sharpies. It's really tiny, so don't expect perfection. Color around the logo with the black Sharpie.

Cut a tiny shield from white cardstock and use the red and blue Sharpies to make a second NFL logo. This will go on the hat (but not yet). 

Return to the hat circle. Cupping the circle in one hand, overlap the flaps you've cut so that each piece sits onto the one next to it. This will form the crown. Add craft glue all the way around the circumference of the crown and glue it to the top of the referee's head. You may have to hold it in place for a few minutes while the glue sets. Then cut a black visor. 

You should be here:


Glue the googly eyes in place and add a nose and a smile. Glue the logo to the crown of the hat and add the visor. You should be here:


Cut a short length of embroidery floss, then remove 4 strands (leaving 2). Put a dot of glue on his chest where the whistle will sit, then additional glue on each of his (non-existent) 'shoulders' and another dot of glue on the back of his neck. Place the center of the floss on his chest, then wrap the ends around to meet behind his neck, making sure the floss rests on his shoulders. 

Cut a silver whistle (basically the shape of a comma) and glue it on his chest. 

Cut two ears from the painted cardstock. Glue them in place. Now you're here. 


To make the mask, cut a small piece of seam binding and two short lengths of embroidery floss (use all six strands this time). Glue the ends of each piece of floss to the corners of the mask, leaving just enough slack so you can get the mask in place after it dries. If you don't care about being able to remove the mask, just glue it in place. That's easier. 


I had a lot of fun making my referee. Enjoy!