Showing posts with label heart. Show all posts

6/5/26

Pride Heart Keychain

Happy Pride Month to all of my LGBTQIA+ friends! 

I am proud to belong to a church that welcomes everyone. That includes people of all sexual orientations, gender identities, and gender expressions. Literally everyone is welcome. One of the ways in which our congregation is celebrating Pride is with a keychain craft. I'll be leading that after church on June 14. My sample is based on the rainbow flag, but attendees can switch out the colors to make a different flag if they wish. Affiliate links below. 


Pride Heart Keychain


Materials:


Steps: 


Place one purple bead in the center of the bottom row of the pegboard. Put three purple beads centered in the next row up, then five on the next row. Add a row of 7 blue beads and then 9 blue beads. The next row up has 11 green beads, then 13 green beads. 

Add two rows of 13 yellow beads immediately above the row of greens. Add two rows of 13 orange beads above the yellows. The next row up is red: skip a space, add 5 beads, skip a space, add 5 beads, skip a space. The top row has two sets of 3 red beads, centered on the previous row of red. 


Follow the directions that came with the pegboard to fuse the beads. I suggest fusing the beads more than you might ordinarily, since you want your keychain to be very sturdy. 

Use the paper piercer to enlarge the hole where the keychain will attach to the heart. Open a jump ring and thread it through the hole. Continue adding jump rings until it is the length you want it, then attach the key ring.


2/20/26

Heart-Shaped Pillows for Breast Cancer Patients

At my first doctor appointment after I was diagnosed with breast cancer, the nurse navigator gave me a pair of heart-shaped pillows, courtesy of Bosom Buddies of Solano County. She explained that they're designed to tuck under your arm after surgery to relieve pressure on the area. They also make wearing a seatbelt tolerable. My heart pillows were indeed extremely useful after surgery, but I appreciated them even more during and after radiation when my skin was so raw and painful

Last week, my friend Ann and I had the chance to finish some partially completed heart pillows at a local quilting store. Someone else had cut, sewn, and stuffed the hearts; we hand-sewed the openings. I finished 9 pillows. It was very satisfying to be able to make these, knowing that they will help other women with breast cancer. Heart pillows are also helpful after cardiac surgery


Many hospitals and support groups like Thriving Pink give out heart pillows and are always looking for volunteers to make them. If you are interesting in making heart pillows to donate, contact your local hospital or support group to find out if they have specific requirements and where they can be dropped off. Once you're ready to start sewing, my friend Becky has a great tutorial. On behalf of the patients who will receive them during one of the most challenging points in their lives, thank you. It means so much. 

9/17/25

Rainbow Heart Sun Catcher

Check out my latest tissue paper project! This sun catcher really brightens a room and it makes me smile with all the little patterned hearts sprinkled on the larger heart. And because I used Mod Podge Gloss, it has a delightful shine when it catches the light. Affiliate links below. 


Rainbow Heart Sun Catcher


Materials: 


Steps: 


Cut a large heart from scratch paper, then use it as a tracer to draw a heart on a piece of 12x12 cardstock. Set it aside. 

Choose your colors of tissue paper, then tear a small corner of each piece. Tissue paper has a grain, so you'll notice that one direction tears cleanly and one direction tears with lots of jagged bits. 


Use a ruler to help you tear straight pieces of tissue paper, making sure the grain is going the correct direction. The edges will be a bit ragged, but that's not a problem. . 


When all the strips are ready, apply a thin coat of Mod Podge to the cardstock and lay the strips in place. I chose to overlap them slightly. When all the strips are in place, paint another coat of Mod Podge over the top to seal them. 


When the Mod Podge is dry, it will look like this. 


Punch tiny hearts from the patterned paper. Add another coat of Mod Podge to the base heart and arrange the tiny hearts on top. Place them strategically to cover any particularly jagged edges, or scatter them randomly. Seal the hearts with a final coat of Mod Podge. 


Hang your sun catcher in the window and enjoy the beautiful color and patterns of the rainbow heart.

8/12/25

Summer Creative Workshop: Neon Heart

The sixth (and final) project I completed during Summer Creative Retreat was this neon heart. 


The instructor, Mako of Makoccino, taught an excellent class about how to use watercolors to paint a neon flamingo. 


I decided to simplify the project and switched my design from a flamingo to a heart. I tried using watercolor for the project, but I got really frustrated with not being able to control the pigment. Rather than give up on the class entirely, I switched from painting with watercolor to painting digitally. That allowed me to erase my mistakes with a single click - if only you could do that with watercolors!


How to Paint a Neon Heart (Digital Version)


Add a white heart to a rosy pink background. 


Select a darker shade of the same pink. Use a spray paint tool to color outside and inside the heart, leaving a visible band of the original pink.   


Select an even darker shade of the same pink and darken the outer edges of the canvas. 


Set the spray paint tool so that it is three times as wide as the white heart. Trace over the heart with white. This gives it the glow.  


Duplicate the white heart and change the color to a medium gray. Drop it down and slightly to the right to make a shadow. 

Add very faint horizontal lines to the canvas to mimic the wall where the neon sign is hanging. Move the white heart to the front. 


Use the airbrush tool to soften the entire design. 


This was so much fun to make! It's far from perfect, but I loved trying something completely new. I'd like to get more into digital art. You really can't beat that undo button. 

5/8/25

Best Friends Forever (Bonded Bunnies)

I am thrilled to have been able to make a page about our bonded bunnies. For a long time, we weren't sure if they would ever bond. Thank goodness that they are now best friends. 

Best Friends Forever (affiliate link)


This page was inspired by a National Scrapbook Day challenge called 'Put a Little Love in Your Art." We had to include at least five hearts on the page. But there was a catch. You couldn't use five heart stickers or five punched hearts. You had to have at least five different types of heart. I used die-cuts, stickers, a rub-on, washi tape, and enamel hearts to make my page. I love how it turned out. 

2/20/25

Celebrate Card with Heart Balloons

Remember that yesterday I told you I dropped sequins onto my heart project? It occurred to me that, in addition to being a pretty piece of art and a functional set of swatches, I could also use my color chart as a fun way to randomly pick a color palette for a project to challenge myself. Sort of like throwing darts, but without putting holes in the wall. 

Once I had my color palette, I made this card.  


So how exactly did I pick my color palette? When I dropped the sequins, one landed on a pink heart with a teal background. (Kuretake calls those colors "Rose Madder" and "Turquoise Deep Green.") The other sequin landed on "Imperial Violet." I was really happy with that trio of colors. Pink, teal, and purple are beautiful together. That would be an easy challenge. 


Too easy. So I decided to add the next closest color to the sequin ("Lemon Yellow") to make it harder. I went through my cardstock to find the closest matches I could to the four colors. I used the teal as a background, punched a bunch of hearts from the yellow, pink and purple, then arranged them into a bunch. I added embroidery floss strings and glued a pre-cut sentiment over the top. I thought I was done at that point and scanned the card...


... but I decided later that my balloons needed highlights. After a few quick marks with the Posca pen, my card was done. Much better. 


I had a lot of fun with this challenge. I will definitely be using my color chart as a color selector again in the future!

2/19/25

Heart Art Color Chart

Check out my latest heart art! Isn't it pretty?


Each of the colors I used for the project is in its particular place for a reason. I didn't choose the colors, nor where I placed them. Why? My heart art is actually color swatches from my newest paint set, Kuretake Gansai Tambi (affiliate links here and below). The hearts are the first four rows of paints, in order. The background squares are the next four rows of paints, in order. (For this project, I didn't swatch the last row, which is white and three metallics.) 


Gansai is a type of Japanese watercolors. It comes in large pans (perfect for the large brushes used in Japanese painting) and is designed to work well with Japanese rice papers. There is a wide range of colors so that the artist doesn't need to mix their own. Although they are water-based, gansai don't behave like other watercolors. They require very little water and are designed to stay in place instead of flowing on the paper. There are different brands of gansai, just like there are different brands of western watercolors. Kuretake's brand name combines the word gansai (watercolor paint) with the word tambi (aesthetics).

I had never tried gansai before, so I thought this project would be a fun way to experiment with my new paint set. I started by using 1/4" painter's tape to create a grid on a 9" square of watercolor paper. You can eyeball it, but using a centering ruler makes it really quick and easy to get perfect squares. Be sure your painter's tape is pressed firmly to the paper so no pigment sneaks underneath and spoils your white lines. 


Now fill in the squares with the paints in rows 5-8. So pretty!


While the base is drying, use a heart squeeze punch to make 16 hearts from watercolor paper. 


Paint the hearts with the colors in rows 1-4. Beautiful!


When the paint is completely dry, glue the hearts onto the background. 


I plan to hang my project on the wall so I can both enjoy it and use it when I need paint swatches. But first, I put it onto the floor and dropped two large sequins onto it. 


Why? I'll tell you tomorrow. 

5/13/24

Decoupaged State Flag Heart Magnets

I still have a lot more National Scrapbook Day projects to share, but I wanted to show you a Mod Podge project first. Mod Podge is celebrating its 57th birthday this Friday, May 17. The Plaid Ambassadors are celebrating by using our favorite varieties of Mod Podge on a craft. I used Mod Podge Ultra (affiliate link here and throughout the post) to make state flag heart magnets for Washington, Virginia, Massachusetts, and Nebraska. Each of these states' flags features a design that would be way too difficult to paint like I did with the previous batch of flag magnets. Mod Podge to the rescue!


Decoupaged State Flag Heart Magnets


Materials: 


Steps: 


Follow the instructions to make salt dough hearts. When they are completely dry, paint them to match the background color of the flag. If the flag you want to make has a white background (like Massachusetts does), be sure to paint it too, even though the salt dough is white. 

To make the images that you'll be decoupaging onto the hearts, find an image of the flag you're making and copy it. Shrink it to the desired size, then print and cut. 


When the paint is completely dry, protect your work surface (I used newspapers and a box I use for spraying). Place each heart onto a plastic lid or small container so that it is raised off the bottom surface. Follow the directions on the bottle to shake the Mod Podge and spray it onto the hearts. 

Place each cut-out onto the heart while the Mod Podge is still wet. Let it dry, then add another coat over the top. Add an extra coat when that one is dry. 


When the Mod Podge is completely dry, turn over each heart and add a strip of magnet tape. Now your magnets are ready to hang on the fridge. 

5/6/24

Fingerprint Heart Magnet for Mother's Day

On Friday, I shared an idea for a homemade Mother's Day heart magnet for one child to give to Mom. Today's idea, featuring fingerprint hearts, can be made by a group of siblings (for Mom) or cousins (for Grandma). Or, you can do like I did and include Mom and Dad to make a family heart. Affiliate links below. 


Fingerprint Heart Magnet for Mother's Day


Materials:


Steps: 


Paint the background - a blue sky and green grass. 


When that is dry, add fingerprint roses floating above the grass. To make the rose, add one fingerprint at a 45° angle to the left, then add a second fingerprint at a 45° angle to the right. It is easiest to do with a pointer finger. Use a pinky finger if you need smaller hearts to fit in more people. 


When the fingerprints are dry, paint stems and leaves under each flower. Then use a Sharpie to write each person's name above their flower. I added a dashed border around the edges to finish my heart. 


The final step is adding magnet tape to the back. Display your art on the refrigerator for everyone to enjoy. 

4/12/24

Salt Dough State Flag Heart Magnets - Painted Version

Ready for the next project inspired by state flags? They're refrigerator magnets! They'd make such a fun classroom project and they are easy to do. Affiliate links below.  


---------

Salt Dough State Flag Heart Magnets


Materials:


Steps: 


Cut out hearts from the salt dough, then let them dry. You can dry them in a low oven, but I just air-dried mine for four days. I cut them out on a Silpat and let them sit for a day until they were crusted over and pale, then flipped them. You can see the color difference below between the five on the left I haven't flipped and the three on the right I have. 


After the second side crusted and turned pale, I removed the Silpat and let them dry completely on the cooling rack for two days. Obviously, the drying time is going to vary significantly depending on your temperature and humidity. Do make sure they are completely dry before you paint them though. 

I started by penciling in the basic designs, then adding a base coat. That was really easy for New Mexico and Texas; it took a bit more effort for Colorado and Tennessee. 


When that was dry, I switched to the paint pens to add the white stars on Texas and Tennessee and the red lines on New Mexico. 


Here's a closer look at each:


Seal your hearts with a coat of Mod Podge. When that is dry, cut a strip of magnet tape and adhere it to the backs. 


I'm really happy with how these turned out! 

1/24/23

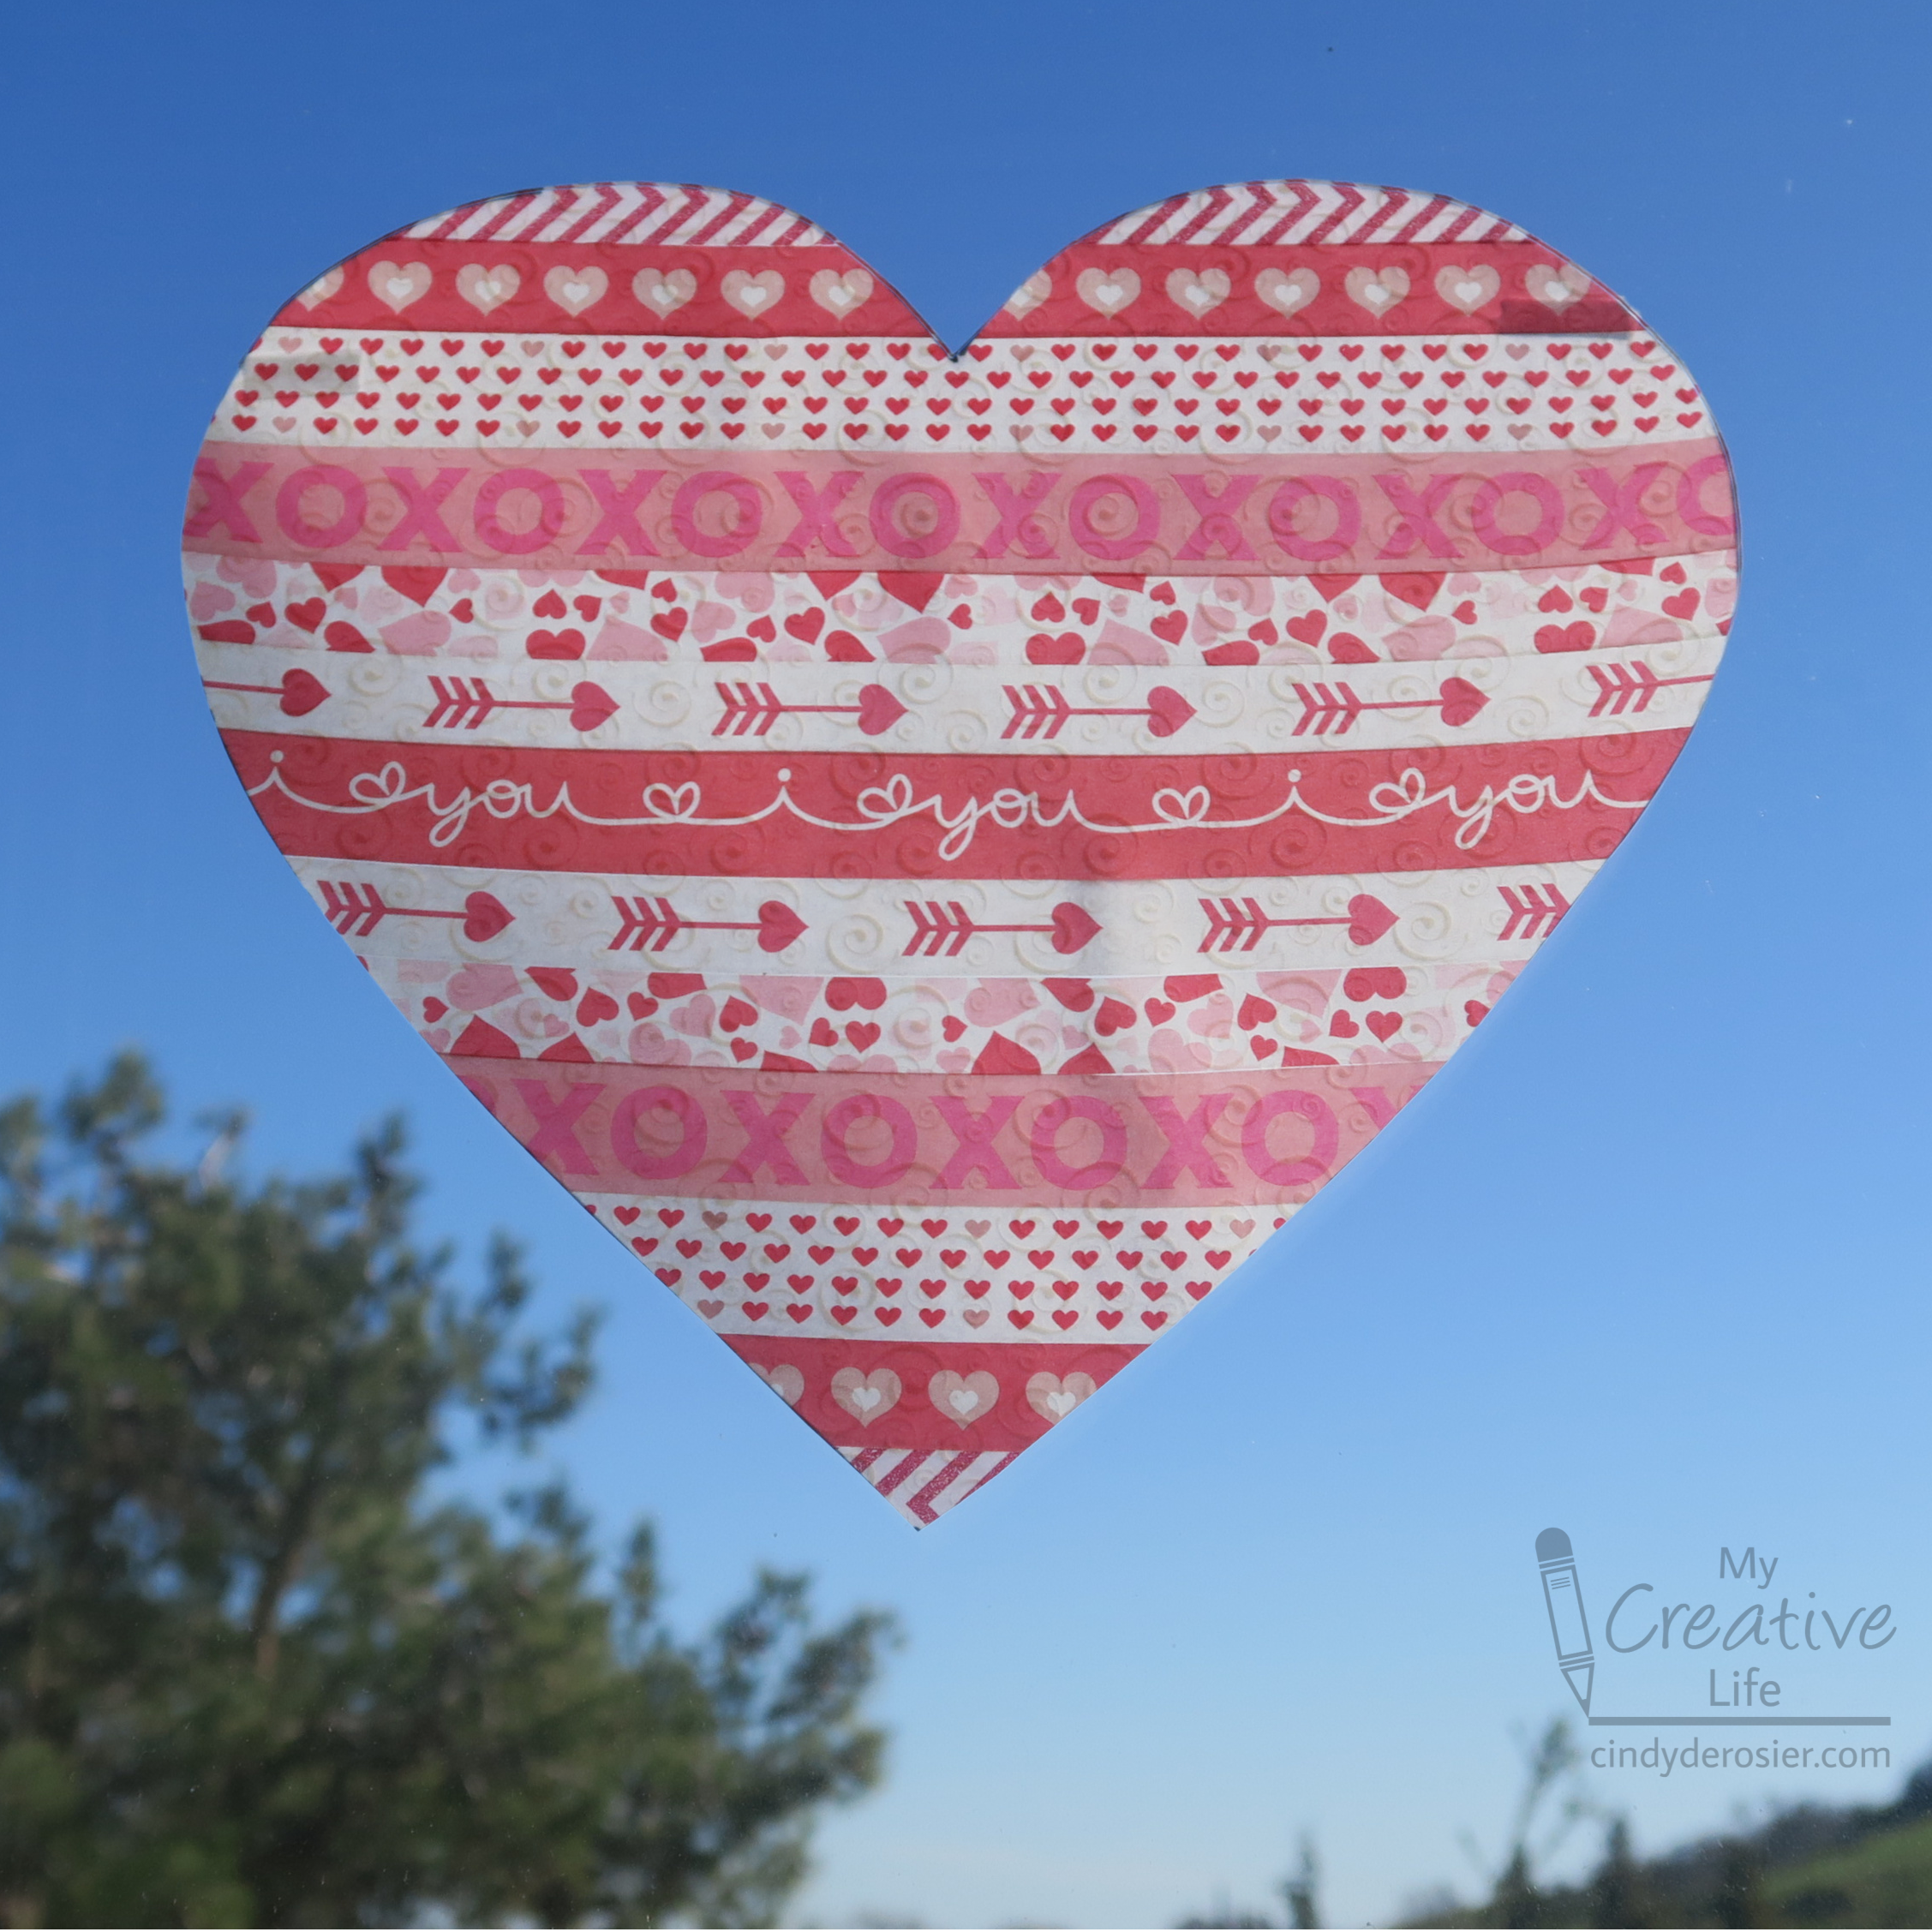
Washi Tape Valentine Heart Suncatcher

I made another project this week to add to my huge collection of Valentine's Day decorations. This is what it looks like on the wall...


... but it's intended as a suncatcher. Look how pretty it is in our bedroom window, against the bright blue sky. 


The whole project takes about 10 minutes and the end product is so pretty. Note that I used a 20+ year old scrap of patterned vellum, which is really hard to find. It's also hard to find the same washi tapes I used. Below, you'll find affiliate links to non-patterned vellum, different Valentine's Day washi tapes, and other products you'll need to make this.

---------


Washi Tape Valentine Heart Suncatcher


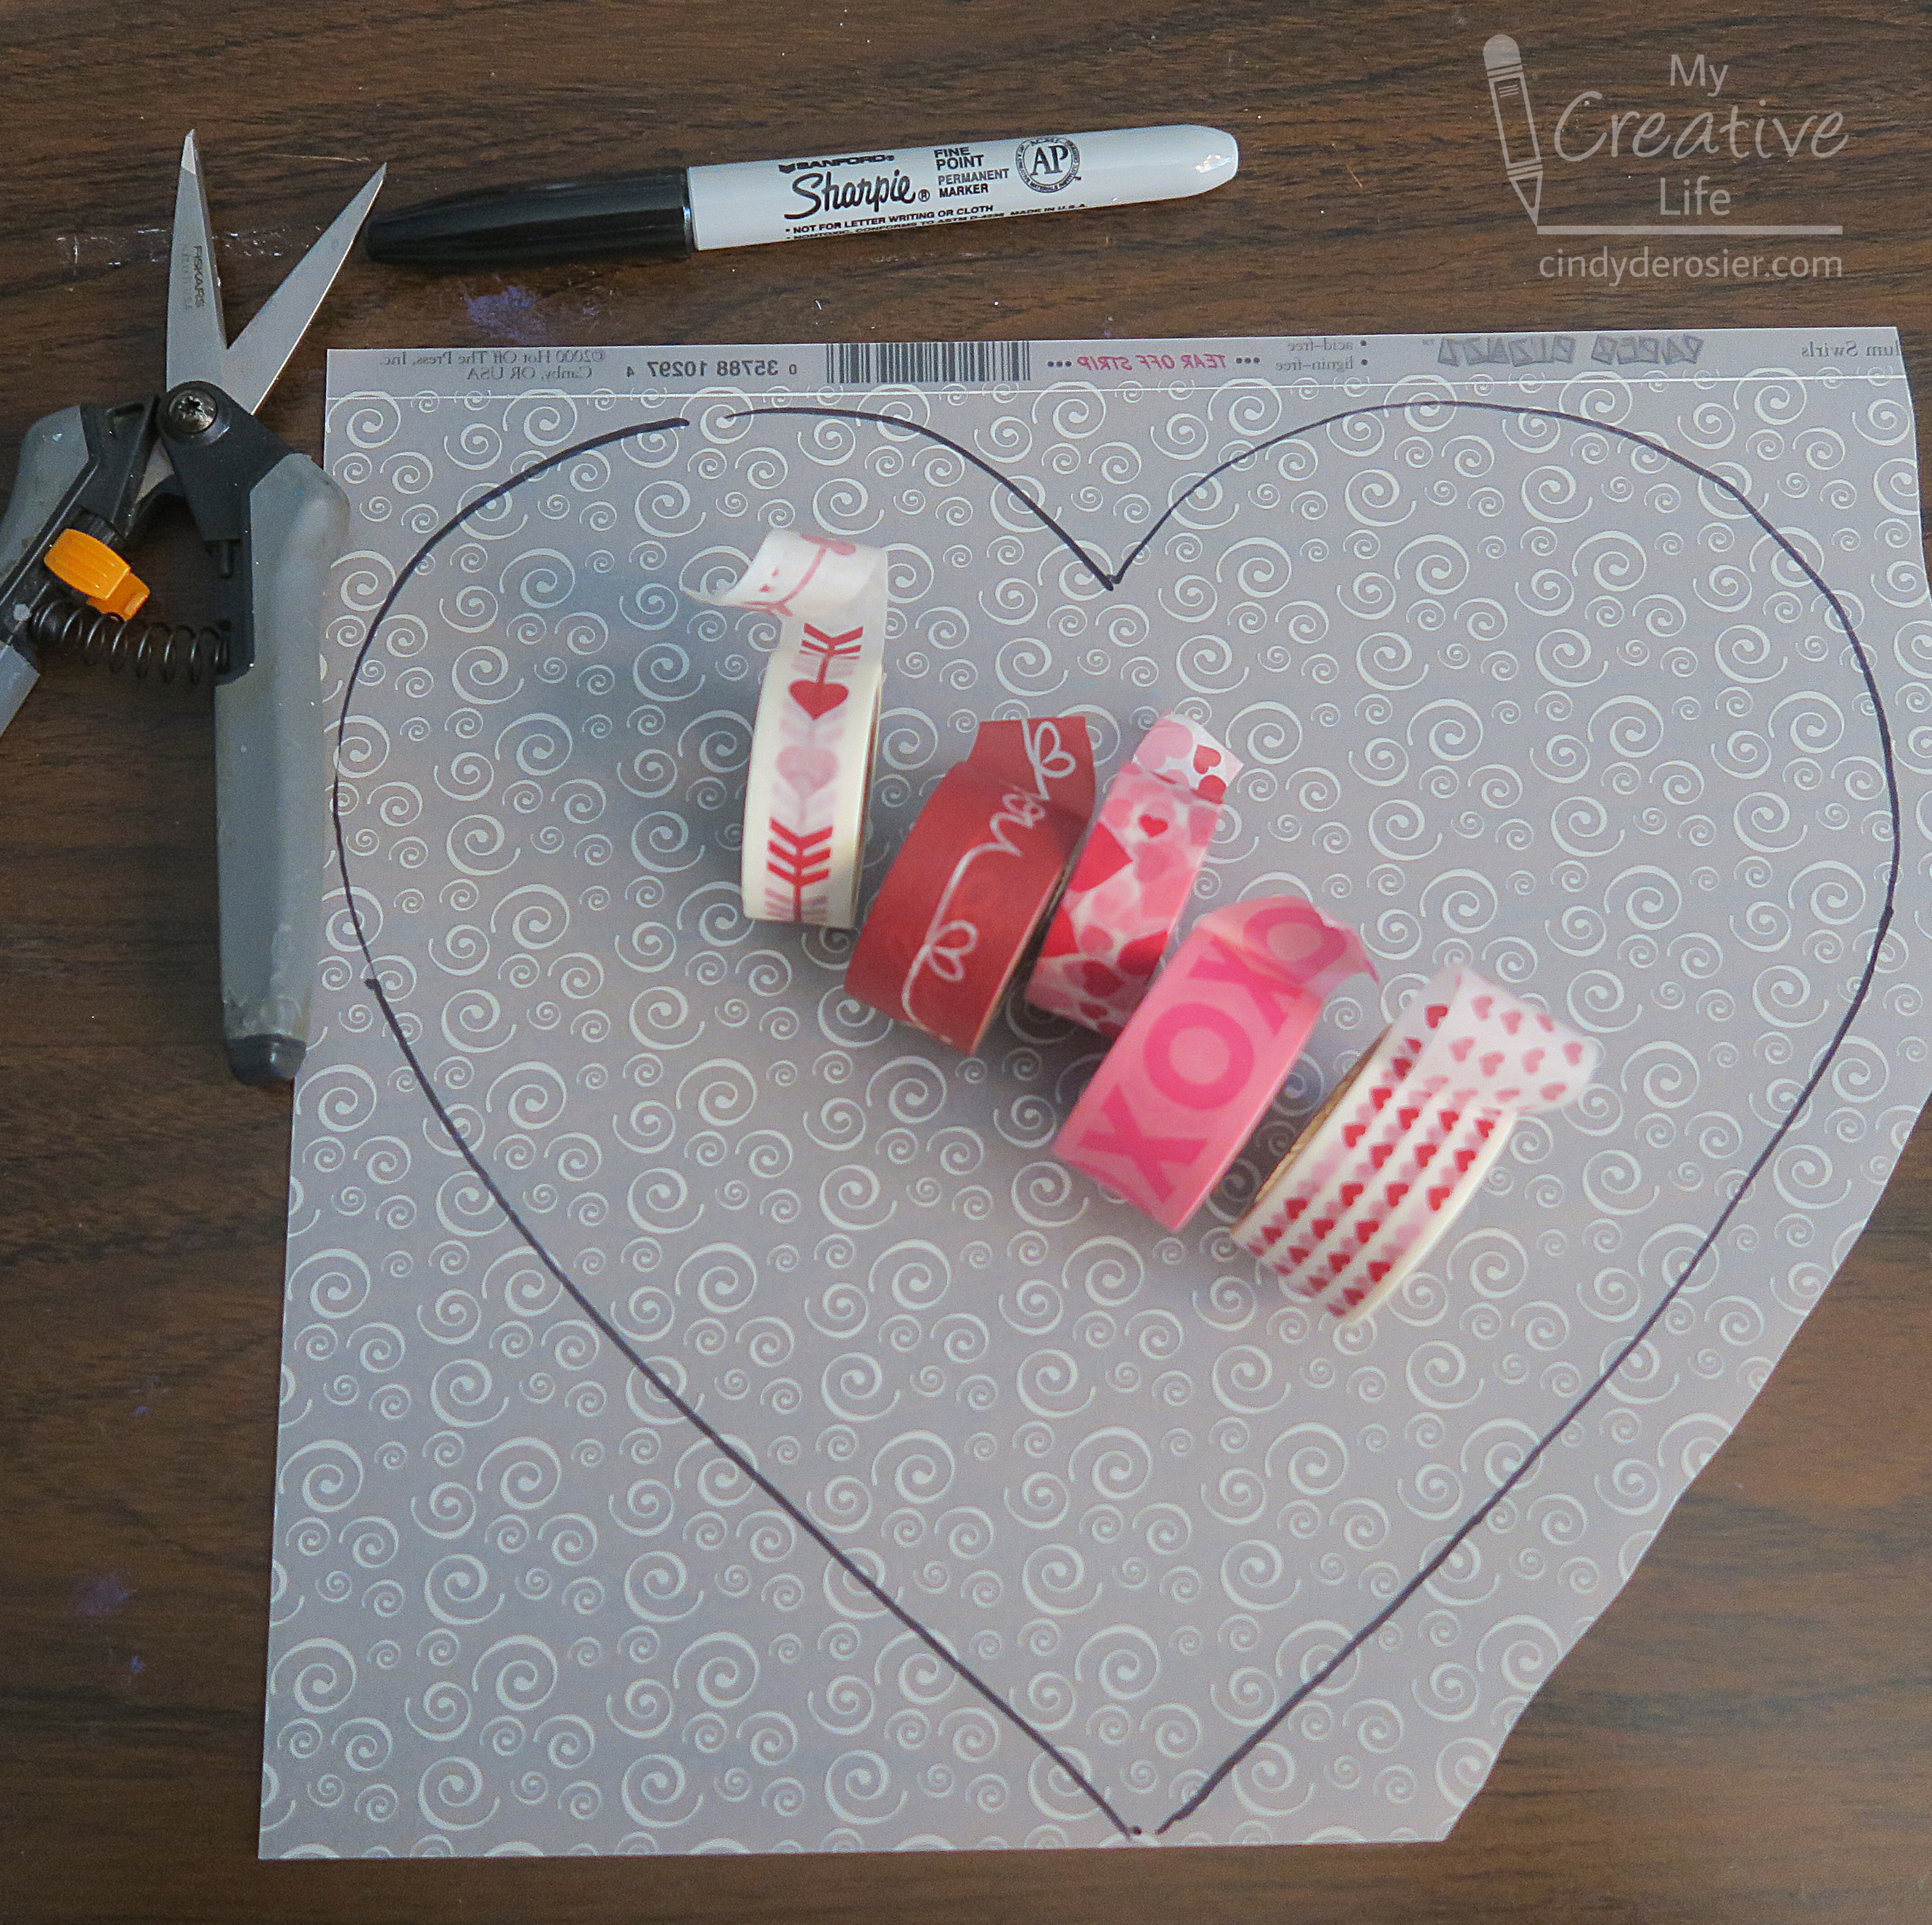
Materials: 


Steps: 


Make a heart pattern, then trace it onto the vellum with the Sharpie. 


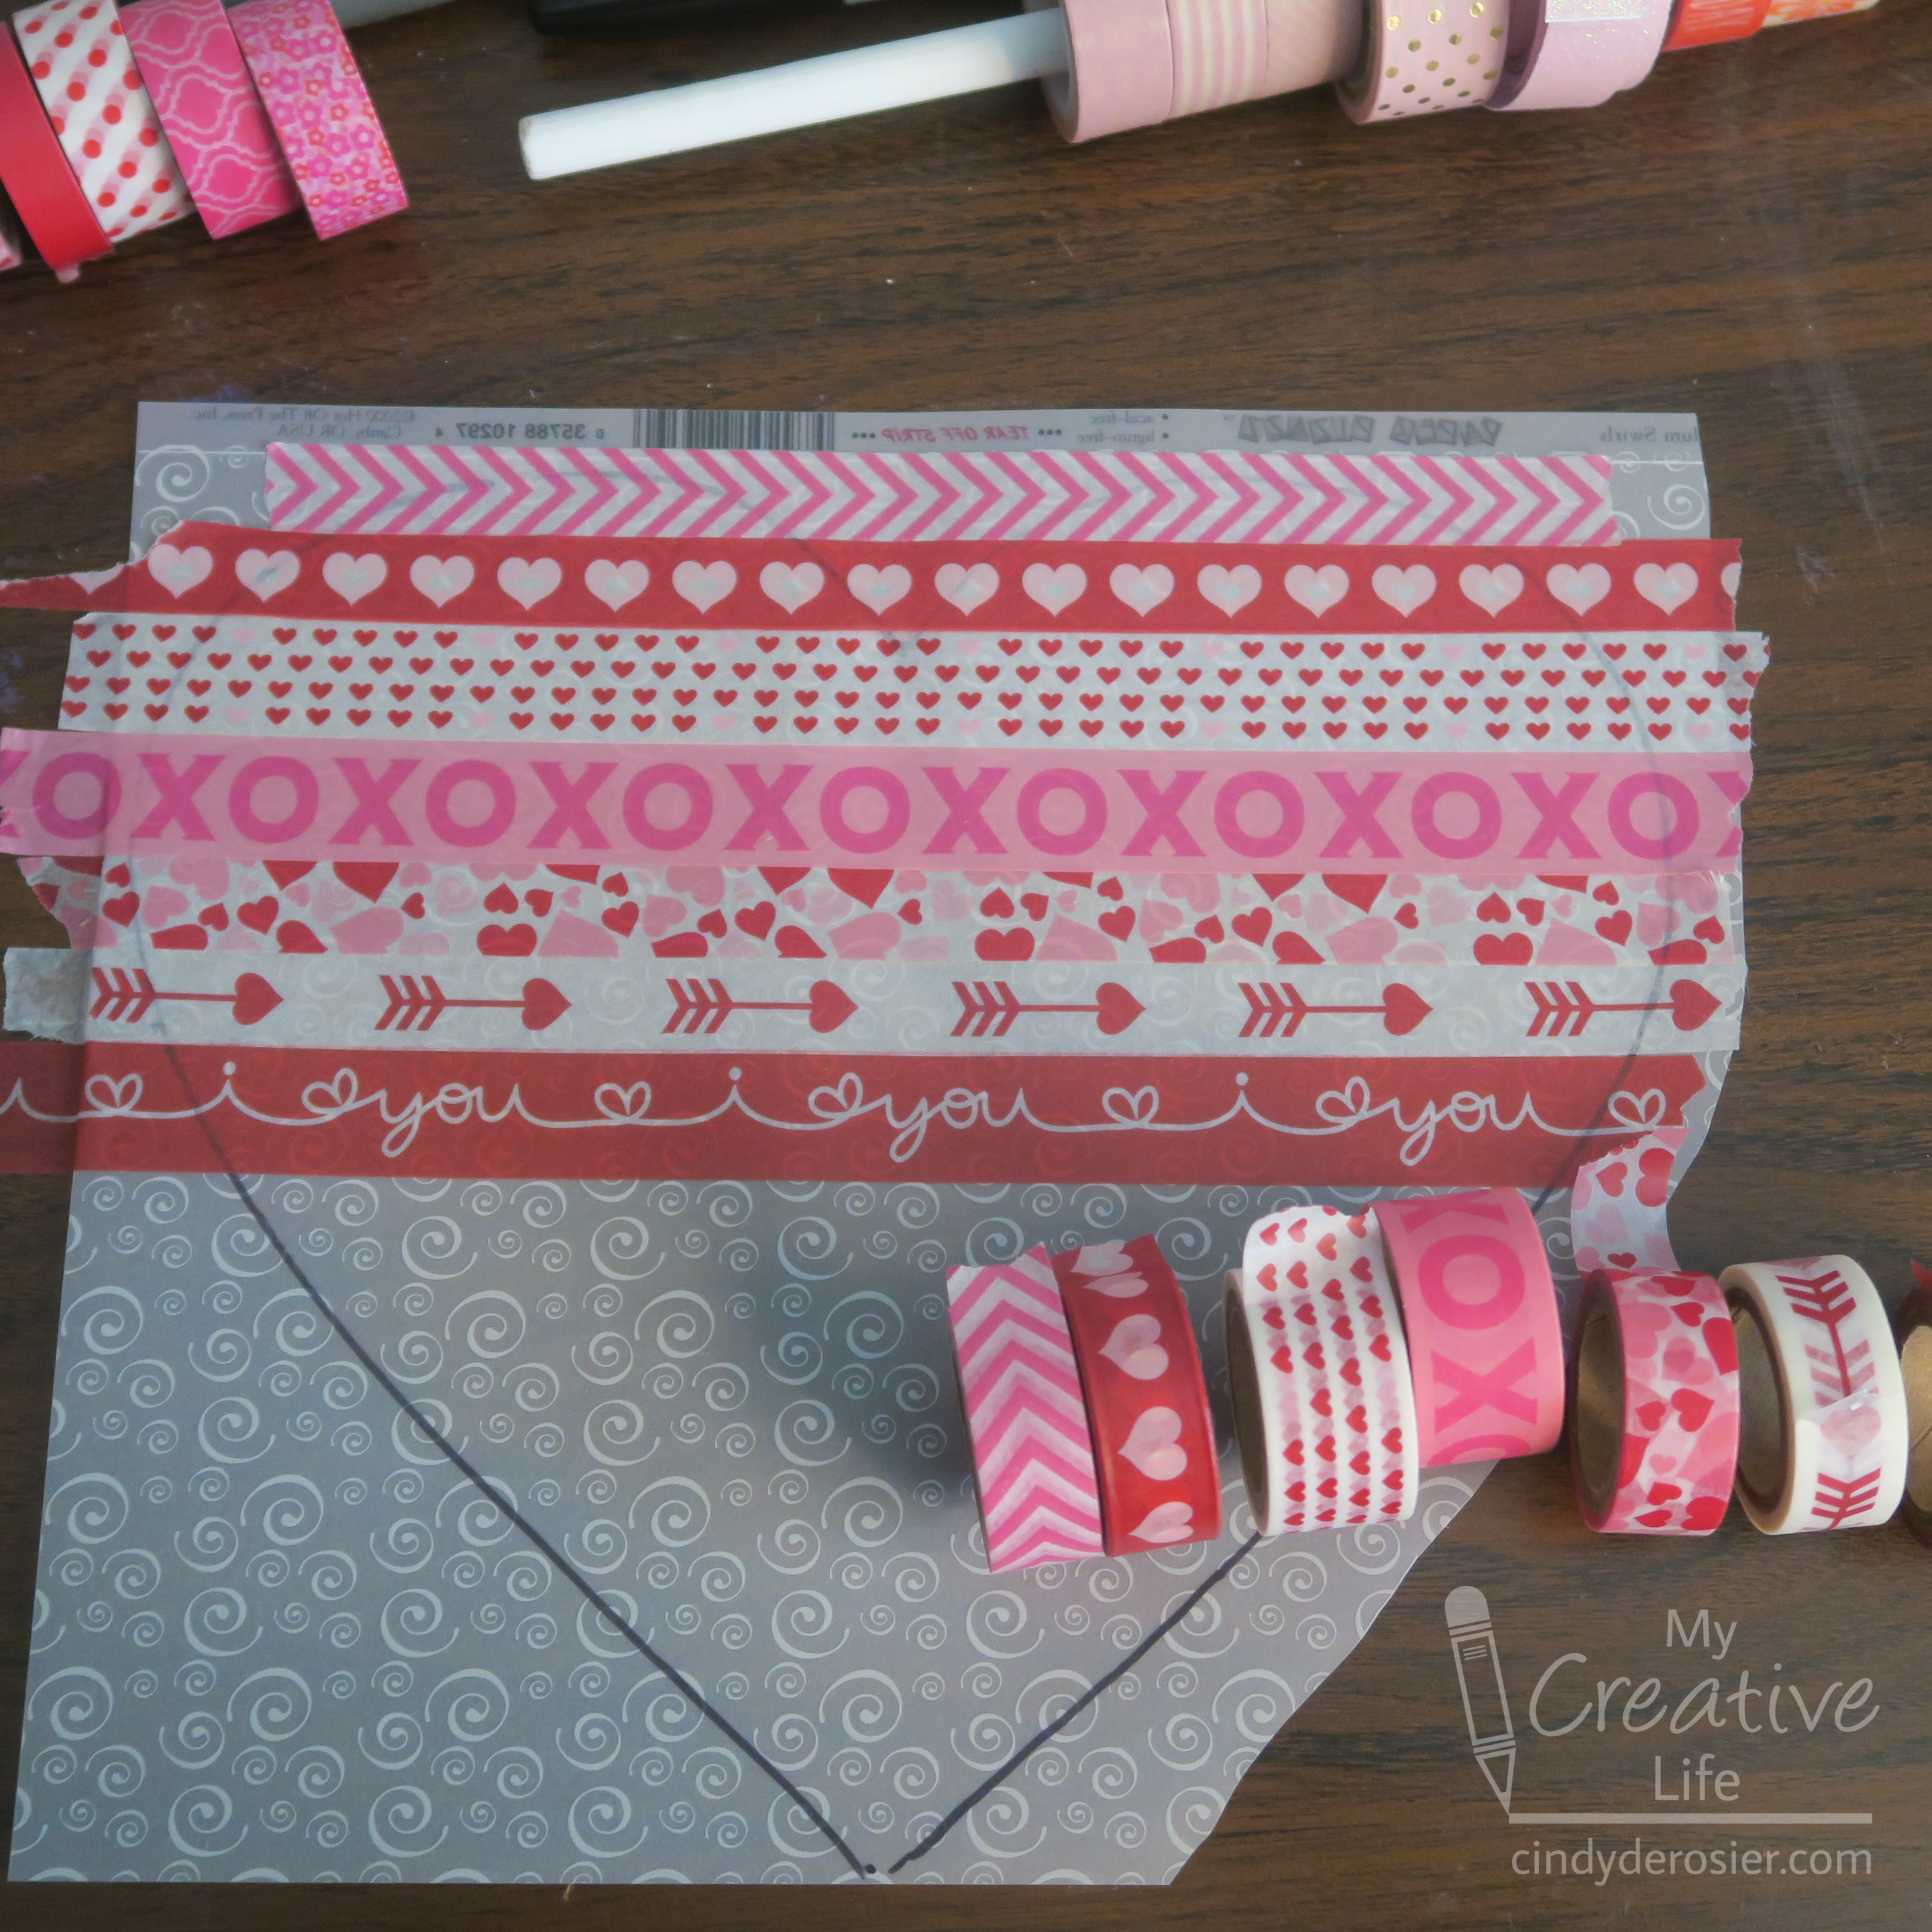
Arrange the washi tape in an order you like. Apply the first tape horizontally across the center of the heart (I started with the eye-catching "i ♡ you" tape), allowing the ends of the tape to hang over the edge of the outlined heart slightly. Add each tape above that one until you have filled the top portion of the heart. The size of your heart and the width of your washi will determine how many rows that is. 


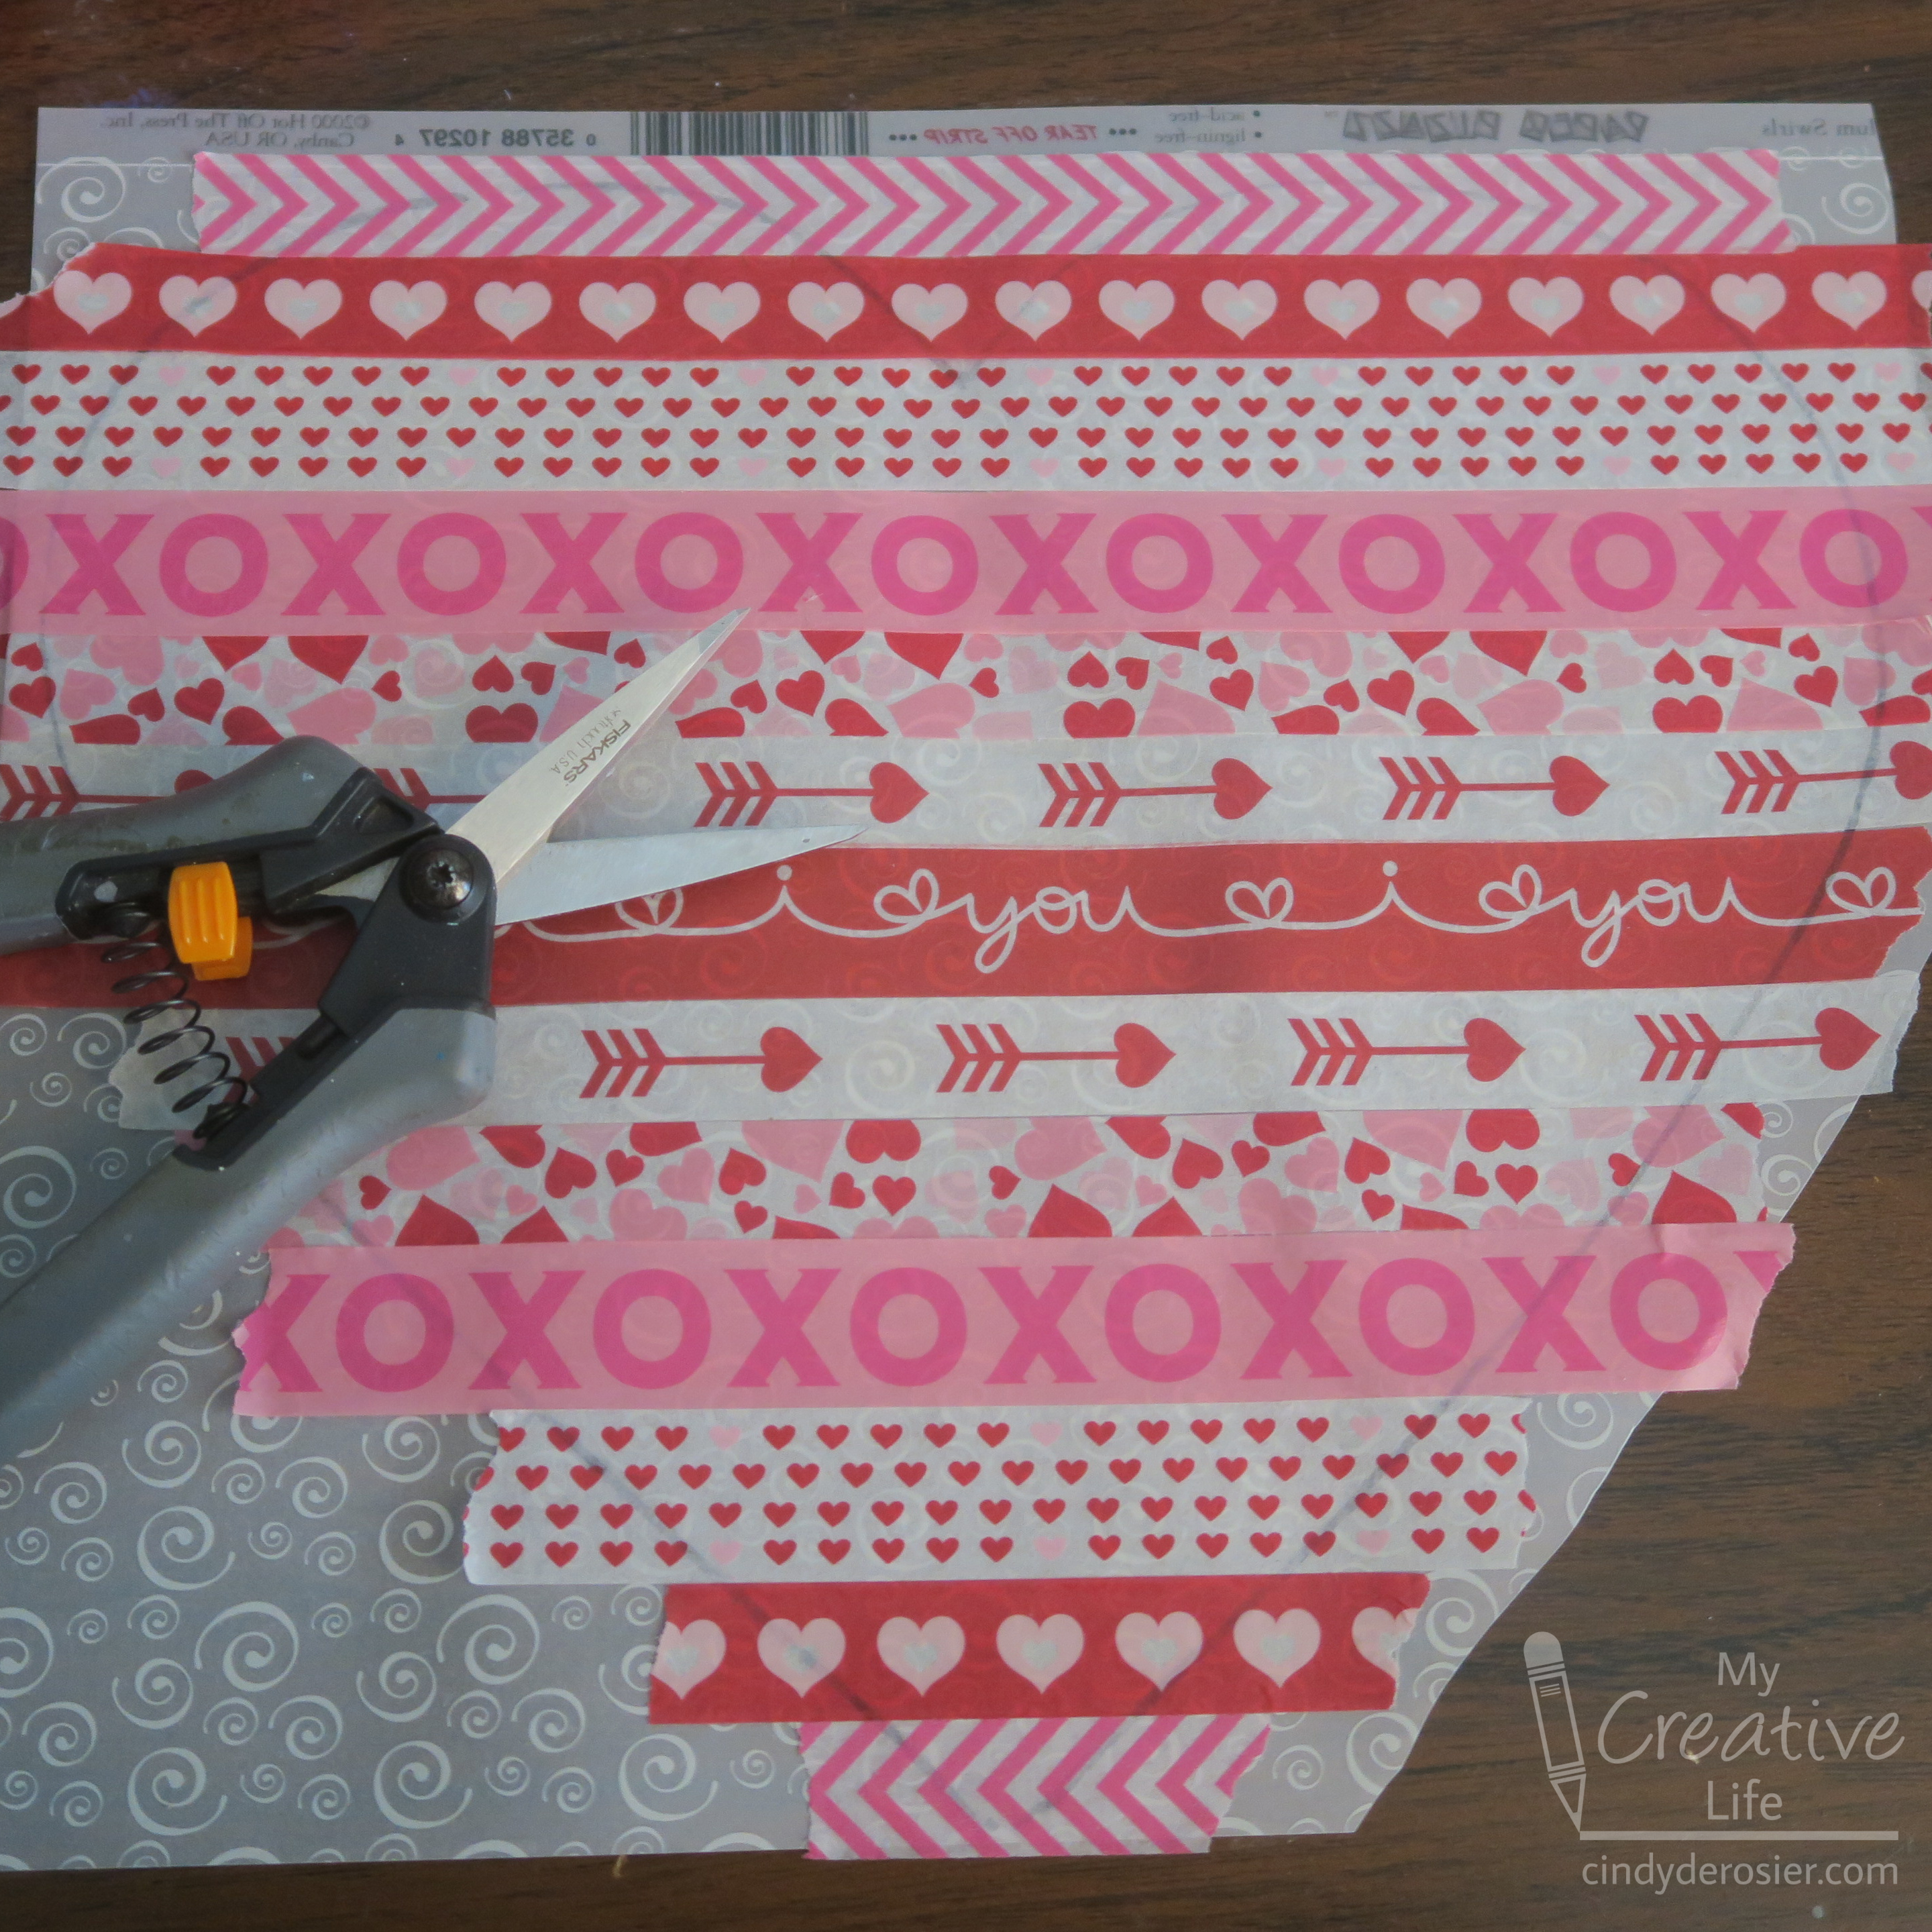
Keeping the tapes in the same order, fill in the bottom of the heart. You'll end up with the tapes mirrored across the 'equator' of the heart. Press all the tapes down firmly. 


The black Sharpie line will show through the washi. Cut just inside this line. Then tape your suncatcher to a window and enjoy!


Obviously, you can use this technique for any holiday or occasion. Just change the washi tape and the shape of the vellum. It's such a quick and easy project, one I'll definitely be doing again.