Showing posts with label Washington. Show all posts

9/2/26

Cherry Craft for Kids - Practicing Shadows and Highlights

The United States is the second-largest producer of cherries in the world (Turkiye is #1). We grow two main types: sweet cherries and tart cherries. The top cherry-producing states for sweet cherries are Washington, California, and Oregon (in that order). Michigan dominates tart cherry production; Traverse City is called The Cherry Capital of the World and home to the National Cherry Festival. Interestingly, only one state has named the cherry as its state fruit and it's not any of those four. It's Utah, which is the only state in the top 5 producers of both sweet and tart cherries. Cherry proponents in Michigan have attempted to name the cherry their state fruit, but the powerful blueberry lobby has thwarted their efforts. 

Today's project allows young creators to practice adding shadows and highlights to their artwork. It starts with a basic pair of cherries cut from cardstock and uses student-grade Crayola colored pencils. Affiliate links below. 


Cherry Craft: Practicing Shadows and Highlights


Materials:


Steps: 


Cut two cherries from red cardstock. Start with rounded shapes, then add a dimple on one side. Cut two skinny green stems and a green leaf. Finally, cut a tiny green square shape that connects the two stems. Glue everything to a piece of white cardstock. 


Find a reference photo of cherries and look closely at the shadows and highlights on them. Cherries are quite reflective, so you'll see shiny white highlights on them. Notice the shadows as well. Drawing in a tiny circular motion, use a white colored pencil to add the highlights to your cherries. Then use a grey pencil to add shadows, using the same circular motion. 

Don't forget the stems and the leaves! Draw veins on the leaf, then shade the lower half with grey and the upper half with white. Add a shadow to each stem. Finally, color the little rectangle brown. 


It only takes a few minutes to add so much dimension to your project. For additional practice, you can choose another reference image with the light source coming from a different direction and repeat this activity. Or, switch to a coloring an apple. Like cherries, apples are glossy and provide great practice for highlights and shadows. 

8/12/26

The City I Most Want to Visit in Each State, Part 10: Virginia to Wyoming

This is the tenth post in a series. I recommend reading the firstsecond, third, fourth, fifth, sixth, seventh, eighth, and ninth posts before this one. Today I'll be wrapping up this series by selecting the city in Virginia, Washington, West Virginia, Wisconsin, and Wyoming that I most want to visit, then listing my top 2 attractions in each location. 


---------


The City I Most Want to Visit in Each State, Part 10: Virginia to Wyoming


It should come as no surprise - the city I most want to visit in Virginia is the capital, Richmond. It's one of the five state capitals I haven't visited yet. There are a lot of things I want to see and do in Richmond, but my top priorities are the Virginia State Capitol and the Virginia Museum of History and Culture


Leavenworth is a Bavarian-inspired village in the Cascade Mountains of Washington and it is the city I'd most like to visit in the Evergreen State. It looks so charming and I'm a big fan of Bavarian food. The attractions I most want to see include the Leavenworth Nutcracker Museum and Blackbird Island


The city I'd most like to visit in West Virginia is Fayetteville. It's a very small town, with approximately 2800 people. The amount of infrastructure in such a small place is surprising, until you realize it's the gateway for our newest National Park. New River Gorge National Park is the primary place I'd like to visit. Since it's right there, I would enjoy a look at BSA's Summit Bechtel Reserve


Green Bay is the city I most want to visit in Wisconsin. It the oldest city in the state and is famous for being the smallest American city to have a major professional sports team. Green Bay is known as the Toilet Paper Capital of the World (!) and is where "splinter-free" (!!) toilet paper was invented. Sadly, there is no toilet paper related attraction in town; worse, the World's Largest Toilet Paper Roll is gone. When I visit Green Bay, I would most like to visit the Bay Beach Wildlife Sanctuary and the Green Bay Packers Hall of Fame and Museum


The city I'd most like to visit in Wyoming is Jackson. Located in the scenic valley of Jackson Hole, Jackson is the primary entry point for Grand Teton National Park, which is the attraction I most want to visit. My second priority would be the National Museum of Wildlife Art


-------


That wraps up the cities I most want to visit in each of the 50 states. This was such a fun project! It introduced me to some places I wasn't previously aware of and had me really studying maps, especially  for the states where I've traveled extensively already. Not every one of the 50 places I chose is a must-visit for me, but quite a few of them are. I look forward to sharing them with you in the future!

6/16/26

Perler Bead Lighthouse

My latest internet rabbit hole led me to lighthouses. I learned that there are 750+ standing lighthouses in the US, of which approximately 450 work. All are fully automated. There are lighthouses in 31 states; Michigan has the most by far. There is some debate about how to define what exactly a lighthouse is, but most experts agree that Michigan has around 129. Maine and New York each have around 65, followed by Massachusetts (52), California (45), Wisconsin (43), Washington (30), Florida (30), North Carolina (29), and Ohio (26). 

The vast majority of lighthouses are white for easy visibility. Some have colored patterns (usually black, red, or unpainted brick) called "daymarks" that provide a contrast with the sky and water for easy identification during daylight. Lighthouses come in a wide variety of shapes and styles. Rather than design a craft for one specific lighthouse, I decided to make a generic design that represents the hundreds of lighthouses in our country. Affiliate links below. 


Perler Bead Lighthouse


Materials:

Steps: 


Start by placing three black beads at the bottom center of the pegboard. Add five white beads on either side of the black beads. Repeat this same pattern for the next three rows up. Then add four rows of 13 white beads, then one row of 13 grey beads. 

Add two rows of 11 white beads centered over the grey row. Then make three rows with two white, two black, three white, two black, and two white. Add two more rows of 11 white beads, then 11 grey beads, then 11 black beads.

The next row up has 9 black beads. Then add three rows with one black, three yellow, one black, three yellow, and one black. The next row has 11 black beads. Add two rows of 7 black beads, then one row with 5 black beads, one row with 3 black beads, and a single black bead at the top. 


My pattern is easy to alter if you want to make a lighthouse that looks different. Just change out the colors to add daymarks, make it wider, make it taller (you'll need to use a second board), move the windows, etc. You can base your project on an existing lighthouse or design your own like I did!

2/3/26

The Best and the Worst of the 50 State Seals, Part 5

This is my last post rating the designs of each of the 50 state seals. I suggest starting with the first post, which gives the background and explains the criteria I'm using for grading. 


---------


Rating the State Seals: South Dakota through Wyoming


The state seal of South Dakota was designed before statehood, then modified in 1889 when it became the 40th state. It features scenes of agriculture (farmer, cattle), commerce (steamship), industry (smelting furnace), and natural resources (hills, river). The state motto and the year of statehood appear around the outside. This is an attractive seal. While there are some generic elements, I appreciate the details that make it unique. Question: I'm not a farmer; should he really be plowing furrows that are knee-deep?

Design: 4, Representation 3.5 = 7.5


Tennessee's state seal, most recently updated in 1987, takes a different approach to depicting agriculture and commerce than other states do: the words are literally written on the seal. Images of agriculture include a plow, wheat, and cotton. A riverboat represents commerce. Roman numerals XVI show that Tennessee is the 16th state, admitted to the Union in 1796. I don't like the addition of these words at all. It makes the seal look really crowded. And what is up with the tiny doghouse that is dwarfed by the plow and wheat? I'm assuming it's supposed to be a people house in the background. 

Design: 1.5, Representation 3 = 4.5


The state seal of Texas is two-sided and was updated in 1992. The front features a 5-pointed star in the center, representing the Lone Star State. An olive branch (peace) and a live oak branch (strength), tied together with a ribbon, surround the star. I like the simplicity and symbolism of this seal but it feels incomplete. Adding the date of statehood (1845) or the state motto (Friendship) to the empty portion at the bottom would make this design so much better, both aesthetically and in representing the state. 

Design: 3, Representation 2 = 5


Utah's state seal was adopted in 1896 and features a shield in the center. On it are a beehive (the state emblem), the word Industry (the state motto), sego lilies (the state flower), and 1847 (the year pioneers arrived in Utah). Behind the seal are the American eagle and US flags. The year 1896 is when Utah became a state. Ordinarily, I wouldn't be a fan of having national symbols on the state seal, but with Utah represented in so many ways on the center shield, I don't mind it. It's a very attractive design. The only thing I don't like are the dots on either side of the text. 

Design: 4.5, Representation 4.5 = 9


The state seal of Vermont was designed in 1788, replaced with a (better) design, and then reinstated in 1937. It includes a 14-branch pine tree (Vermont is the 14th state) rising from a forest of much smaller trees. Above the forest are several floating items: grain, a cow, and wavy lines (possibly representing the Connecticut River). Below the forest is more grain surrounding the state motto, Freedom and Unity, plus more wavy lines (possibly representing Lake Champlain). I'll say it - this design is hideous. There are so many things wrong with the design that if I listed them, I'd just end up with a list of everything on the seal. The only thing saving this seal from being the very worst is that it incorporates the state motto and 14 branches (and possibly the water boundaries) that are unique to Vermont. 

Design: 0.5, Representation 2.5 = 3


The state seal of Virginia was designed in 1776 and standardized in 1912. It is two-sided; I'm focusing on the front. It features Virtus standing on a man representing tyranny, whose crown has fallen off his head. She's holding a spear and a sword. The tyrant is holding a broken chain and a whip. The state motto (Thus Always to Tyrants) appears below the fallen tyrant. OK, I get it: this was designed immediately after the Declaration of Independence, when vanquishing the king was at the top of everyone's minds. But that was not unique to Virginia then and it certainly isn't now. Other than the state name, the state motto is the only thing that says Virginia. There is another problem with this design. 

Design 1.5, Representation 1 = 2.5


Washington's state seal, designed in the 1850's when Washington was still a territory then updated in 1889 with statehood, features a portrait of the state's namesake. This seal is distinctive, if boring. I wish the natural beauty of the Evergreen State was featured as well (or instead). 

Design 2, Representation 2 = 4


The state seal of West Virginina was adopted in 1863, when it became a state. It features a boulder with the statehood date. Two men, representing agriculture and industry, lean against the boulder. In front are crossed rifles and a liberty cap. The state motto ("Liberty out of Fidelity") appears at the bottom. Two thoughts: The miner looks like a skeleton. There are periods after State of West Virginia and Montani Semper Liberi. Why? 

Design: 2, Representation 2.5 = 4.5


Wisconsin's state seal was redesigned most recently in 1881. It features a shield with a plow (agriculture), pick and shovel (mining), arm and hammer (manufacturing), an anchor (navigation), and the US Coat of Arms. Above there is a badger, the state animal, and the state motto. Below, a cornucopia (abundance) and 13 lead bars (mineral wealth and the 13 original colonies). There are 13 stars below that. (Wisconsin is the 30th state.) I love that there is a badger and the state motto on this seal. Other than that, meh. 

Design 2.5, Representation 2.5 = 5


The state seal of Wyoming was revised in 1921. It features a statue in the center with the banner "Equal Rights" as Wyoming was the first to give women the right to vote (in 1869, while still a territory). Other banners highlight livestock, mines, grain, and oil, four of Wyoming's major industries. A rancher and miner stand on either side of the statue. At the base is an eagle and a star with 44 printed on it, as Wyoming was the 44th state. The two dates represent the organization of the territorial government (1869) and statehood (1890). This is a very nice seal. It's aesthetically pleasing and does a good job of representing Wyoming's history. 

Design 4, Representation 4 = 8


---------


Here are the results! For the states that are tied, I've listed them alphabetically. 

1st (tie): Arizona, Minnesota
3rd: California
5th (tie): Ohio, Utah
6th: Kansas
10th (tie): Alaska, Idaho, Montana, Wyoming
16th (tie): Delaware, Hawaii, Nevada, Oklahoma, Oregon, South Dakota
19th (tie): Colorado, Nebraska, North Carolina
24th (tie): Florida, New Hampshire, Missouri, New York, South Carolina
27th (tie): Maine, Maryland, North Dakota
31st (tie): Iowa, Michigan, New Mexico, Rhode Island
35th (tie): New Jersey, Pennsylvania, Texas, Wisconsin
37th (tie): Tennessee, West Virginia
41st (tie): Kentucky, Louisiana, Indiana, Washington
45th (tie): Alabama, Georgia, Massachusetts, Vermont
47th (tie): Illinois, Virginia
48th: Mississippi
49th: Arkansas
50th: Connecticut


This was a fun (if incredibly time-consuming) exercise. I'd love to hear your thoughts. Let me know if you agree with my rankings or if yours are completely different!

4/30/25

The Best Tour in Every State, Part 5

This is the fifth and final part in my series about the best tour I've taken in every state. I recommend reading the first post (Alabama through Georgia), second post (Hawaii through Maryland), third post (Massachusetts through New Jersey), and fourth post (New Mexico through South Carolina) before this one. 


-------


South Dakota


We have taken a number of excellent tours in South Dakota, but there's no question which is the best: the Buffalo Safari Jeep Tour at Custer State Park. My only complaint about the tour is that they should call it the Bison Safari Jeep Tour. During the two-hour tour, we saw many bison, pronghorns, and prairie dogs. We learned so much about the native plants and animals of the area. I'd happily take this tour again and again. 


Tennessee


The best tour I've taken in Tennessee is Old Town Trolley Tours in Nashville. This hop-on-hop-off style tour took us to the most popular locations in the city, including the Ryman Auditorium, Marathon Motor Works, Centennial Park (home of the Parthenon), the Belmont Mansion, Music Row, and the Frist Art Museum. Our guide was outstanding. 


Texas


The best tour we've taken in Texas is the Lone Star Riverboat Sunset Cruise in Austin. The tour begins with a narrated scenic cruise during the daylight, then the captain positions the boat by the Congress Avenue Bridge in time for the bat flyout. 


Utah


I've taken many great tours in Utah, but my favorite has to be the Great Salt Lake Tour. The narrated tour took us through downtown and past a lot of interesting sites on the way to the Great Salt Lake. There, we caught live sea monkeys and then had the chance to swim in the lake (we waded). Our guide was excellent and we learned so much!


Vermont


Oh how I agonized over this one! Ben & Jerry's Factory Tour or Rock of Ages Quarry Tour?! I went back and forth a dozen times. They're both so good! But I'm going with the Rock of Ages Quarry Tour. I learned so much during the tour. The smaller size and more relaxed pace (relative to the larger group and strict timeline at Ben & Jerry's) made for a really enjoyable experience. Don't miss either tour when you're in Vermont. 


Virginia


The best tour I've taken in Virginia was a ranger-led tour of Yorktown Battlefield. That was part of the April 2000 trip I took with my fellow 5th grade teachers and our students. We all learned so much about this important site from colonial times and the American Revolution. 


Washington


The best tour I've taken in Washington is one of the most unique tours I've taken anywhere. It's called Beneath the Streets and that's literally what it is: a tour of what's beneath the streets of Seattle. It was so interesting to learn the history of a place that not a lot of people know about and even fewer see. 


West Virginia


I haven't actually taken any tours in West Virginia, so I can't pick the best one. However, I can highly recommend the outstanding West Virginia State Museum


Wisconsin


The best tour we've taken in Wisconsin was the Milwaukee City Tour by Untapped Tours. Most tours are either driving or walking, but this was both. I loved that, as we were able to visit places that were far apart, but still get an up-close view of them. It was a fantastic tour. 


Wyoming


I've only taken a single tour in Wyoming (so far!), so I'm calling Cheyenne Street Railway Trolley the best tour in Wyoming. We really enjoyed our trolley ride and learned a lot about the fascinating city of Cheyenne. 


That wraps up my version of the Best Tour in Every State! If you have any tours to recommend, please let me know in the comments. 

11/26/24

State Bird Window Clings Using Gallery Glass (American Goldfinch and Northern Mockingbird)

After making diamond art ornaments featuring two of the state birds, I thought it would be fun to use a different medium to make another pair of state birds. These window clings of the American goldfinch and Northern mockingbird are made from Gallery Glass. They're currently on the window in my craft room - that's our neighbor's tree you're seeing through my window. Aren't they cute? Affiliate links below. 


Gallery Glass - Bird Window Clings


Materials: 


Steps: 


Draw a simple bird shape onto a piece of scratch paper, then position it under the workmat. Use the black leading to outline the shape. Let the leading dry completely (overnight is best). 

Use the paint to flood each section, much like you would when decorating a cookie with royal icing. I used a skewer to create a variegated color in both tails and the mockingbird's wing, but it dried a solid color so don't bother with that. 


Let the paint dry completely, again overnight. When it is dry, carefully peel the birds off of the workmat. Now you have a window cling that that will stay on the window until you peel it off. 

Here's a closer look at each bird. The mockingbird is the state bird of Arkansas, Florida, Mississippi, Tennessee, and Texas. 


The goldfinch is the state bird of Iowa, New Jersey, and Washington. 


It would be easy to adapt this project to make literally any bird. Give it a try!

11/22/24

50 State Quarters: Coloring Pages Using Ohuhu's New Pupe

I was trying to decide what art material to use for my next batch of 50 State Quarter coloring pages when I got an email from the folks at Ohuhu asking if I'd like to review their latest markers. Would I?! Yes! I absolutely love everything that Ohuhu makes. Just read my reviews of the Ohuhu Honolulu and Ohuhu Kaala alcohol markers and you'll see! Affiliate links below.  

Ohuhu's latest set, called Pupe, includes 60 water-based markers. But these are not ordinary water-based markers. They are specifically designed to be paper-friendly, meaning they won't scratch or peel the surface of your paper, even if you color over the same spot repeatedly. This is a total game-changer!


The Pupe markers are double-sided, with a brush tip and a 0.4 mm fineliner tip. They're non-toxic, acid-free, and fade-resistant. They come in a handy carrying case. And best of all, they are extremely inexpensive. But how is the quality? Fantastic! The ink goes down beautifully and my paper held up to 3-4 layers with no issues. Both tips are comfortable and easy to use. The colors are vibrant. If I have any complaint at all, it's that I wanted a paler grey for shading. I'd happily trade one of the oranges or reds for another grey or a light tan. But other than that, I absolutely love the Pupes. Here are the pages I colored: 


I know I said I wasn't going to announce my favorite art materials until after I've done all 50 State Quarters, but I will say that the Ohuhu's Pupe set is near the top. Here are all of the materials I've used previously:

A big thanks to Ohuhu for letting me test out the Pupe set. I'll be back to them soon, but for now I need to set them aside, find a different art material, and start on my next batch of State Quarter coloring pages.

5/13/24

Decoupaged State Flag Heart Magnets

I still have a lot more National Scrapbook Day projects to share, but I wanted to show you a Mod Podge project first. Mod Podge is celebrating its 57th birthday this Friday, May 17. The Plaid Ambassadors are celebrating by using our favorite varieties of Mod Podge on a craft. I used Mod Podge Ultra (affiliate link here and throughout the post) to make state flag heart magnets for Washington, Virginia, Massachusetts, and Nebraska. Each of these states' flags features a design that would be way too difficult to paint like I did with the previous batch of flag magnets. Mod Podge to the rescue!


Decoupaged State Flag Heart Magnets


Materials: 


Steps: 


Follow the instructions to make salt dough hearts. When they are completely dry, paint them to match the background color of the flag. If the flag you want to make has a white background (like Massachusetts does), be sure to paint it too, even though the salt dough is white. 

To make the images that you'll be decoupaging onto the hearts, find an image of the flag you're making and copy it. Shrink it to the desired size, then print and cut. 


When the paint is completely dry, protect your work surface (I used newspapers and a box I use for spraying). Place each heart onto a plastic lid or small container so that it is raised off the bottom surface. Follow the directions on the bottle to shake the Mod Podge and spray it onto the hearts. 

Place each cut-out onto the heart while the Mod Podge is still wet. Let it dry, then add another coat over the top. Add an extra coat when that one is dry. 


When the Mod Podge is completely dry, turn over each heart and add a strip of magnet tape. Now your magnets are ready to hang on the fridge. 

9/25/23

Paper Plate Apples with Peekaboo Seeds

 Tis the season for apple crafts! 


Paper plate make great apples and they're even more fun when they're hiding a surprise inside! Those are real apple seeds, arranged just the way they were in the apple they came from. Affiliate links below. 


Paper Plate Apples with Peekaboo Seeds


Materials:


Steps:

Carefully cut an apple in half horizontally and observe the star pattern that the seeds make. Remove the seeds. Rinse them and set them aside to dry. 

Choose the color(s) for the apple(s) you're making. I made a solid red, a solid green, and a solid yellow, but you can mix colors to mimic different varietals. You can see examples of that with this apple craft, which uses the same tissue paper technique. 

Tear the tissue paper into strips. Use a paintbrush to moisten the back of a paper plate (the non-eating side) with a little bit of undiluted Sta-Flo, then place a piece of tissue paper on it. Paint over the top with more starch. Repeat until the back of the plate is covered. Set it aside to dry. Glue the apple seeds to the front (eating side) of a second paper plate. 

When everything is dry, carefully trim off any excess tissue paper from the apple and then cut it in half. Arrange those pieces on top of the plate with the seeds. Use a craft pick (adults only!) to poke a hole through the bottom of each side of the apple, then use a brad to attach each piece.  


Cut apple stems from brown cardstock and glue them to the back of the apple. Fold a piece of green cardstock in half, then cut an arched shape (rainbow, hilltop, etc) along the fold. Open it up and glue the leaf to the back of the apple. 

Pair this craft with fun and educational children's books about apples!

4/14/23

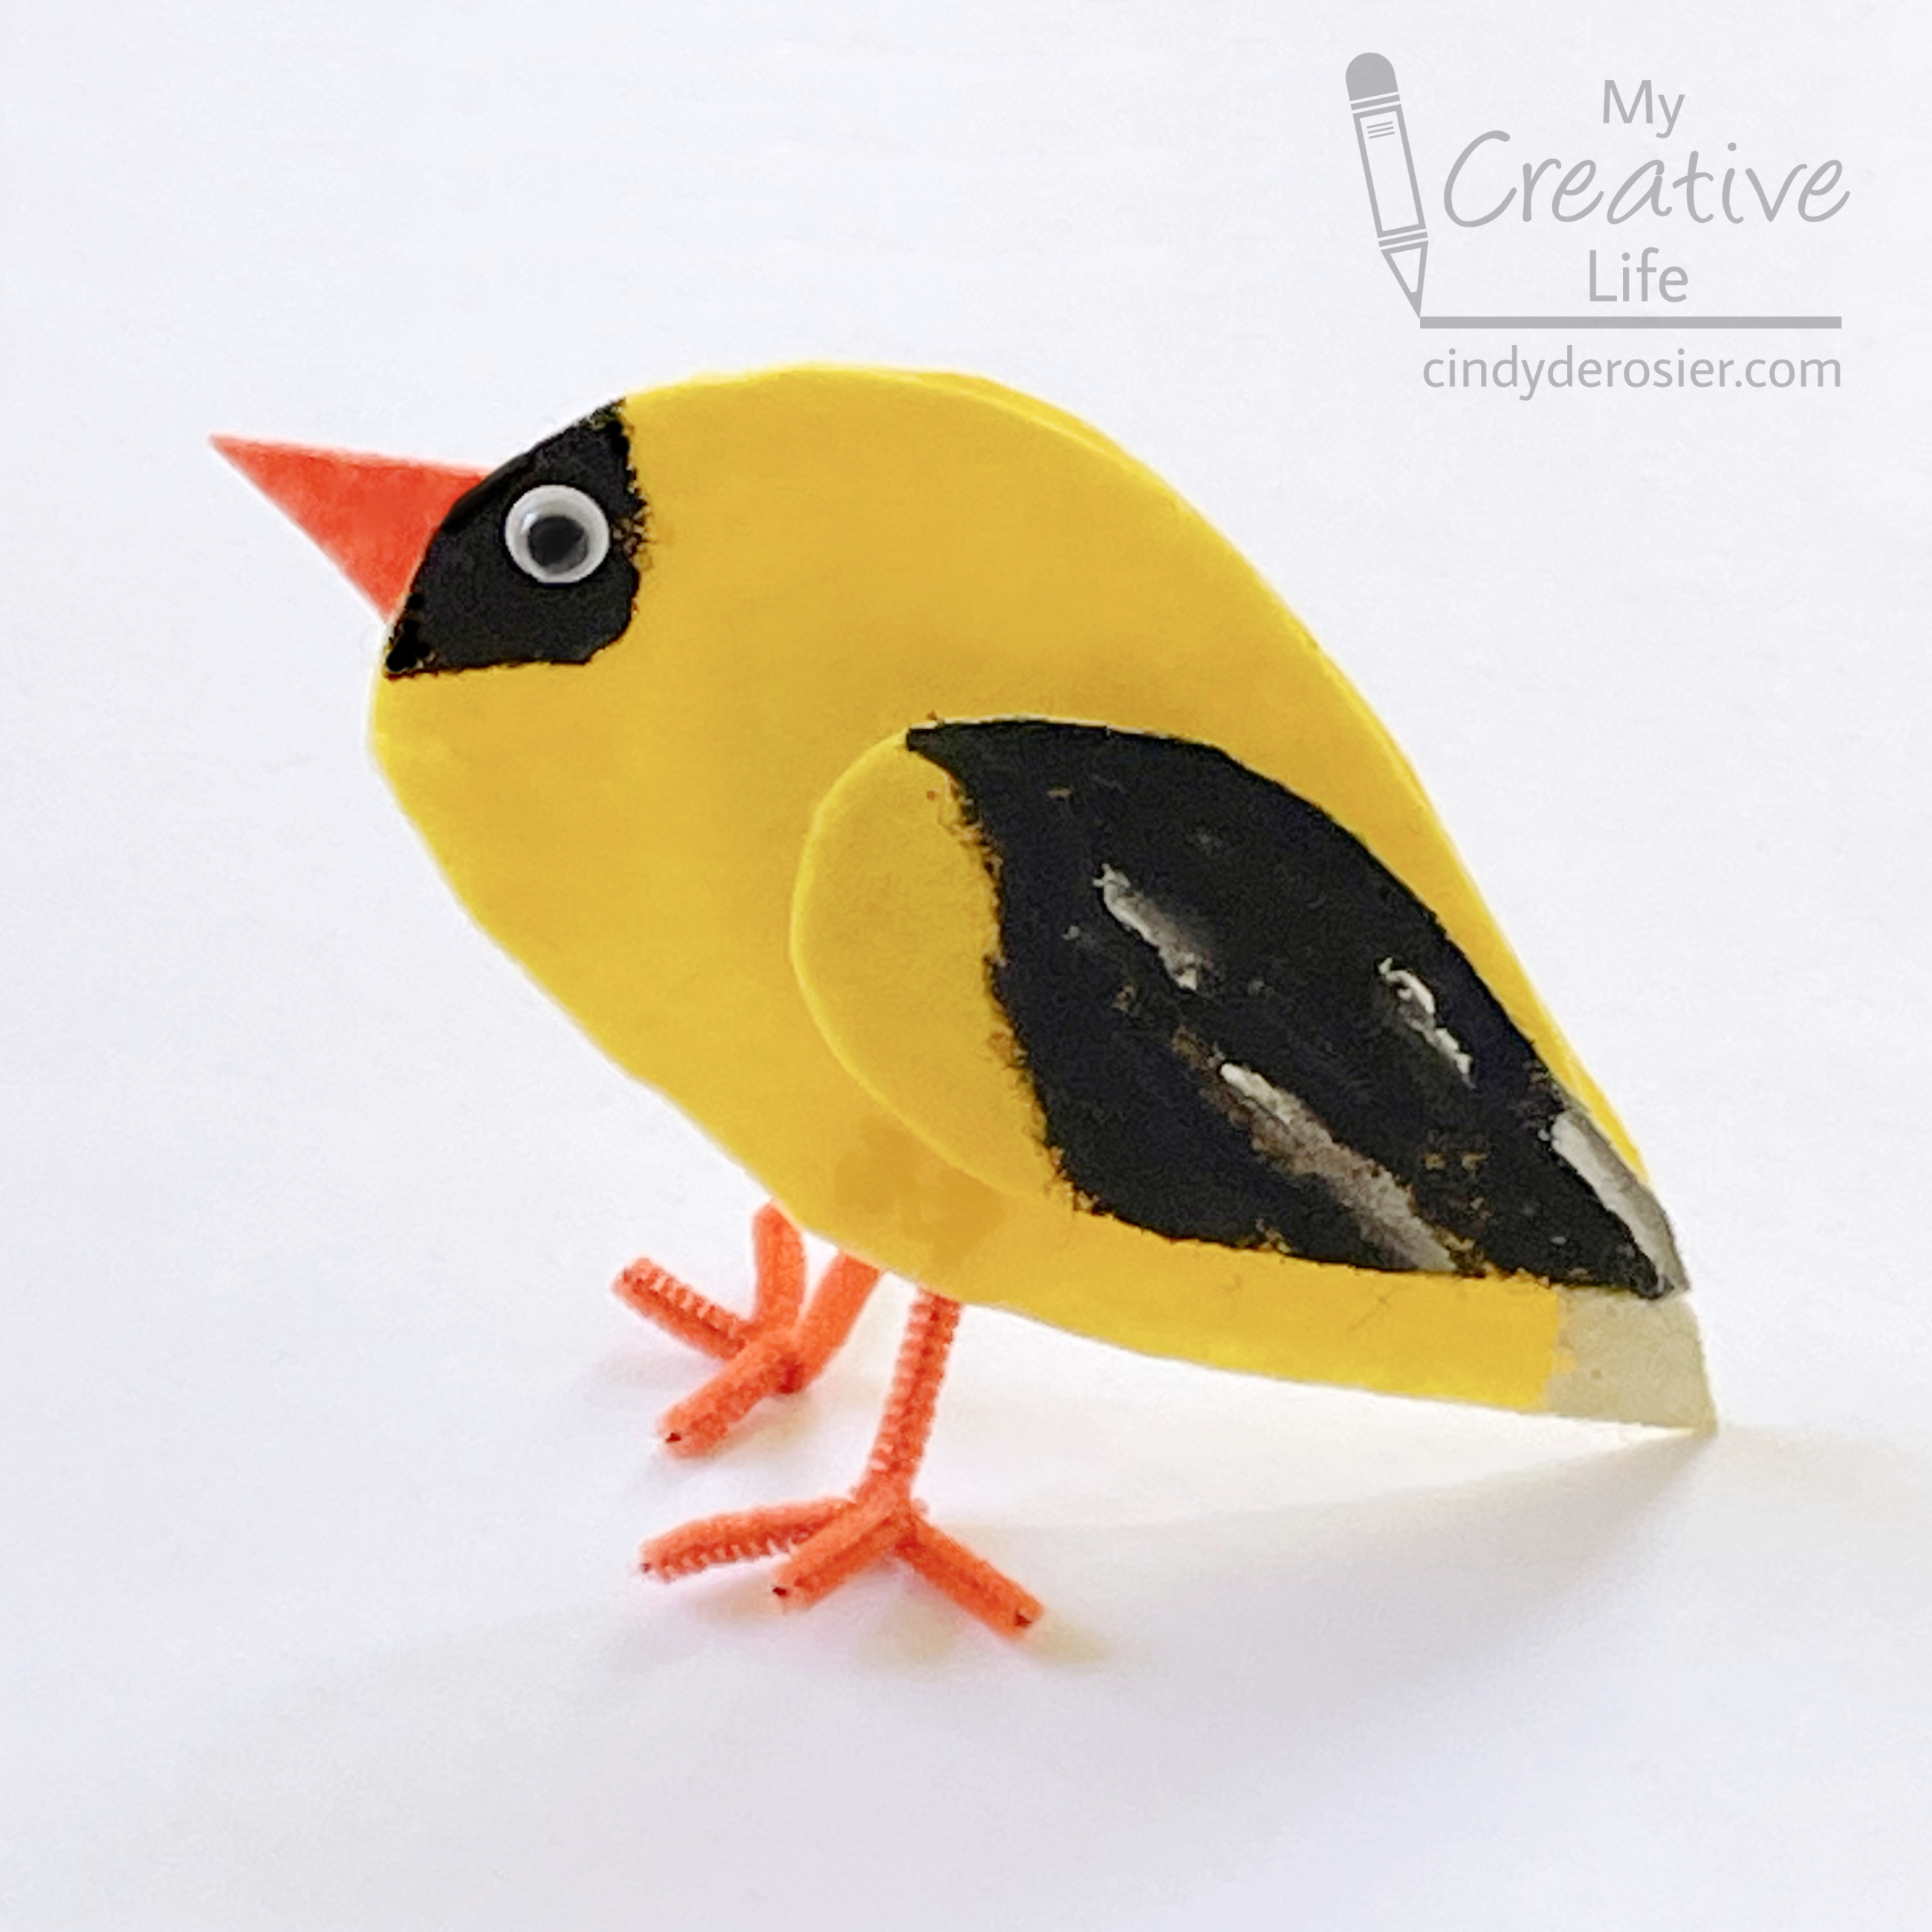
Felt American Goldfinch

My mom is very knowledgable about backyard birds. Despite years of her telling me the names of the various birds at the feeders (both at our home in California and when we visited relatives in Washington), one of the very few I was able to recognize as a kid was the American Goldfinch. Its distinctive yellow body with black forehead and wings stood out from the other various finches and whatnot that congregated at the feeders and birdbath. The goldfinch is the state bird of Iowa, New Jersey and Washington; I'd done my 5th grade State Report on Washington and had to draw a goldfinch for my report, so that helped cement it in my mind. All these years later and I'm still not much better at identifying backyard birds, but I can always spot a goldfinch. 

This felt version stands on its own and is fun project for kids to try. Obviously, you can adapt it for practically any similarly-shaped bird. Affiliate links below. 


Felt American Goldfinch 


Materials: 


Steps: 


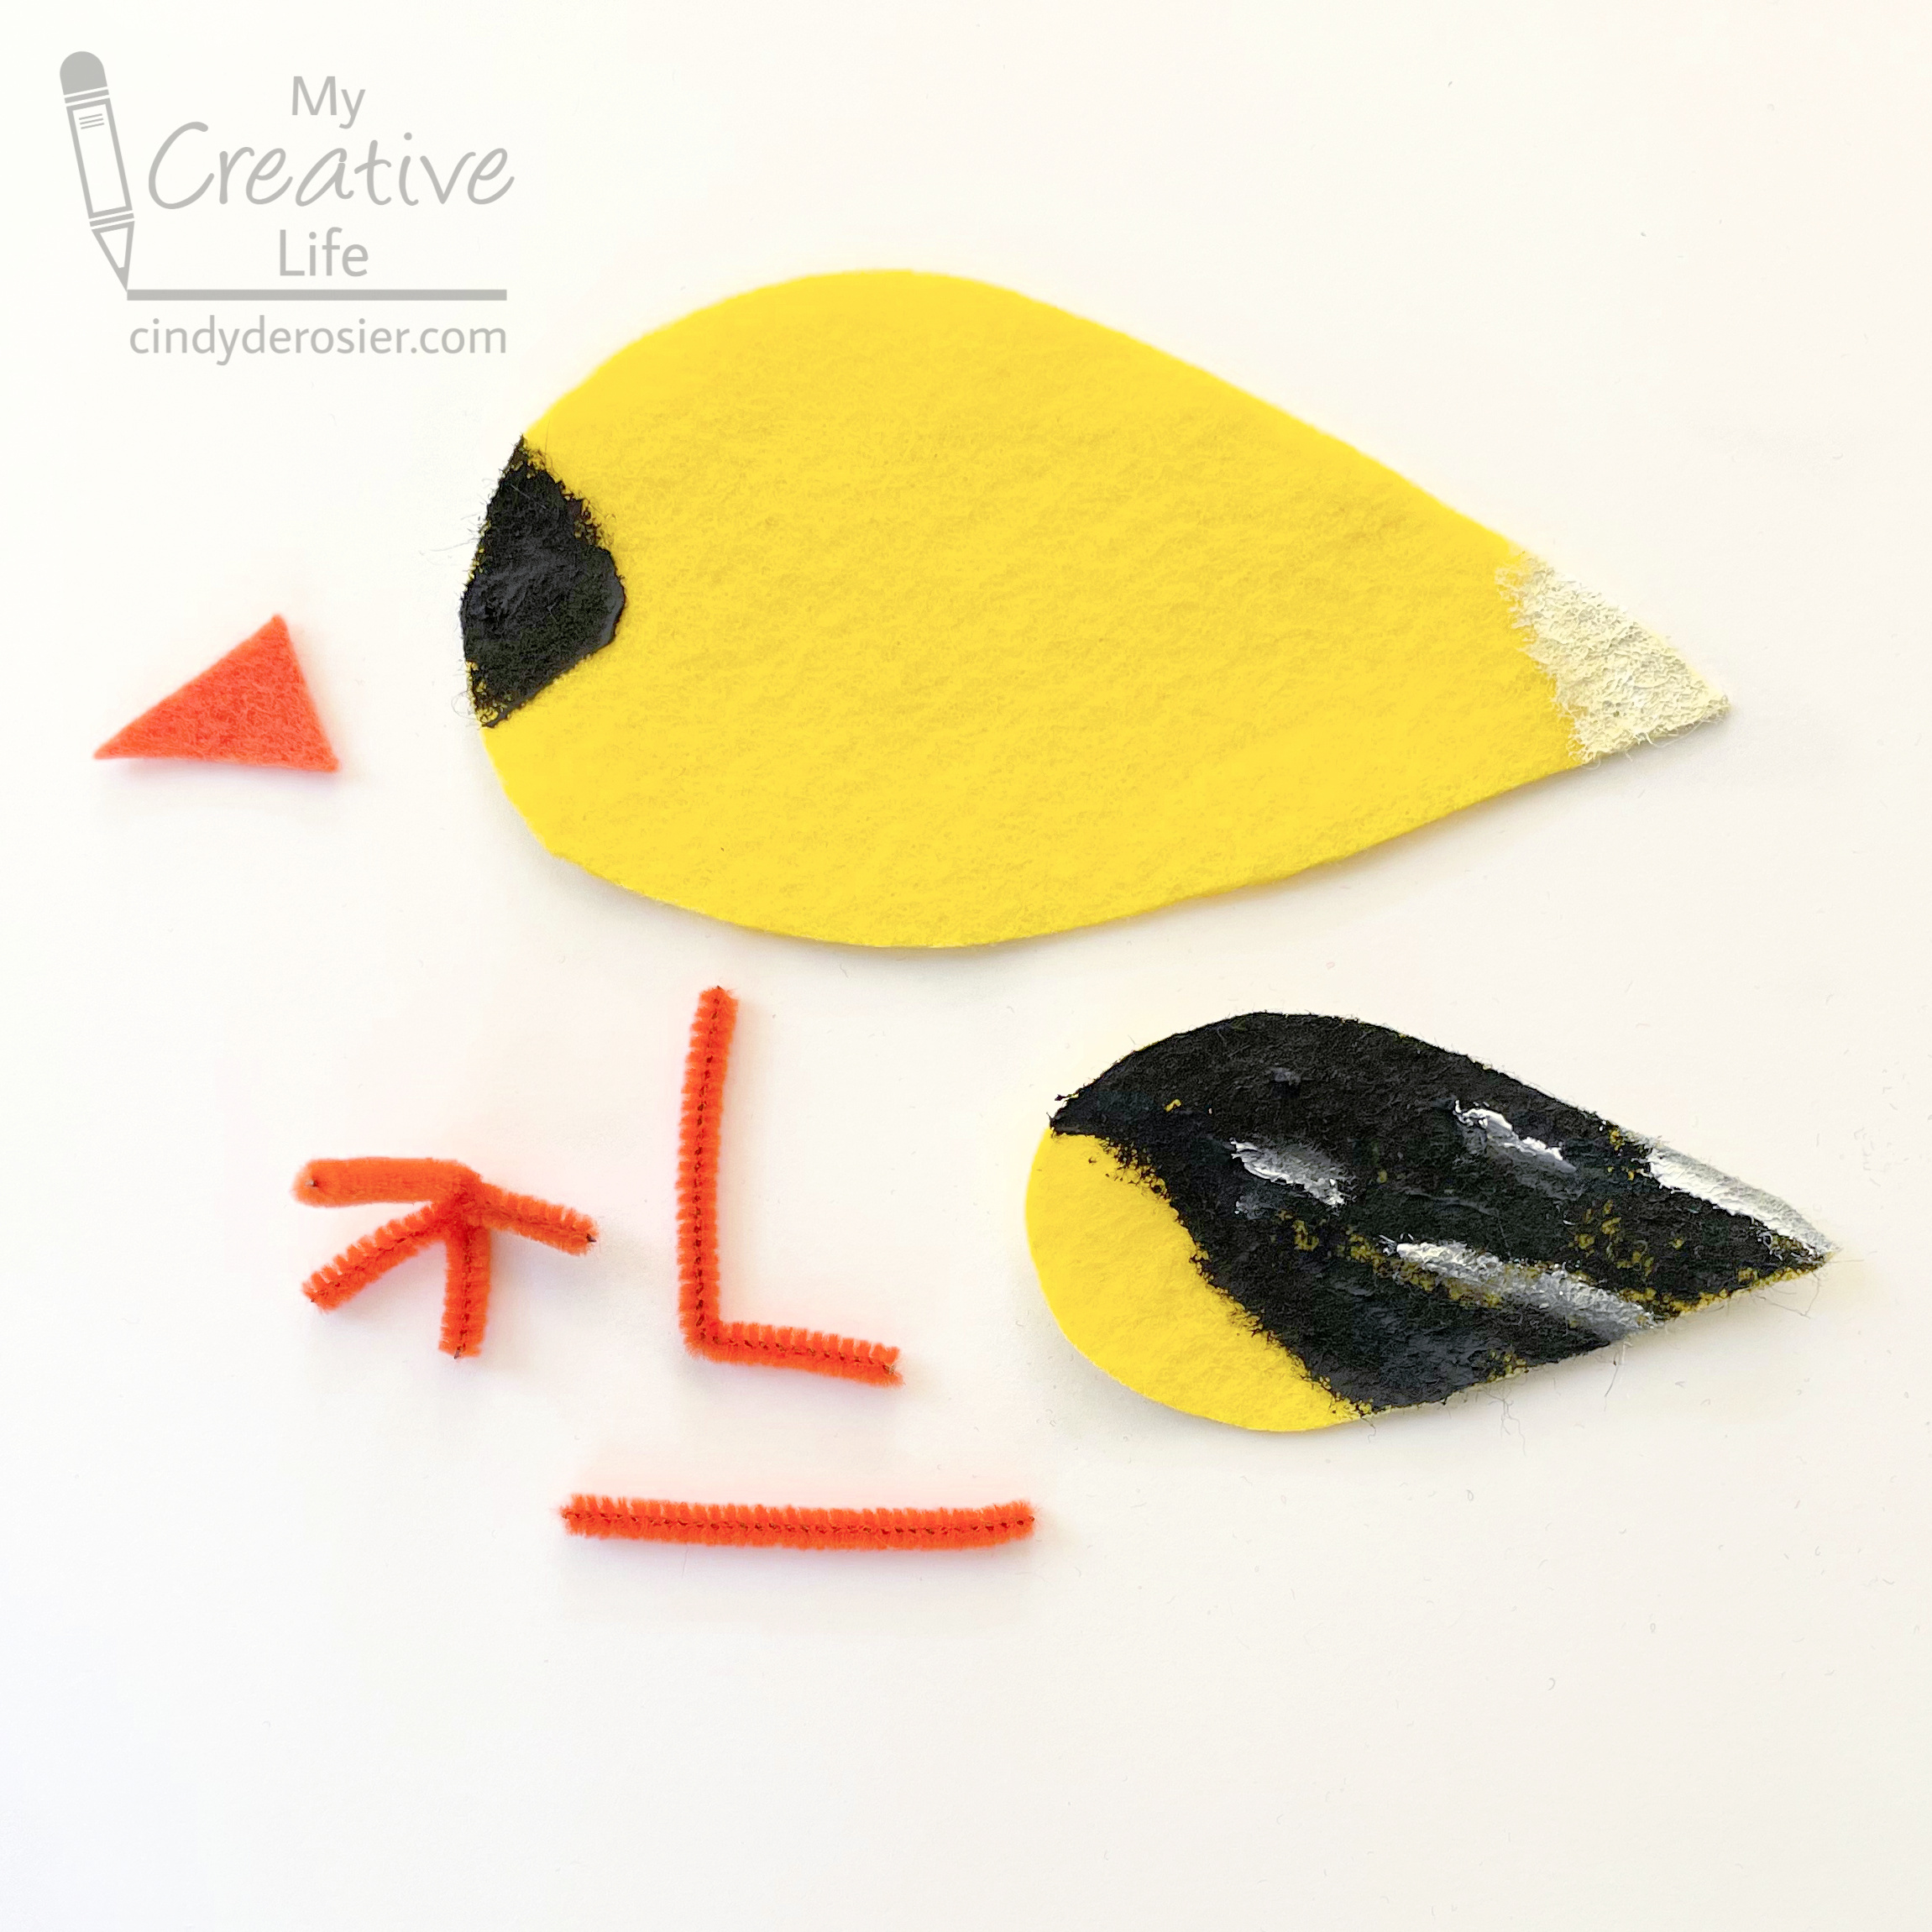
Cut out two large teardrop-shaped body pieces from yellow felt. Cut two smaller teardrop-shaped wing pieces from yellow felt. Cut a triangular beak from orange felt. 

Using a photo of a goldfinch as a reference, paint the forehead and part of the wing black on each of the two body pieces. Paint the tail white on each side, then add streaks of white to the wings. 

Cut an orange pipe cleaner into four lengths. To make each foot (shown completed below on the left), you will need one piece bent like an L and a second straight piece (shown on the right). Twist the straight piece around the L, then adjust the toes so they're evenly spaced. Trim off any excess so that the toes are the same length. 


To assemble your goldfinch, glue the wings and eyes to each side of the body. Glue the legs to the INSIDE of one of the bodies, making sure the toes face forward. Glue the beak to the inside of this body part as well. 

Add glue around the edge of this piece, leaving a gap where the legs are for stuffing. Press the two body pieces together. Push Poly-fil inside the goldfinch, then glue the opening closed. 

You may have to adjust the feet a bit, but once you do, your goldfinch will stand on its own.