Showing posts with label apple. Show all posts

8/18/26

Summer Creative Retreat: Inspiration Treasure Hunt

Last year, I took six classes during The Pigeon Letters Summer Creative Retreat. (This one was my favorite. Or maybe this one.) Summer Creative Retreat is billed as the world's biggest free online art event, with 60 classes and over 20, 000 people attending. I really enjoyed it last year and was eager to participate again. Unfortunately, I didn't get home from Idaho until this year's Summer Creative Retreat was half over, and then I had to do all those annoying things like laundry, groceries, bills, and catching up with work that come after a trip. I did manage to watch four of the classes on replay before the event ended and I crafted along with two of them. 

The first was Inspiration Treasure Hunt: A Playful Process for Creating Art, by Mel Rye


Mel began by asking us to go on an Inspiration Treasure Hunt to find random objects on our workspace. We looked carefully at the items we found to discover shapes and textures. For example, a simple pencil has a round eraser that might inspire dots, a metal ferrule with vertical lines, and a wavy pattern where the pencil was sharpened. 

We used the shapes we found to doodle the shapes they inspired onto plain paper. It was fascinating how many different patterns I was able to make using found items sitting on my desk. I did most of my doodles with a ballpoint pen, then switched to a Sharpie in order to get darker shapes for contrast. After creating a bunch of patterns, we cut those apart and arranged them on a colorful background. As you can see in the graphic above, Mel made abstract designs. I made fruit. The watermelon, pear, and apple each use three different patterns and the pineapple has two, so there are 11 different doodles represented below. 


This was a really fun activity and a great way to stretch creatively. It's something you could do anywhere, since it uses so few materials. Such a fun class!

10/10/24

Decorating Disney-Themed Halloween Cookies and a Wormy Apple Cookie

Last weekend, I took a cookie-decorating class at Every Baking Moment with my friend Rebecca. The last time Rebecca had been there was for Trevor's 8th birthday party (he's 18 now). I took a different cookie-decorating class there once, two years ago (which apparently I never blogged about?!), so I was excited to give it another go. 

The instructor demonstrated how to make eight different Disney-themed Halloween cookies, then we were set loose to create. It was so much fun trying out different techniques! I've never used a stencil on cookies before, like we did on Madame Leota. Nor have I used a dehydrator for cookies. We dried the red of the apple before adding the green on top. 


Compare my nine cookies above with the eight cookies below that the instructor made. 


I went my own direction with a few of the cookies, but not always intentionally! I should have made curved lines of black frosting on my spiderweb cookie, but I made straight lines. Oops. I put a leaf on the poison apple, but not on the Mickey pumpkin... and I didn't even notice until I photographed my cookies the next morning. I outlined Oogie Boogie in black after the green had tried to see if I could follow the lines (no). I skipped the writing on the cauldron. I'm terrible at writing, but it would have provided a little camouflage for the bad flooding job I did. I think I used the thick black frosting intended for writing instead of the 15-second frosting. I did a good job flooding the bat, so I must have used the correct frosting for that. The central Mickey with the spider was my own idea.  

We were allowed to take home some undecorated cookies plus any leftover frosting. These are the cookies I made at home, without any time pressure. Notice that the pumpkin Mickey is infinitely better than the one I made in class?


As for the letters on the bat, I piped them onto parchment paper rather than directly on the bat, then transferred them over when they dried. I piped each letter dozens of times and then picked the best of each and they still don't look great. 

Since the apple was not someone else's idea (or trademarked character), here's a tutorial. Affiliate links below. 


---------


Wormy Apple Cookie


Materials: 


Steps: 


Bake and cool apple-shaped cookies, then prepare the royal icing. If you're making your own, aim for the consistency of honey. Color the icing with your desired shades. I made a green apple with an orange worm because those were the colors of icing I had, but you could make red, green, or yellow apples and orange, green, or pink worms. You'll need a little bit of black for the hole. You may also want a brown stem. I used green since I didn't have brown.  Put your colored royal icing into the piping bags. 

Working on parchment paper and with one cookie at a time, flood the apples with your desired color(s). Use the scribe tool as needed. While the icing is still wet, pipe a circle of black onto the apple. Set the cookie aside to dry. 

To make the worm, pipe a series of 5 of 6 circles touching one another onto a piece of parchment. The circles will sink together, leaving a vague impression of body segments. Use the scribe tool to dot two black eyes onto the worm while it is still wet. Let the worm dry completely. 

Peel up the dried worm (ew), add some dots of icing onto the back to act as glue, and place it on the apple. When the icing is dry, your cookies are ready to serve!

9/25/23

Paper Plate Apples with Peekaboo Seeds

 Tis the season for apple crafts! 


Paper plate make great apples and they're even more fun when they're hiding a surprise inside! Those are real apple seeds, arranged just the way they were in the apple they came from. Affiliate links below. 


Paper Plate Apples with Peekaboo Seeds


Materials:


Steps:

Carefully cut an apple in half horizontally and observe the star pattern that the seeds make. Remove the seeds. Rinse them and set them aside to dry. 

Choose the color(s) for the apple(s) you're making. I made a solid red, a solid green, and a solid yellow, but you can mix colors to mimic different varietals. You can see examples of that with this apple craft, which uses the same tissue paper technique. 

Tear the tissue paper into strips. Use a paintbrush to moisten the back of a paper plate (the non-eating side) with a little bit of undiluted Sta-Flo, then place a piece of tissue paper on it. Paint over the top with more starch. Repeat until the back of the plate is covered. Set it aside to dry. Glue the apple seeds to the front (eating side) of a second paper plate. 

When everything is dry, carefully trim off any excess tissue paper from the apple and then cut it in half. Arrange those pieces on top of the plate with the seeds. Use a craft pick (adults only!) to poke a hole through the bottom of each side of the apple, then use a brad to attach each piece.  


Cut apple stems from brown cardstock and glue them to the back of the apple. Fold a piece of green cardstock in half, then cut an arched shape (rainbow, hilltop, etc) along the fold. Open it up and glue the leaf to the back of the apple. 

Pair this craft with fun and educational children's books about apples!

9/29/22

Cinnamon Spice Caramel Apple Popcorn with Felt Apple Tag

Tis the season for Pumpkin Spice Everything, but personally I don't get it. Pumpkin is fine, but for me fall is all about apples. Apples are sweet, sometimes tart, crisp, and full of flavor. They are delicious on their own, as juice or cider, mashed up as applesauce, baked with savory dishes (like pork), and excellent in desserts of all sorts. I like squash (though pumpkin is not even one of the best squashes), but there's no comparison. Virtually everyone agrees that Apple > Pumpkin. Spices definitely improve pumpkin, but I firmly believe Apple Spice > Pumpkin Spice. Don't even try to argue. 

If you're tempted to argue, make some cinnamon spice caramel apple popcorn first. Then get back to me and tell me that pumpkin spice is better than apple spice. Affiliate links below. 


Cinnamon Spice Caramel Apple Popcorn

  
Ingredients:                                                           


Steps: 


There is no right or wrong when making your own flavored popcorns. It's not like baking a cake where chemical reactions mean that quantities matter. You can add more or less of any ingredient. I was hesitant to even put quantities above, as I didn't measure when I was making mine. Those are my best guesses. 

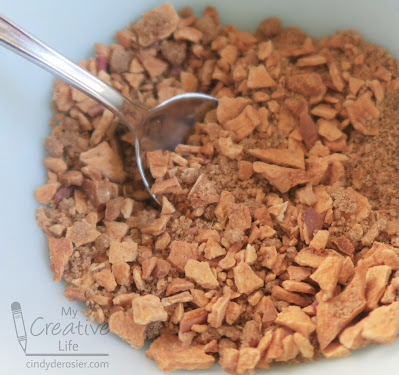
Start by crushing some crisp dried apples until about half of the apples are powder and the rest is pea-sized bits. Stir in some brown sugar and cinnamon, then add a dash of nutmeg. Mix thoroughly. 


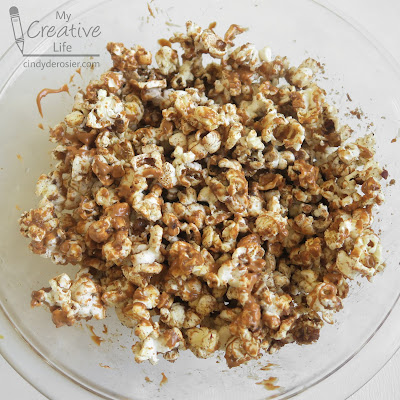
Pop and generously butter approximately 10 cups of popcorn. Immediately pour the apple mixture over the popcorn and stir well. Some of the apple mixture will remain at the bottom of the bowl instead of stuck to the popcorn, but that's not a problem. 

Follow the directions to melt the Salted Caramel Candy Melts. Drizzle half of the melted candy over the popcorn and immediately stir well. Repeat with the remaining candy. Most of the apple mixture should now be stuck to the popcorn. 


If you eat the popcorn immediately, the tiny apple bits are still crispy. If you let the popcorn sit for a while, or bag it up, the apple bits will soften, but remain equally delicious. 

I made a cute felt apple tag to label my bagged popcorn. It's a quick and easy project. 

-------


Felt Apple Tag


Materials: 


Steps: 

Cut out an apple from the red felt, using pinking sheers. Cut the leaves and stem from green felt with regular scissors. Apply green Stickles to the leaves and set them aside to dry. 

Use two strands of black embroidery floss to backstitch a smile and two eyebrows.

Cut a piece of red cardstock that is slightly smaller than the felt apple. Glue it to the back of the apple, covering the knots from your stitching. Write a message to your recipient. 

Glue the googly eyes and the leaves to the front of the apple. 

9/1/20

Paper Plate Apple Basket

Apple season is almost here! Plan the ultimate fun family day this fall with a visit to a farmers market or you-pick orchard, some apple-themed books, an apple taste test, and this cute craft. Affiliate links below. 


Paper Plate Apple Basket


Materials:


Steps:


Cut one paper plate roughly in half. Keep the smaller piece and set the larger one aside. Use the smaller piece to trace a line on the second paper plate. Cut along that line, then up and around the inside of the corrugated section of the plate to make the basket. 

Use the scraps to cut out apples, leaves, and stems. You're aiming for around 6 each. The apples won't be fully round if you use just the scraps from the two paper plates. It's not what I did, but I recommend using construction paper for the apples. It is much easier. You can still cut the leaves and stems from the paper plate scraps. 

Paint the two basket pieces and the stems brown. Paint the leaves green. Paint the apples a mix of red and green. 


When the paint is dry, put a line of glue along the edge of the basket front. Position it in front of the main part of the basket and use binder clips to hold it in place while it dries. 

Glue the stems and leaves to the apples. 


Glue three apples to each other and use binder clips to hold them in place while they dry. (You don't need the clips if you use construction paper instead of the paper plate scraps. 


Glue one row of apples to the back portion of the basket and one row to the front. This gives it a dimensional look. When the glue is dry, you can carry your basket or hang it up!


7/15/20

Felt Apple Coaster and Apple Pie Slushie Recipe

Once I started making felt coasters, I couldn't stop! (Here are the tutorials for the lemon, lime, and orange.) They're such a quick and satisfying project. Today I have a felt apple coaster and a delicious, refreshing Apple Pie Slushie. It has all the wonderful flavor of fall in an icy version that's perfect for summer. Affiliate links below. 


Apple Pie Slushie


Ingredients:

  • 2 c. apple juice
  • juice of one lemon 
  • 1 tsp. cinnamon
  • 1/4 tsp. nutmeg
  • 1/4 tsp. cloves


Steps:

Combine all ingredients, then pour them into an ice cream maker. (This is the one we have and I LOVE it.) Churn for approximately 15 minutes, then transfer to glasses. Garnish with whipped cream and cinnamon. 


---------


Felt Apple Coaster


Materials:


Steps: 


Cut out a circle of red felt, approximately 4" in diameter. Cut out a circle of cream felt that is slightly smaller than the red circle. Cut five teardrop-shaped seeds from brown felt. 

Use brown thread and a very short running stitch to sew the seeds to the cream circle. When all the seeds are attached, use cream thread to sew the cream circle to the red circle.


7/1/14

Introducing The Cursive Project: Apples

Trevor will be entering third grade in 6 weeks, the year students in California traditionally learn cursive. With the adoption of Common Core, cursive won't necessarily be taught in school anymore. (Note that Common Core does not require forbid the teaching of cursive. Instead, it doesn't require it. Big difference.) I'm not freaking out about this. I'm not one of those people who thinks civilization is going to crumble because our kids aren't learning cursive.

Trevor wants to learn cursive. Since he may not learn it in school, I'm choosing to teach him at home over the summer. (If it is taught at school, he'll be a step ahead. Nothing wrong with that.) During the month of July, we'll be doing The Cursive Project together. Each day, he'll learn one letter in cursive, then we'll do an art project that corresponds to that letter. By formalizing it and turning it into a project that we'll do every day, it will keep us both on track and excited about it.

I started by having him think of something that starts with each letter from A-Z that we have never made together before. While he was doing that, I prepped worksheets for each letter.


Then we went over his list together and talked about what materials we'd use for our first few projects. Once those were planned, we were ready for A.


He was so excited to finally learn cursive! He did very well for his first attempt.


As you can see, I kept the work extremely brief. Learning isn't fun for him (or anyone) if it's repetitive and tedious. After tracing my sample letters on the first row, he tried them on his own. Then he did a row of capitals and a row of lowercase. Then he connected Aa and finally aa. (Once we've gone all the way through the alphabet, he'll come back and write a sentence about his art project on the last three lines.) He was so proud of his first cursive writing!

Next, we moved on to our craft, a tissue paper apple. We gathered our materials: watercolor paper, paint brushes, tissue paper (red, yellow and two different greens), and Sta-Flo liquid starch (affiliate link). I've blogged about my love of crafting with liquid starch many times. If you're not familiar with it, read this post.


Tear the tissue paper into small strips. Using the paintbrush, moisten the paper with a little bit of undiluted starch, then place a piece of tissue paper on it.  Paint over the top with more starch.  


Layer the colors and overlap the strips to add interest. I chose to make two apples (one red and one green). My paper looked like this when I was done.  


Let the paper dry completely, then cut out your apple shape. We each did a quick sketch on the back of our paper, then held it up to the window to be sure that we were happy with the placement and colors.


Cut out the apple, then use scraps to make a stem and leaves. Here's Trevor's apple:


These are mine:


The Cursive Project is off to a great start!

5/9/12

Apple-Shaped Teacher Appreciation Card

Here's another card I made on National Scrapbook Day.  It's for Trevor's kindergarten teacher for Teacher Appreciation Week:


I was inspired by this card by Fiskateer #8546, Amy:


Of course, Trevor made one too.  Materials: red, brown and green cardstock, scissors, pencil, pen, and glue.

 
Begin by folding the red paper in half to form a card.  Lightly sketch the shape of an apple on the card, making sure there is a slightly 'flattened' part on the left side of the apple.  This will hold the card together.  Cut along the sketch line.


Cut a stem from brown cardstock and a leaf from green cardstock.  Attach using the glue.  Add a message to the card.  Couldn't be easier!  
 
Here's Trevor's finished card. 


I like to photograph the inside of the cards Trevor makes.  It's fun to see how his spelling and handwriting are improving over time.  Quite a dramatic difference from this time last year!  Which, of course, is just further proof that Mrs. Monachello is a grat techer.  :)


To all the teachers out there, Happy Teacher Appreciation Week!