Showing posts sorted by relevance for query jewelry. Sort by date Show all posts

5/5/11

My First Attempt at Making Jewelry

Not too long ago, I made my first purchase from Michaels' jewelry aisle.  I know absolutely nothing (nothing!) about making jewelry.  (I barely know anything about wearing jewelry.)  But like many crafts that I've never done, I figured it couldn't be that hard.  You'd think I'd know by now to never make that assumption.

Back in November, there was a vendor at the Sacramento Scrapbook Expo that was selling adorable ceramic scissor charms in a tiny bucket for 25 cents each.  They looked just like little Fiskars scissors.  Aren't they so cute?!


I had a dollar in my pocket, so on a whim, I bought 4.  My plan was to make necklaces for my two newest Fiskateer recruits (Sheena and Amanda), the Fiskateer who recruited me (Jennifer), and myself.  Every Fiskateer has a number, so I wanted to personalize the necklaces with those numbers.

I decided to work with shrink plastic.  I used the Fiskars Stamp Press and Staz-On ink to stamp the numbers on the shrink plastic.  Amanda is #7259.


I cut the shrink plastic into the shape I wanted, punched the hole, and shrunk them.  Perfect!  I was really pleased.  Gee, these necklaces were going to be so easy to make!

Then I went to Michaels.  I'm not sure what I was picturing, but whatever it was, I couldn't find it.  Instead, there was a dizzying assortment of jump rings, clasps, end caps, and chains of all different sizes and finishes.  I must have stood there for 30 minutes picking up packages, studying the instructions on the back, and eventually putting them back.  It was all so confusing!

Eventually, I bought a long piece of chain, a package of jump rings, a set of end caps, and four magnetic clasps.  The instructions on the packages were very brief and not at all helpful... didn't they know I was a total beginner?!  I cut the chain into lengths.  That went smoothly.  As for the rest, I didn't have the right tools and attaching those tiny pieces was tricky!  I kept trying.  I eventually googled jewelry making and learned that I was opening the jump rings incorrectly.  Oops!  Doing it the right way made a big difference. 

Here are the four necklaces (from left: mine, Jennifer's, Sheena's and Amanda's):


And here's a close-up of mine:


Well worth the effort, I'd say!  My friends all liked theirs, and I've received many compliments from other Fiskateers.  Still, I don't anticipate more jewelry making in my near future- at least not without some instruction in the basics!

7/30/12

Evening Beading: Basic Stringing Class

Anyone remember my first attempt at making jewelry?  I thought it would be pretty easy, but my complete lack of experience meant that I was totally and utterly baffled as I stood there in the jewelry aisle of the craft store.  I fumbled my way through my project, but realized that I absolutely needed to take a Jewelry 101 class before ever attempting any sort of jewelry project again.  

Fast forward to my list of 40 Things.  I knew Jewelry 101 had to be on the list!  After some Googling, I realized that our local bead store would be the best place to take a class.  I recruited my friend Cathy and we signed up for the "Evening Beading: Basic Stringing Class" at Beads on Main in Vacaville. We were told to come an hour early to pick out our beads.


An hour was not enough time.

Talk about overwhelming!  The walls all looked like this:

 
and the center of the store looked like this:


Fortunately, the employees were incredibly helpful.  Our teacher, Jess, recommended we just start picking out beads we liked, without worrying about how many we'd need or what works with what.  She also pointed out some kits they had available.  She suggested that we find a finished piece that we liked and use it for inspiration.  I decided to make a bracelet similar to this one:

 
I knew I didn't want the turquoise/rust colors of my inspiration piece, but I had no idea what I actually DID want.  I started picking out beads... some blues, some whites, then some oranges, all with no real plan or vision.  Then I came to this section:   


I was totally drawn to these greens, so I decided to build my bracelet around these.  I kept the orange beads I'd chosen earlier, but put back the white and blue ones.  After a LOT of indecision, eventually I ended up with greens, oranges, and yellows.

 
Once I had my beads, it was time to lay them out and start planning the bracelet.  I spent awhile experimenting with different patterns and designs.  I snapped a photo of each rough draft so that I could move the beads around and easily recreate a previous design if need be.  

 
Then it was time to string the beads and to learn about the findings!  I was so excited to finally be taught the proper techniques.  I took a ton of pictures so that I'd remember how to do it the next time I make something.  


The class was small enough (6) that Jess was able to supervise each of us during the critical crimping step.  I was first, which meant that I had some time to snap some pictures of her helping the others.  


I also had time to add up the cost of my bracelet.  I was pleasantly surprised to learn that the whole thing cost only $9.21.  

 
Here's my finished bracelet. I LOVE it. I had so much fun at the class and will definitely be beading again. (In fact, some of you on my Christmas list might get bracelets this year...)
 
 
Goal #26 accomplished! 

1/12/23

Hidden Money Gift: Necklace and Earring Set

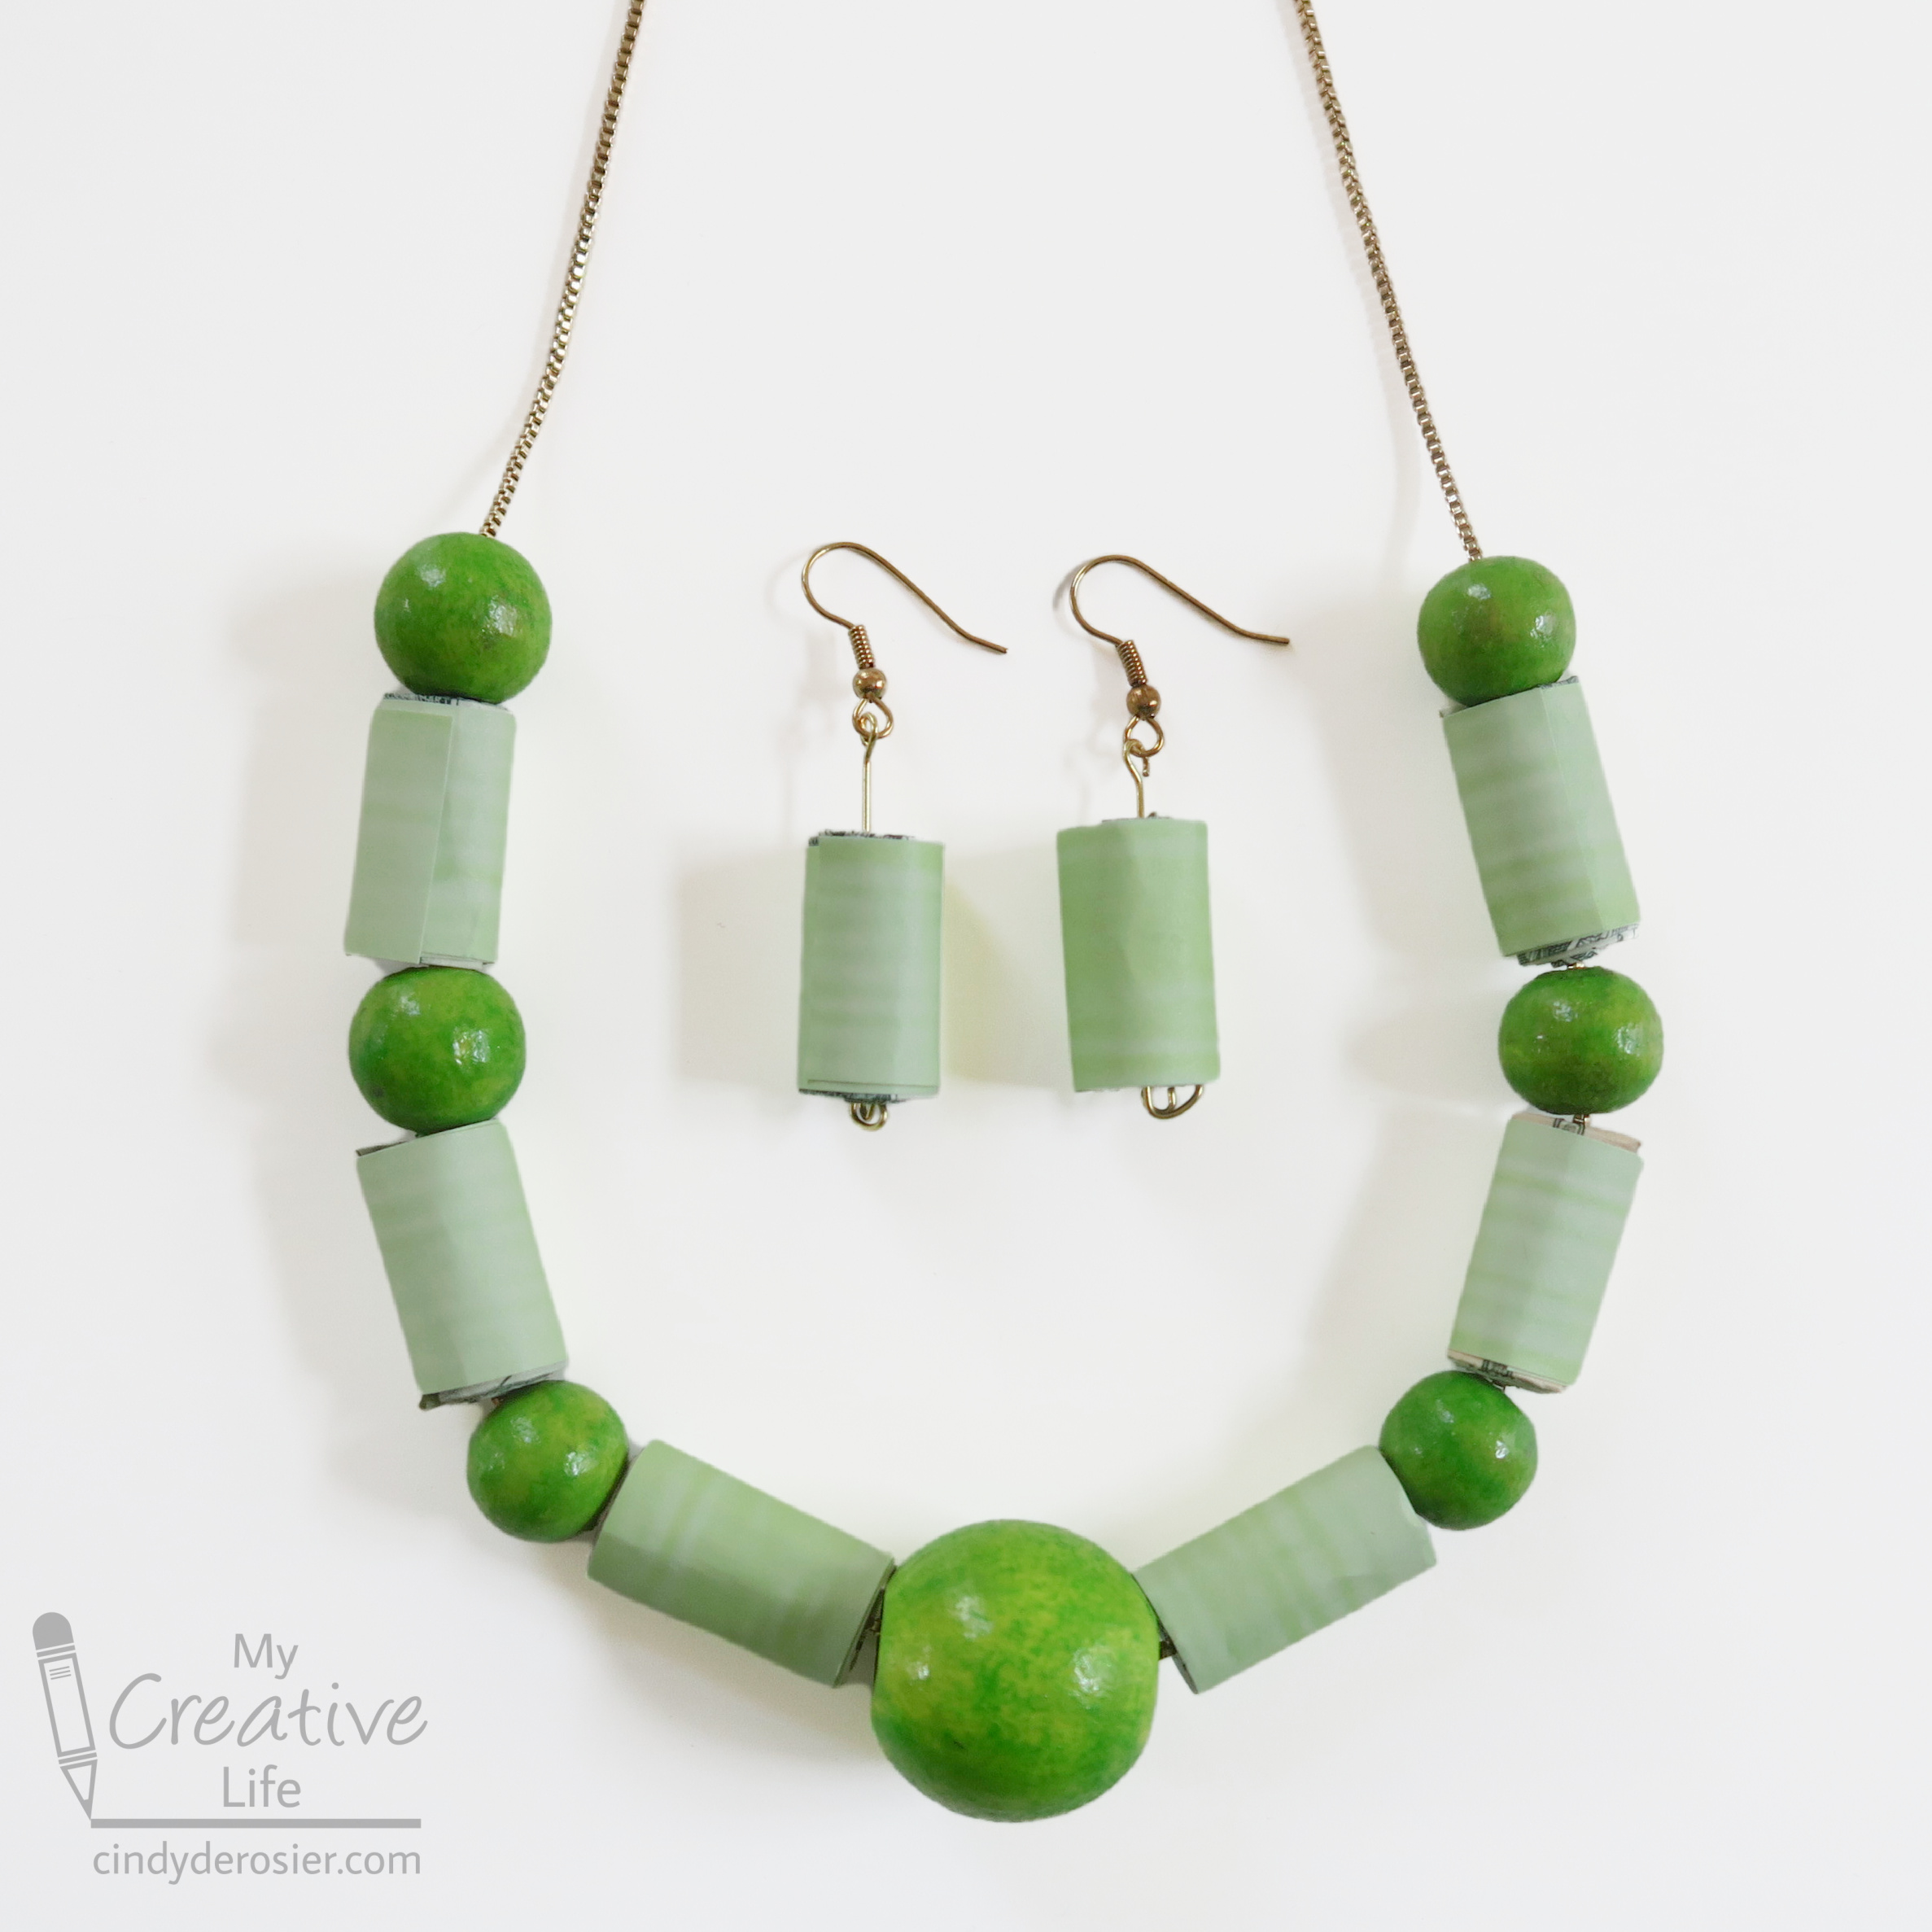
For Christmas, I made this necklace and earring set for my 22-year old nephew, Timothy. 


I haven't seen him for a couple of years, but as far as I know, he doesn't wear necklaces or earrings. In fact, I fully expected him to completely destroy this gift within 30 seconds of opening it. Why? Because he knows that every gift from me has hidden money inside. This one has 8 bills of varying denominations. Affiliate links below. 

---------


Hidden Money Gift: Necklace and Earring Set


Materials:


Steps: 

Paint the beads with acrylic paint. When the paint is dry, add Extreme Glitter. I found that putting the beads on a skewer and propping that up on paint bottles was the easiest way to paint them. 


Choose a patterned paper that coordinates with your beads. Cut 8 strips of paper, each slightly bigger than 3/4" wide by around 3" long. 

Working with one bill at a time, fold the bill lengthwise into thirds, creasing the fold well. Roll it into a tight bead. Wrap the patterned paper around it, adding glue only to the area where the paper overlaps itself. Don't get any glue on the money! Repeat for all 8 bills. 

In this picture, you can see the steps of prepping the money. The third bill is loose because I let go of it for the photo; you'll actually want it to be as tight as possible, as you can see with the finished bead on the right. 


Here's a look at a finished bead. 


To make the earrings, thread a bead onto an eye pin, then curl up the end to secure the bead in place. Use a jump ring to attach it to the earring hook. 

To make the necklace, arrange six paper beads (hidden money) and seven wooden beads in order. String them onto the necklace chain. Depending on the necklace and the beads, you may need to temporarily remove the clasp of the chain (if it's wider than the gap in the beads) and/or use a yarn needle to thread the beads. 


This is what the finished jewelry set looks like. 


Package your gift in an elegant jewelry gift box for an extra fun touch. Then wait and see how long it takes your recipient to notice that the necklace and earrings aren't actually the gift they think they are!

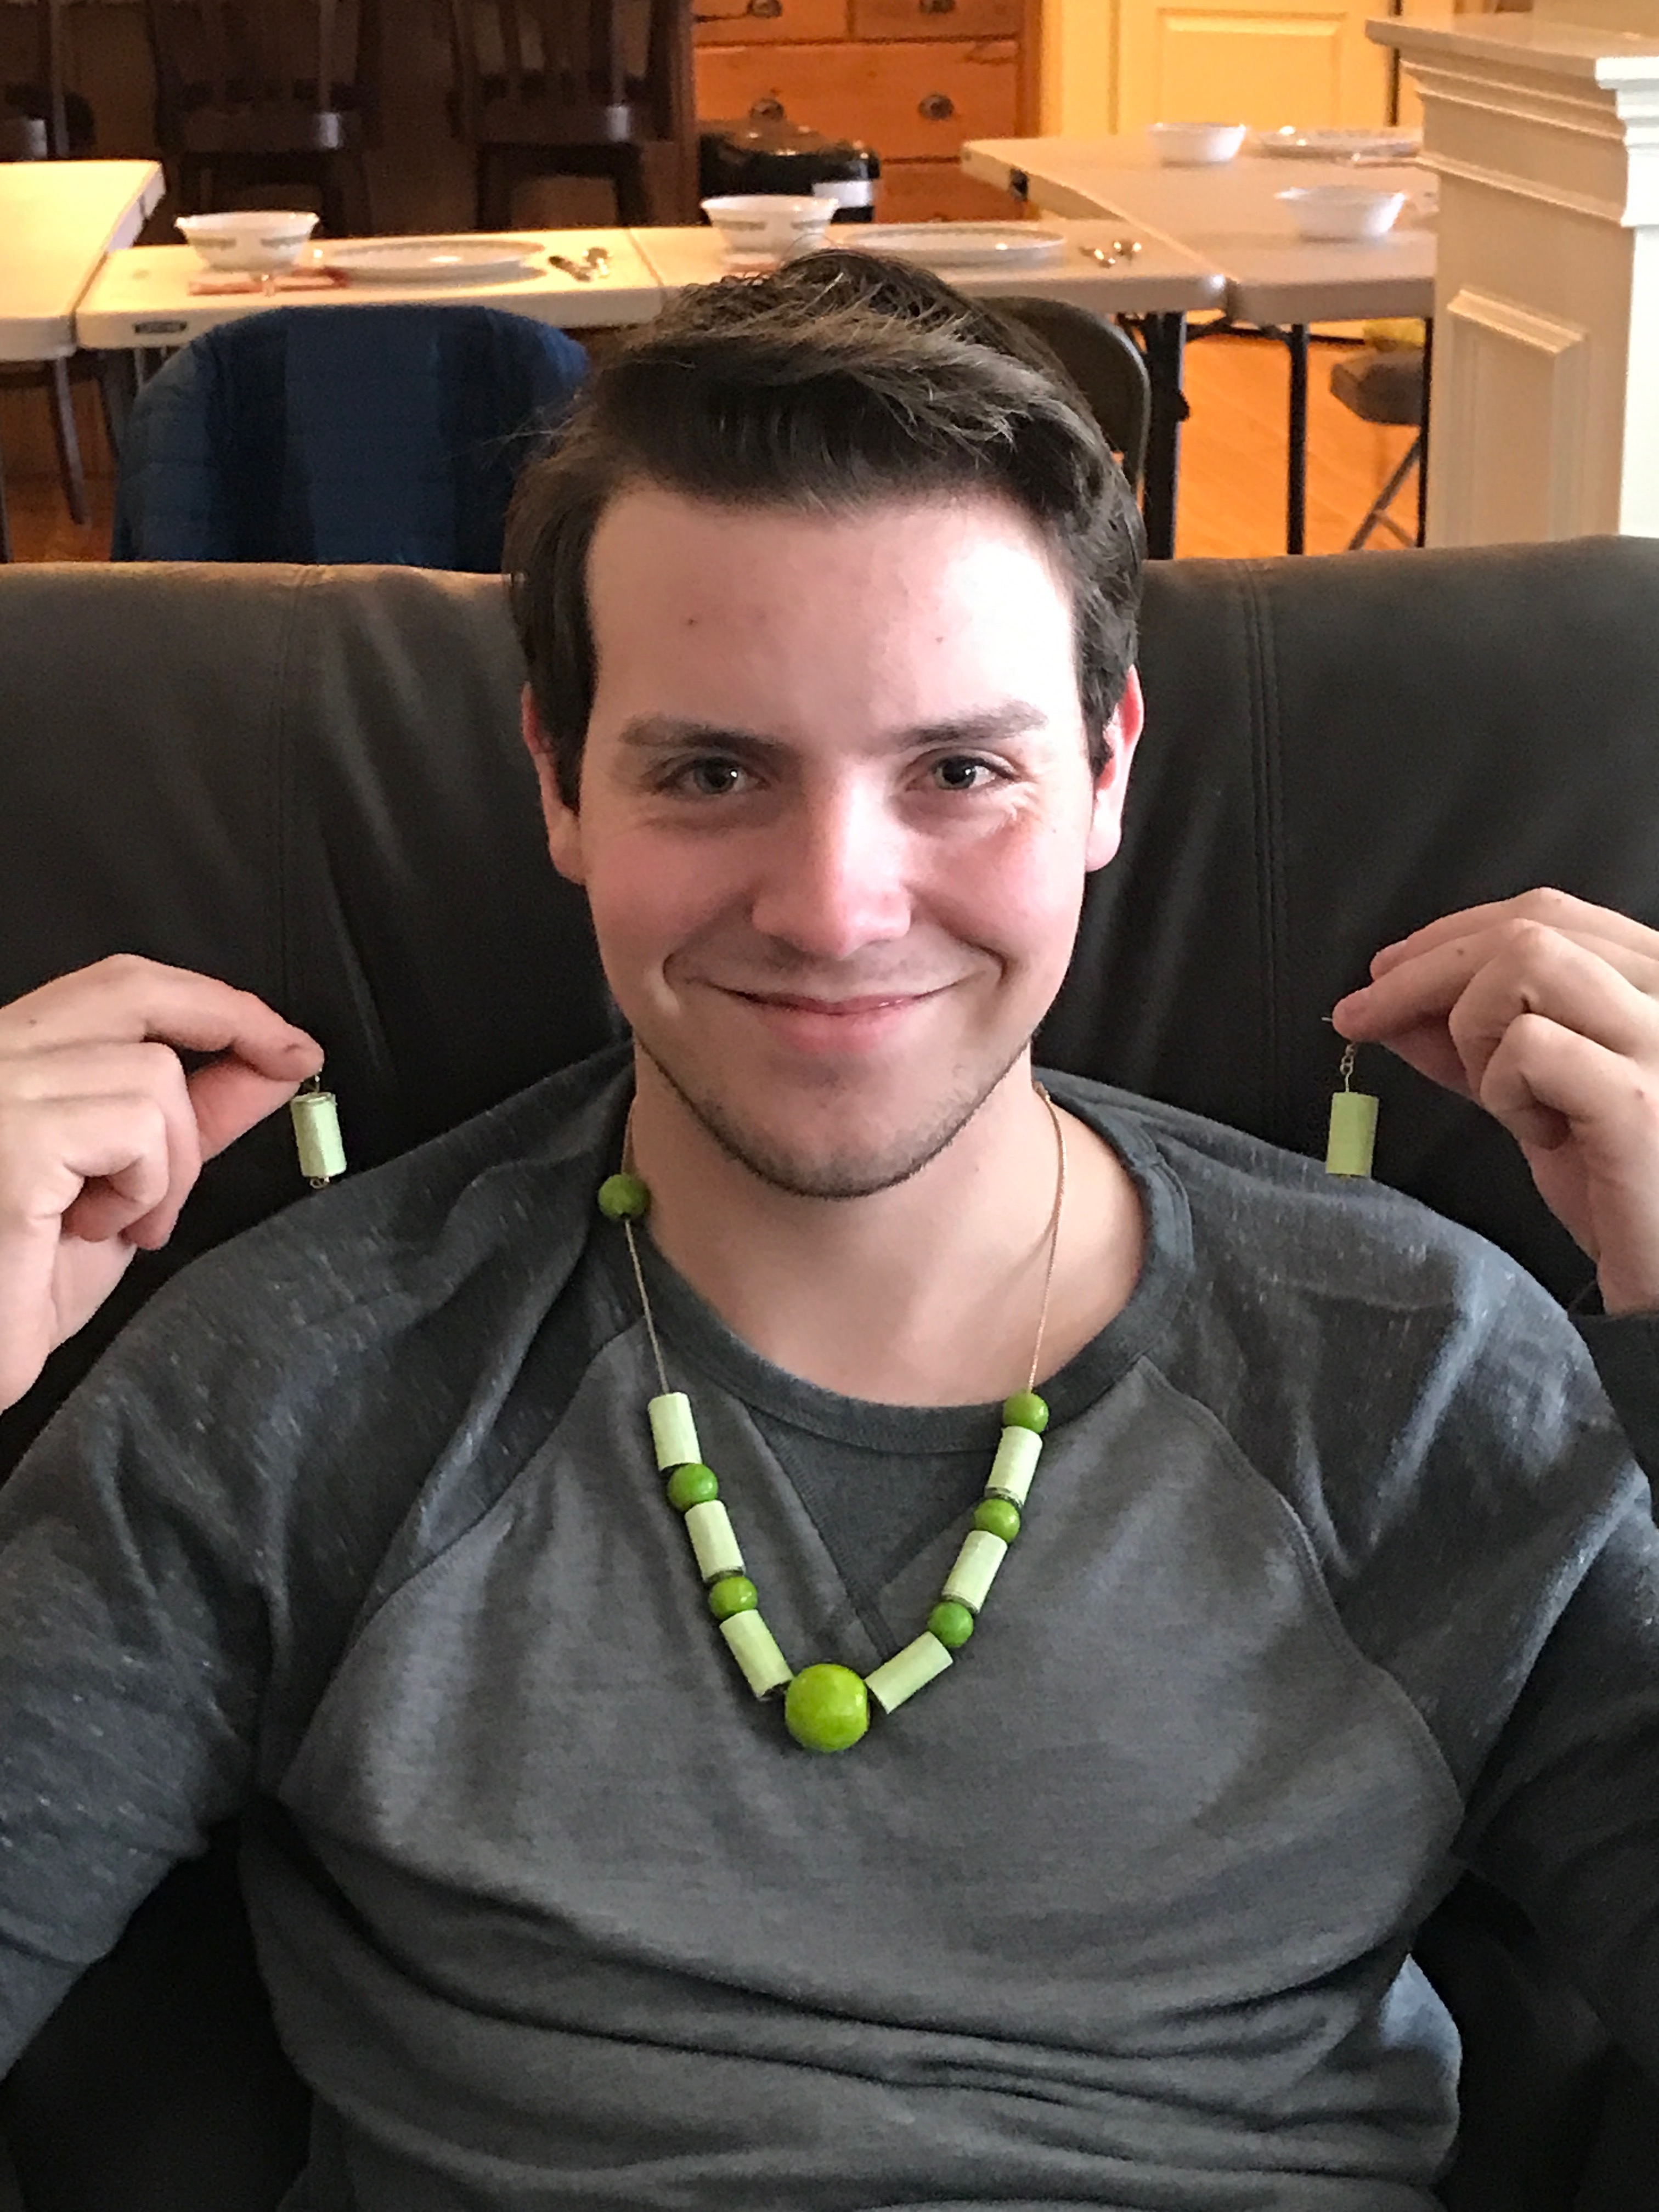
My sister sent me this photo of Timothy modeling his new jewelry (pre-destruction). I love it. 


Browse through the dozens of ideas for money gifts I've given to Timothy and others over the years. I love looking back at them. 

2/28/13

Goal #38: Metal Stamping

I've been wanting to try metal stamping for a long time.  I've seen so many cute projects: keychains, spoon placecards, garden markers, and all sorts of jewelry.  I especially love the necklaces where the artist has stamped her One Little Word.  

When I started my 40 Things project, I knew I wanted metal stamping to be one of the 40.  I searched for local classes but couldn't find any.  I looked into buying a set of dies on various jewelry websites.... way too expensive to justify.  But then I heard that Harbor Freight sells very inexpensive sets.  Since we have one locally, there wouldn't be any costly shipping.  I added a set of dies to my Christmas list.  I was only hoping for one, but Steve and Trevor surprised me with both a 1/4 and a 1/8 inch stamping set.  Cool!


Rather than just leaping in and trying the metal stamping on my own, I thought about who to ask to join me.  I've been making an effort to ask a wide variety of friends to join me for my various goals.  That's a huge part of what I've loved so much about my 40 Things project.  I thought my friend Rebecca would really enjoy it, so we made plans to get together in my icy garage and do some metal stamping.

We started by practicing on chipboard to get the feel of the dies, to work on spacing, and to become comfortable with the process.  Then we moved on to more practice on wood pieces.  


Using masking tape to create a guideline really helped.


We experimented with chalking our wood shapes, which worked out pretty well.  Then I discovered that you could chalk the die before striking it and get a neat effect.


As we were digging through my bin of wood shapes (left over from my teaching days), we came across a bag of animal shapes.  Rebecca had a fantastic idea, inspired by a family joke. Her 1 year old niece gets people's attention by yelling "BAH!" as loud as she can.  Now everyone in the family does the same thing, cracking up whenever they do.  She stamped BAH on a sheep, then added other animal sounds to the rest of the menagerie.


I found a rabbit shape.


Eventually, I moved on to metal stamping.  I'd dug through the garage and the scraproom to find some interesting metal surfaces.  After a variety of trials (and errors), I successfully stamped some metal tags.


 Following the instructions on this extremely helpful metal stamping tutorial, I colored the letters with a Sharpie, wet a rag with rubbing alcohol, then gently wiped off the excess Sharpie.  At that point, I learned that most of my letters weren't deep enough for the effect to work.  Oh well!
 
As I continued to struggle with the metal, Rebecca came up with another brilliant idea for the wood shapes.  Here is an apple to give to her daughter's teacher.   
 
I think the next step in my adventures with metal stamping is going to be buying some proper jewelry blanks.  The various tags, washers, and other metal items we had on hand weren't intended for metal stamping.  I suspect I'll have more luck stamping on items meant for that purpose.

Thanks to Rebecca for joining me for a fun creative day, and thanks to Steve and Trevor for the dies.  Goal #38 completed!

8/11/21

Family Fun in Idaho and Montana: Helena (Part 4)

This is the fourth post about our family's 2021 travels to Idaho and Montana. If you haven't already, start by reading the first, second, and third posts about this trip. Because I blog about educational travel, some locations provided me with complimentary admission tickets, discounts, media rates, and similar benefits. Other attractions are free to everyone. I paid full price for the rest. This has no bearing on my reviews, as everything that I share here is something that I fully recommend.


---------

Family Fun in Helena


We started our first full day in Helena, Montana taking photos in front of the Capitol building. I absolutely LOVE the Montana 2021 landscaping! A quick Google search reveals that the design changes each year and not just the single digit. 


Montana is the 35th state our family has visited and this is our 27th Capitol building. We've visited two capital cities (Honolulu and Boston) where we didn't go to the actual Capitol building. There are six capital cities we haven't visited at all, despite having been to the state (Olympia, Springfield, Albany, Augusta, Richmond, and Tallahassee). We'll visit those eventually, though not necessarily before Trevor's 18th birthday. The pandemic put us behind a bit with our 50 states goal. 


Here we are at Montana's Liberty Bell. 


You may wonder why there are no photos of the inside of the Capitol. There will be! We didn't go inside right away because it was time to board our train. 


If you only do one thing in Helena, it should be the Last Chance Train Tour. In one hour, our entertaining and knowledgable guide introduced us to all the highlights of Helena. 


We saw the Cathedral of St. Helena, the mansion district, the governor's homes, Last Chance Gulch, the Old Fire Tower, and much more.


The train was a great way to learn the history of Helena, get the lay of land, and figure out must-visit places for the rest of our time in town. It was awesome. 

The train tour starts and ends at the Montana Historical Society Museum, which was next on our day's agenda. Before we went in, we enjoyed the display out front. 


Much of the museum tells the story of the people living in Montana during and after of the Lewis and Clark expedition. 


As usual, I was drawn to the native beading like a moth to light. Gorgeous!


During this trip, we saw different museums deal with COVID concerns in different ways. Some blocked off or removed hands-on exhibits, while others left them fully accessible. Montana's Museum posted signs asking us not to touch interactive displays. 


With the hands-on stuff hands-off, we still found plenty to enjoy at this interesting museum. For example, this tea brick. 


And this display about Montana's state symbols. 


And this collection of Montana military memorabilia. 


And the artwork by Montana's "Cowboy Artist" Charles M. Russell.


After the Montana Museum, we popped into the Capitol. The first order of business was stamping the Capitol Collection. 


Then we spent some time poking around. 


One of my favorite things about the Capitol was the flag display out front. While most states fly just their own state flag and the US flag, Montana now flies the flags of its eight tribal nations. 


We had lunch at the highly-recommended Bert & Ernie's. It was excellent. 


We popped in to Barnes Jewelry next door, because the people at the Montana Museum told us that they have the only pressed penny machine in Helena (Trevor collects pressed pennies). If not for the name, I wouldn't have known it was a jewelry store, as every single surface was covered in clocks, not jewelry. It was cool. 


Next, the Holter Museum of Art. It's small, perfect for a quick visit. 


Another quick visit, this time inside the Cathedral of St. Helena we'd seen from the outside during the train tour. It's stunning. I don't know if there's always someone there, but when we arrived there was a man there who was able to tell us all about the building and the gorgeous, incredibly detailed stained glass. 


We walked along Last Chance Gulch, which is lined with lots of shops and restaurants and all sorts of interesting artwork. 


As we walked, we looked for marked spots on the ground where you can use an app that takes you back in time. By that, I mean that you hold your phone up and it shows a photograph of the exact same location many years ago. It's really cool. 


We continued on until we reached Reeder's Alley, the oldest intact part of Helena. It's neat.


After exploring the Alley, we headed back the way we'd came. We'd had a surprising amount of elevation change and the heat was feeling oppressive. Cones from Big Dipper Ice Cream really hit the spot. I had tangerine sorbet and it was incredible. 

Along the way, we passed this interesting sidewalk display of the history of Pride flags. We were very pleasantly surprised to see how LGBTQ+ friendly Helena is.


We went back to the hotel to watch Olympics and rest, then had a late dinner in the lounge at the amazing Silver Star Steak Company downstairs. As before, we ordered one entree, one appetizer, and one soup to share. Everything was incredible. 


It was a fantastic, albeit busy, day. We still had one full day in Helena remaining. I'll tell you all about it tomorrow.