Showing posts with label candy eyeballs. Show all posts

10/19/26

Pancake Beaver

If your breakfast could use a little more fun, may I suggest a Pancake Beaver? The beaver is North America's largest rodent, and while rodents don't normally scream "breakfast" to me, I'll totally make an exception for the pancake version. Affiliate links below. 


Pancake Beaver


Materials:


Steps: 


Prepare pancake batter. You'll need enough for 6+ pancakes, but I recommend making extras. Transfer a few tablespoons of batter to a separate bowl and add a teaspoon each of cocoa powder and sugar. Mix thoroughly.

Cook the plain pancakes. You will need one large oval(ish) pancake for the beaver's tail and two small round pancakes for the ears. Pour another round pancake for the teeth, but as soon as it sets, flip it and then use the side of the spatula to cut it into rectangles for the teeth. Pour a large round pancake for the face and immediately use the spatula to push the batter away to make the indentation at the bottom. If you prefer, you can cook the pancakes like normal and cut away the parts, but this worked well for me. 

Cook the chocolate pancakes. You will need one small oval pancake for the nose and a second oval pancake (cut in two) for the inner ears. 

Use the edible marker to draw lines to mimic the scales on a real beaver's tail. Select two large candy eyeballs. 


Assemble the pieces onto a plate. 


I had so much fun making this pancake beaver! I'm excited to add it to my collection of edible crafts featuring candy eyeballs. I should have held off making that graphic. I think this beaver is cuter than almost everything else I featured. 

10/1/26

Crafts for Kids Using Candy Eyeballs

I love crafting with candy eyeballs. They add so much personality and whimsy to cakes, pancakes, cupcakes, milkshakes, marshmallows, lollipops, and so much more! Below are some of my favorite edible crafts decorated with candy eyeballs. 


Edible Crafting with Candy Eyeballs


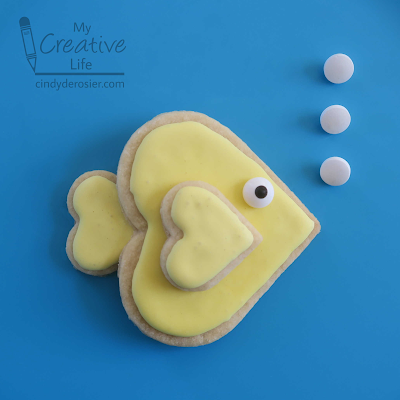
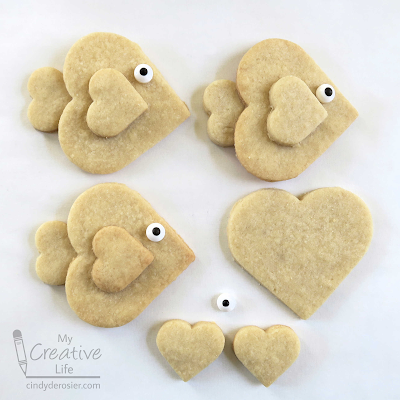
Heart Tropical Fish Cookie - Three heart cookies come together to make a cute tropical fish. Make just one or a whole ocean's worth of brightly colored fish. 

Candy Melt Witches - I had a blast making these witches. The sprinkle eyebrows and mouth add so much expression. Can you guess what I used to make the noses?

Nut Butter Bear - This cute bear is made with two types of rice cakes and two types of nut butter. It's easy to make and really tasty. I've included ideas in the tutorial for substitutions if nut allergies are a concern. 

Ho Ho Bat - I love bats. These delicious treats are made with Ho Hos, Oreos, almonds, and a few other items... including candy eyeballs, of course!

Twinkie Birds - From Ho Hos to Twinkies! Dress up these snack cakes to look like a family of birds. Each is on a stick to make it extra fun to eat. 

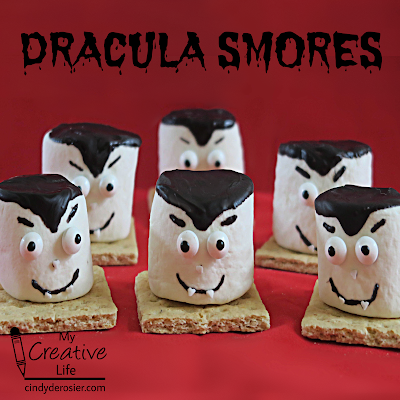
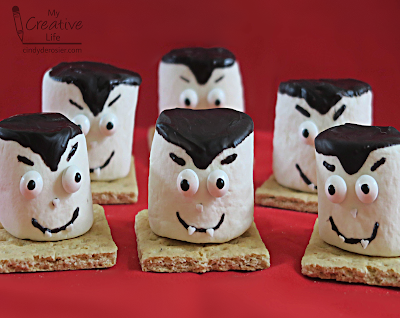
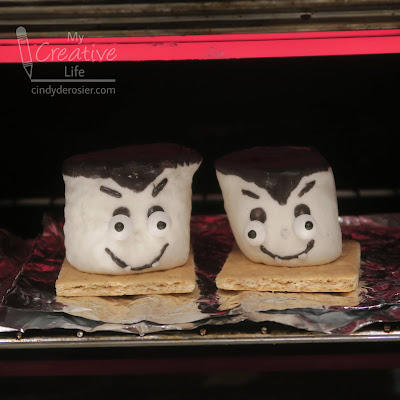
Dracula Smores - Ordinary smores are fun, but Dracula smores are even better. These are so fun to make for Halloween or other vampire-themed occasion. 

Nutter Butter People - It turns out that Nutter Butters are great for turning into different characters. Gather up candy eyeballs and other treats and get creative! I ended up making 7 people and it was so much fun. 

Decorated Donuts - Candy eyeballs and donuts are a match made in heaven. There are so many creative possibilities, but I'm particularly fond of this grouchy cinnamon roll. 

Graham Cracker Owls - Make one graham cracker owl or a whole family. They're quick and easy to make and are such a fun option for snack time. 


Be sure to check out all of the edible crafts I've made featuring candy eyeballs. And if you have an idea for something you'd like me to try, let me know in the comments! I'm happy to give it a go. 

2/24/22

Heart Tropical Fish Cookie

Heart-shaped cookie cutters get most of their use around Valentine's Day, but there are so many other things you can do with hearts. One large heart and two small hearts make an adorable tropical fish. This project gave me a great excuse to make my own royal icing for the first time! Affiliate links below. 


Heart Tropical Fish Cookie


Materials:


Steps: 


Prepare your cookie dough, either from scratch (my preferred recipe linked above) or purchased. For each fish, cut one large heart and two small hearts. Bake the cookies and let them cool completely. Set the cooled cookies and the candy eyeballs on a piece of parchment paper.


Make royal icing and color it as desired. Put it into a piping bag and cover each cookie, leaving a small edge around each cookie. Use the scribe tool to pop any bubbles or drag the icing as needed. Let the icing harden. 

To assemble the cookies, use a bit more royal icing to 'glue' one small heart onto the large heart to make the fin. Add the eyeball above that, then 'glue' the tail fin behind the large heart. Let the icing set before moving the cookies. 


I'm so happy with how these came out! I kept the fish really simple for my first time making my own royal icing, but you can use a variety of colors, or add spots, stripes, or other designs to your fish. There are endless possibilities! I will definitely be experimenting again in the near future.

11/16/21

Turkey Lollipop Cupcake Topper

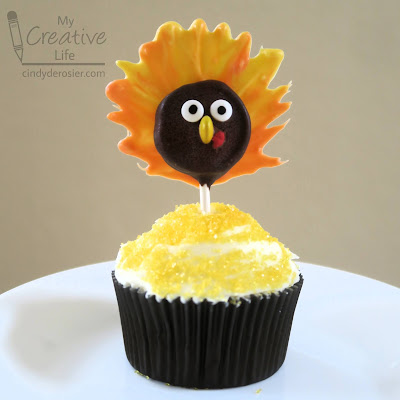
Pumpkin pie is ok, but frankly I'd rather have a turkey lollipop in a cupcake as my Thanksgiving dessert. Affiliate links below. 


Steps: 


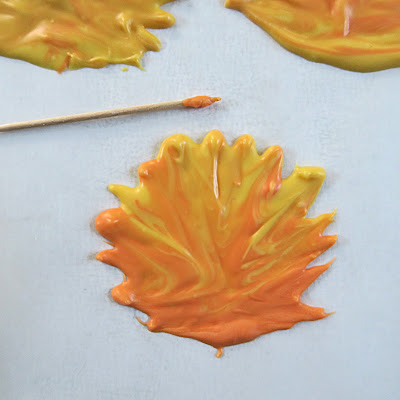
Put a sheet of parchment paper down on your workspace, then prepare the yellow and orange Candy Melts following the directions on the package. Spoon a quarter-sized dollop of orange Candy Melts onto the parchment paper, then add a nickel-sized dollop of yellow directly on top. Drag the toothpick through the candy to blend the colors and make the feathers. Repeat this process for each of the turkeys you'll be making. 


Prepare the rest of your supplies: unwrap the lollipops you'll be using, set out pairs of candy eyeballs, pick out pairs of red mini hearts, and use a sharp knife to cut the mini M&Ms in half (just press straight down, slowly and firmly).  Melt the Dark Cocoa candy melts according to the directions on the package. Dip a lollipop into the melted candy, turning to coat it on all sides. Place it on top of one of the turkey feathers, then place the the eyes, M&M (beak), and hearts (wattle) onto the face. The M&M should be sitting cut-side down and the two teeny hearts should be right up against each other without a gap. 

Repeat this for as many turkeys as you need. Let them set at room temperature for at least 15 minutes, then poke each lollipop turkey into a frosted cupcake. 


What about you? Would you rather have pumpkin pie or a turkey cupcake following the big meal? Or maybe both? Of course, you could pop these turkeys into slices of pumpkin pie or whatever else you're serving. Lots of possibilities!

10/20/21

Dracula Smores

Smores aren't just for summer. Nor are they just for camping. They are just as appropriate indoors for Halloween. Evidence: 


I had so much fun making these! They came out exactly how I'd hoped. Affiliate links and cooking suggestions below. 


Dracula Smores


Materials:


Steps: 


Prepare the Candy Melts according to the package directions. You'll need about 1.5 discs per finished smore. (I used 8 discs for 6 smores and it was just right.)

Dip the top of each marshmallow into the melted candy, then turn it to allow the candy to start to drip down one side to make Dracula's famous widow's peak. Stop the dripping by turning it upside down again. Within 20 seconds or so, it will firm up enough not to drip anymore. 


Use a toothpick to dab a small amount of melted candy to the back of the candy eyeballs and place them on the face. The dip the end of the toothpick in candy and press it to the marshmallow, just above the eyes, to make the eyebrows.


Use the toothpick to make a tiny dot for the nose and attach a white heart sprinkle. Draw a melted candy mouth with the toothpick and attach two heart sprinkles to make the fangs. I had to warm up the melted candy halfway through making my six Draculas. 

Place the Draculas on top of graham cracker halves. You can put a dollop of melted candy down first if you want them to stay in place. I didn't, because I wanted to experiment with cooking my smores. 


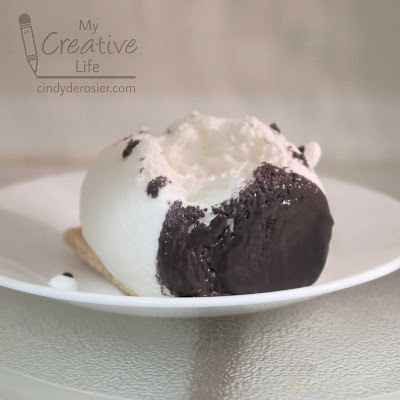
Experiment 1: Microwave. 

I set one smore on a plate and put it into the oven for 45 seconds at 50% power. As expected, it puffed up huge. I didn't not expect the eyeballs to pop off, nor for the face to basically melt away. 


Verdict: Quick, and easy, but with no browning it's missing most of what's good about smores. Not to mention, the end result is decidedly not adorable.  2/10


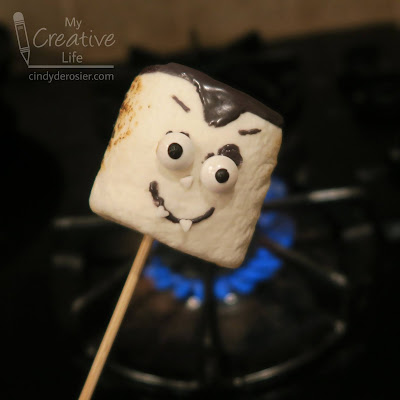
Experiment 2: Stovetop.

I poked a skewer into a Dracula and heated it over the stovetop, attempting to get a perfectly-golden toast while not letting anything drip or drop into the stove and make a huge mess.


Verdict: Not as quick and easy as the microwave, and definitely less safe. The eyes slid a bit despite my efforts to keep that side up. The back of the marshmallow got some nice browning and I was able to get some gooey melting going on.  5/10


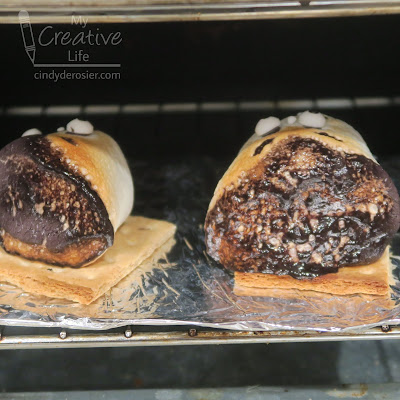
Experiment 3: Toaster Oven. 

I must have been feeling confident, because I put two smores on foil into the toaster oven with the setting on TOAST. Within 30 seconds, their eyes started sliding downhill and their tops were bubbling...


... so I took them out, laid them on their backs, and put the eyeballs back where they belonged. Then I slid them back into the toaster oven. 


When their faces had a decent tan, I took them out and set them back up on their graham crackers. 


Verdict: This took more effort than the other methods, but it yielded the best browning and melting. I was concerned that the hair was burnt, but it wasn't. It tasted like the sugar on top of creme brulee and was nice and crackly. Yum! I think if I'd used white candy melts to attach the eyeballs, it wouldn't be as obvious that they're drooping in the finished Dracula. Next time.  7/10

Enjoy!

8/27/21

Koala Pancakes

I am in awe of the amazingly talented people who create works of art in pancake form. I'm not sure who was first to popularize the technique of using pancake batter on a hot griddle to draw portraits and other intricate designs, but the first I came across was Nathan Shields. His designs are absolutely amazing. I'm blown away by how he achieves such detailed designs by carefully adding lines of batter at just the right time for them to create the dark and light parts of the portrait.   

My brain does not work like that. This koala is my ability level when it comes to creativity with pancakes.
 

To make your own, make a large round pancake for the face, two smaller round pancakes for the ears, and an oval pancake for the nose. Spread Nutella on the nose, the use dots of Nutella to attach candy eyeballs in place (affiliate links). Add a dollop of whipped cream to the inside of each ear right before serving. 

I wanted to give my koala a mouth, but the only food I had on hand that was shaped like a small smile was a black olive. I don't particularly like olives in places where they belong, so I'm certainly not adding them to pancakes with Nutella and whipped cream. I tried using a toothpick to draw a Nutella mouth, but it needed to be darker to stand out against the pancake. I suppose I could have cut a mouth from an extra pancake, or made a tiny mouth-shaped pancake from the beginning. I'm open to other suggestions!

5/10/21

Nut Butter Bear Edible Craft

These edible bears are fun and easy to do. And they are adorable, if I do say so myself. Which I do. Affiliate links below. 


Nut Butter Bear


Materials:


Steps:


Spread peanut butter onto one rice cake and three popcorn mini cakes. 


Put a dollop of Nutella off center on two popcorn mini cakes to make the ears. Stick them in place (the peanut butter will hold them nicely). 

Put a smaller dollop of Nutella directly in the center of the third popcorn mini cake. Position it on the face to make the bear's snout.


Drag a toothpick through the Nutella on the snout to make the bear's smile. Add two candy eyeballs. 


Since I suspect someone will point this out, this project is not appropriate for people with nut allergies or for groups where you don't know for certain that no one has nut allergies. You can make an equally adorable bear using other types of spreads. For example, try Monkey Butter in place of the peanut butter and Apple Butter for the Nutella. There are lots of other possibilities. Don't be afraid to be creative!

2/25/21

Twinkie Bird on a Stick

You had to have guessed that after making a heart from Twinkies I wouldn't just let Steve eat the rest of the Twinkies in the box without using them for a craft first, right? You know me so well. 


I had originally planned to make blue birds, but when I went through my "still need to try" flavorings, nothing made sense with blue. So I switched to pink and used grapefruit oil to flavor it. Affiliate link here and throughout the post. 

Fun fact: When I was a teenager, we had a yellow parakeet named Twinkie. He had a ton of personality. His favorite bird-approved food was oat groats, but he would regularly help himself to all sorts of human food (including chicken) if we left our plates unguarded for two seconds. 


Twinkie Bird on a Stick


Materials: 


Steps: 

Unwrap the desired number of Twinkies (one for each adult bird and one for each pair of baby birds). Insert the lollipop sticks into the Twinkies. 


Set out a set of small eyes and a yellow TicTac for each baby bird. Use a sharp knife to cut yellow M&Ms in half, then set out sets of medium eyes and an M&M half for each adult bird. 

Next, you're going to melt the candy according to the package directions and flavor it as desired. Here's where you need to learn from my mistakes: Do not leave the Twinkies on a wire rack and pour the melted candy over them. And, do not pour the melted candy over the Twinkies and then place them on a wire rack to drain. Why? Because when you remove them, a bunch stays behind. 


Now learn from my next mistake. After the wire rack fails, do not put the melted candy into a narrow glass, thinking you can just dunk the Twinkie and then lift it out perfectly covered. Instead, the stick comes out and the Twinkie stays put. 

Instead, I had the best luck putting the Twinkies onto parchment paper and spooning the candy over them, adding the eyes and beak, and giving them a good dusting of sanding sugar. Then I lifted the bird out of the puddle, dipped the uncoated back side into the puddle, let the excess drip off, and then placed the bird in a clean spot to set up. 


There are five more Twinkies in the box. Any suggestions for what I should make next? I have a few ideas, but I'd love to hear what you think. 

10/22/20

Candy Melt Witches

After making my peanut butter graham cracker owls, I was playing around with the leftover candy eyes and candy corn and realized they'd make awesome witches. My witches are green, because I was born after 1939. Fun fact: People who grew up before 1939 grew up seeing witches portrayed with red or orange skin. Affiliate links below. 


Candy Melt Witches


Materials: 


Steps: 


Put a sheet of parchment paper onto your work surface. Prepare the Candy Melts according to the package directions, then spoon a blob of melted candy onto the parchment. Drag the spoon through it to create a chin. 

Place a piece of candy corn in the middle of the face for the witch's nose. Drizzle additional melted candy over the top. Put the eyes in place, then choose two black jimmies as eyebrows. Push additional jimmies up against the edges of the still-melted candy for hair. Finally, add a sugar pearl wart on the witch's nose. 


Let the candy set for approximately 15 minutes, then peel it from the parchment paper. Every witch is going to turn out a bit different, which is half the fun!


I'd intended these for Halloween, but they would also be fun for a Wizard of Oz themed party. Turn the finished witches upside down, put a lollipop stick on each, then 'glue' the sticks in place with more melted candy for a super fun Witch-on-a-Stick treat. Wouldn't they look cute alongside this famous quintet? (Answer: Yes.)


*Same problem as with the owls. It appears the Wilton candy eyeballs printed with the eyelashes are discontinued. Make your own by drawing eyelashes onto the candy eyeballs I've linked above using a black edible marker. 

10/15/20

Peanut Butter Graham Cracker Owls

 Meet the Owlan family. 


Here are Mr. and Mrs. Owlan with her sister, Owlicia Owlexander. 


Can you tell I had the best time making these? Because I totally did. They were a hit with my family and you should definitely make some. Affiliate links below. 


Peanut Butter Graham Cracker Owls


Ingredients:


Steps: 


To make Owlice, use a knife to spread peanut butter onto a graham cracker. Add two eyes and a candy corn beak. Follow the package directions to melt the Candy Melts, then use that to add the forehead and wings. 


Owlejando is basically the opposite. Start with the cocoa candy melts, add the facial features, then use peanut butter to make the forehead and wings.

To make Owlicia, I spread the peanut butter smoothly, then used a toothpick to draw in the forehead, wings, and tail feathers. 

The owlets (Owlison and Owlex) are made with half a graham cracker each. The easiest way to get them to split cleanly is to use a sharp chef's knife and press down along the score line with equal pressure along the whole knife. Spread peanut butter on each, then pounce the knife up and down repeatedly against the peanut butter to create their fluffy feather texture. Add the eyes and candy corn beaks.   

*I wasn't able to find the Wilton candy eyeballs printed with the eyelashes that I used anywhere online.  I've had them for awhile and it looks like they might be discontinued. You can make your own version by drawing eyelashes onto the candy eyeballs I've linked above with a black edible marker. 

5/15/20

Rice Krispie Treat Pig with Chocolate Mousse Mud

You guys, I am ridiculously pleased with myself because this pig turned out even better than I'd planned. It's inspired by friend Doreen. Doreen has a pet pig (Hamlet) and she is constantly showing off yummy desserts on her blog. 

My pig is made of Rice Krispie Treats and is sitting in chocolate mousse. Hamlet is black, not pink, and is a house pig, so I don't think he does much mud-wallowing. So I took some artistic license with my creation. 


But I didn't forget the curly tail. 


Read on to learn how I made it. Once I figured everything out, it was actually quite easy. (And delicious.) Affiliate links below. 

---------


Rice Krispie Treat Pig with Chocolate Mousse Mud


Ingredients:


Steps: 


Put 1/2 c. cream into a bowl and gently warm it (I did 30 seconds in the microwave). Use a serrated knife to chop the chocolate. Put half of the chocolate into the warm cream and let it sit for about two minutes, then whisk it together. Add the rest of the chopped chocolate and whisk until it is smooth. (Congrats - you've made ganache!)

Pour the remaining 1/2 c. cream into a large bowl and whip it to medium peaks. Gently fold half of the cream into the chocolate mixture. Fold in the rest of the cream. (Congrats - you've made mousse!) Gently spread the mousse into a shallow container and put it in the refrigerator to set up. 

Unwrap a pink Starburst and roll it out on a clean surface. 


Cut out a snout and two ears. I used a knife for the ears and an ancient cookie cutter for the snout (but I totally want this set. Imagine the possibilities!!) Don't eat the Starburst scraps (yet). First, roll a snake then twist it into a tail. Roll two itty bitty balls, then flatten them and put them on the snout to make the nostrils. Now you can eat the scraps. 


Now it's time to coat the rice krispie treat to make it pink. I melted 8 white Candy Melts with 1 red Candy Melt and it was the perfect amount for a single pig. (I did 45 seconds at 50% power in a glass container and then stirred, but every microwave is different).

The easiest way to get good Candy Melt coverage without too much waste or too much mess is to insert a stick into the short end of the rectangular rice krispie treat and spread the melted candy on using a knife. When it is covered on all sides, set it down on a piece of parchment paper. 


Let the candy set up for a minute or two, then place the snout, eyes, and ears in position. Let the candy firm up completely, either at room temperature or in the refrigerator. (Don't put it in the freezer, as it turns out that the condensation makes the eyeballs run when it comes to room temp.) Peel the pig up from the parchment paper. It would make a fun treat just like this, but the mud/mousse makes it more awesome. 


Remove the mousse from the refrigerator. It should have set up considerably so that it holds the pig upright without slumping. (If not, return the mousse to the fridge sans pig and try again later.)


Finally, nestle the pig's tail behind the pig into the mousse. 


Adorable, if I do say so myself! And sooooo yummy!

12/14/18

Oreo Penguins

When our plans to make an Oreo Christmas tree were thwarted, we made Oreo Penguins instead. 


As you can see, they're adorable but far from perfect. A friend once told me that what she loves the most about my blog is that you don't have to have any talent to make the things I share. She immediately blushed and apologized profusely for implying I don't have any talent, but I thought it was hilarious. It's totally true that my projects are not likely to grace the pages of a magazine (except this once!). My projects are doable and rarely require any special skills or expertise. I consider my talent to be thinking up the ideas, figuring out how they're done, and writing clear instructions, rather than the actual execution of the project. Particularly when it comes to edible crafts! So regardless of whether you have any talent or not, go ahead and give these Oreo Penguins a try! Affiliate links below. 


---------


Oreo Penguins 


Materials:


Steps:


Set the Silpat mat on the table with the cooling rack directly above it. Place 4 White Fudge Oreos on the rack, with enough space between them that you can fit your fingers. Use scissors to cut 4 small squares of aluminum foil. Put them on top of one another and fold them in half vertically. Cut the stack of squares into a half teardrop so that they're vaguely heart-shaped when you unfold them. Separate them and press them onto the Oreos, with the end press down the front. In the photo below, you can see three Oreos with the foil positioned on them, plus one piece of foil that I haven't unfolded yet. 


From another angle, with the fourth Oreo now covered:


Melt about 15 black Candy Melts according to the package directions. Drizzle the melted candy over the tops, trying as best you can to avoid the foil-covered area. 


Let the candy set for just a minute or so, then use the tab of foil at the bottom to lift the foil straight up. If you wait too long, you end up with a rough edge instead of a nice smooth line between white and black. If don't wait long enough, you have to be really careful that the extra candy on the foil doesn't slop onto the white portion. How long it takes the candy to set up depends on your room temperature and humidity, so I can't give you a more accurate guess. 

Transfer the penguins to a plate. If you drizzled aggressively, you may end up with a few penguins that are stuck to the cooling rack. Push up from the bottom of the rack with one hand as you're gently pulling up with the other and it should pop free. If you happen to break one doing this, you have my permission to eat it. None of mine broke, so unfortunately I didn't get to eat one. 

Move the now-empty cooling rack, then peel the dripped candy off the Silpat and put it back into the bowl. Remelt the candy. Set up your next four Oreos and repeat the process of adding the foil, drizzling the candy, and then peeling the foil. 


Continue working, four at a time, until all your Oreos are covered. You may need to add more Candy Melts to the bowl. 

In a separate bowl, melt 3 white wafers. Use a toothpick to dot melted white candy onto the backs of the candy eyeballs, then place them on the penguins. They'll set very quickly, so make sure you put them where you want them and don't try to move them. Add a dab of white candy below the eyes and place a sunflower seed beak there. 

Here are some of the penguins I made. As you can see, they are FAR from perfect.


But they are fun! I learned a lot as I went - what consistency is best for the melted candy, where to position the foil and when to remove it, what happens if you try to dip the penguin in the candy melts instead of drizzling, etc. I figured out what to do as I went. Like anything, the more Oreo Penguins I made, the better they turned out. And for a Scout cookie exchange, these imperfect (yet charming) penguins were perfectly fine.  


And I did eventually get to eat one. Delicious!