Did you know that some penguins live in warm climates, one species as far north as the equator? I mention this because we've somehow decided as a society that penguins only live in very cold places (not true) and thus are a winter bird, as if they cease to exist in spring, summer, or fall (also not true). There's an unwritten law that penguin crafting must take place in December and January only. Likewise, owl crafting is for the fall. Flamingo crafts should occur in the summer. None of this makes any sense, since the birds obviously live year-round, but I don't make the rules.
March is when we make bluebird crafts.
Today's tutorial will teach you how to make the wall hanging above, but it you stop midway through you'll have a fun set of finger puppets. Affiliate links below.
Felt Bird Family: Finger Puppets and a Wall Hanging
Materials:
- felt - blue, yellow, brown, green
- microtip scissors
- embroidery floss - blue, yellow, green
- googly eyes
- fiber fill
- cardboard tube (I used the tube from a box of aluminum foil)
- craft glue
- cord for hanging
Steps:
Layer two pieces of light blue felt together, so that when you cut out the birds' bodies and wings, you'll get two of each piece. It's an easy shape, so I cut mine freehand but you can make a pattern on scratch paper first if you'd like.
Next, cut out one yellow triangular beak for each bird. Cut a handful of leaves from the green felt. Wrap the brown felt around the cardboard tube and cut off any excess.
Glue the brown felt around the cardboard tube and set it aside to dry.
Now it's time for sewing. Use three strands of green embroidery floss and a simple backstitch to add the midrib to each leaf. Orient the seam of on the cardboard tube to the back, then glue the leaves in clusters to the front.
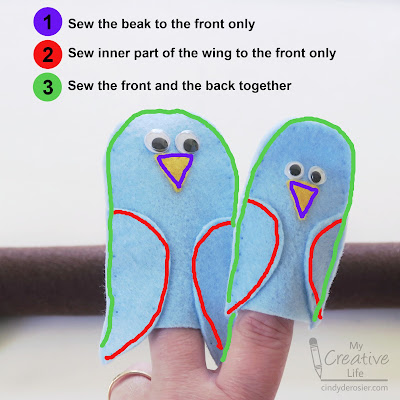
There are three steps to sewing the birds together:
- Separate the two blue body parts of each bird and set aside the back pieces. Use two strands of yellow embroidery floss and a running stitch to attach each beak to the front piece of each bird.
- Sew the INNER portion of the wings to the front piece of each bird, using two strands of blue embroidery floss and a running stitch. The wingtips extend below the birds' bodies; continue the stitch in that area for a uniform look.
- Pair the bird fronts with the backs. Sew around the perimeter, starting at one wingtip and ending at the other wingtip. Don't sew the bottom parts together!
Drop the cord down through the tube and tie a knot to make the hanger. Hang your newly-created branch, adjusting the hanger until it is level. Add glue to the bottoms of the birds' bodies and to their wingtips, then position them on the cardboard tube. The wall will support the birds as they dry.
You can use the same technique to make a wide variety of bird finger puppets or wall hangings. (Even penguins, owls, or other 'seasonal' birds.) Just change out the felt color and other details as needed and craft away!


