

3/30/19
Giveaway!!
Just a reminder - you only have today and tomorrow to comment to win a StickTogether kit. You get to decide which one you'd like to win! Follow this affiliate link, browse through the designs, then leave me a comment here or on the original giveaway post with which kit you'd most like to win. If you can't decide, list the ones you like best and if you're the winner, we'll surprise you!
 Cindy deRosier has a masters in Education and taught 4th and 5th grade for 11 years. She uses that experience to blog about crafts and family-friendly educational travel. She spent many years as the Editor of Fun Family Crafts, a website with over 12,000 kid-friendly craft tutorials. Cindy is the co-author of "What Would Jesus Patent?", does freelance writing and designing, loves jigsaw puzzles, is an avid scrapbooker, and has been to all 50 states.
3/29/19
Bunny Week, Day 5: Bunny Raspberry Hand Pies
Steve mentioned that he'd been craving pie, so I made him a treat for the conclusion of Bunny Week. They're raspberry hand pies and they're delicious. (For humans, that is. Don't feed pie to your bunny. Here are some ideas for bunny-safe treats.)


Start by rolling out your favorite pie dough. Use a bunny-shaped cookie cutter and arrange the bunnies on a Silpat-lined baking sheet. Spread raspberry jam in the center of half of the bunnies, including the ears. Do not overfill them, but don't skimp either. The bottom left is the correct amount.

Get a small dish of water. Use your finger to thoroughly moisten around the edges of an un-jammed bunny, then place it on top of a jammed bunny. Do not skimp on water! This is what seals the pies and keeps the jam in. I experimented with different ways to crimp the bunnies closed (fork tines head on, fork tines from the side, finger pinch, and rolling) and they all worked equally well. The water is the key, not the crimping.

Bend the middle two tines of a plastic fork up, leaving the outer tines intact. Pierce each bunny to make eyes.

Bake your hand pies at 400°F for 10-15 minutes. Let the pies cool until they are safe to touch, then use an edible marker to add a nose and mouth to each bunny.

Happy Bunny Week, everyone!
Cindy deRosier has a masters in Education and taught 4th and 5th grade for 11 years. She uses that experience to blog about crafts and family-friendly educational travel. She spent many years as the Editor of Fun Family Crafts, a website with over 12,000 kid-friendly craft tutorials. Cindy is the co-author of "What Would Jesus Patent?", does freelance writing and designing, loves jigsaw puzzles, is an avid scrapbooker, and has been to all 50 states.
3/28/19
Bunny Week, Day 4: Apple Branch Bribe
Rabbit teeth grow continuously, so it is important that they grind their teeth down. In the wild, rabbits do this by eating fibrous grasses, leaves, and branches. In your house, rabbits will do this by eating baseboards and table legs... unless you give them fibrous grasses, leaves, and branches.
Trouble has access to unlimited hay, plus he gets fresh greens, and a small amount of pellets twice a day. He also gets branches (twigs) often. There are a number of trees that are rabbit-safe, but Trouble has a strong preference for apple branches. He devours them, particularly if there are still leaves attached. So when we wanted to do a photo shoot, an apple branch was the perfect bribe to get Trouble to pose. We had an unexpected bonus when we got a photo of his sweet little tongue!
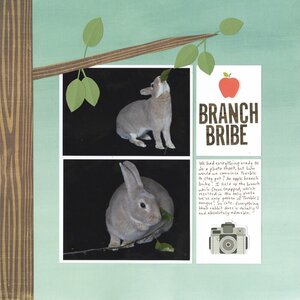
We currently don't have a source for apple branches, so Trouble has had to make do with less-desirable trees. If you're local to me and have an apple tree, let me know. I'd love to come over and get some clippings, or do a full pruning for you at the proper time of year. Just let me know. Trouble would really appreciate it!
Cindy deRosier has a masters in Education and taught 4th and 5th grade for 11 years. She uses that experience to blog about crafts and family-friendly educational travel. She spent many years as the Editor of Fun Family Crafts, a website with over 12,000 kid-friendly craft tutorials. Cindy is the co-author of "What Would Jesus Patent?", does freelance writing and designing, loves jigsaw puzzles, is an avid scrapbooker, and has been to all 50 states.
3/27/19
Bunny Week, Day 3: 'You're Amazing' Bunny Card
I'm blessed with a lot of amazing people in my life, but this card isn't for any of them.

This card is actually for a group of people, none of whom I know personally. In honor of Bunny Week, I'm sending this card to the staff and volunteers of House Rabbit Society. HRS is an international nonprofit animal welfare organization with two main goals:
- Rescue abandoned rabbits and find permanent homes for them.
- Reduce the number of unwanted rabbits and improve bunnies’ lives by helping people better understand these companion animals.
Trouble has changed our lives and made us better people and the HRS has been a big part of that. We will forever be grateful to HRS for educating us and for everything else they do.
Follow this link to see the inspiration for my card. I love these SO much.
---------
"You're Amazing" Bunny Card
Materials:
- white card base
- construction paper or cardstock (tan, white, pink, black)
- scissors
- glue
Steps:
Cut out an egg shape from the white cardstock. Holding it against the tan cardstock, cut out a tan egg that is slightly larger. Fold a scrap of white in half and cut out a tail, making sure not to cut along the fold. Cut two matching ears. With the pink cardstock, cut two inner ears and a nose. Cut two tiny circles for eyes.

Glue half of the tail underneath the wide side of the white egg, leaving the other portion free. Glue the white egg to the tan egg.

Glue the eyes, nose, and ears in place. Add a sentiment, matting it with pink and tan cardstock. Glue the bunny and the sentiment in place.
 Cindy deRosier has a masters in Education and taught 4th and 5th grade for 11 years. She uses that experience to blog about crafts and family-friendly educational travel. She spent many years as the Editor of Fun Family Crafts, a website with over 12,000 kid-friendly craft tutorials. Cindy is the co-author of "What Would Jesus Patent?", does freelance writing and designing, loves jigsaw puzzles, is an avid scrapbooker, and has been to all 50 states.
3/26/19
Bunny Week, Day 2: "What?"
Welcome to Day 2 of Bunny Week, 2019!
Dogs communicate with barks, yips, and growls. Cats purr, meow, and hiss. Rabbits do most (though not all!) of their communication non-verbally. Once you get to know a rabbit, you'll be amazed how much he can communicate to you via ear position, body position, and facial expression.
Trouble picks up his water dish and clanks it against the food dish to tell me it's empty, bonks his nose into my leg when he wants me to pet him, and dances back and forth in front of the kitchen gate when he wants a treat. None of those are especially subtle. His facial expressions, on the other hand, are more nuanced. At least they are until I try to get a picture. Then 9 times out of 10, I get this expression:
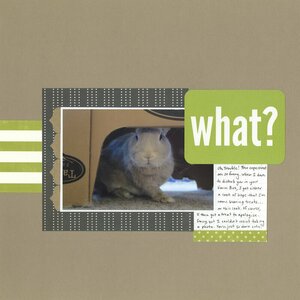 What? (affiliate link)
Dogs communicate with barks, yips, and growls. Cats purr, meow, and hiss. Rabbits do most (though not all!) of their communication non-verbally. Once you get to know a rabbit, you'll be amazed how much he can communicate to you via ear position, body position, and facial expression.
Trouble picks up his water dish and clanks it against the food dish to tell me it's empty, bonks his nose into my leg when he wants me to pet him, and dances back and forth in front of the kitchen gate when he wants a treat. None of those are especially subtle. His facial expressions, on the other hand, are more nuanced. At least they are until I try to get a picture. Then 9 times out of 10, I get this expression:
Can't you just see him asking, "What do you want? Why are you bothering me?" Of course, he doesn't dare ignore me, because it's possible that I am interrupting whatever he's doing to give him something tasty and it would be a tragedy of epic proportions if he did not know about this treasure immediately. It's funny - for an only rabbit, you wouldn't think he'd be so paranoid about eating quickly so that no one else can take his food. But he is. In fact, when I give him a treat, most of the time he will run off with it with a foot flick to remind me that the food is HIS and that I should not even consider trying to get it from him. I then remind him that I gave it to him, so there's no reason to think I'd take it back. We've been having this 'conversation' daily for 8 years. Silly rabbit.
Cindy deRosier has a masters in Education and taught 4th and 5th grade for 11 years. She uses that experience to blog about crafts and family-friendly educational travel. She spent many years as the Editor of Fun Family Crafts, a website with over 12,000 kid-friendly craft tutorials. Cindy is the co-author of "What Would Jesus Patent?", does freelance writing and designing, loves jigsaw puzzles, is an avid scrapbooker, and has been to all 50 states.
3/25/19
Bunny Week, Day 1: Pixelated Bunny Craft and a Giveaway!
Welcome to Bunny Week 2019! Bunny Week is an annual tradition here at My Creative Life, a chance to celebrate All Things Rabbit. I'm starting off Bunny Week with a pixelated rabbit craft.

Place a tan sticker in the upper lefthand corner of the construction paper, leaving a small (and hopefully even) gap between the left and top sides. Line up three more tan stickers immediately below that, leaving no gap between the stickers. Start the next column down one square to shape the bunny's ear. Continue to fill in with stickers. It is easiest to first work down the left ear, across the top of the face, then up the right ear.


That's all there is to it! And obviously, this isn't limited to bunnies. Use your extra StickTogether stickers to make any sort of animal, design, or pattern that you can dream up!

Pixelated Bunny Craft
Materials:
- leftover stickers from a StickTogether kit (tan, black, pink)
- construction paper
- scissors
Steps:
Place a tan sticker in the upper lefthand corner of the construction paper, leaving a small (and hopefully even) gap between the left and top sides. Line up three more tan stickers immediately below that, leaving no gap between the stickers. Start the next column down one square to shape the bunny's ear. Continue to fill in with stickers. It is easiest to first work down the left ear, across the top of the face, then up the right ear.
Complete the rabbit's face. Use the scissors to carefully cut away any excess construction paper.
That's all there is to it! And obviously, this isn't limited to bunnies. Use your extra StickTogether stickers to make any sort of animal, design, or pattern that you can dream up!
Now for the exciting news- my friends at StickTogether are giving away a kit to one of you! Even better, you get to decide which one you'd like to win! Simply follow this affiliate link, browse through their designs, then leave me a comment with which one you'd most like to win. If you can't decide, just list a few you like and if you're the winner, we'll surprise you! I'll announce the winner on Monday, April 1 (no fooling!) so get your comment in by then.
Cindy deRosier has a masters in Education and taught 4th and 5th grade for 11 years. She uses that experience to blog about crafts and family-friendly educational travel. She spent many years as the Editor of Fun Family Crafts, a website with over 12,000 kid-friendly craft tutorials. Cindy is the co-author of "What Would Jesus Patent?", does freelance writing and designing, loves jigsaw puzzles, is an avid scrapbooker, and has been to all 50 states.
3/22/19
Announcements, Plans, and Random Tidbits
A lot has been going on at Casa deRosier. Trevor leaves at 3:00 am tomorrow for a school trip to Washington DC and New York City. The 7th annual Bunny Week starts Monday. I'm prepping our first-ever trip to Europe, an 18-day, 6-country (7 if you count Vatican City, which I totally do) extravaganza. I have new work commitments with deadlines looming. I'm overwhelmed, but (mostly) in a good way. Today's post is a random collection of announcements and other things I've been wanting to share. There are affiliate links throughout the post.
If you're a longtime reader of My Creative Life, you'll know that Bunny Week is an annual event in March. Starting on Monday, you'll get a week of bunny-themed crafts, layouts, and interesting tidbits about the Best Pet Ever. I've long explained Bunny Week as "Like shark week, only fuzzier," so you can understand why I laughed so much when I saw this shirt. The only thing that would make it funnier is if the carrot were a banana instead. Rabbits are crazy about bananas.


---------
Bunny Week 2019
If you're a longtime reader of My Creative Life, you'll know that Bunny Week is an annual event in March. Starting on Monday, you'll get a week of bunny-themed crafts, layouts, and interesting tidbits about the Best Pet Ever. I've long explained Bunny Week as "Like shark week, only fuzzier," so you can understand why I laughed so much when I saw this shirt. The only thing that would make it funnier is if the carrot were a banana instead. Rabbits are crazy about bananas.
Plaid Ambassador
I'm very excited to announce that I am now an ambassador for Plaid, the makers of Folk Art paint (my all-time favorite), Mod Podge, and tons of other fabulous products! Expect to be seeing lots of fun tutorials using Plaid specialty paints and more.

Roundups
It's been awhile since I've shared any roundups. These are the latest ones I've done.
Travel Purchases
I've made a few travel-related purchases for my upcoming adventures. I bought a two-piece set of carry-on luggage in a gorgeous purple that is inexplicably $10-20 cheaper than the other five other colors of the exact same luggage, which are already crazy inexpensive. I love how it's simultaneously lightweight and sturdy. It has tons of room and rolls like a dream.
I also got a fabulous anti-theft purse. It has a bunch of bells and whistles - a locking zipper, secured pockets, slash-proof material with a cut-proof strap, RFID blocking, and more.
Finally, I got myself a two-in-one convertible pillow (changes from U-shaped to square-shaped) for the long-haul flights. I brought it with me in the car to Pinners Conference and it was nice and comfy. When it comes to flying, I'll happily do anything to make the trip even a little bit more pleasant. Tranquilizer darts come to mind, though apparently they're not especially safe or practical for humans. Too bad.
Prime Blogger Conference
Prime Publishing is hosting their inaugural blogger conference, taking place in Chicago in May and I'll be there! I'm really excited to return to the Windy City and take part in this event for craft and food bloggers.

Not coincidentally, I am now an affiliate for FaveCrafts and Recipe Lion. Click the banners below to check out these fabulous free resources.


Giveaway!
I've already had two giveaways during in March and the fun isn't stopping! Return on Monday for another giveaway that you will not want to miss. No image for now so that I don't spoil the surprise!
Cindy deRosier has a masters in Education and taught 4th and 5th grade for 11 years. She uses that experience to blog about crafts and family-friendly educational travel. She spent many years as the Editor of Fun Family Crafts, a website with over 12,000 kid-friendly craft tutorials. Cindy is the co-author of "What Would Jesus Patent?", does freelance writing and designing, loves jigsaw puzzles, is an avid scrapbooker, and has been to all 50 states.
3/21/19
Bandon Family Reunion
I’ve had photos from our 2017 family reunion in Bandon, Oregon cropped and mounted to black cardstock for a REALLY long time. I finally forced myself to sit down and make a title card and journaling card to complete the layout.
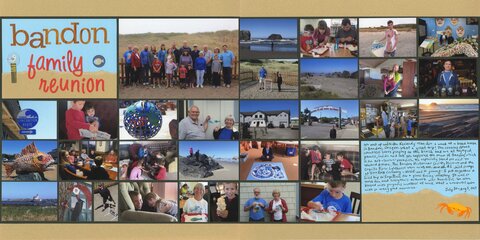
I don't love it, but I'm happy to have it in the album.
Cindy deRosier has a masters in Education and taught 4th and 5th grade for 11 years. She uses that experience to blog about crafts and family-friendly educational travel. She spent many years as the Editor of Fun Family Crafts, a website with over 12,000 kid-friendly craft tutorials. Cindy is the co-author of "What Would Jesus Patent?", does freelance writing and designing, loves jigsaw puzzles, is an avid scrapbooker, and has been to all 50 states.
3/20/19
Scrabble Tile Hanging Welcome Sign
I love Scrabble. I have a huge bag of Scrabble tiles and racks that I got at a thrift store years ago (in addition to the 8 Scrabble boards I own) and was recently digging through them for a collaborative project I'm doing with a friend. After setting aside the letters I needed for that project, I decided to make a welcome sign. Affiliate links below.

---------
Scrabble Tile Hanging Welcome Sign
Materials:
- Scrabble tiles (WELCOME plus a blank)
- Scrabble rack
- Fiskars craft drill
- Folk Art Baby Pink paint
- star punch
- black cardstock
- Supertite glue
- craft glue
- wood bead
- twine
Steps:
Use the craft drill to bore holes 1/4" from each end of the rack. I put a piece of cork beneath the rack, then set it on top of a cardboard box. Oh, the horror stories I've heard about people using the craft drill on their dining room table!

Paint the blank tile pink and set it aside to dry. Punch a star from the black cardstock. Arrange the Scrabble tile in the rack to spell WELCOME, centering them as best you can. Remove one tile, add Supertite glue, then replace it. Do this for the remaining tiles.

Thread the ends of the twine down through the two holes on the rack. Tie a knot in each end. Tie another knot at what will be the top of the hanger to form a loop. Now it's time for glue. Put a dab of glue above the two end knots, then pull snugly against the rack. Add a very small amount of glue to the top of the rack directly to the left of the W and to the right of the E. Press the twine to the glue. This will help it hang upright without tilting. Finally, fold the loop over to make a bow shape and glue it in place.

Glue the black star to the front of the now-pink tile, then glue the tile to the wooden bead.
When everything is dry, it's time to hang your sign. I originally planned to hang the wooden bead on a nail, then hang the welcome sign on that. It worked fine, but I ended up preferring to use a small picture hanger. I put the sign up first, then added the bead to the hanger.
It occurred to me while I was writing the post that I could have added a second rack that hangs below the first to create WELCOME FRIENDS. My sign is already glued in place, but if I ever make another I'm going to do it that way.
I'd planned to end my post after the last sentence, but I couldn't get the WELCOME FRIENDS idea out of my head, so I make a really quick digital mock-up.

I like it. I just might have to make one.
Cindy deRosier has a masters in Education and taught 4th and 5th grade for 11 years. She uses that experience to blog about crafts and family-friendly educational travel. She spent many years as the Editor of Fun Family Crafts, a website with over 12,000 kid-friendly craft tutorials. Cindy is the co-author of "What Would Jesus Patent?", does freelance writing and designing, loves jigsaw puzzles, is an avid scrapbooker, and has been to all 50 states.
3/19/19
Rotating Tabletop for Jigsaw Puzzle Fans
I've told you guys before about the beautiful woodwork my dad has done. Now that my parents moved out of state into a smaller house, his garage workspace is significantly smaller than the workshop he used to have. Fortunately, he still has room for some tinkering. He sent me photos of his latest creation, a rotating tabletop for jigsaw puzzles, thinking I might want to share it with you all. Here it is, sitting on top of a card table.

To work on another section of the puzzle, simply rotate the tabletop.

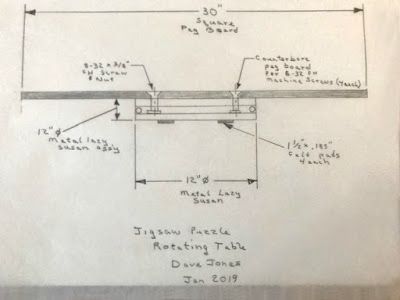


Did you happen to notice the puzzle piece shaped sorting bins (affiliate link) in the photos at the top of the post? We gave those to Dad for Christmas and they are a hit. They interlock and stack, which is so handy. He recommends getting two sets of six.

To work on another section of the puzzle, simply rotate the tabletop.

Cool idea! Here are the plans in case you'd like to make your own.

This is the underside. The felt pads are there so it doesn't harm the table underneath it.

This is what the top looks like when there isn't a puzzle on it.

Obviously, you could paint it whatever color you want. You could use a solid board instead of pegboard if you want a smooth tabletop, but the finished product will be a lot heavier. As is, it's about 7 pounds, making it easy to move and store.
Dad also gave me the cost breakdown. He found everything at Lowe's.
TOTAL COST $30.87
- Pegboard $16.48 (comes as a 4'x8' sheet but they will cut it to size for free)
- Metal Lazy Susan $7.65
- Flat head screw machine screws $1.79 (comes in a package of six sets)
- Felt pads $4.95 (comes in a package of twelve)
Let me know if you end up making your own rotating puzzle tabletop. Thanks for sharing your design, Dad!
Cindy deRosier has a masters in Education and taught 4th and 5th grade for 11 years. She uses that experience to blog about crafts and family-friendly educational travel. She spent many years as the Editor of Fun Family Crafts, a website with over 12,000 kid-friendly craft tutorials. Cindy is the co-author of "What Would Jesus Patent?", does freelance writing and designing, loves jigsaw puzzles, is an avid scrapbooker, and has been to all 50 states.
3/18/19
Pinners Conference California Trip: Sightseeing in San Bernadino County
Rather than spend a second day at Pinners Conference, Jennifer and I played tourist in Ontario and nearby San Bernadino. Jennifer's high school friend, Sandy, joined us for an epic day. I'd never met Sandy before, but we hit it off right away. We both have house rabbits! Check out her awesome sweater. I need one with grey bunnies.

You might think from the photo that we started our morning with Egg McMuffins. Absolutely not! Breakfast was included at the hotel, but even if it hadn't been, we wouldn't have gone to McDonald's. I could do that at home. When I travel, I want something I can't eat at home. So while I had no interest in visiting McDonald's for food, I was all about going to the museum at the site of the first McDonald's restaurant, located in nearby San Bernadino.

As I mentioned in Friday's post, our local friends warned us that San Bernadino has a reputation for crime. A bit of googling reveals that San Bernadino is ranked the most dangerous city in California. Alarming at first glance, but take it with a grain of salt. Vallejo is listed as the #4 most dangerous city in California. I taught there for 11 years and felt perfectly safe (and was perfectly safe) every single day. Most cities have neighborhoods that are better or worse than the others. Oakland and San Francisco (ranked #1 and #7 for crime respectively) are both examples of cities with extreme differences between the best and worst parts of town. And even in the poorer parts of town, common sense goes a long way. Visit during the daytime, travel with others, avoid displaying expensive stuff, and remain aware of your surroundings. Don't buy or sell drugs, don't hang out with gang members, and stay indoors at 2:00 am and you'll significantly reduce your chances of being a victim of a crime in the "most dangerous" cities.

The neighborhood around the McDonald's museum has definitely seen better days (as is true of most areas along Route 66). There are some boarded up buildings and vacant lots and it looks rundown. It's not a place I would walk around alone at night, but it felt perfectly safe during the day. The museum itself is fenced and very well-maintained. Definitely go!

I am not exaggerating when I say that we spent 20 minutes walking around the building before we ever went in. Not only are there a bunch of retro McDonald's rides throughout the grounds, but the building is covered in the most amazing mural I have ever seen. We took a ton of photos and kept spotting things to point out to each other.

A sign declared it, "The World's Most Detailed Mural." It definitely is. I wish I'd put my hand up against the mural to give you a sense of scale. The level of detail was amazing.

Jennifer and I were excited to find Vince's Spaghetti in the mural, where we'd eaten two days earlier. I didn't realize it at the time, but the yellow building pictured to the right of Vince's would be our next stop after the McDonald's Museum!

Sandy and I spent all day long calling out, "Bunny!" whenever we saw one. This one, located on the opposite wall from "The World's Most Detailed Mural," was easy to spot.

Time to pose in the Golden Arches before heading indoors.

The building was jam-packed with everything you can imagine having to do with McDonald's.

We saw menus, food wrappers, advertising posters, restaurant rides, Happy Meal toys, promotional items, and so much more.

There was a section dedicated to The Founder (affiliate link), which Jennifer had coincidentally just watched. I was fascinated and will be watching the movie this week. There was another area about now-famous people who once worked at McDonald's. There were souvenirs from the Olympics that McDonald's sponsored.
I loved it all, but my absolute favorite were the displays about McDonald's restaurants outside the US. There were shelves dedicated to dozens of countries, showing their food wrappers, promotional items, and not-found-here menu items. There was a whole shelf of pie wrappers from around the world. I only ever remember seeing apple pie, but apparently there are places where you can get taro pie, pineapple pie, and corn pie, among many others. (It made me think of the McDonald's burrito in Albuquerque!)

In the same building as the McDonald's Museum, there is a small room dedicated to the history of Juan Pollo, which is a Mexican-style rotisserie chicken restaurant chain. The owner of Juan Pollo, Albert Okura, also owns the McDonald's Museum. Mr. Okura is a very interesting man, a third-generation Japanese American who is very active in restoring and revitalizing Route 66.

We left the McDonald's Museum and drove to another location along Route 66, the beautifully restored Cucamonga Service Station.

I remember when gas cost under a dollar, but I definitely don't remember when it was 17 cents!

Alas, there is no gas for sale here anymore! The museum is very small, but there is lots to see inside. I got a kick out of these Route 66 soda bottles.

Our next stop was at Ontario's oldest business, Graber Olive House. They've been selling olives continually since 1894.

We browsed the grounds and the gift shop while waiting for the guided tour.

The tour took us to see the machinery the seasonal workers use to grade, cure, and can the olives.

During harvest season (October through December), visitors get to watch the process. If you visit in March like we did, the equipment is empty and the machinery is quiet.

After the tour ended, we poked around in Graber's small museum.

By this point, it was after 2:00 pm and we were starving. Where to eat? Juan Pollo, of course! Jennifer and I had never heard of it before visiting the McDonald's Museum and Sandy had seen it but never eaten there.

I ordered "Juan's Bowl" which was absolutely delicious, but enough food for at least three meals. Seriously, if I'd had Steve and Trevor with me, the three of us would have been satisfied!

Sandy had nachos, which I did not photograph, and Jennifer had rotisserie chicken. I had a bite and it was fantastic. Everything was fresh and delicious and very affordable.

We arrived at the Ontario Museum of History and Art at 3:00 pm, aware that we only had one hour until they closed.

The museum is housed inside the former City Hall building. It has two wings connected by a center portion. One wing has two large galleries for temporary exhibits. We saw "Jerry Weems: Visual Histories" and "Danny Lyon: Memories of Southern Civil Rights." Both were so impactful and well worth a visit.
The other wing has a permanent exhibit about the history of Ontario. They are renovating it, so about half was closed. While I would have loved to have seen it, we were short on time so it might have been a blessing in disguise. The part that was open was very well done and I learned a lot about the area. Note the Graber's Olives in the lower right!

Here's a display about Vince's Spaghetti! It's clearly an institution and I'm so glad we ate there.

When the museum closed, we crossed the street and walked a block to this interesting structure.

"What is it?" you ask. A monument to the Mule Car.

From 1888 to 1895, the Mule Car provided public transportation up and down Euclid Avenue. The mule pulled the car up a 1000 foot incline (which took an hour) then rode on a platform behind the car for the gravity-powered return ride (which took 20 minutes). In 1895, when electricity powered the cars, the mules were sold to a farmer. He soon complained that the mules would only pull the plow one direction before expecting a ride back the other way!

Our final stop in our epic tour was just a block away. Logan's Candies has been making candy by hand since 1933.

They host very popular candy making demonstrations in November and December. But there's still plenty to see during the other months. The highlight for me was the "World's Largest Homemade Candy Cane," which is six feet long. That and tasting their ribbon candy. Delicious!

After Logan's, we headed back to the hotel room and collapsed, thrilled with everything we got to see and do. I'm so glad we had a free day to explore the area. It would have been sad to travel there and only see the inside of the Convention Center.
You might have noticed that I didn't mention the admission fees we paid for the three museums or the factory tour. That's because there aren't any admission fees. The McDonald's Museum, the Cucamonga Service Station, the Ontario Museum of History and Art, and the tour at Graber's are all free. It's amazing to me that such high-quality, interesting, and informative places don't charge admission. What a treasure! Definitely visit if you can.
Cindy deRosier has a masters in Education and taught 4th and 5th grade for 11 years. She uses that experience to blog about crafts and family-friendly educational travel. She spent many years as the Editor of Fun Family Crafts, a website with over 12,000 kid-friendly craft tutorials. Cindy is the co-author of "What Would Jesus Patent?", does freelance writing and designing, loves jigsaw puzzles, is an avid scrapbooker, and has been to all 50 states.
Subscribe to:
Posts (Atom)