Showing posts with label Cub Scouts. Show all posts

2/1/22

Painted Newspaper Tiger

2022 is the Year of the Tiger! Here's a craft I think you'll enjoy, whether you need a project for Chinese New Year, as an activity for your 1st grade Cub Scouts, as decorations for a zoo-themed party, or to accompany a study of tigers. It starts with a pile of newspaper and is a great way to develop fine motor skills.     
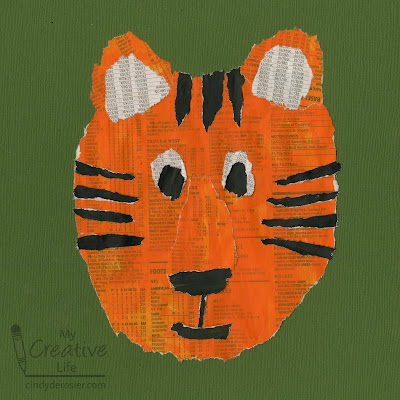


Painted Newspaper Tiger


Materials: 

  • newspaper
  • acrylic paint (orange, black)
  • glue

Steps: 

For each tiger, paint one sheet of newspaper orange and one sheet black.  Leave one sheet white. You won't need that much, but it's better to prepare extra. Try to pick a page with just text, like the sports scores, stock information, or classifieds. Just add one coat of paint - part of the charm of the project is seeing the text showing through. 

When the paint is dry, tear out a large circle for the tiger's face and two small circles for the tiger's ears. Tear slowly and carefully; newspaper tends to want to rip in just one direction, so you'll have to direct it the way you want it to go. If you mess up, no problem. That's why you painted extra. 

Tear two inner ears and two eyes from white, then two small pupils from black. 
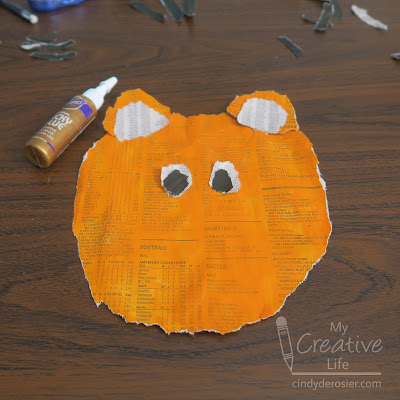

Add a triangular orange muzzle, and a black nose and smile. Glue all the facial features into place. 
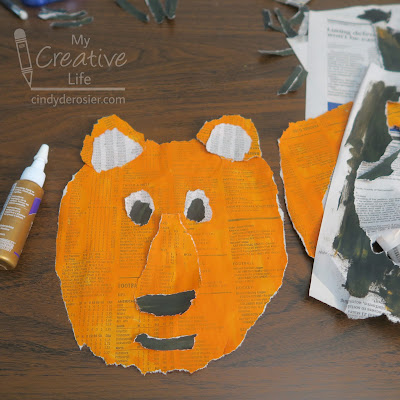

Tear strips of black to make the tiger's stripes. I used three thicker stripes along the top of his heat and four thinner stripes on each side of his face. Glue them in place. Add one very thin stripe to connect the nose to the mouth.  You can hang your tiger as is, or mount it onto contrasting paper like I did. 


Obviously, you can use this technique to make all sorts of animals. I may just do exactly that!


11/22/21

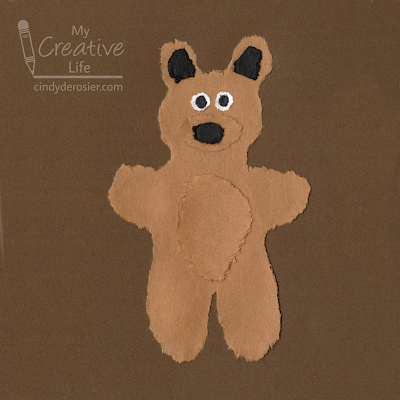
Torn Paper Bear

One of my most popular crafts of all time is this torn paper panda. I don't know if it's popular because it's a panda or because of the unusual technique used to make it, but either way, it generates a lot of traffic to my blog. Part of what makes this project unique is that the cheaper the paper you use, the better it turns out.  

I found some scraps of very inexpensive brown construction paper and thought they'd be perfect for turning into a fuzzy bear. I love how my bear turned out!


Torn Paper Bear


Materials:

  • construction paper (brown, black, white)
  • q-tips
  • a bowl of water 
  • glue

Steps: 

Dip a q-tip in water and "draw" the outline of the bear onto the construction paper. You can draw freehand, or you can create a template first. 


Trace the outline at least twice (more times if you're using higher quality paper). You should be able to see the outline on the back of the paper. If you can't, wet the q-tip again and retrace.   

While the paper is still wet, gently tear out the shape. The paper falls apart easily along the wet line and leaves a fuzzy texture.  

Continue using for the rest of the body parts: brown ovals for the snout and the belly, white circles for the eyes, black circles for the pupils, a black oval for the nose, and black gumdrop shapes for the inner ears.  

Let the paper dry completely, then glue everything together. 


8/5/21

Scrap Paper Photo Frame

One of my favorite art blogs is Making Art Together, the blog of the Eric Carle Museum of Picture Book Art. In this post, Art Educator Sara Ottomotto talked about using the small scraps generated in the Art Studio for future projects in the space. The post inspired me to use my own small scraps for a project, creating a scrap paper photo frame.   


I started with a 4" x 6" photo (a duplicate of a photo from 5+ years ago that I already used on a layout) and a pile of scraps in browns, tans, greens, blues, and reds. My rule for choosing the scraps is that each had to be smaller than the photo in at least one direction. 


I started by adding tan strips behind the edges of the photos to make a mat. Then I repeatedly layered more pieces on top. I didn't give it much thought - I took a piece, added glue, and put it down where I thought it would look good. 

As you can see, I didn't use the red at all. I kept most of the structure browns and tans with some blue, and used the green for pop. The two green triangles on opposite sides help bring the eye in toward the photo instead of out beyond the frame. The two thicker rectangles frame either side of Trevor's face to keep the focus where I want it.  


While the resulting frame is very haphazard, I really like it. I wouldn't have expected something asymmetrical with uneven edges and imperfect cuts to appeal to me so much. I'm so glad I tried this! I definitely want to experiment with this technique again. 


5/10/21

Nut Butter Bear Edible Craft

These edible bears are fun and easy to do. And they are adorable, if I do say so myself. Which I do. Affiliate links below. 


Nut Butter Bear


Materials:


Steps:


Spread peanut butter onto one rice cake and three popcorn mini cakes. 


Put a dollop of Nutella off center on two popcorn mini cakes to make the ears. Stick them in place (the peanut butter will hold them nicely). 

Put a smaller dollop of Nutella directly in the center of the third popcorn mini cake. Position it on the face to make the bear's snout.


Drag a toothpick through the Nutella on the snout to make the bear's smile. Add two candy eyeballs. 


Since I suspect someone will point this out, this project is not appropriate for people with nut allergies or for groups where you don't know for certain that no one has nut allergies. You can make an equally adorable bear using other types of spreads. For example, try Monkey Butter in place of the peanut butter and Apple Butter for the Nutella. There are lots of other possibilities. Don't be afraid to be creative!

7/13/20

Scout Crafts and Games

I've been knocking items off my long-ignored blog to-do list left and right recently! It's amazing how much you can get done when you go nowhere, do nothing, and avoid everyone, lol. Anyway, I've gathered all of my Scout crafts, games, and other ideas into one place. 


As with everything else I've indexed, I'm kicking myself for not doing it sooner. Yes, it was a lot of work, but having everything in one place is so satisfying and makes the posts more accessible and thus more useful. And now that it's in place, it'll be a breeze to maintain.

9/9/19

Cub Scout Pack Pride Pin

I've been cleaning out my Cub Scout leader stuff and passing it on to our local pack. I've unearthed some items I'd forgotten about, like the Pack Pride Pins our Cubs made during their Blue & Gold. In that post back in 2013, I told you I'd share a tutorial in a future post. Oops. I guess this counts as a future post, six years later! Affiliate links below.


Cub Scout Pack Pride Pin


Materials:


Steps:


Sort out the beads you will need. Each Pack Pride Pin needs 4 yellow beads, 10 blue beads, and three number beads. 

Cut a piece of lanyard lace approximately 18" long. Fold it in half and use a cow hitch to attach it to the safety pin. You'll now have two cords hanging down securely from the safety pin.

String one yellow bead through both cords and push it up toward the safety pin. 

For Row 1, lace three beads (blue-yellow-blue) on one cord, then lace the other cord through the same beads in reverse order. Pull both cords snugly.

For Rows 2-4, follow the same steps as Row 1, but replace the yellow bead with a number bead (blue-number-blue). Pull snugly after each row. 

For Row 5, repeat the steps from Row 1. 

String the final yellow bead onto both cords and push it toward Row 5. Tie off the ends with an overhand knot or a square knot. Trim the cords if needed. 

4/10/19

Convert a Photo to a Square (Without Losing Parts of the Image)

I've been going back into the archives making sure I didn't miss any projects when I did my big organization and indexing of all my animal crafts. Sure enough, I found another reptile craft, which I'm very happy about since that category is sorely lacking. I'd forgotten about Trevor's Snake Cake from his early days as a Cub Scout. In order to include it on the indexed page, I needed to convert the existing photo from a rectangle...


.... to a square. 


It wouldn't have been that big of a deal to just crop it square in this case, but there are many projects where doing so would cut off part of the image in an unflattering or confusing way. So I take a few extra steps to preserve the original image while converting to square. Using PicMonkey, I open Design and make a custom canvas size (usually 1000x1000). Then I choose Add Your Own Graphics and put the original photo on top of the plain canvas. I save this file. 


Then I reopen the file in Edit. Next, I make color corrections. The original Snake Cake image is a bit dark, so I adjusted the exposure in the Basic Edits, then used Highlights in the Touch Up menu to lighten the tabletop and the marshmallow eyes a little.


The final step is to use the Clone tool from the Touch Up menu to fill in the white areas to match the tabletop and wall in the original photo.  


I've done this so many times that it takes me just a few minutes to go through the steps to create a square image from a rectangular one. (It's not perfect, but it doesn't need to be since it will be displayed at such a small resolution compared to what you see here.) With new projects, I create the square image from the get-go to save having to go through the steps to create it later.

By the way, not only is this Snake Cake now up on the Reptiles and Amphibians page, but I've added it to my current huge project, which is indexing my edible crafts. I'm almost done, so I'll be sharing that soon! I'm really excited to have all of the edible crafts in one place, and pleased with myself for working hard on another of my 2019 creative resolutions.


12/18/18

Whole Lotta Speakin' Going On

I have three speaking engagements in the next three months. Part of me is saying, "What was I thinking?!" as I'm looking at everything I need to do to prepare (on top of all the regular things I need to do), but most of me is very excited. I love public speaking and I love teaching and I am enthusiastic about my topics.

I told a friend that I had these three classes coming up and that I was stressing about how much work the preparations will be. She asked if I could basically give the same talk three times, since the audiences were completely different. Nope! My three topics could not be more different. (Yet they're all totally me.) I've already told you about two of them:

Come join fellow introverts as Cindy deRosier talks about networking and connecting at Creativation - because you never know who might be the key to the next big break in your business. This seminar will address a variety of things introverts should do at the event and beyond to connect with fellow attendees. Leave with a comfortable strategy for networking. 
Thursday 1/19 at Creativation in Phoenix, AZ


Travel is the ultimate learning experience! Make your family vacations as educational as they are fun. Expect lots of hints, tips, and budget-friendly resources to expand your kids' world (literally!) through educational travel.

Friday 3/8 at Pinners Conference in Ontario, CA


So what's #3? (Well, technically it's #2, because it falls after Creativation and before Pinners.) I'll be presenting at LEAD. (Leader Education And Discovery), which is a leadership training for Scout leaders. 

Join Cindy deRosier for a an action-packed hour of demonstrations and hands-on experiments. Learn how to teach basic chemistry using common household items that will amaze, delight, and educate your Cubs.

Saturday 1/26 at LEAD in Pleasant Hill, CA


With apologizes to Jerry Lee Lewis, there's a Whole Lotta Speakin' Going On.

7/6/18

Webelos 2 - The Last Cub Scout Layout

Trevor's time in Cub Scouts ended in March 2017 and I've scrapped quite a few of the adventures he's had since then as a Boy Scout (like Crab Camp!). I finally went back and finished up the final layout from Cub Scouts. It's hard to summarize an entire year in a page, but I think these photos and the journaling hit the highlights. 

Webelos 2 (affiliate link)

Trevor had a wonderful experience in Cub Scouts and so did we. While we miss the friends we had in Cub Scouts, I'm so glad for the new friends and continued adventures we're having in Boy Scouts. 

2/20/18

Camp Lassen, Year 3

I've gotten another step closer to scrapping the remaining photos from Trevor's time in Cub Scouts. This two-page spread is from 2016, his third and final trip to Camp Lassen as a Cub.

Camp Lassen (affiliate link)

Since I scrapped this about 18 months after the trip, there was no way I could remember the details from a trip I didn't even attend. Thank goodness I keep a daily journal about Trevor's life (412 typed pages and counting). I just searched the document for Camp Lassen, then copied what I'd typed onto the journaling block, as good as if I'd scrapped it the day they'd returned home from camp! 

2/15/18

Webelos 1, Scrapped and in the Album

Trevor has been a Boy Scout for 11 months now, which means that it's about time I finished up the layouts from his time as a Cub Scout. This double-page spread covers his first year of Webelos (2015-2016).

Webelos 1 (affiliate link)

As you can see, I included as many photos as I possibly could, showing the wide variety of activities from the year. I made sure to include the other boys as often as possible, but the focus is definitely on Trevor. I used two fussy-cut photos and the sun sticker to form a visual triangle, but that's about it as far as design goes. 

I should add that I had to piece together the blue backgrounds in the upper left and lower right. All I had were small scraps, but I really wanted to use them up. The yellow text boxes and photos are placed very strategically to hide the seams as best I could!

7/31/17

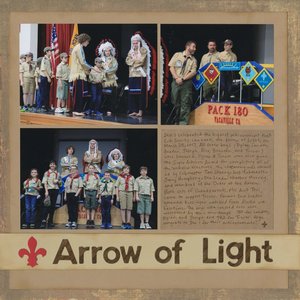
Arrow of Light

The Arrow of Light is the highest award given in Cub Scouts. Trevor and his denmates had their Arrow of Light ceremony in March. The ceremony is conducted by the Order of the Arrow, the national honor society of the Boy Scouts of America.

Arrow of Light (affiliate link)


The night was one of mixed emotions. We were all proud to see our boys' hard work recognized, but saddened that the Cub Scout journey was over and the seven boys would no longer be together. One of the last things a boy does before earning the Arrow of Light is to visit Boy Scout troops to find the one that is a good fit for him. Trevor was the only one to choose the troop he did. You can see this represented with the different neckerchiefs the boys are wearing in the posed photo after the ceremony. (The Scout with no neckerchief is not continuing on into Boy Scouts.) 


I'm proud of Trevor for choosing the right troop for him, even if it meant separating from good friends. So far, he absolutely loves his troop. And we've found ways for him to stay connected to his Cub Scout friends and share their scouting journeys. I'll share a layout about that soon.  

7/13/17

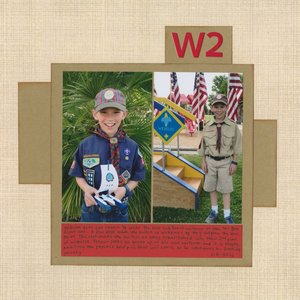
The Tan Shirt

It's a big deal for most Cub Scouts to make the transition from the blue uniform the younger kids wear to the tan uniform of the older Scouts. This can happen any time during the 2-year Webelos program. Trevor switched shirts at the end of his fourth grade year, at the midpoint of his time in Webelos.

W2 - Tan Shirt (affiliate link)
The two photos were taken about two weeks apart. You can see that Trevor is wearing the same Webelos hat and neckerchief in both photos. We made the decision not to transfer his many patches and other awards off the blue uniform so that he could keep it as a reminder of all he accomplished as a Cub Scout. 

3/6/17

40-4-Steve: Wood Badge

Steve has one huge regret from childhood... that he never became an Eagle Scout. He was active in Cub Scouts and then Boy Scouts and made it all the way to Life (the rank before Eagle) before dropping out. Despite his deep regret, there's nothing he can do about it now, as you can't earn Eagle as an adult. You can, however, complete Wood Badge. So I signed him up for the training as part of my 40-4-Steve project. 

Wood Badge starts with two weekends of intense training. Steve's took place at Camp Herms. He absolutely loved the experience. Here he is (2nd from the right) with the rest of the people in his patrol. 


Each patrol is given an animal name. Steve is part of the Bobwhite Patrol. After completing his trainings, he asked me to make a thank-you card for his mentor. I drew and colored a bobwhite (after looking up what exactly a bobwhite looks like) and added the Wood Badge log and hatchet. I stamped a sentiment, then added stickers representing Steve's Wood Badge course number. 


The weekend trainings are just the start of Wood Badge. The real work comes over the next 18 months as participants set and achieve goals related to different areas of Scouting. Each goal is called a 'ticket' and the process of completing them is called 'working your ticket.' That's where Steve is right now. 

Keep up the hard work, Steve. We're proud of you!

2/10/17

Trevor's Last Pinewood Derby, 2017

Trevor is enjoying his last few weeks of Cub Scouts before bridging to Boy Scouts in March. We've visited four local Boy Scout troops so far in hopes that Trevor will find his perfect fit. One troop has risen above the rest, but his decision isn't final yet. Soon, though! Because of this upcoming transition, it has been a year of 'lasts' for Trevor. Here's his last Pinewood Derby car:


As usual, Trevor came up with the design, sketched it, and did the cutting in Grandpa's wood shop. He brought the pieces home to paint and assemble. 

---------

Golden Gate Bridge Derby Car


Materials: 

  • Pinewood Derby kit
  • dowels
  • paint (blue, grey, red-orange)
  • craft glue
  • black cardstock
  • yellow paint pen
  • hole punch
  • red Twisteez wire

After donning eye protection, Trevor turned the block of wood that would be his car on its side, then used the scroll saw to cut a rectangular portion out. He used the drill press to drill four holes and cut dowels to length to fit in the holes.

He painted the middle portion of the car blue, then let that dry. 


He painted the dowels an orangey-red. 


At this point, he headed out to the garage with Steve to put the wheels on the car. 

Then he painted the ends of the car grey. He used craft glue to put the dowels in place. Then he cut a rectangle of black cardstock and used a yellow paint pen to draw lines down the center. He marked where the road would touch each dowel, then used the hole punch to remove a portion of the road so it would fit around the dowel. He glued the road in place. The final step was cutting the wires and gluing them in place. He used E-6000 and it held well throughout his races.


So how did his car do in the races? Well... Trevor knew going in that his design would be slow and it was. Fortunately, it looked so cool that it made up for its poor performance. That's a bit of a tradition for Trevor - awesome design, so-so speed. You can see all of Trevor's previous awesome designs, including an eraser, a spaceship, a dragon and a mouse here. That same link has my past cars, as well as Steve's and one made by my nephew, Timothy.


11/15/16

Cub Scout Fleece Blanket Project

Trevor's Cub Scout den held a recent meeting in an unusual place... the fabric store!


Each boy picked out a solid and a patterned fleece to make tied blankets, which we will be donating to a shelter in town. Check out Trevor's patterned fabric. It's obvious he was very influenced by our New Mexico trip! 

Steve helped out by holding the red and the orange solids against the patterned fleece so Trevor could make a decision. He chose the red.


Off to the cutting counter! We need 1.5 yards of each fabric. That plaid to Trevor's right is the one I picked out. Can't leave me out of a crafting opportunity!


Holly commandeered the pattern table and taught the boys how to make the blankets. 


Trevor got started first thing in the morning before school. Trouble helped.


To make the blanket, put the fabrics together with the right sides out, then trim as needed so they are the same size. Cut a square from each corner (4" x 4" is a good size) and discard. 


Starting from one corner, cut a strip approximately 1" wide and 4" deep, making sure to cut through both layers of fabric. Tie the two pieces of fleece together in a double knot. Repeat this all the way around the blanket. This is easier to do without a rabbit on the blanket as you work. Fortunately, Trouble got distracted by the empty bag, snatched the store circular sitting next to it, and ran off to do some nibbling.


I used a different tying technique to do my blanket. I prefer no bulky knots, so I followed these instructions. (The next time I make a fleece blanket, I'm going to try this method.)


Here we are, showing off our completed blankets. 


Our Cub Scout den will be visiting the shelter soon to deliver the blankets to those in need. Good work, Scouts!

10/25/16

Cackling Witch (or Clucking Chicken) Science Experiment

Tonight is 'Weird Science Night' for our Cub Scout Pack. I'm in charge of one of the stations. For my own sanity, I wanted to choose an experiment that wasn't messy, complicated or required any degree of focus. Picture three dozen 6-10 year old boys, in costumes, running around doing science experiments... and you'll probably see why I wanted to keep things simple.

My inspiration came from the Witch Craft Trevor and I made a few years ago.


Perhaps you're familiar with the Clucking Chicken experiment about sound? Well, a clucking chicken and a cackling witch sound pretty similar, so I decided that was just the right Halloween twist to put on this experiment.


---------

Cackling Witch Noisemaker


Materials:


  • paperclip
  • yarn (affiliate link), approximately 2 feet
  • plastic cup
  • hand drill (affiliate link) or nail 
  • paper towel
  • water

Steps:


1. Tie the piece of yarn to the paperclip.
2. Use the drill or nail to poke a hole in the bottom of the cup.
3. Thread the loose end of the yarn through the hole. Pull it all the way through until the paperclip stops it.


4. Fold the paper towel to the size of a dollar bill. Moisten it in water.
5. Hold the cup with one hand and the paper towel with the other. Grasp the dangling yarn near the top of the cup, pinching the paper towel around it.
6. Pull downward with a jerking motion. It should sound like a cackling witch!


What’s Happening:


You’ve created a sound board! When you jerk the string, it causes vibrations. These would be almost silent without the cup, but the cup spreads the vibrations and makes them louder. This is the same thing that happens in a piano or a music box – the wood amplifies the sound of the vibrations that we hear as music.


---------

Easy, not messy, and very little need for the kids to listen and focus. Will my sanity be preserved, or will I soon regret providing 38 boys with noisemakers in an enclosed space? How many parents will curse the day I taught their sons to make said noisemakers? Will any of them be speaking to me after the event is over? Or, will the ringing in my ears be enough that I can't tell whether anyone is speaking to me or not? Wish me luck!

10/20/16

Camp Lassen, 2015

Trevor will graduate from Cub Scouts in March, so it's time to get all of his Scout layouts completed. Today's is from Camp Lassen, 2015.


Once again, I struggled with this layout because I wasn't there and I had to decide which pictures best told a story that I didn't experience. It didn't help that it took place over a year ago; fortunately, I was able to look back in my daily journal. Not the first time it has come in handy!