6/28/19

I'd Rather Be Camping

I was chatting with the District Executive of Trevor's Scout troop at a recent event and he asked me if I like camping. I assured him that I do... as long as there are flush toilets somewhat nearby and I don't have to schlep all my stuff more than a short distance between the car and the campsite. I am fine with sleeping on the ground. I can easily go for 3 or 4 days without a shower or a mirror. Bugs and other critters don't bother me. Cooking over a fire or camp stove is fun. Being in nature is great.

In other words, I love car camping. I hate backpacking and/or being in the backcountry. Carrying stuff any distance is not fun. Blazing trails is awful. Treating water is a pain in the neck. Backpacking food is lousy. And living without a flushing toilet and a way to properly wash my hands is unacceptable.

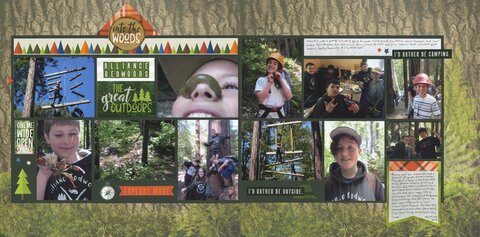
When Trevor's Scout troop planned a car camping trip focused on orienteering and geocaching, I happily accepted the invitation to come along. I'm so glad I did. It was a really fun trip. I even had my own private bathroom, as the only female on the trip - such luxury! Not to mention, the boys did all the work cooking and cleaning. Now that's my kind of camping trip.

I'd Rather Be Camping


I put this layout together using goodies I received from Paper House Productions. With the exception of the background paper, everything came from the Great Outdoors collection (affiliate link). I love the canteen dangling from the title sticker. So cute. And I love that the orange tent matches the one in the photos on the right. It was a really fun layout to put together. And yes, I am in the group photo at the top right, so there is evidence that I was actually there. 

6/27/19

Best FREE Family-Friendly Factory Tours

When I was a kid, I was obsessed with the Hershey’s chocolate factory in Oakdale, CA. We passed by it when we drove to our cabin, and my parents were happy to stop and take the tour any time it was open. That was the problem. Tours were only during business hours on weekdays and never on holidays. When did we go to our cabin? When school was out... weekends and holidays. We toured successfully about 8 times over the years before Hershey left Oakdale. Each time was incredible. I loved smelling the chocolate scent that permeated everything, watching the machines make row after row of perfectly aligned Kisses, seeing the rolls of foil transform into wrappers, and eating the samples. I thought it was magical getting to watch how something I loved was made.

I still love factory tours as much as I did when I was a kid. Steve and Trevor love them too. Visiting them is a priority for us when we travel. The only thing better than an awesome factory tour? A FREE awesome factory tour. Below are seven of our favorites.


---------


Jelly Belly Candy Company (Fairfield, California)


There is so much to love about the Jelly Belly factory tour! The smell alone is reason to go. We live less than five miles away, so I can't even begin to count the number of times we've been there. Twenty? Probably more. They have special events at all of the holidays. When Trevor was younger, we always went to their annual Munchkin Masquerade, which is tons of fun.


No matter when you go, the tour is great. It's self-paced, with hands-on activities and challenges along the way. You get to watch all the stages of production. There are generous samples at the end of the tour, as well as at the Sample Bar in the retail shop. Don’t skip the cafe! Their jelly-belly shaped pizza and burgers are delicious, as is everything else on the menu. The retail shop has lots of great stuff for sale, but my favorite are the Belly Flops. These discount Jelly Bellies are a bit misshapen, but just as delicious as the others.


---------

Bob's Red Mill (Milwaukie, Oregon)


The tour at Bob's Red Mill was a highlight for me during our visit to Portland. The free guided tour was educational, interesting, and surprisingly hands-on. We loved working together as a group to identify beans (no bean experts among us, apparently!) and touching all of the exotic grains. Trevor got to grind wheat, which was really cool. We followed up our tour with lunch at their amazing restaurant at Bob's Red Mill Store- I'd eat there all the time if I were local.


---------

Snyder's of Hanover (Hanover, Pennsylvania)


We really enjoyed the tour at Snyder's of Hanover. The guided walking tour takes you to see the raw materials warehouse, the warehouse for finished product, the packing room, and the oven room, where the scent of baking pretzels is incredible. I was surprised to learn how many different products are under the Snyder's umbrella; they make a lot more than pretzels! We tried to stump our guide with all sorts of questions, but she was a walking encyclopedia who knew pretty much everything about Snyder's and their products.


---------

Utz Potato Chips (Hanover, Pennsylvania)


While you are in Hanover, don't miss the Potato Chip Trip at Utz. This self-guided tour lets you walk along an observation gallery and see the entire chip-making process from beginning to end. It was so cool seeing potatoes go in one end and packaged chips come out the other. We'd never tried Utz products before; after getting free samples, we're hooked!


---------

Celestial Seasonings (Boulder, Colorado)


I don't like regular tea, but I am a big fan of certain herbal teas by Celestial Seasonings. My favorite is Cinnamon Apple Spice - yum! The tour at Celestial Seasonings starts with serve-yourself samples of dozens of different teas. This is a great way to try new flavors without committing to buying a whole box. We each discovered some flavors we liked that we might not ordinarily have even tried.

After a video, then the tour goes right into the manufacturing facility. It is so interesting seeing all the raw ingredients and how they are transformed into products that are ready to ship. My favorite part of the tour is the Mint Room. Because mint is so strong, they have to keep it segregated in its own locked room so that it doesn't impart flavors into other types of tea. Entering the Mint Room is indescribable. Mint explodes at your senses in the very best of ways. It's like aromatherapy times a thousand. 


---------

Buffalo Trace Distillery (Frankfort, Kentucky)


It may surprise you that I'm including a distillery in an article about family-friendly tours, but Buffalo Trace offers an interesting and educational tour that is appropriate for all ages. I'm not a bourbon fan (and obviously, neither was 12-year old Trevor), but we enjoyed the tour just as much as Steve, who is a bourbon fan. You don't have to use the finished product to learn about how it's made and its role in the history of the area. Bourbon is an important industry in Kentucky and Buffalo Trace runs a top-notch tour. The tour ends with bourbon tasting and bourbon-filled chocolates; anyone who didn't want bourbon, for whatever reason, sampled root beer and plain chocolate.


---------

Tillamook Cheese Factory (Tillamook, Oregon)


Cheese is one of my very favorite foods and Tillamook makes some of the best. The farm exhibit is informative and interesting, but the best was seeing each step of the cheesemaking process on their tour. I particularly watching the huge blocks being cut into consumer-sized portions. And tasting all the samples. That part was awesome.


---------

We're always on the lookout for family-friendly factory tours when we travel. If you've been to one that's great, please let me know in the comments. Bonus points if the tour is free!

6/26/19

Creative Ways to Give Money as a Gift

I've been working really hard indexing all my crafts. It's been a huge job, but so worth it. I LOVE having all my crafts organized visually by topic. My latest efforts have been with all the money gifts I've done over the years. This icon now appears on my Crafts by Holiday/Topic tab.


When you click it, you'll go to a page with 24 ideas for creative and thoughtful ways to give money. I hadn't realized I'd made so many different money projects over the years. It's so much fun seeing them all in one place. And it reminds me that I need to start planning for the next money gifts! Timothy's birthday and Christmas will be here before I know it.

6/25/19

8 Years (and Counting!) with a House Rabbit

Today marks eight years since we adopted Trouble. (Best decision ever.) Trouble is a house rabbit, meaning that he roams free throughout the house and is not confided to a cage. We knew next to nothing about rabbits when we adopted him and worked hard to learn as much as we could to let him have the happiest, healthiest life possible. The House Rabbit Society is a wonderful source for information that I highly recommend.

One thing we learned is how rabbits like to be petted. It's totally different than the way most dogs or cats prefer. This illustration is commonly found on many rabbit sites and gives you a general idea of where to pet a rabbit, and more importantly, where rabbits do not like being touched.


While it is an excellent starting point for unfamiliar rabbits, as you get to know a particular rabbit you'll learn how and where they want to be petted. A member of a house rabbit Facebook group I'm in posted the Bun Petting Preference Chart by Winnie the Wonderbun and suggested we each fill it out. This is what Trouble's looks like. 


You can see from a quick image search that many rabbits like (or hate) being petted in similar areas, but there is a lot of variation between individuals. It's no surprise. Rabbits' personalities and preferences are as diverse as any other animals' personalities and preferences are.  

Here is a blank copy of the Bun Petting Preference Chart. 


Happy Adoption Day, Trouble. You are the best and we love you so much.

6/24/19

Life with Aphantasia

I've spent my whole life knowing there's something wrong with me. Not different - wrong. Broken. Absent. When I'm asked to picture something in my head, I see nothing. It's frustrating and, at times, lonely.


Two months ago, I learned that the defect that has been with me for 47 years has a name: aphantasia. Since then, I've been greedily soaking up as much information as I can find about it, watching countless videos of people with the same condition. (This video could be me, almost word for word.) Many of the interviews feature someone saying they had no idea they were different. I've always known other people had mental images and I didn't. I've been trying my whole life to get those images, practicing like you'd practice trying to wiggle your ears on command (which I can't do either). I dream vividly, so I know it's there. I just can't get to it, like trying to see through a solid wall. I decided I just wasn't doing it right and everyone else had figured out something I couldn't. It's incredibly frustrating.

Learning that this condition has a name was huge, as was discovering that up to 2% of the population also has aphantasia. I'm not alone! Others get it! After creating the graphic above, I went in search of graphics other people had made about their experiences with aphantasia. There are many. Below are some that really spoke to me. You can read their stories in the link below each image.


One of my friends commented about how amazing it is that I can create what I do without a way to visualize it. I figure out my craft designs via sketching, not by picturing them in my head. Ideas pop into my head, but it isn't until I work them out on paper that I can see them. When I scrapbook, I just start moving pictures and papers around until I'm happy with it. I wish I could picture things in my head, but I can't. Perhaps someday, but probably not. But I'm going to keep trying.

6/21/19

Sixth Grade Science Camp at Alliance Redwoods

I received a big box of goodies from Paper House Productions recently (affiliate link here and throughout the post). It was like Christmas! The box was stuffed with all sorts of fun papers, stickers, washi, and more. I couldn't wait to dig in. I found some papers and stickers that were perfect for documenting Trevor's week at Alliance Redwoods with his sixth grade class and got to work. 

Sixth Grade Camp at Alliance Redwoods

Since Trevor and his classmates camped in the redwoods, the Tree Bark papers were the natural choice for my background. Because the two sheets are identical, I laid out the photos to cover the the most obvious details so it wouldn't look weird. For example, you can see the fern on the right hand side, but I've completely covered it on paper on the left. If you look closely at the tree bark, you can see that the papers are indeed a perfect match. 

After matting the photos, I filled in the gaps with elements from the sticker sheet in the Great Outdoors Camping kit. It's rare that I use so many from one sticker sheet, but I couldn't help myself! For my journaling spots and title block, I cut pieces of the Gone Fishin' paper. There's a very subtle tree pattern that you can barely see behind my journaling. After adding the letter stickers for the title and writing my journaling, I trimmed an orange frame sticker to highlight both elements and create a visual triangle of orange. 

I love how this 2-pager came out!

6/20/19

Ice Cream Sandwich Craft

It may seem that I'm a bit obsessed with ice cream lately. I assure you that is incorrect. Not because I'm not obsessed. It's the 'lately' part that's wrong. I've been obsessed with ice cream for a very long time, but summer is the perfect time to share ice-cream related posts.

The inspiration for today's craft came from this ADORABLE plush toy (affiliate link). My version is made with construction paper.


---------


Ice Cream Sandwich Craft


Materials: 

  • construction paper (brown, pink, cream)
  • scissors
  • googly eyes
  • craft glue


Steps: 


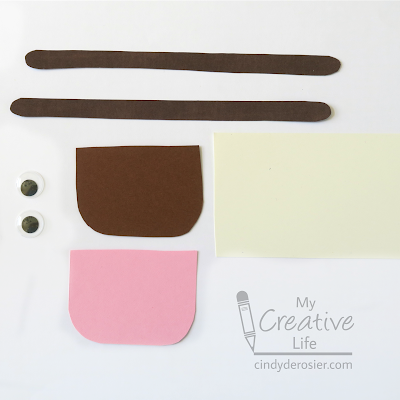
Cut a rectangle of cream-colored construction paper the size you want your ice cream sandwich to be. Using it as a guide, cut out the chocolate and strawberry ice cream sections. Then cut two long, thin brown strips as shown below. I used two different shades of brown because I was using up scraps I had on hand, but you can do whatever. You could even substitute craft sticks and paint them brown. 


Glue the parts together and that's all there is to it. Couldn't be easier! 

6/19/19

Travis Air Museum with Dad

I've done plenty of crafting recently, but I haven't actually done any scrapbooking since National Scrapbook Day (May 4). It's like this every year - a ton of scrapping the first weekend in May for NSD, then none until we get past our anniversary, the end of school, and Trevor's birthday. And this year, the Prime Blogger Conference in Chicago. All good, but the last six weeks have been about making the memories instead of documenting the memories!  

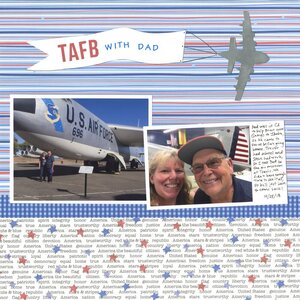
This page is about a visit with my dad. He was in town on a weekday last fall. Trevor had school and Steve had work, so I took Dad to Travis Air Force Base Heritage Center. (I had to look that up to see what it's called now. I've been there at least a dozen times and I know it as Travis Air Museum, but that was two name changes ago. Old habits die hard.) We had a good time together checking out the exhibits outside and in. It's a neat museum - make a point to go if you're local or visiting my neck of the woods. 

TAFB with Dad (affiliate link)


I started this page with an airplane-themed patterned paper in yellows and grays, but it just wasn't working. Even though the gray plane and our selfie could theoretically go with any color, I couldn't get it to look right. When I switched to patriotic colors, the layout came together easily. I'm particularly happy with how the airplane banner turned out. I cut it freehand and darkened the edges with gray ink, added the stickers, then drew lines connecting it to the die-cut airplane (which I painted gray and then inked). I'm very pleased to have this in page in the album. 

6/18/19

Llama Diamond Art Altered Journal

I've been waiting a LONG time to share this with you and I finally can! I made this Llama Diamond Art Altered Notebook in February using supplies I received at the FaveCrafts Blogger Networking Event during Creativation. This post contains affiliate links. 


---------


Llama Diamond Art Altered Notebook


Materials:


Steps:

The first thing I did was complete the llama Diamond Art. I see no reason why a llama should be subject to drama, so....   


... I used the microtip scissors to carefully cut the llama away from the rest of the canvas. No drama for you, llama! 


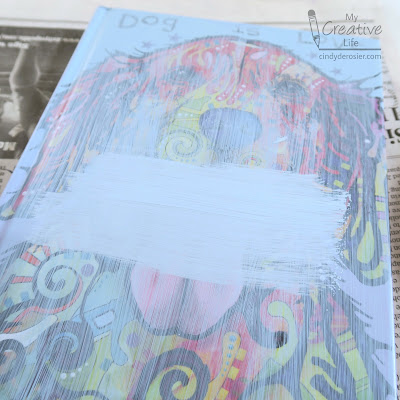
I grew up with dogs and like them just fine, but didn't see myself using a 'Dog is Love' journal, so....


.... I painted over the design. I used Folk Art's multi-surface acrylic and applied a very thin coat.


When it was dry, I added another thin coat going the opposite direction. I added a third coat going the original direction, though it really wasn't necessary. Two coats gave good coverage.


Next, I cut out 'LOVE' from the Kindness Matters coloring book. 


I colored the letters black and the interior of the O and the E a hot pink that matched the color in the Diamond Art. 

I applied a thin coat of Mod Podge to the front of the book, then positioned the letters. I added two more coats of Mod Podge over the entire front cover, allowing plenty of drying time between coats. 


I used the Supertite glue to attach the llama to the front cover, then used a few of the leftover Dotz to fill in the letters.


I am so happy with how the completed journal turned out!


No drama for you, llama! Only love.

6/17/19

Ice Cream Sundae Craft

Last week, I shared the recipe for a delicious PB&J sundae. Today's sundae isn't edible, but it's a fun project for summer. I've had the idea of using wax paper to make a sundae glass for awhile and finally got around to trying it out. I've decided wax paper is underrated as a craft supply. Most people have it on hand and there are a lot of ways to use it. Unfortunately, it doesn't scan well. It looks much better in person.


---------

Ice Cream Sundae Craft


Materials: 

  • construction paper or patterned paper
  • scissors
  • wax paper
  • craft glue / tape runner


Steps:


Cut out ice cream scoop(s), chocolate sauce, a cherry, a stem, and whipped cream, as shown below. Of course, you can change out the ice cream and sauce flavors and add whatever other toppings you'd like.


It is difficult to cut a symmetric shape without folding the material you're cutting, which you want to avoid with wax paper. Instead, make a template. Fold a piece of scratch paper in half, then cut out the shape of the glass. Open it and see if you like the shape. If not, fold it and make small cuts until you are satisfied. Place a piece of wax paper on top of your template and cut it out. 


Now, glue everything together EXCEPT the glass. Because the wax paper is transparent, you need to be careful how you apply the glue. Directly below is Trevor's sundae. He used a tape runner to add small bits of adhesive to the glass. If you look carefully, you can see the adhesive spots in the ice cream area, but they're virtually invisible everywhere else. 


By contrast, I used craft glue to attach my glass. It is virtually invisible on the ice cream area, but shows a little bit on the glass. Worse, I didn't notice the wrinkles in the base of my glass until the glue had dried. 


Based on our experiments, I'd suggest testing the various adhesives you have on hand to see how they behave on the papers you use. Or just don't worry about it, as most people won't scrutinize the work for tiny flaws. Enjoy!

6/14/19

Sparkly Patriotic Photo Frame

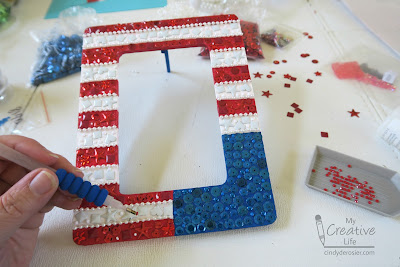
For those who don't know, June 14 is Flag Day. Back in my teaching days, when June 14 fell on a weekday, we'd do a flag-inspired craft. Today’s craft is perhaps too time-consuming for school, but it's perfect for camp or home. Affiliate links below. 


---------

Sparkly Patriotic Photo Frame


Materials:


Steps: 


Paint upper left corner of the frame blue. Paint stripes down the right side, alternating red and white. There will be 13 stripes in all (7 red, 6 white). Paint the left side of the frame so that it matches the stripe pattern on the right. 

I didn't do any measuring, but if I were teaching this project to kids, I would have them use a pencil and ruler to plan out their stripes. Divide the height of your frame by 13 to get the approximate width for each stripe. It doesn't need to be exact, as should be obvious by the fact that I just eyeballed it. 


To apply the bling, work on one small section at a time. I divided the blue into three areas. Apply a generous amount of craft glue and then add gems, sequins, and other bling. Don’t overlap the materials and don’t worry about small gaps. Using the stylus makes this much easier than picking up the little pieces and trying to place them perfectly. 

When you finish a section that borders a white stripe, cut a length of pearl trim to fit the spot. Add a line of glue and put the pearl trim in place. Then continue with the next color. 


When you have filled in every section as well as you can with rhinestones, sequins, and gems, it’s time to fill in the tiny spaces with Diamond Dotz. Add a dots of glue, then place the Dotz.


Allow the glue to dry completely. Your sparkly frame is ready to fill with your favorite photo!


Obviously, this craft is perfect for any patriotic occasion. It makes a wonderful gift for a veteran or active-duty service member, too!

6/13/19

Guilt-Free PB&J Sundae

We're in the middle of a heat wave here in Northern California. You know what's REALLY refreshing on a hot day? A homemade peanut butter and jelly sundae. Even better, it's guilt-free. 


Believe it or not, you can actually serve this as a meal and not feel like the worst mom ever. With homemade frozen yogurt (literally frozen yogurt - no added sugar), naturally sweet ripe berries, a homemade peanut butter sauce, and plenty of nuts, it's not all that different than serving a PB&J with a glass of milk, nutritionally speaking. The fancy glass makes all the difference. Affiliate links below.

---------

Guilt-Free Peanut Butter and Jelly Sundae


Materials:


Steps:


Follow the manufacturer's instructions to freeze the Greek yogurt in the ice cream machine. 

Meanwhile, remove the berries from the freezer so they can thaw and then make the peanut butter topping. In a small saucepan, combine 1 c. sugar with 1/2 c. water. Bring the mixture to a boil, then allow to boil for one minute. Remove from the heat and stir in 1/2 c. peanut butter. Let the topping cool. Chop the peanuts and set them aside.


To assemble your sundaes, put a large scoop of berries in the bottom of the glass. Add a generous dollop of peanut butter topping, then add a scoop of frozen yogurt. Repeat the layers until the glass is full, then sprinkle chopped peanuts on top. 

The result is amazing. Trust me.

6/12/19

Plaid's Let's Paint Live: Under the Sea

I love painting, but don't do it often enough. Sure, I frequently use paint on cardboard tubes and other kids crafts, but it's not the same as actually painting something representational. But now that I am a Plaid Ambassador, I receive the supplies to paint along with Plaid's Let's Paint Live events, which means I'm more motivated than ever to get out the paints and play! 

Plaid sponsors Let's Paint Live nights on the first Thursday of each month. It's just like the Paint and Sip events that are so popular, but you don't have to go anywhere (a major plus for me) and you don't have to pay (another major plus). Sipping is optional. I've done two now, and they've both been great. And the best part is that if you can't attend when they're live, just watch the recording when it's more convenient and paint along then! 

June's painting was this starfish. 


I knew it would be a great challenge for me, because I'd never done impressionistic painting or intentionally left visible brushstrokes on a project. And I'd never used Floating Medium (affiliate link), so it was particularly fun to try a totally new-to-me product in a structured way. I'm a fan. That stuff is really cool. I can't wait to play with it again.

I tend to be a fairly quick painter, almost always waiting for the next instructions when painting in a group setting, so I decided to doubly challenge myself. In addition to creating a painting where I followed the directions closely, I'd paint a second version simultaneously with a more blended style. Same design, same colors, same brushes, both done following along with the live instruction. 


Trevor painted also. Here's the proud artist:


A closer look:


In addition to Let's Paint Live, Plaid has two other Let's Paint series. I am dying to do some of those projects, particularly Lemons and Luau Pineapple (I like to paint fruit.) If you are local to me and are interested in painting with me, let me know! I'd love to host a lemon- or pineapple-themed paint night. If you aren't local, consider hosting your own event. Plaid makes it so easy!

6/11/19

Construction Paper Ostrich

I had some random black scraps on my desk and they reminded me of an ostrich. So naturally, I added legs, neck, and a head to make an ostrich for all of you who desperately need a fresh craft idea for O Week. You're welcome. 


Construction Paper Ostrich


Materials:

  • construction paper (black, pink)
  • scissors
  • craft glue
  • white feather
  • black pen

Steps:


Cut an oval body, a pair of wings, and a triangular beak from the black construction paper. Cut a pair of legs, a neck, and a head from the pink. Use the pen to add eyes. You'll want to trim the feet so there are two toes, which I did after assembling the ostrich. (Fun fact - ostriches are the only birds with two toes! All others have three or four.


Glue the body parts together. 


Snip a white feather in half and glue it so that the tufts stick out above and below the body. Glue your finished ostrich to background paper.


By the way, one of the coolest things I've ever done was feed ostriches in Aruba. That's me behind all those ostrich necks. 


Here's Trevor. He wisely held the bowl of food lower than I did. 


Here's an ostrich that felt like we hadn't fed them enough. 


If you ever get the chance, feed an ostrich.