4/29/22

Back Where it All Started

I have been blogging for 11 years (!), but my entry into the professional crafting world started three years before that. Shortly before Trevor's second birthday, I was hired by a local scrapbook store called Remember When. In spring 2008, the owner (Brenda) was looking for both designers to create projects for classes and the teachers to teach those classes. Oddly, employees could only be one or the other. If you designed projects, someone else taught the classes to make those projects. If you taught classes, you were teaching someone else's design, using yet another person's lesson plan. (One employee wrote lesson plans and put together all the class kits and could neither design nor teach.) I'm not sure what the logic was of dividing the work this way, other than some sort of checks-and-balances idea. Anyway, I applied for both open positions and when I was hired, Brenda gave me the choice of designer or teacher. I'd been a classroom teacher for 11 years and had absolutely no design experience, but I selected the design option. It sounded more fun and would definitely be more of a challenge. But most importantly, the hours were flexible, which they wouldn't be if I were teaching classes. I loved the job. 

Each month, I was assigned a few layouts and/or cards to design to fit a particular theme, material, or skill. One of the first layouts I ever made was this Lady and the Tramp themed project called 'Bella Notte.' My job was to create a simple, beginner-level, multi-photo, two-page spread featuring Jolee's stickers (which were all the rage in 2008). 


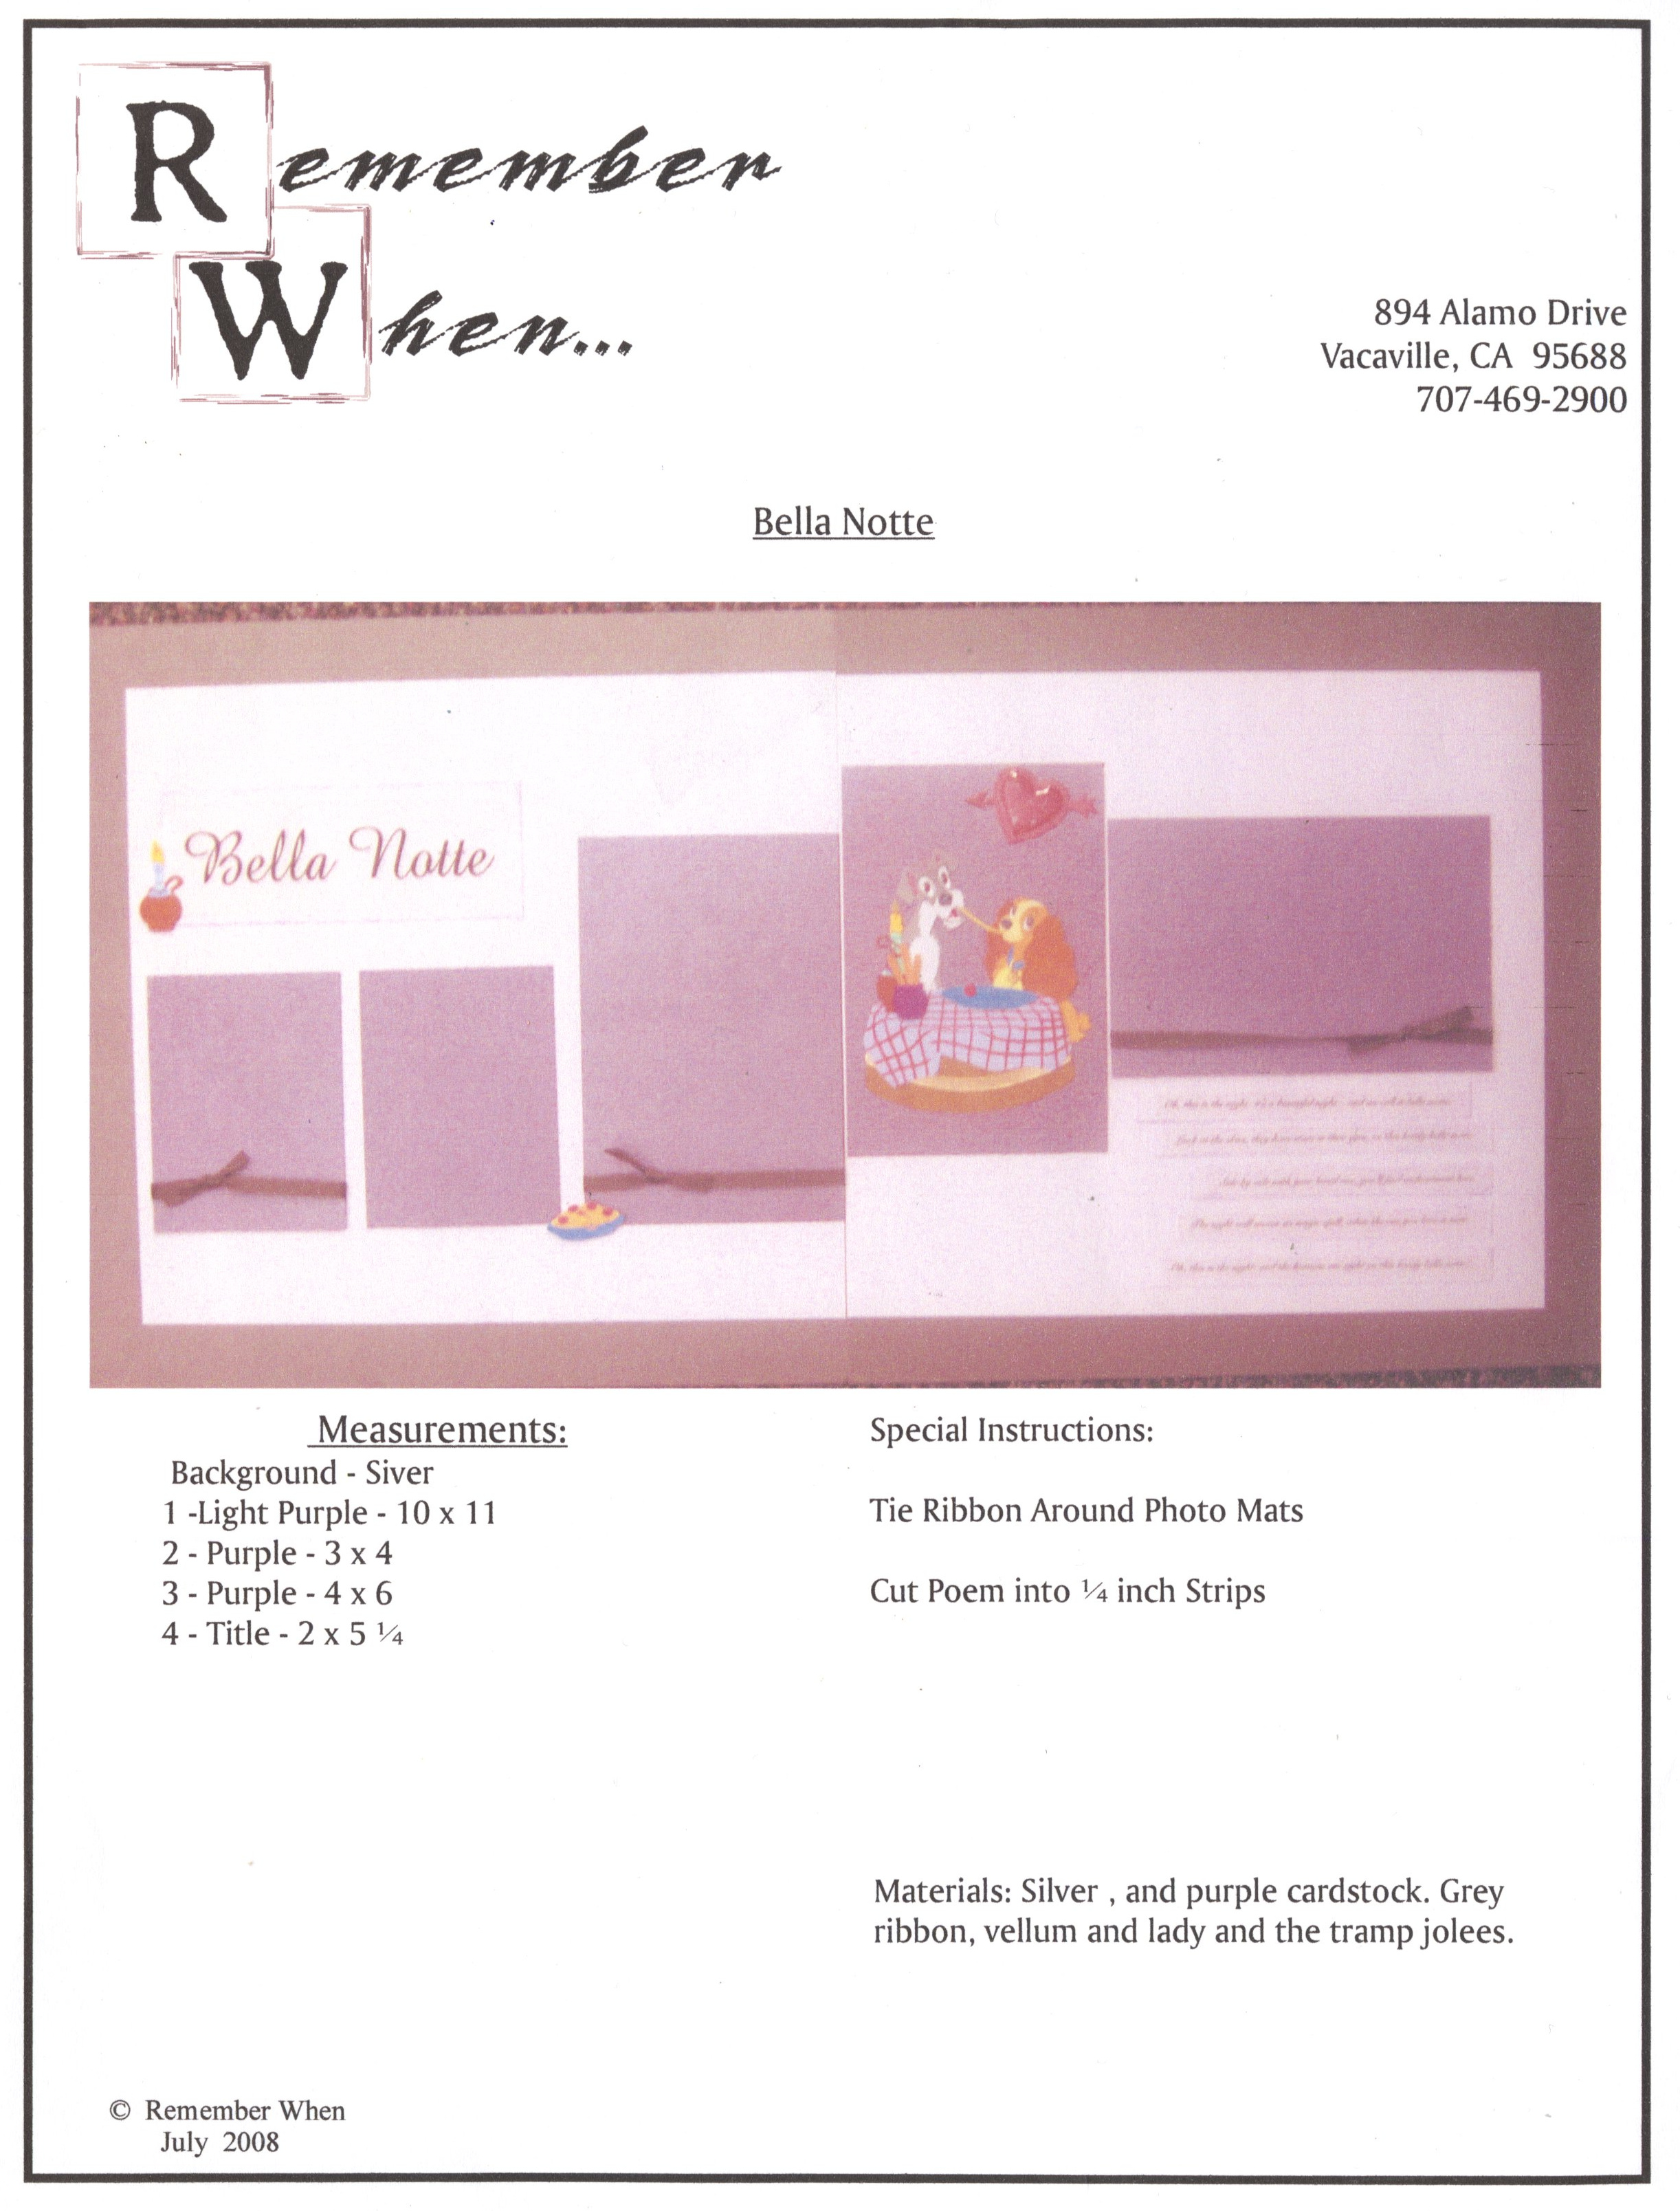
As you can see, the page used silver, light purple, and dark purple cardstock, grey ribbon, vellum, and the Jolee's. The class consisted of cutting things to size, tying ribbon, using adhesive, and adding stickers. 

This is the only lesson plan I ever received (since I never wrote nor taught my designs). I found it recently when I was cleaning out files, along with this: 


It's very interesting to me to read back over the guidelines, particularly the Page Expectations. My biggest challenges were #1 (I had to remind myself to measure and write everything down); #3 (I hated incorporating 3-D items then as much as I do now), #7 (I struggled mightily to use all the embellishments in a pack or all the stickers on a page), and #8 (when making the pages at home, it was hard to know what there was a lot of in stock or what was leftover from past classes, so I had to take a lot of notes when I was in the store). 

None of my projects were ever rejected (#7 on Creative Team Expectations) and it was amazing being paid to make layouts and cards, even if I didn't get to keep the finished items. It allowed me to stretch myself creatively and explore product and themes I wouldn't have used in my own scrapbooking. Most importantly, it started me along the path to where I am now.   


Sadly, my time at Remember When was very short. Brenda decided to relocate (and thus close the store) about six months after I started. It's crazy to think how that small job led to the next and the next and the next. It's a good reminder to jump through a door when it opens, because you never know what's on the other side. 

4/28/22

Thinking about Our 'States Visited' Map

I'm busy working on preparations for two big summer trips. One will take us to states we've visited before, while the second will be new-to-us states #41 and #42. I'm really excited. 

Right now, our States Visited map (which I keep updated on my main travel page) looks like this, with ten states on the to-do list: 


If we meet our goal of taking Trevor to all 50 states before he's 18, and I have every intention to do so, that map will be completely blue in two years. Until recently, I'd given no thought as to what I want to display in that space once the map is all filled in. One idea I had was changing the map to show how much time we've spent in each state. Obviously, the time we've spent in each state varies significantly and it would be interesting to see at a glance if we'd cumulatively spent less than 24 hours in a state (Delaware), 3-5 days (Kentucky), a week or two (Hawaii), or lived there (California). It might inspire me to book trips to places that didn't get much attention, or encourage me to spend even more time at places we've enjoyed for longer amounts of time. 

However, I'm not sure what to count. Right now, the map shows the states we've visited as a family. If I make a map showing how much time we've spent in each state, what counts? Only trips with all three of us together? That seems very limiting, particularly as Steve and I traveled before Trevor was born, and I assume Trevor will eventually stop traveling everywhere with us when he's off to college and beyond. And what about travel that I do, like conferences and such, where Steve and Trevor don't go? Does that count? And what's the starting point? I couldn't possibly go back and reconstruct all the travels I did from birth to 30, when I met Steve and started documenting the travel we've done together. 

Do I just take down the completed map and not replace it with anything? 

All of this raises questions about my plans as a travel blogger two years from now. I fully intend to keep traveling throughout the US, as often as possible. Steve would like to visit more National Parks and I want to continue exploring museums, historical sites, and the best of what our not-yet-visited cities have to offer. 

In the near future, I plan to put more work into the travel component of this blog to match the efforts I put into the crafting portion. To that end, I have started looking at attending travel blogger conferences. TravelCon starts tomorrow in Memphis and it looks incredible! Previous commitments prevent me from attending in person, but I got a Virtual Ticket and will have access to all of the keynotes, talks, and panels. Being there in person would probably be a lot more valuable, but attending virtually this year will help me decide if it makes sense to prioritize attending in-person next year.

4/27/22

Multiplication Facts Bracelets: A Way to Teach Times Tables with Kids

Back in my teaching days, I used games and fun activities to help my students learn multiplication and division facts. One of my favorites, which worked beautifully for Trevor, is Tic Tac Toe Dice. Physical activities, like playing Steal the Bacon with products or coloring multiplication tables, worked for some kids, while songs and chants helped others. Regardless of the method, it's crucial for their future success that kids learn multiplication and division facts as soon as possible. When kids don't know 6x7 or 9x4 off the top of their heads, they're going to struggle with almost all of the math beyond third grade. 

I don't think I ever encountered a 5th grader who didn't know the 1, 2, 5, and 10 facts, and the vast majority of them also knew the 3's and 4's. But I had plenty of students each year who didn't know the 6, 7, 8, and 9 facts well enough to apply them to the more challenging math we did. I wish I'd thought of the idea of Multiplication Fact Bracelets idea back then, because I think these may have helped some of them. Making the bracelets is a useful way to practice facts, of course, but by wearing them and looking at them frequently, and even using them as a fidget device, I imagine some kids could become more confident with their times tables. Affiliate links below. 


Multiplication Facts Bracelets


Materials: 


Steps: 


Cut a 12" length of stretch cord. This will leave you with plenty to tie off the bracelet when you're done beading. Attach a binder clip to one end of the stretch cord to keep the beads from falling off that end. 

Choose a single color of seed beads for each bracelet. I used yellow for the 6's, red for the 7's, blue for the 8's, and green for the 9's. If you're doing this in a classroom, have everyone make the same set of facts in the same colors, so that you can refer to the "blue 8's" bracelet without causing confusion or the inevitable, "My 8's are pink!" interruptions. I'll use the blue 8's for this tutorial; obviously, follow the same steps for the other bracelets. 

Begin by putting three blue seed beads onto the cord. The cord is sturdy enough that you can use it to poke into the hole of a bead to thread it. Then add the number 8. Add three more blue seed beads, then then 16. Three more blue seed beads, then 24. Make sure the numbers are all facing the same direction. There is no up and down for 0, 1, 3, and 8, but it matters for the others, particularly the 6 and 9. Continue this pattern until you reach 80.
  

Carefully remove the binder clip and then tie the ends together using a surgeon's knot. It's basically the same as the square knot they already know with an extra 'up and over' when you make it. 


Put the tied bracelets on a piece of parchment paper, then add a dot of glue directly onto the knot you just tied. Let the glue dry completely, then cut off the extra cord. 


The surgeon's knot and glue combination is strong, but to make sure your bracelet doesn't come apart when you're stretching it to put it on, hold onto the knot with one hand while you stretch the bracelet over the other. 


These bracelets are also fun for teaching the concept of Least Common Multiple. In the photo, you can see that 56 is visible on both the red (7) and the blue (8) bracelets and that 48 is visible on both the yellow (6) and the blue (8). Are these the LCMs of those pairs of numbers? Rotate the two bracelets to see if there's another lower number they both share!

4/26/22

Candy Cardinals

I had some extra black Candy Melts and black Sugar Pearls sitting out after I finished making the Pretzel Raccoons, so I used them to make Candy Cardinals. Can you tell what I used to make the beaks? Affiliate links below.   


Candy Cardinals


Materials:


Steps:


Melt the red candy according to the instructions on the package. Use a spoon to put a dollop of melted candy onto parchment paper, shaping it into the teardrop that makes the cardinal's head. While the candy sets, use a sharp knife to cut orange M&Ms in half. Press straight down firmly; they'll cut without shattering. 

Melt the black candy, then put a dollop onto the head to make the cardinal's face. Place two black sugar pearls and half an M&M onto the black candy to make the eyes and beak. Let the candy set completely, then peel it up from the parchment paper. 

---------


Looking for another cardinal project? I love this tissue paper cardinal craft! The cardinal is the state bird of Illinois, Indiana, Kentucky, North Carolina, Ohio, Virginia, and West Virginia, so it's an especially great choice to make if you live in one of those states. 

4/25/22

Nine Awesome Restaurant Chains You'll Only Find in California

Last week, I shared nine of my favorite restaurant chains that aren't in California but should be. Today is the opposite - nine great restaurant chains that you'll only find in California. It was harder to come up with this list than the other one. Some of the chains that were only in California just a few years ago have expanded outside the state. The best example of that is In-n-Out, which I have been enjoying locally for over 30 years, but has only recently made it to nearby states. 

Many of the biggest chains in the US started in California. This includes McDonald's (San Bernadino, 1955), Jack in the Box (San Diego, 1951), Carl's Jr (Los Angeles, 1941), Taco Bell (Downey, 1962), IHOP (los Angeles, 1958), Hot Dog on a Stick (Long Beach, 1946), Jamba Juice (San Luis Obispo, 1990), Cheesecake Factory (Beverly Hills, 1972), Baskin-Robbins (Glendale, 1945), Round Table Pizza (Menlo Park, 1959), and a bunch more. Some of them were only in California when I first had them. 

This has the potential to be one of those blog posts that is out of date ten minutes after I publish it, but as of today, you can only enjoy the following chain restaurants in the Golden State. 


---------


Nine Awesome Restaurant Chains You'll Only Find in California


Boudin Bakery and Cafe is a must-visit when you're in California. Their sandwiches and burgers are outstanding, but my absolute favorite thing to order is their Rustic Tomato soup in a bread bowl. The original San Francisco location at Fisherman's Wharf is enormously popular; build in wait time if you plan to eat there. Use that time to explore the small Bakery Museum onsite and watch the iconic sourdough as it is made. Fortunately, Boudin has expanded both within and beyond San Francisco. There are 7 locations in the City and another 18 throughout the state, including the one near us in Vacaville that we enjoy as often as possible. 


Dos Coyotes Border Cafe opened their first location in Davis, CA in January 1991, when I was a freshman at UC Davis. Their delicious southwestern cuisine quickly earned them a loyal following. Our family gets Dos whenever we're in or near Davis. All three of us always get their Border Burritos, which are big enough that we cut in half and enjoy for two meals. Each burrito is stuffed with grilled steak or chicken, beans, rice, cheese, sour cream, salsa, and guacamole, and served with housemade chips. There are now 11 Dos Coyotes locations, primarily in the Sacramento area.


Mary's Pizza Shack is another deRosier family favorite. Their pizza and pastas are delicious, but I almost always get their fantastic calzone. They make the best breadsticks ever. You can get a free breadstick from the basket at the front counter to try; I guarantee you'll buy an order after trying one. There are 14 Mary's locations throughout Sonoma and Solano Counties.


Fentons Creamery is an iconic ice cream shop, beloved in the Bay Area. The Oakland location opened in 1894; the second location opened in 2007 near us at the Nut Tree in Vacaville. Their handcrafted ice creams and sauces are legendary (get the signature Black & Tan Sundae), but that's not all they have. The menu has a wide selection of grilled sandwiches, burgers, and salads. You might remember seeing Russell and Mr. Fredricksen enjoying ice cream at Fentons in the Pixar movie 'Up.' It turns out that Fentons is a favorite place for Pixar employees to celebrate personal milestones and professional accomplishments.
 

La Bou Bakery and Cafe has a lot of delicious choices, including their famous handmade croissants and tasty scones. They have a wide variety of soups, salads, sandwiches, and paninis; everything I've tried there is delicious. La Bou has 15 locations in the Sacramento area.


Gott's Roadside serves California-inspired burgers, hot dogs, tacos, sandwiches, and more, using locally sourced ingredients. Their motto, "Tray Gourmet," sums up their concept well: high-quality food in a casual setting. I first tried Gott's at the original location in St. Helena, apparently not too long after it opened in 1999. Gott's now has 8 locations in the Bay Area. 


Juan Pollo is the master of Mexican-style rotisserie chicken. They first opened in 1984. With great food, low prices, and enormous portions, it's not surprising that they spread and now have 26 locations throughout Southern California. I was introduced to Juan Pollo during my time in Ontario speaking at Pinners Conference


Leatherby's Family Creamery is a Sacramento institution. First opened in 1982, it is the best place around to get enormous sundaes and great food in a family-friendly place. There are three locations with four generations of the Leatherby family working at the creameries. I first discovered Leatherby's during college and have enjoyed every visit since.


Mel's Drive-In is probably the most famous on this list. This classic American diner first opened in 1947 and has appeared in countless movies, TV shows, music videos, and commercials. American Graffiti was set in Modesto, but the drive-in scenes were filmed at Mel's in San Francisco. There are 8 locations - four in Northern California and four in Southern California, though the history is complicated. Even more complicated is its relationship with Original Mel's, the result of a rift between father and son. Original Mel's has more locations, and while I definitely recommend it, it does not meet the California-only requirement that Mel's Drive-In does. Eat at both when you're in California!

So that's my list of 9 restaurant chains that you should definitely try when you're in California. Are there any I missed? Let me know in the comments!


4/22/22

Pretzel Raccoon Craft

If you've been searching high and low for an edible raccoon craft, I have good news.


I was sketching a pretzel (as one does) when I noticed that the little nubs at the ends of the arms (do pretzels have arms?) looked like ears. So I dropped what I was was doing and made some raccoons. You'll notice I experimented with different ways to make whiskers on two of them and left the whiskers off the others. I prefer the no whiskers, while Steve says the white whiskers are best. Rather than a tutorial with one or the other, you get both. Affiliate links below. 


Edible Pretzel Raccoons


Materials:


Steps: 


Follow the instructions on the package to prepare the Candy Melts. I used 10 white discs and 3 black to make grey. Dip each pretzel in the melted candy, then transfer it to a sheet of parchment paper. Fill the holes of the pretzel with more melted candy. If the ears aren't prominent, add a little extra candy to emphasize them. Let the candy set. 


Follow the package directions to melt the black candy. Dip the scribe tool into the black, then lay it across the face (angled downward) to make one side of the raccoon's mask. Add a white pearl eye, the repeat on the other side of the face. 


Use more black to color the inner ears. 

If you want to make whiskers, do it now. For the white whiskers, I tried to use the same technique as with the marshmallow bunnies, but it didn't really work (since the marshmallow was convex and the pretzel surface concave), so I just drew them on. I used a clean scribe tool to etch whiskers from the solid grey, but it was really hard to get clean lines. Ultimately, I decided I preferred the raccoons whiskerless. Your call. 

Put a tiny amount of black candy onto the scribe tool, then touch it to the white sugar pearls to add pupils to the eyes. Add a dot at the bottom of the face to adhere the black sugar pearl nose. 

---------


If you're looking for more raccoon crafts, I have two others: a cardboard tube raccoon, inspired by The Kissing Hand, and a Valentine's Day raccoon that you could make with any box of treats, not just conversation hearts. 

Fun Fact: Tennessee named the raccoon its official state wild animal in 1971. 

4/21/22

Decoupage Scout Sign from a Paper Bag

I take a fabric tote with me every time I shop, no matter what I'm buying. I have dedicated totes that are only for groceries and others for non-food items. Each time I bring a tote shopping, that's one fewer paper or plastic bag that will ultimately be thrown out. 

When paper or plastic bags do enter our house, I do my best to reuse them as many times as possible. And occasionally, they become part of a craft project, like this bag from the Scout Shop. Obviously, you could use any design or logo from your favorite store for this project and you could put it onto lots of different surfaces besides the wood panel that I used. Affiliate links below. 


Decoupage Scout Sign from a Paper Bag


Materials: 


Steps: 


Paint the wood panel black. While the paint is drying, use the microtip scissors to carefully cut out the design, which in this case was the BSA fleur-de-lis. Apply a thin coat of Mod Podge to the panel where you'll be putting the design, then add a thin coat to the back of the design. Carefully position the design and let the Mod Podge dry, approximately 15 minutes. Add a coat of Mod Podge over the entire surface to seal it. If you'll be hanging this, one coat is fine. If you'll be using it as a desktop tray or something similar, add at least one more coat of Mod Podge after the previous one dries. 

4/20/22

Bake and Be Blessed - Streamlined (No-Knead) White Bread

I recently finished reading a book I thoroughly enjoyed, called Bake and Be Blessed (affiliate link here and throughout the post). Trevor received it during his Confirmation and I finally got around to reading it. It's an unusual book in the best of ways and I wish I'd read it sooner. 

Bake and Be Blessed was written by Dominic Garramone, who successfully merged careers as a Catholic monk, priest, PBS star, and cookbook author. Father Dominic has an excellent writing style and is an interesting person, to say the least. He got a degree in theater before becoming a monk and now has two masters degrees.  


Bake and Be Blessed is part spiritual guide, part cookbook, and part memoir. While I am not Catholic, I found his teachings and reflections to be relevant and helpful. His recipes are appealing, his baking techniques informative, and his personal stories are very interesting. It's a quick read, yet promotes deep thinking. 

There aren't very many recipes in the book - only 6, I think. I started with Father Dominic's recipe for Streamlined White Bread. This yeast bread is beaten rather than kneaded, so there is less active time involved. It felt very strange spreading a yeast batter into pans rather than kneading a soft dough and forming it into beautiful loaves. This is how my bread look just after I put it in the pans. (They're sitting on a plant stand in a sunbeam to rise.) 


I didn't have a lot of hope that those jagged tops would smooth out beautifully when the bread baked. Indeed, I was correct. The finished bread will not win any beauty contests. 


It might win a taste contest though. This bread is delicious and has a great crumb. The recipe below makes one loaf. I doubled it, because two loaves are better than one and there's no extra effort. 


Streamlined White Bread

by Fr. Dominic Garramone


1 pkg. active dry yeast
1 1/4 c. warm water
2 T. vegetable oil
1 tsp. salt
2 T. granulated sugar
3 c. all-purpose flour

Sprinkle the yeast over warm water in a medium bowl; stir to dissolve. Let stand until foamy. Add oil, salt, sugar, and half of the flour. Using a heavy wooden spoon, beat 200 strokes (or beat on medium speed of an electric mixer about 2 minutes). Add remaining flour and stir until thoroughly incorporated. Cover bowl with a clean cloth and let rise in a warm, draft-free place for about 30 minutes, or until doubled. 

Beat the batter about 25 strokes, then spread evenly in a lightly greased 9x5x3-inch loaf pan. Let rise, uncovered, 30 to 40 minutes, or until the batter just reaches the top of the pan. (Do not allow to over-rise or the bread will collapse during cooling.)

Bake in a preheated 375-degree oven 45 to 50 minutes or until loaf is browned and sounds hollow when tapped on the bottom. Let cool on a wire rack. 

4/19/22

Asparagus and Potato Soup

Our family loves soup. I make soup more often than any other category of food, particularly in the winter months, but I'm a fan of soup year-round. It's asparagus season now, making this the perfect time for some creamy Asparagus and Potato Soup. This recipe, like all soup recipes, is not fussy. I used sour cream in my soup, but otherwise it is vegan. Feel free to leave it out if you want a vegan dish, or add meat (ham would be delicious) to please the carnivores in your family. Basically, you can add or subtract what you want, change the amounts of the ingredients, make your soup thicker or thinner - anything goes. I used the microwave this time to pre-cook the potatoes before putting them into the soup pot in order to have dinner on the table sooner. You can cook your soup entirely on the stovetop if you prefer. Affiliate links below. 


Asparagus and Potato Soup


2 lbs. potatoes
4 cloves garlic
2 T. oil
2 lbs. asparagus
dollop of sour cream


Wash the potatoes, then cut them into thin slices. (There's no need to peel them unless you want to.) Put the potato slices into a large microwave-safe bowl with 4 cups of water. Microwave them for 5 minutes. Meanwhile, mince the garlic. Heat the oil in a large pot and saute the garlic over medium heat until golden. Pour the water and the potatoes into the pot.

Add 4 more cups of water to the microwave-safe bowl, then heat until boiling. Stir in the vegetable base. When it is completely mixed, pour the broth into the pot. Cover the pot. 

Cut the tops off the asparagus and put them into the bowl with 1 cup of water. Set them aside for now. Cut the asparagus stems into 1" pieces, discarding or peeling any woody ends. Add the asparagus stems to the pot. Simmer, covered for 20 minutes, or until the asparagus stems and potatoes are tender. 

Microwave the asparagus tops for 2 minutes or until just tender. Set them aside again. 

Puree the soup with an immersion blender. Adjust the seasoning as needed and/or thin with the asparagus water as needed. Pour off any extra water from the asparagus tops. 

To serve, ladle the pureed soup into bowls. Add a dollop of sour cream to each bowl, stir gently two or three times, then garnish with a generous amount of asparagus tops. 


---------


Nothing goes better with soup than homemade bread, fresh from the oven. Tomorrow I'll share the bread I served along with the Asparagus and Potato Soup. 

4/18/22

Nine Awesome Restaurant Chains That Aren't in California but Should Be

Our family has a rule that we never eat anywhere on vacation that we could visit at home. We love trying new-to-us foods, particularly regional favorites and local specialties. Many of the restaurants we visit are family-owned, single-location gems, suggested by locals. They are always fantastic. As much as I enjoy them, I'm also always on the lookout for chain restaurants that we don't have here in California. Why? A chain restaurant started with a single location, so for it to grow beyond that original location, it stands to reason that it is doing something right. That is not to say that all chains are good. I can name quite a few that are not. The worst burger I've ever had (and that's saying something) was from a popular (how?!) regional chain. But some chains are absolutely fantastic. Some of the most memorable meals we've had during our US travels have been from local or regional chains. 

Below are nine of my favorites, in no particular order. These are places I've thought about and craved long after the vacation ended, places I would definitely patronize if they popped up in my area. 


---------

Nine Awesome Restaurant Chains That (Sadly) Aren't in California


Lou Malnati's Pizzeria is considered by many to have the best deep dish pizza anywhere. The flaky, buttery crust is amazing, and the tomato sauce, sausage, and cheese are outstanding. The first Lou Malnati's opened in a Chicago suburb in 1971. There are now 60 locations in Illinois, 7 in Arizona, 4 in Wisconsin, and 4 in Indiana. We first tried Lou Malnati's during our 2018 trip to Chicago.   


The Flying Biscuit Cafe is an Atlanta favorite. Since 1993, they've been serving some of the best all-day breakfast you'll find anywhere. Their biscuits with apple butter alone are worth a trip to Atlanta, but everything else they serve is equally fantastic. Definitely get pancakes with pecan butter and don't skip the grits! There are now 15 locations in Georgia, 5 in Norther Carolina, 3 in South Carolina, 2 each in Alabama and Florida, and one in Texas. We enjoyed The Flying Biscuit Cafe during our January 2022 trip to Atlanta


Boise Fry Company should be a destination for all french fry fans, which is to say, everyone! When you order, you choose your potato (Russet, Red, Gold, Purple, Yam, or Sweet) and the style (Regular, Homestyle, Curly, Shoestring, and Po'ball). They have a buffet of interesting (and unusual) ketchups and dips to try with them. Definitely don't skip their burgers or their housemade sodas - they're delicious. The first Boise Fry Company opened in 2009. There are now six locations, all in the Boise area. The first time we ate there was during our Boise trip in the summer of 2015 and we've been back every time we've visited my family in Idaho.


Weber Grill Restaurant is a must-visit place for anyone who likes grilled food. Which again, is probably everyone! Everything they serve is cooked on large Weber grills in an open kitchen. Even the decor is grill-themed. The food is outstanding and it smells SO good. I challenge you to walk by and not go in. Weber Grill Restaurant opened its first location in Illinois in 1989. There are now three locations in Illinois and one in Indiana. We tried it and fell in love during our 2018 visit to Indianapolis


Mellow Mushroom is a pizza restaurant that also has burgers, sandwiches, cocktails, desserts, and more. Vegan or gluten-free? They've got lots of choices for you, too. Mellow Mushroom started in Atlanta in 1974. It now has many locations throughout the southern US, as well as a few in the midwest, one in Colorado, and two in Arizona. (Is it coming my way? Fingers crossed!) When I was researching our recent 5-state trip, Mellow Mushroom popped up on must-try restaurant lists in multiple cities we'd be visiting. We went during our January 2022 visit to Columbia and loved it. 


Runza is a fast food restaurant most famous for their delicious Runza Sandwich, which is basically a meat pie in a bread instead of a pie crust. The original is stuffed with spiced ground beef, onions, and cabbage. There are seven other tasty varieties of Runza Sandwich. Runza sells burgers, chicken, and other fast food favorites, but don't bother. You can get those anywhere, but you can only get a Runza at Runza. They opened their first restaurant in 1949 and there are now 80 locations in Nebraska and five in adjacent states. Sadly for all of us who aren't midwesterners, Runza is intentionally not expanding nationwide. We first tried Runza during our June 2017 trip to Nebraska


Cook Out is another fast food restaurant. They serve the usual hamburgers, hot dogs, and chicken, but also BBQ, quesadillas, wraps, cheese bites, floats, cheesecake, and an enormous choice of milkshakes, just to name some of the items on their huge menu. Cook Out first opened in North Carolina in 1989; now there are 290 locations in ten states, including: North Carolina, Alabama, Georgia, Kentucky, Maryland, South Carolina, Tennessee, Virginia, West Virginia, and Mississippi. We enjoyed Cook Out during our December 2021 visit to Alabama


Tin Lizzy's Cantina is most famous for their creative tacos. Some feature expected flavor combinations, for those who want traditional Tex-Mex, but you can also find buttermilk fried chicken, Korean barbecue, and Philly cheesesteak tacos. If you're not in the mood for tacos, no problem! There are lots of other mouth-watering items on the menu, not to mention a great selection of drinks. Tin Lizzy's first opened in 2005 and now has 8 locations in Georgia and one in Florida. We ate at Tin Lizzy's during our January 2022 visit to Atlanta


Does a restaurant with just two brick-and-mortar locations count as a chain? I don't care, because Coned Pizza is going on my list as one of the most memorable, crave-worthy places I've ever visited. Of all the restaurants above, it is the one I most want to open in my area. Coned Pizza started as a food cart in 2016 with a food truck soon after. The first brick-and-mortar opened in 2018 in a Boise suburb and another followed in 2021 in downtown Boise. We tried Coned during our August 2021 visit to Boise.  


So that's my list of 9 restaurant chains that I wish were local to me. Do you have a beloved local or regional chain where you are? Let me know what it is in the comments!

4/15/22

Trevor's Eagle Project

It's hard to believe, but Trevor has been active in Scouting for almost 10 years. He started in Cub Scouts in 2012 as a first grade Tiger, then moved up through Wolves, Bears, Webelos, and Arrow of Light. In 2017, Trevor said goodbye to Cub Scout Pack 180 and bridged to Boy Scout Troop 482. During the past five years, he has worked hard and moved up through the ranks from Scout to Tenderfoot, Second Class, First Class, Star, and Life. 

The final rank is Eagle. To reach Eagle, a Scout must: 
  1. Be active in the troop for at least six months as a Life Scout. 
  2. Demonstrate Scout Spirit by living the Scout Oath and Law and provide references. 
  3. Earn at least 21 merit badges, including 13 specific required merit badges. 
  4. Serve in a position of responsibility within the troop for six months while a Life Scout. 
  5. While a Life Scout, plan, develop, and give leadership to others in a service project helpful to any religious institution, any school, or your community. 
  6. While a Life Scout, participate in a Scoutmaster conference. 
  7. Successfully complete a board of review for the Eagle Scout rank.
While Trevor still has work to do to reach the rank of Eagle Scout, he has completed the largest and most difficult of the requirements: #5, the Eagle project. I described his project planning stages last week; today I'm sharing about the build and installation days. 

On Saturday, a team of Scouts came to our house to construct the raptor silhouettes under Trevor's leadership. He showed them how to project the silhouettes at the correct size and trace them onto plywood. 


The older Scouts cut out the raptors, following all safety guidelines and under close supervision by Trevor and the adults.


The younger Scouts filed the rough edges and prepared the silhouettes for painting. 


They also measured and marked the support pieces...


... and carried materials back and forth between our house and the neighbor's. 


Our neighbor, Curt, was a huge help to Trevor throughout this project. Not only did he act as a mentor during the planning stages, he made two trips to the hardware store with us for supplies that wouldn't fit in our car, let us use his tools and his garage on the build day to have extra work stations, and helped with installation. 

Another task that fell to the younger Scouts was preparing the QR codes that would go on the cages at the Raptor Center, encouraging visitors to (symbolically) adopt a raptor. 


We ended the first build day with the QR codes ready, and all seven raptors cut, filed, and labeled with their support pieces prepped. 


Sunday was all about painting. We had a smaller work crew, which was perfect. 


Each bird got two coats of paint, front and back. They dried quickly in the California sun. 


We moved the birds into the garage and let them dry completely. On Tuesday morning, we applied the labels. 


Then we loaded everything up and drove 25 miles to the California Raptor Center. This is the wall where his silhouettes will go, which is part of the Golden Eagle enclosure. 


Over the next five hours, we hung the QR codes...


... and the raptor silhouettes.


Here, we were arguing about the placement of some of the silhouettes. As the leader, Trevor listened to everyone's opinions and then made his own decision.


The most exciting part of the day came when we needed to mount support beams from the other side of the wall. Trevor sent Steve into the cage with two golden eagles. One, an 8-pound mellow male named Sullivan, was only mildly curious what was up. The other, a 15-pound nesting female named Fuzzy, had a lot to say (loudly) about this intruder.


Steve was safe, of course. The staff entered first with large nets and kept the eagles on the far side of the cage.


He was in the cage for about 20 minutes while Trevor directed everything from the best vantage point.


While they finished hanging the last silhouettes, I visited some of my favorite birds. Meet Kalli. Once I'm a bit better with colored pencils, I'm going to try drawing her. She's as charming as she is beautiful. 


It was so exciting to see the silhouettes mounted on the wall after all that hard work. Here's the before and after:


That represents a combined 198.5 hours of work. That total includes all the meetings, site visits, approval presentations, shopping, building, and installation. Trevor still has a few hours of post-project paperwork to do. 

Plus, we need to make one more visit to the California Raptor Center. We'll be installing the plaque that signifies it as an Eagle project, but more importantly, Trevor will be presenting them with a check. Our friends and family were very generous in their support of Trevor's project and he raised over $500 beyond the materials costs. The money will help the Raptor Center in their mission to rehabilitate injured and orphaned raptors, as well as to care for the non-releasable resident raptors, including Sullivan, Fuzzy, and Kalli. 

If you're local, I strongly encourage you to visit the California Raptor Center and see for yourself what wonderful work they are doing. Then measure your wingspan against the raptor silhouettes. It makes me so happy to think of all the people who will be doing exactly that. 

Good job, Trevor. Only a few more steps before Eagle Scout! I couldn't be more proud of you.