2/28/22

Bash Bowl 2022: Busy in the Lab

It's the fourth and final week of Bash Bowl. I started off with a page about the multiple functions of our garage, including housing the lab that allows Steve to work from home. Looking at the layout, can you guess any of the elements in the Game 4 Playbook?  

Busy in the Lab (affiliate link)

This layout earned 5 points for Team Twisted Scissors. I got one point for having at least three triangles, 1 point for using dotted paper, 2 points for having at least three clusters, and 1 point for the page submission. I could have easily added brads for an extra point, but I don't want the lumps in my albums, so I left them off. 


Here's my before picture: 


Go Twisted Scissors! Beat those Banshees!

2/25/22

Torn Newspaper Monkey

Do you remember the newspaper tiger I made? Now he has a monkey friend. 


Torn Newspaper Monkey


Materials: 

  • newspaper
  • acrylic paint (brown, tan, black)
  • glue

Steps: 


Find three sheets of newspaper with mostly small text, like the sports scores, stock information, or classifieds. Using a single coat of paint so that some of the text is showing through, paint one sheet of newspaper brown and one sheet tan. Paint half a sheet of newspaper black and leave the rest unpainted. 

When the paint is dry, tear out a large oval of brown for the monkey's head and two smaller ovals for the ears. Tear slowly and carefully, as newspaper wants to rip in just one direction.  

Tear the tan paper into a figure 8 for the monkey's face. Remove a notch from the top. Use the rest of the tan paper to tear two small inner ear ovals and a small figure 8 nose. 

Tear two oval eyes from the unpainted newspaper. Then tear two pupils, two nostrils, and a mouth from the black. 

Glue everything together, then mount it on background paper if desired. 


2/24/22

Heart Tropical Fish Cookie

Heart-shaped cookie cutters get most of their use around Valentine's Day, but there are so many other things you can do with hearts. One large heart and two small hearts make an adorable tropical fish. This project gave me a great excuse to make my own royal icing for the first time! Affiliate links below. 


Heart Tropical Fish Cookie


Materials:


Steps: 


Prepare your cookie dough, either from scratch (my preferred recipe linked above) or purchased. For each fish, cut one large heart and two small hearts. Bake the cookies and let them cool completely. Set the cooled cookies and the candy eyeballs on a piece of parchment paper.


Make royal icing and color it as desired. Put it into a piping bag and cover each cookie, leaving a small edge around each cookie. Use the scribe tool to pop any bubbles or drag the icing as needed. Let the icing harden. 

To assemble the cookies, use a bit more royal icing to 'glue' one small heart onto the large heart to make the fin. Add the eyeball above that, then 'glue' the tail fin behind the large heart. Let the icing set before moving the cookies. 


I'm so happy with how these came out! I kept the fish really simple for my first time making my own royal icing, but you can use a variety of colors, or add spots, stripes, or other designs to your fish. There are endless possibilities! I will definitely be experimenting again in the near future.

2/23/22

Handprint Saguaro Cactus

It's been awhile since I've shared a handprint craft. Did you recognize that the cactus is a handprint? 


Handprint Saguaro Cactus


Materials:

  • construction paper
  • scissors
  • colored pencils
  • craft glue

Steps: 


Position your hand on a piece of green construction paper with your three middle fingers together and your thumb and pinkie separate. Bend your thumb and pinkie slightly so they point upward like the arms of a cactus. Trace around your hand. 


With a pencil, lightly round off the top of your handprint so that you have one barrel-shaped cactus instead of three distinct fingers. Cut out the handprint. 

Use a green colored pencil to draw the ribs of the cactus. Then use a white colored pencil to draw little tick marks between the ribs for the needles. 

Cut a piece of tan construction paper into a pot that is slightly wider than your handprint. Then cut three wavy circles from bright pink and three small circles from yellow to make the flowers. 

Glue a strip of brown construction paper to white to make the background. Then glue the cactus into place. Add the pot and the flowers. 


You can stop there, but I wanted to see what I could do to turn this simple preschool craft into something more challenging for older kids. Here's what it looked like after I thickened the ribs, added shadows to the flowers, colored the pot to look more like terra cotta, and added a little bit of color to the background to mimic a textured wall.  


If you're going to enhance the craft with colored pencils, do so before you glue everything together. I felt limited in what I could do since everything was already glued down. Still, it was a fun challenge for me. 

2/22/22

Five More Pages in the 50 States Albums

After our recent adventure through the South, Trevor added five more pages to his 50 States Album. As always, I love reading what he puts in his journaling and seeing what photos he picks to represent each state.


Of all the pages, I'm most excited that Alabama is done. Why? Because it's the first state alphabetically, which means that the first page of the album had been blank for years. Now the first blank is the fourth page, Arkansas. That bothers me a lot less than having the first page blank. 

As we have visited 40 of the 50 states, Trevor's album is now 80% complete. I LOVE this album. I can't wait until it's complete. Once it is, I'll make a digital version to share here on the blog. In the meantime, you can visit my travel page to see all the pages he's done so far. 

2/21/22

Bash Bowl 2022: Happy Birthday, Steve!

 I only made a single page for Week 3 of Bash Bowl.

Happy Birthday, Steve! (affiliate link)

But the one page I made earned a touchdown for Team Twisted Scissors! I got one point for using at least three green items (the background paper, the washi tape across the center, and the scalloped circle under the title); 1 point for the ribbon (under the washi and hanging down behind the scalloped circle); 1 point for including photo corners; 2 points for building a title using more than one word; and 1 point for completing a page with at least one element. 


Overall, I'm happy with my page. I use green and build titles all the time, so those were no problem for me. But I rarely use ribbon on layouts and never use photo corners. In this case, I think the ribbon adds to my layout (although the same navy color in paper or washi would have looked just as good), but I'm not a fan of the photo corners at all. 

Here's my Before photo:


I'm happy to report that Twisted Scissors took Week 3! We're now ahead 2 games to 1.


In a few days, we'll have our final spin for Bash Bowl 2022. Fingers crossed for a great playbook for Week 4 so I can have a strong finish after a weak week. 

2/18/22

Bash Bowl 2022: Trouble at 11

"Trouble at 11" sounds like something a newscaster would say. In this case, it's a layout about the world's best bunny celebrating his 11th birthday. At 11, Trouble is quite elderly, so it's more important than ever to appreciate the time we have with him.  

Trouble at 11 (affiliate link)

I love how this layout turned out. The warm greys go so well with Trouble's coat. This page earned 5 points for Twisted Scissors: two for black and white with one other color (grey), one for the glitter trim, one for the word stickers, and one for completing a layout. 

Here is the before picture:


I'm really happy with everything I made during Week 2. Unfortunately, the Banshees beat us this week. 


Fingers crossed for a Twisted Scissors win next week! I'm having such a fun time with this competition and definitely plan to make it an annual event.

2/17/22

Bash Bowl 2022: Christmas 2021

We spent Christmas in Nashville, so we held our family celebration early. On the 20th, we had Steve's parents, sister, and aunt over for dinner. On the 21st, the three of us opened our gifts as if it were Christmas morning. It worked out really well. 

Christmas 2021 (affiliate link)

This was the third page I made for Week 2 of Bash Bowl. It earned 3 points for my team, including one point for the glitter trim, one point for the word sticker, and one point for completing the challenge with at least one element. 

Here's the before picture: 


Go, Twisted Scissors! Beat those Banshees!

2/16/22

Bash Bowl 2022: National Honor Society

In November, Trevor was inducted into the National Honor Society. We're so proud of his hard work and academic achievements. Rather than include journaling, I printed the pledge that Trevor gave. 


This layout earned me my first-ever Bash Bowl touchdown! Here's the before photo: 


I got two points for making a page with black, white, and only one other color, one point for having three blue items (background paper and two border strips), one point for the word sticker in the upper right, one point for the glittery stickers I used for the date, and one point for completing the layout. Six points to Twisted Scissors!

2/15/22

Bash Bowl 2022: Halloween 2021

We just finished Week 2 of Bash Bowl and I am so happy with the pages I made! First up, Halloween 2021. 

Halloween 2021 (affiliate link)

This week's playbook, while still a challenge, was much better for me than last week's. My Halloween layout earned five points for my team, Twisted Scissors: two for a layout with just black and white and one other color (orange); one for the word sticker at the top left; one for the glittered strip above the journaling; and one for completing the page using at least one requirement. 


As was the case last week, the hardest part was picking out all my products ahead of time and actually sticking with them. Here's my before picture:


There was one thing that made it a lot easier to stick to my intended supplies. For the first time in two years, I was scrapping somewhere other than at home. My scrappy BFFs and I met in person for a 12+ hour crop and it was fabulous. While our virtual get-togethers have been fun, I've really missed being in person with them. 

Tomorrow I'll share another page I made - my first touchdown of Bash Bowl!

2/14/22

Elderberry Linzer Cookie Kit

Happy Valentine's Day! Here in Casa deRosier, we're celebrating with Linzer cookies. Aren't they pretty? They taste just as good (if not better) than they look! 


The folks at Erin's Elderberries sent me this Linzer cookie kit in order to try out. The kit included pre-measured dry ingredients, a jar of elderberry jelly, two cookie cutters, and the instructions. I just needed to add butter, an egg yolk, and vanilla to make two dozen cookies. 


I've had many Linzer cookies in my day filled with a wide variety of jams and jellies, but this was the first time I ever had elderberry jelly. I wasn't sure what to expect, but it was delicious! I don't really know how to describe it, other than to say it tastes sort of like a blackberry with a pleasant tartness. In addition to using the elderberry jelly for the Linzer cookies, I also put it in my peanut butter sandwich (delicious) and spread it on toast (delicious). Two thumbs way up!

Erin's Elderberries sells a wide variety of products beyond just cookie kits. There are jams and jellies, syrups, honey, concentrates, teas, vinaigrette, and more. This syrup sampler set looks fantastic. I've never tasted elderflower, aronia berry (aka chokecherry), or butterfly pea flower. Actually, I hadn't even heard of butterfly pea flower until looking through their website. You know I'm always on the lookout for new-to-me foods


Big thanks to Erin's Elderberries for the cookie kit, and particularly for introducing me to elderberry jelly. I'm a fan!

2/11/22

Bash Bowl 2022: Christmas Card 2021

This is the second of two pages I made for Game 1 of Bash Bowl 2022. It's another 3-pointer (one point for the red elements, one point for the ephemera, and one point for completing a page). 
 
Christmas Card 2021 (affiliate link)

Most of the items on this page are at least 10 years old, so I'm really pleased that the Playbook for Game 1 pushed me to look for elements I wouldn't necessarily have used for this page. That is the best thing about scrapbook challenges. 

Here's the before photo of the supplies I thought I'd use. Some yes, many no. 


Between my two layouts, I contributed a total of 6 points to Twisted Scissors, which turned out to be a mere drop in the bucket. Each team has 118 members and the resulting point totals were astronomical. 


Twisted Scissors emerged victorious! Go Scissors! 

2/10/22

Bash Bowl 2022: Love This Bun

During the month of February, I'm participating in a fun scrapbook competition/event called Bash Bowl. It's hosted by Bash Your Scrapbook Stash, with the goal to use up supplies and make pages. We were randomly divided into two teams (just like the Super Bowl) and the game has a football theme. I'm a proud member of Twisted Scissors.


Each Wednesday night, we attend a Facebook Live session where they spin a wheel to determine the week's elements (aka, the playbook). Then we have until Sunday to make as many layouts as we want following the playbook. Each layout is worth up to six points (a touchdown), with one point for completing a layout then more points depending on which elements we use. The process repeats for a total of four weeks. 

The wheel was not kind to me during Game 1. As a simple scrapper who loathes lumpy elements in albums, I knew going in that some things just wouldn't work for me. And that's ok. 


I don't use a lot of red, but I don't mind it. They clarified that purchased die-cuts count as ephemera, so thank goodness for that. Buttons? They said no paper buttons, so that's a hard pass for me. I prefer not to use interactive elements on my pages since they're in page protectors, so I figured any layouts I made would probably earn just three points for Twisted Scissors. 

Here is the first 3-point page I made:

Love this Bun (affiliate link)

There was one more challenging component to the game, which is that you must post a before photo of your supplies in order for the points to count. I pick out materials as I go (see: aphantasia), so to figure them out ahead of time was difficult. Fortunately, nothing says you have to use everything in your before pic, so I put way more items than I ended up using in the pile. 


Tomorrow I'll show you the second of two layouts I made for Game 1, along with the final point totals. 

2/9/22

Conversation Hearts Bouquet of Flowers

This bouquet of flowers takes yesterday's flower cupcakes one step further. They're so festive and would be just as fun for a springtime party as they are for Valentine's Day. Affiliate links below. 


Conversation Hearts Bouquet of Flowers


Materials:


Steps: 


Prepare your materials. For each flower, you will need four large hearts of the same color, plus one yellow Sweet Tart Heart. You will also need one lollipop stick. 

Prepare 4-5 Candy Melts, following the package instructions. Put a dollop of melted candy onto the parchment paper, then immediately press the four large hearts into it. They should be message-side down, with their points facing in. Place the Sweet Tart Heart on top. 

It took me awhile to figure out the right amount of melted candy. If you look closely at the orange flower, there is some candy showing between the petals. There's less on the yellow flower, but it's still an issue. The pink flower has the right amount - none is showing, but there's still enough at the top for the center candy to stick. The dollop on the right is the correct size. It should be close in size to the Sweet Tart Heart. 


Let the candy harden (approximately 15 minutes), then gently peel it off the parchment paper. Place the flowers upside down on the parchment paper. Re-melt the candy, then add a generous dollop on top of the existing candy. Press the lollipop stick in the candy, then let it set completely. 


Fill a vase (or a drinking glass) with candy hearts, then nestle the flowers into them. You can make your bouquet as full as you'd like. 


In addition to looking great on a buffet table or as a centerpiece, his bouquet makes a wonderful Valentine's Day gift for someone special. 

2/8/22

Sweet Tarts Conversation Hearts Flower Cupcakes

I am a conversation heart connoisseur, if such a thing exists. Some people hunt for Girl Scout cookies this time of year, but those don't tempt me nearly as much as conversation hearts. While my absolute favorites are these classics (affiliate link here and throughout the post), I really like these as well. They're Steve and Trevor's favorites, so I used them to make these cupcakes. I love the way the pastel colors look against the chocolate frosting. 


Sweet Tarts Conversation Hearts Flower Cupcakes


Materials: 


Steps: 


For each cupcake, you need four Sweet Tart hearts of the same color, plus two that are green. You also need one white pearl. Have these ready to go. 

Follow the package directions to prepare 2 Candy Melts. Put a dollop of melted candy (about the size of a large pea) onto parchment paper, then arrange the four hearts upside down on the melted candy, with the points facing in. Put the pearl in the tiny hole at the center. Repeat until you have the desired number of flowers. Let the flowers sit 15 minutes to harden.

Gently peel the flowers off the parchment paper and place them onto the frosted cupcakes. Place the leaves on either sides of the flowers. 

2/7/22

Family Photo Paper Plate Wreath

When Trevor was a baby, I printed pretty much all the photos I took, then picked among them to scrap my favorites. The ones I didn't use went into a box. By the time he was 4 or 5, I started planning my layouts before ordering photos. Now I rarely end up with a printed picture I don't use. 

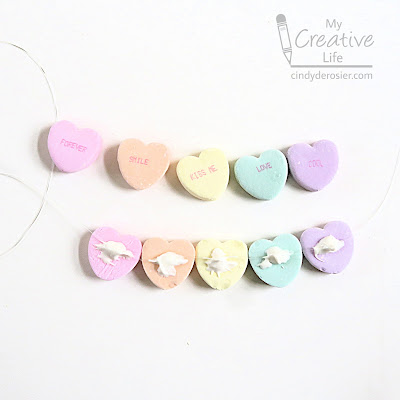
Last week, I picked a photo out of the box to make my 
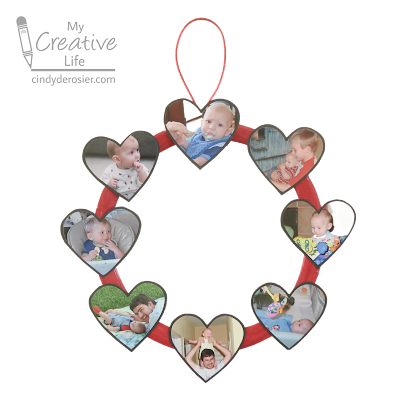
conversation heart photo frame ornament. While I had the box open, I chose another 8 photos from Trevor's first year to make a paper plate wreath. Starting at the top, that's the first time Trevor had solid food (rice cereal) and he gave me such a confused expression. Going clockwise, you see cousin Timothy reading to baby Trevor, Trevor playing in his exersaucer, Trevor in his crib looking at his mobile, Steve parading Trevor around the house on his shoulders, Steve and Trevor hanging out on a blanket in the backyard, Trevor trying to feed himself, and Trevor chewing on the ribbon on a gift. The wreath is now hanging with the Valentine's Day decorations and it makes me smile every time I see it. Affiliate links below. 


Family Photo Paper Plate Wreath


Materials: 


Steps: 


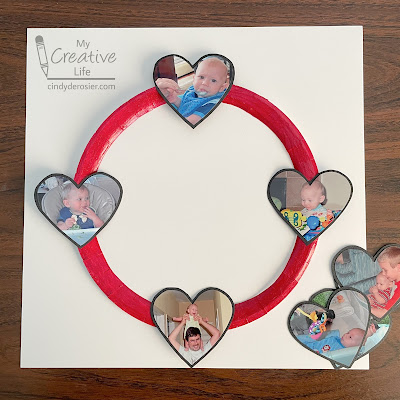
Cut out the center of the paper plate, leaving just the rim. Add a coat of Extreme Glitter.   

Place the heart template on a photo and move it around until you are happy with how the photo will look when cut into a heart. Trace the stencil with the Sharpie, then cut just inside the line. Repeat for the remaining photos.

Glue the cut-out photos to the cardstock, leaving 1/2" between each photo. Carefully cut around the photos so that they have narrow black mat around them.  

Thinking about the wreath like a clock, place photos at 12:00, 3:00, 6:00, and 9:00. For the 3:00 and 6:00 positions, try to have the faces looking inward.  


Place the remaining hearts evenly between the hearts you've already placed. Again, try to position the faces looking in. Glue all of the photos in place. When the glue is completely dry, turn the wreath over and glue the hanger in place. 


If I were doing this with a group, I'd glue the photos and the hanger with hot glue since it dries much faster. Plus, it has a stronger hold. Mine is holding up just fine with the craft glue; we'll see how it holds up over time. I may end up reinforcing it with hot glue.

2/4/22

Conversation Heart Candy Necklace

Whether you're a kid, or just a kid at heart, this Conversation Heart Candy Necklace is a really fun craft for Valentine's Day. To test its durability, I took mine on and off repeatedly, then left it on for hours. It held up surprisingly well. Give it a try! Affiliate links below. 


Conversation Heart Candy Necklace


Materials:


Steps: 


Cut a length of stretch cord large enough to fit around your neck with room to tie a knot. Select the five colors/messages you want for your necklace and set them aside. The necklace is reversible, so you're choosing two of each color (a total of 10 conversation hearts). 


Put a few Candy Melts into a small container and melt them according to the package instructions. Arrange the hearts so that half of them are message-side down. Dab a small amount of melted candy onto each, then lay the stretch cord into the warm candy. 


Immediately press the matching candy on top, trapping the stretch cord inside. Allow the candy to set up completely (30 minutes at room temperature, or 10 minutes in the fridge), then tie it around your neck. Remember - it's reversible, so you can flip the candies around if you want to send a different message. Enjoy!