9/30/16

Tissue Paper Yarn Pumpkin

Here's the yarn trivet I made with the Premier's "Mint Swirl" Sweet Roll yarn. As promised, I'm sharing the tutorial for the pumpkin. If it's not obvious, it's made of yarn too.


I actually made a second yarn balloon using the technique I shared yesterday. Follow the steps up through popping the balloon. Then, simply tear orange tissue paper and apply pieces of it to the hardened yarn using Mod Podge. 


While that is drying, dip two strands of green yarn (approximately 2 feet each) into white glue and wrap them around a plastic fork. 


Let it dry completely (overnight, to be sure), then slide it off the fork.


Brush the yarn tails with white glue and wrap them around pencil stubs. Let that dry and you have curly vines attached to the stem. 


Glue the stem to the top of the pumpkin. 


Thanks again to Premier Yarns for providing me with these versatile yarns!

9/29/16

Yarn Pumpkin

I shared most of the activities from the Little Passports Ohio State Journal awhile back. This yarn pumpkin was the last Ohio project. It's inspired by the Circleville Pumpkin Show. It's also a great craft for New Hampshire, since pumpkin is their state fruit!


Yarn Pumpkin


Materials: 

  • balloon
  • yarn
  • white glue
  • orange paint
  • cinnamon stick


Steps: 

Blow up the balloon. Pour white glue onto a shallow tray. Cut about 10 feet of yarn and put it into the glue, making sure it is all moistened. 


Wrap the yarn around the balloon. Note that I am doing the activity and Trevor is photographing it. He HATES anything gooey touching his hands. This wasn't even that bad. 


When the balloon is completely wrapped, set it down on a plastic container to dry. I like to use a strawberry basket because there's plenty of air flow. 

The next day, pop the balloon.


Take out the balloon, then paint the pumpkin orange. (Better yet, use orange yarn from the get-go. I used the white yarn that was left over from the kumihimo bracelets.) When the paint is dry, push a cinnamon stick between the yarn where the stem would go. That's all there is to it! 


9/28/16

Hunger Action Month: Sweet Potato Birds

As Hunger Action Month comes to a close, I want to extend a huge thanks to all of you who donated to the Food Bank this month. I greatly appreciate those who shared my posts, checked out the links, wore orange, and helped spread the word. I have one last project to share for Hunger Action Month 2016: Sweet Potato Birds.


I bought three sweet potatoes and showed them to Trevor. He declared that one looked like an eagle, one like a quail and one just looked like a sweet potato. So we turned two of the sweet potatoes into birds and used the other for spare parts.

To make the quail: 

Peel a whole sweet potato. Put the peels onto a plate. Use the spare sweet potato to carve a topknot and to sliver a pair of wings. Add two toothpicks for legs; together with the tail end of the sweet potato, it should now stand up in the peels. Attach the wings with toothpicks and carve a slot for the topknot. Use a food marker to add eyes. 


To make the eagle: 

Peel just the pointy end of the sweet potato to make a beak. Carve an eye and add a pupil with a food marker. Put it onto a plate along with an eagle's favorite food: fish. 
 

After photographing our sweet potato creations, we took them apart and cut the sweet potatoes into chunks. We put them in a foil pouch with a small pat of butter and a teaspoon of maple syrup. After about 20 minutes in the oven, they were perfectly done and SO good. 

I decided to collage all the orange edible crafts Trevor and I made this month... and I realize now that we made only bunnies and birds! Here I'd thought we'd made a wide variety of stuff, but apparently not! At least the ingredients are mostly different from project to project!  


While Hunger Action Month is coming to an end, hunger continues. Please continue to support your local Food Bank by donating money or food, volunteering your time, or simply spreading awareness. Each of us can make a difference. 

9/27/16

Pantone's Spring 2017 Color Report

I've been stalking Pantone's site, eagerly awaiting the reveal of the Spring 2017 Color Report. After the huge disappointment of the 2016 Color(s) of the Year, I'm eager to see what colors are in the running for what I hope will be the Color (singular) of the Year for 2017. The colors look promising:


According to the Spring 2017 Color Report (which you can read in its entirety here), the colors represent a mixture of vitality, relaxation and the great outdoors. Interestingly, one color (Niagara, a "classic denim-like blue that speaks to our desire for ease and relaxation") is identified as the most prevalent for 2017. Pantone doesn't normally name a "most prevalent" color. Could this mean Niagara is a shoo-in for Color of the Year?

Let's take a look at the previous Color(s) of the Year.


The neutrals are almost never chosen as the Color of the Year (for good reason), so I think we can toss out Pale Dogwood and Hazelnut from the running. Flame and Pink Yarrow are reminiscent of 2011's Honeysuckle and 2012's Tangerine Tango, so I don't expect either of those to be named The One. I think Niagara is a strong contender, as well as Kale and Greenery. Considering their three buzzwords of the year are vitality, relaxation and the great outdoors, I'd put my money on Greenery as the most likely. But not much, as Pantone has certainly shaken things up before and could do it again.

Any thoughts or predictions?

9/26/16

Sweet Roll Yarn Coaster and Trivet

My friends at Premier Yarns asked if I wanted to try out their new Sweet Roll Yarn, so of course I said yes! Each 245-yard Sweet Roll has two complete repeats of three beautiful colors. If you use it to knit or crochet, you get wide, evenly spaced stripes. The yarn is 100% acrylic, which means it is machine washable and dryable. But the best thing about the Sweet Roll is that as you pull the yarn from the center, the ball stays put without rolling around or dropping to the floor. Love that!

I made a yarn trivet and a yarn coaster (plus the yarn pumpkin, which I'll share in a separate post).


All were made from Premier's "Mint Swirl" Sweet Roll. Isn't it pretty?!


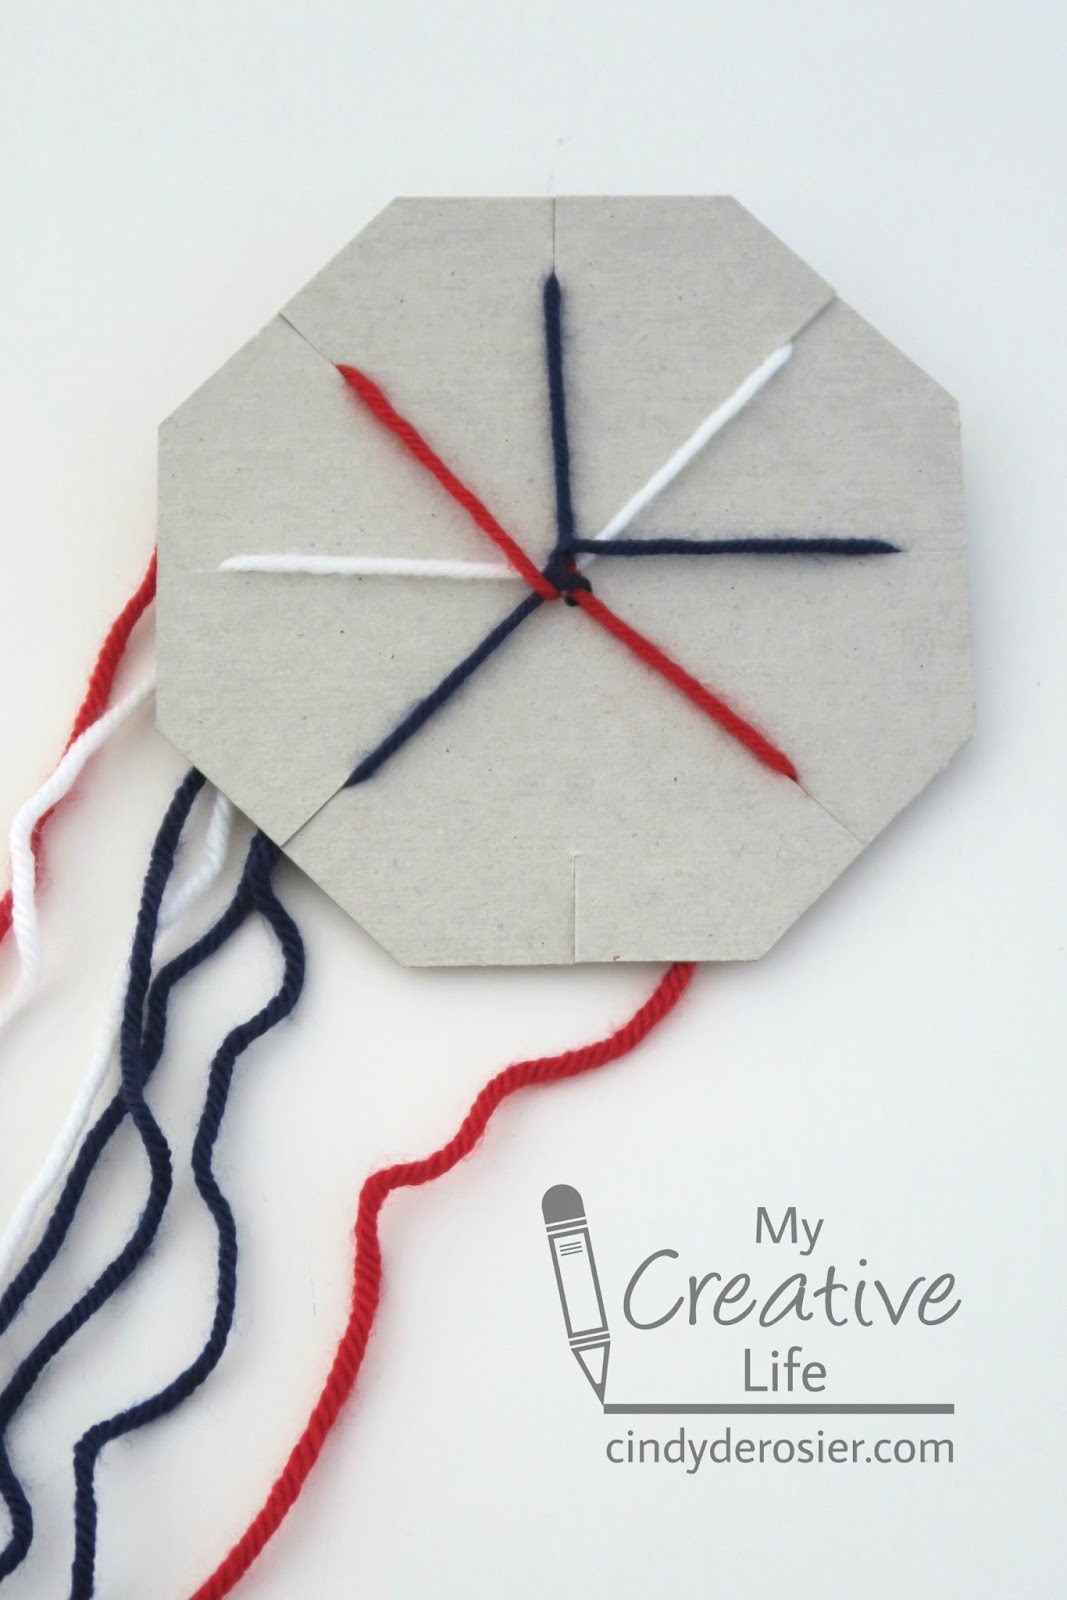
When I received the yarn, I already had a knitting project on my loom. So I decided to experiment with what would happen if I tried kumihimo with multiple strands of yarn. I cut 21 strands of yarn, each around 2 yards long, tied a loose knot in one end, and threaded them onto the kumihimo octagon. I put three strands each in seven slots, leaving the eighth slot empty. Then I started braiding, following these instructions.


When I was done, I removed it from the octagon. Rather than tie a knot with all 21 strands, I took one strand, wound it tightly around the other 20 strands about ten times, then knotted it tightly with one of the strands it was wrapped around. Then I cut off the extra lengths of yarn, very close to the knot. I took out the loose knot I'd started with and did the same wrapping and knotting. I didn't cut off those ends, because I wasn't sure if I'd need them intact (as it turns out, no).

With my 21-strand braid done, I started a 14-strand braid (two strands instead of three in each of the seven slots). I worked on that one during Trevor's dental appointment. It's the perfect craft to carry around for when you have a few minutes here and there. It fits easily in a purse and you can start and stop at any time without having to get to the end of a row or struggle to figure out where you left off. 


Here are the two yarn braids. The top one has 21 strands of yarn (3 x 7) and the bottom has 14 (2 x 7). Both braids ended up just under 3 feet long, so approximately half of their starting length.


Obviously, that is much too long for a bracelet! My plan was to coil the braid to create a pretty coaster. I cut a long piece of yarn and threaded it on a yarn needle. 


And then I started coiling. As I coiled, I used the yarn to attach braid to the growing coil by sliding the needle under one strand of each and pulling tightly.  


In a matter of minutes, I had this:


I trimmed off the long ends as close as I could to the knot, then I sewed the end to the coil.


Here are the coaster and the trivet. Each was a nearly 3-foot braid, but because the braids had different thicknesses, they coiled up to form different diameters. 


There are 25 different colors of Sweet Roll. If you'd like to get your hands on some, use the code CINDY10 to get 10% off any purchase at www.premieryarns.com through October 31, 2016.

9/23/16

Two-in-One: Cardboard Tube Bear or Dog

My latest cardboard tube project is a bear:


Or a dog. It's the same tube. I just changed out the ears.


Materials: cardboard tube, paint (dark brown, white), scissors, craft glue, googly eyes, black mini pom pom

Paint the cardboard tube dark brown. Add a drop of white paint to the brush and wipe it on the inside of the tube until no more comes off. This will be the muzzle and tummy. When the paint is dry, cut one of the halves open.


Use that open piece to cut the muzzle and tummy from the light brown interior. Use the dark brown part to make rounded ears for the bear, or pointy ears for the dog. Cut a slit halfway up the center of each ear. Slide the ears of choice onto the edge of the tube.


Glue the muzzle and tummy in place, securing them with a rubber band until the paint is dry. Add the googly eyes and pom pom nose. Done!

9/22/16

40-4-Steve: Skating Lessons

Trevor has an ice skating recital every 10 weeks. For 30 minutes prior to the recital, friends and family can skate for free. The first time, Steve sat out. The next time, Trevor and I talked him into putting on skates and trying. Let's just say he's not a natural. Ten weeks later, he tried again. He made it around the rink once (almost) before the 30 minutes were up. When learning a new skill, it is not ideal to wait 10 weeks between attempts, especially when it takes you 26 minutes to feel comfortable enough just standing on skates to try actually moving.

Fast forward to March. Trevor had been taking lessons on Wednesdays for 13 months and had worked his way up through Pre-Alpha, Alpha, Beta and Gamma. The next level, Delta, isn't offered on Wednesdays, so we had to switch nights. Happily, we discovered that there was an adult class offered that partially overlapped with Delta! I signed us both up. Trevor would skate from 6:00 to 7:00. Steve and I would skate from 6:30 to 7:30.


I'm happy to report that Steve is now comfortable skating socially. Mission accomplished! Meanwhile, Trevor is working on beginning jumps. I can't wrap my head around that, even though I watch it each week. 

9/21/16

Hunger Action Month: Carrot Soup with a Swimming Bunny

Our family has gone orange during September for Hunger Action Month. As part of our celebration, we've come up with a creative and healthy orange meal each week. This time, it's carrot soup. With a swimming bunny crouton.


Carrot Soup


                                         2 T. butter                      2 lb. carrots
                                         1/2 onion                        2 c. broth
                                         2 cloves garlic                 4 c. water


Roughly chop the onions, garlic and carrots. Heat the butter in a pan over medium heat. Add the onions and cook until they are brown and soft. Add the garlic and cook for about 30 seconds. Add the water and the broth. I used chicken broth because we had it on hand, but you can use vegetable broth if you want to keep this vegetarian. To keep it vegan, swap out the butter for oil. It's a flexible recipe. Turn the heat to high. When the liquids are boiling, add the carrots and return to a boil. Reduce the heat to low and simmer until the carrots are soft, approximately 20-30 minutes. Use an immersion blender to puree the soup. Season to taste. Garnish with grated cheese, a sprinkle of nutmeg, and/or pie crust bunnies.


Pie Crust Bunnies


                                          1 1/3 c. flour              1/2 c. shortening (chilled)
                                          1/2 tsp. salt                3-6 T. ice water
                                          black food marker

Mix the flour and salt. Use a fork to cut in the shortening until it resembles coarse crumbs. Using the fork, stir in just enough ice water for the dough to come together into a ball. Roll out the dough onto a mat and use a knife to cut out the shapes (see photo). Put them on a baking sheet and cook at 375° for approximately 8 minutes or until barely darkened. Remove from pan and let cool enough to touch. Use the food marker to add faces to the bunnies. Float the bunnies in the carrot soup, inserting each piece diagonally so that the face and feet are sticking up out of the soup.


Lest you think you can skip the pie crust and just use white bread for your bunnies... 


The bread started absorbing the soup the SECOND I put it in. I took this photo as fast as humanly possible. Within minutes, the bunny was completely orange and soggy and his face was just starting to run. Conversely, the pie crust bunny stayed crisp and looking just as good for 10 minutes. So definitely go with the pie crust. You can make the bunnies in advance and keep them in a ziplock bag or even freeze them. 

About the food writers: I have two different brands (listed below). They work well on some foods and not great on others. Neither worked especially well on pie crust or white bread, but they were good enough. They're meant for surfaces like fondant, royal icing, and marshmallows, but I use them for all kinds of other things. You keep them in the fridge. I've literally had mine for over a decade and they're still going strong.


9/20/16

Kumihimo Yarn Bracelets

After completing our flag drawings, the next activity during our flag-themed Cub Scout den meeting was to make red, white and blue yarn bracelets. We used a simple version of kumihimo, a Japanese form of braiding. Here's the finished bracelet:


The finished braid could be used as a lanyard, zipper pull or keychain as well, but all the Scouts chose to make theirs into bracelets. 

To make this bracelet, you need:
  • a piece of chipboard
  • yarn (approx. 14 feet total)
  • scissors

Begin by cutting the chipboard into an octagon. It does not need to be perfect. Aim for the size of a CD so that it's comfortable in your hand. Poke a hole in the center of the octagon and cut a 1/4" slit into each side.

Next, cut seven pieces of yarn, each approximately 2 feet. They can be the same color or different colors. We used three blue strands, two red strands, and 2 white strands. Tie a knot on one end connecting all the pieces of yarn. Thread the strand through the center of the octagon. Holding the octagon with the knot on the bottom, take each of the yarn strands and put them into one of the eight slots. Note that there are 7 strands and 8 slots, so you will have an empty slot.


Rotate the octagon so that the empty slot is facing you. Moving counter-clockwise, count three slots and remove that piece of yarn.  


Put it into the empty slot. 


Rotate the octagon so that the empty slot is facing you again. Repeat the previous step, counting three slots counter-clockwise, then moving that piece of yarn to the empty slot. Repeat these steps over and over. It's that easy. Rotate, count, move the yarn. Rotate, count, move the yarn. 


As you work, the finished braid will start emerging from the bottom. 


When it is the length you want, simply remove each yarn piece from the slots, then pull the whole braid out from the bottom. The octagon is ready to be used again.


Tie a knot at the end of the braid. Leave a 1/2" gap, then tie a second knot. Trim the excess yarn off both ends.


To wear the bracelet, slip the knot through the gap between the two knots. 


This easy craft is great to pass the time during travel, waiting for appointments, in restaurants, or any time. Customize it with your favorite colors! Thanks to Premier Yarn for providing us with the materials for our project. 

9/19/16

How to Draw the US Flag (A Communication Game)

I'm leading the Cub Scouts on their Building a Better World Adventure. We had a lot of information to cover about the US flag, so I decided to start off by making sure the boys knew what the flag looks like. I taped paper to the wall and set a chair in front of it, facing the audience. One by one, each boy sat in the chair and described to me how to draw the flag. 


Sounds easy enough, right? Nope. I did my best to follow the directions each boy gave EXACTLY. If they weren't specific about something like vertical vs. horizontal vs. diagonal, I intentionally chose to interpret their instructions incorrectly.


Trevor was the first volunteer. Here's his finished flag:


His instructions? "Using a blue pen, draw a box in the upper left corner. No, wait. Draw a medium-sized box. Put 50 white stars in the box. Now put 14 red lines to the right of the blue box with white space between them."  

Each boy was able to learn from the others' mistakes, but that didn't always help, as there were plenty of other mistakes to be made! Here, J has just realized from the rest of the group's hysterics that he didn't specify how long the red lines to the right of the blue square should be.


I should mention: I know these boys well and they know each other well. I knew that none of them would get their feelings hurt during this game, but I was also careful in who I selected to go first. That person is likely to do the worst and will be the first to experience the group laughing at something he couldn't see. I was relieved when Trevor volunteered to go first because I knew that he would find his mistakes just as funny as the audience did. All of the boys were great sports during their turn in the hot seat. We had a great time laughing together and everyone got the message - how important it is to be clear and specific when communicating directions. 

L was the last to go. He nailed the colors, the rectangle size and placement, and the number and direction of the stripes. The stars weren't right and he forgot to clarify the placement of the stripes.


Here are all 7 Scouts, proudly showing off their flags. They're standing in the order they went. You can see the improvement in communication as they learned from each other's mistakes. 

A closer look:


Tomorrow I'll show you the art project we did as part of the same meeting.