7/31/19

Too Close for Comfort

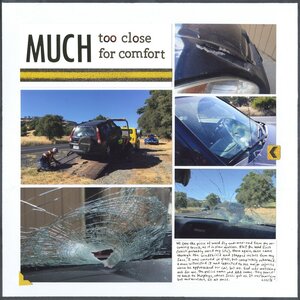
Last summer, we had a car accident on our way up to my inlaws' cabin in Bear Valley. A large piece of wood, the size and shape of a large cabinet door, came flying end-over-end from an oncoming truck. (Yes, oncoming.) Steve was driving, I was in the passenger seat, and Trevor was in the back. There was no way to avoid being hit. One corner of the board slammed into the very front of the hood on the passenger side, then the second corner hit higher on the hood, and the third corner came through the windshield. The board stopped inches from my face. I was covered in glass, but because it was safety glass, I didn't have a single cut even though I had to pick out dozens of pellets of glass embedded in my arms and legs. CHP came promptly and we got towed to a nearby town. The friends who were scheduled to join us at the cabin later that day swung by to get us on the way up, so at least we had a great weekend after the horrible start.    

I scrapped about our fun at the cabin just a few months after the trip, but it took me a full year before I could print photos from the accident on the way there and scrap them. 

Much Too Close for Comfort (affiliate link)

I kept the layout very simple to let the photos (and my journaling) tell the story. The yellow stickers are from Discover the USA by Paper House Productions; the designer probably wasn't thinking of car accidents when she designed this road-trip themed collection, but it totally works. As difficult as it was to make, I'm very glad to have this layout in the album. 

7/30/19

Gallery Glass Removable Drink Identifiers

When we host a party with disposable cups, I put a Sharpie by the cups for everyone to write their names on their cups. When we host a party with wine glasses, we use wine charms (affiliate link here and throughout the post). But when we host a party with stemless, non-disposable glasses, we just hope that no one mixes up their glasses. Until recently! Now I have a sure-fire way for guests to identify their glasses. 

Remember the Gallery Glass sun catchers I made? When guests come to your house, just ask them to peel their favorite sun catcher off the window and stick it to their glass! Brilliant! (If I do say so myself.)


You can also make removable bands to go around the glasses. It's just a matter of putting dots of Gallery Glass Window Color onto Stencil Blanks, letting it dry, then peeling it up and wrapping it around a glass. 


I had a lot of fun experimenting with using different tool with Gallery Glass Window Color. Can you guess what common household item I used to make these?


 If you said a plastic fork, you're right! Just put random globs of Gallery Glass Window Color onto the Stencil Blanks....


... then drag a fork through it until you're happy with the pattern. Let it dry, peel it up, then wrap it around the glass!


In case you were worried, Gallery Glass is non-toxic. So while I wouldn't recommend eating it, there is no danger to decorating the outside of a glass with it. 

So what else can you do with Gallery Glass? You can cut dried pieces with scissors, dies, or punches to get fun shapes! Just spread some on the stencil blank, let is dry, peel it up, and cut. I used Fiskars Squeeze Punches for the stars and hearts below. 


You might be concerned that these might be difficult to remove from the glass. That worried me at first. I tried leaving them on for three days, near a sunny window, and the Gallery Glass peeled right off. I haven't had any trouble removing it from my windows either. It's a really neat product.


The possibilities are endless! Imagine a Halloween party where you and the kids make tons of bats, ghosts, pumpkins, black cats, and whatever else to decorate the windows. As guests come, they peel off their favorite and attach it to their glass. When they're done with the glass for the evening, peel off the shape and stick it back on the window. Fun stuff, Gallery Glass!

7/29/19

Camp Emerald Bay

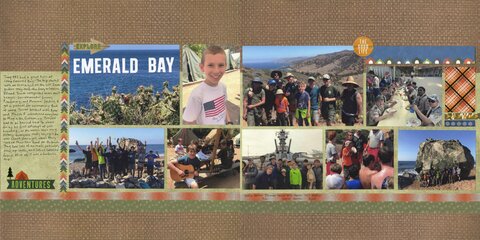
Last year, Trevor's Scout troop went to summer camp on Catalina Island at Camp Emerald Bay. They had a full day's drive and then spent the night on the USS Iowa before taking the ferry to the island. At camp, Trevor earned three merit badges (Environmental Science, Pioneering, and Mammal Study), tried ocean kayaking for the first time, and paddled a war canoe with his friends and spent the night on the beach. He had a great time. 

Camp Emerald Bay (affiliate link)

As usual, there were so many great pictures that I had a hard time narrowing them down for the layout. I ended up with 9 photos that best represent all that Trevor did. I made sure that all the Scouts in his troop were pictured. I adhered the photos to brown background paper, added a spot for journaling, and put the title in the open space in the scenery picture at the top left. Then I added all the cute stickers and embellishments from Paper House Productions' Great Outdoors collection. The layout was a bit top-heavy, so I added two strips of washi tape along the bottom to ground everything. If you look closely, you can see that I added the names of all the Scouts on the trip in the orange/white washi below the photo of the USS Iowa. I'm very happy with the finished layout. 

7/26/19

"Watch Me Pull a Rabbit Out of My Hat!" Craft

As a child of the 70's, I grew up watching Rocky and Bullwinkle (in reruns... I'm not that old):


Bullwinkle never did manage to pull out a rabbit out of his hat. I learned from this fun article that there were only five things that ever came out- a lion, a rhino, a bear, a tiger, and Rocky. No rabbit.

Here's a fun craft for your own "Watch me pull a rabbit out of my hat!" moment. The rabbit puppet moves; hide him in the hat, and then pull him out with plenty of drama.


A good magician never reveals her secrets, but I'm a terrible magician. Besides, a good craft blogger always reveals her secrets. So here's what you need to know:


---------


"Watch Me Pull a Rabbit Out of My Hat!"


Materials:

  • cardstock or construction paper - black, grey, pink, red
  • scissors
  • craft glue
  • Sharpie
  • craft stick

Steps: 


Cut a black rectangle for the main part of the hat, then two identical pieces for the brim of the hat. Glue one piece to the front of the hat. Flip the hat so that the back is facing up and glue the second brim piece ONLY to the ends of the other brim piece. You're making a pocket so the rabbit can slide out of the hat.

Cut a grey rabbit. Add pink inner ears and a pink nose, then add the eyes, mouth, and whiskers with the Sharpie. Glue the rabbit to the craft stick.


7/25/19

Easy Zucchini Quiche

Our zucchini plants are thriving, so zucchini has been making a regular appearance in our meals. Quiche is one of my favorite weeknight meals, so I came up with an easy zucchini version.


---------

Easy Zucchini Quiche


Ingredients:

  • one pie crust (homemade or store-bought)
  • about 2 c. sliced zucchini (one large zucchini or two medium zucchini)
  • 3 eggs
  • 2 c. shredded mozzarella
  • 1/2 c. shredded parmesan 
  • salt and pepper


Steps: 


Preheat the oven to 375°F. 

Put the pie crust into a 9" pie pan, fluting the edges. Set it aside. 

Slice the zucchini, then put it on microwave-safe plate lined with a clean kitchen towel. Sprinkle 1/2 tsp. salt evenly over the zucchini pieces. Microwave for 4-5 minutes. The zucchini should be soft, but not completely cooked (see photo below). The towel should have absorbed quite a bit of liquid. Blot off any additional liquid, then layer half of the zucchini on the bottom of the pie crust. 


Combine the eggs, the mozzarella cheese, and 1/4 tsp. pepper. Spoon half of this mixture over the zucchini pieces. 


Add the rest of the zucchini on top of the egg mixture, then pour the remaining egg mixture on top. Sprinkle the parmesan evenly over the top. 

Tear three narrow pieces of foil and use them to cover the edges of the pie crust. Bake the quiche for 10 minutes, then remove the foil. Bake for another 25 minutes. Remove the quiche from the oven and then let it cool on a wire rack for at least 10 minutes. 


Use a sharp knife to slice the quiche. If the center of the slice dips down, as shown in the photo below, you have not let the quiche cool sufficiently. Walk away! 


Much like a lasagna, quiche needs time to set up. Nothing says you can't eat it piping hot, but you're not going to get clean cuts and it will be much more difficult to serve. If you wait those extra few minutes, you're rewarded with a much prettier slice.  


I served this quiche alongside a salad featuring tomatoes from our garden. Soooo good!

---------

Looking for other zucchini recipes? Here are some of the more unusual ways I like to prepare zucchini:


Love Food. Hate the store?

7/24/19

Iowa 2017

Another page with goodies from Paper House Productions! This is from our June 2017 trip to Iowa


Iowa 2017 (affiliate link)

After narrowing our Iowa photos down from hundreds to nine, I was left with a grid of pictures but no place for a title or journaling. My solution was to use the sky in the upper left photo for a title. I cut the heart sticker in half, centered it behind the "Discover" sticker, and added letter stickers to spell Iowa. I wrote the journaling on a piece of white cardstock I cut into an arrow shape, then layered it over the right center photo. I put the date below the bottom center to complete the visual triangle. It was missing something; the heart sticker on the upper right photo was the perfect finishing touch for this very simple, photo-heavy page.

7/23/19

Children's Party Ideas

As one of my responsibilities as Editor of Fun Family Crafts, I handle our Pinterest account and regularly search for new ideas for the Children's Party Ideas board. For months, I've been wanting to make graphics for all of the party themes I've done over the years. It was a lot of work, but I am finally done. From now on, I'm making the graphics as I go - it's so much easier that way! 

You can click on the graphic to go to the post(s) about each party. 


7/22/19

Cousins

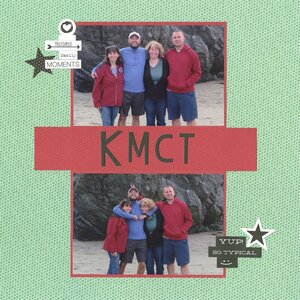
During our family reunion in Bandon, Oregon in 2017, it was important to me to get a photo of my sister and me with our two cousins. The four of us posed for a very nice photo on the beach... then two seconds later, Matt put Kari and me in a headlock and Tim popped up the bunny ears. I love the contrast between the two photos!   

KMCT (affiliate link)

I titled the page with our initials (Kari, Matt, Cindy and Tim). Then I searched through all my word stickers to act as my journaling. I added Treasured, Family, and Moments to the first photo, then Yup, So Typical, and a wink to the second picture. All the details about the what-where-when are on the previous layout in the album, so I didn't feel like I needed to add those on this one. I like the simplicity. 

It's been two years since I've seen Matt and Tim and the rest of the extended family, but I don't have to wait much longer! We're all meeting in Boise soon for another reunion. I'm really looking forward to seeing everyone. 

7/19/19

The Best (and Worst) Ways to Travel with Kids

New parents discover almost immediately that going somewhere with kids and going somewhere without kids are as different as night and day. Even ordinary errands become a production when there's a baby or toddler involved. Vacations, even more so. Choosing the best mode of transportation can have a huge effect on how much you and the other adult(s) enjoy the trip. 


While I've titled this post "The Best (and Worst) Ways to Travel with Kids," there is no one choice that is universally better or worse. Many factors contribute to making different modes of transportation more or less appealing for your specific situation. I'm drawing on a lifetime of traveling with kids, first as Miss Jones (taking students to destinations within California and across the country), then as Aunt Cindy (traveling with nephew Timothy and, eventually, niece Allison), and now as Mom. I've traveled with kids in cars, buses, planes, taxis, trains, ferries, ships, and trams. Below are my thoughts on the pros and cons of traveling by plane, car, ship, and train.


---------

Traveling by Plane


Pros to Plane Travel:


The obvious advantage to traveling by plane is that it is much faster than every other option. Trips that would take days or even weeks take hours instead. Planes can be very exciting and magical for young children. Families with young children get preferential boarding, which can be nice.

Cons to Plane Travel:


Pretty much everything about plane travel, besides the speed, is a giant pain in the neck with young kids. You have to limit the amount of things you bring, depending on the specific airline's policies. Security lines and waiting at the gate are hard for kids who are excited to get on a plane. Once they're on the plane, it is cramped, they can't move around, and your own trip becomes all about making sure the kids don't disturb everyone around them. Preferential boarding can mean spending an extra 30+ minutes in cramped seats. Installing a car seat on a plane is not easy; having a lap baby is not particularly comfortable nor safe. Changing a diaper on a plane is a nightmare; the only thing worse is dealing with a newly potty-trained preschooler on a plane. Oh, when a baby's ears hurt and he's too busy screaming to take a bottle to relieve the pressure - that's pretty terrible, too. 

The Good News:


In my experience, flying with toddlers and preschool-age children is the worst. Babies are relatively easy. Once kids hit school age, they are much better air travelers. Trevor and I have flown together without Steve a couple of times; by age 10, flying with Trevor was no more difficult than flying with an adult companion. Flying across the country with a plane full of 5th graders wasn't a problem either. Everything changes when they can entertain themselves and don't need an escort to the bathroom.


Traveling by Car


Pros to Car Travel:


The best thing about car travel is that you can go at your own pace. If your child needs frequent stops to run around, or use the bathroom, or you need to change a diaper, or whatever... it's not a problem. You can stop. You can set your own schedule and take whatever route you want. There are no limits on what you can bring with you, as long as it fits in your car. You don't have to worry about the kids disturbing others; they may drive YOU crazy, but at least you won't have strangers glaring at you if the kids aren't perfectly behaved. Car travel is usually cheaper than plane, train, or ship travel when you have 3+ passengers. 

Cons to Car Travel:


Car travel can be slow, particularly if you're making frequent stops to let a squirmy child burn off energy. The seats are still cramped and you can't move around while you're traveling. Kids get bored; babies want to be held. Breastfeeding is impossible. (Ask me about the 8-hour drive we took when Trevor was an infant and I had to manually pump in the car nearly constantly and feed him bottles. Better yet, don't. I'm suppressing that memory.) 

The Good News:


Just like with flying, car travel with kids gets much easier as they get older. By the time they're school age (and in some cases, sooner), kids can easily entertain themselves in the car. (If you don't want them using electronics and reading causes motion sickness, audiobooks are a lifesaver. Our family is all about audiobooks during car travel.) Better bladder control means they can use the bathroom during stops you'd be making anyway, versus the newly-potty-trained kid who needs to go randomly with 15 seconds of notice.


Traveling by Ship


Pros to Ship Travel:


Traveling by ship (and by that I mean a ferry, steamboat, cruise ship, etc.) can be a great option with kids. The biggest plus is that there is space to move around and no need to keep kids buckled into a confined space. Kids enjoy watching the water and exploring the nooks and crannies of a ship. The bigger the ship, the more there is to explore and do. On a cruise ship, there is almost always a kids' room with tons of toys and games and organized programming. Unlike on a plane or in a car, being on a large ship is like having a floating hotel that takes you from place to place while you do whatever you want.    

Cons to Ship Travel:


With young children, safety is a major concern with ship travel. Obviously, you need to watch them closely around railings, stairs, and all the places you normally would on land... with the added factor that the movement of a ship can cause even sure-footed kids to slip or fall. Newly walking toddlers may struggle keeping their balance on a ship. Trevor went on his first cruise just after his 1st birthday. We had a good time, but it was less than ideal. It was so frustrating to see all the cool amenities, activities, etc. that we couldn't take advantage of because we had to watch our toddler. We were welcome to use the kids' room, which was nice, but we had to stay with Trevor. Most lines don't let you drop off children until they are at least three. We had no idea Trevor was afraid of foghorns, but he screamed in terror every time one sounded, which was frequently as we sailed out of San Francisco. We had to majorly overpack diapers and other baby supplies, as we wouldn't be able to get those onboard if we ran out.

The Good News:


Once your child is three and can be checked in and out of the kids' room, traveling by cruise ship is awesome. And it only gets better as the kids get older. Parents can have a few hours to relax and kids can craft and play and run around with others their age. Typically, kids' rooms are open for 3 hours in the morning, 3 hours in the afternoon, and 3 hours in the evening and you're free to use any or all of that time. 


Traveling by Train


Pros to Train Travel:


Traveling by train combines one major benefit of airplanes (exciting for most young children) with the freedom to walk around as needed and not stay confined to a seat the whole time. Unlike air travel, there is virtually no security to deal with, and thus no long waits in long lines, and you're free to carry on liquids and that yogurt your child loves that planes won't allow. There is a lot to see from a train, and many children are lulled to sleep by the motion. Even when you are seated, most trains have much roomier seats than airplanes, and they often have tables for games, coloring, or other play.  

Cons to Train Travel:


Train travel tends to be quite expensive. Unlike with a car, you can't determine your own schedule or pull over when you want to stop. You still have to make sure the kids aren't disturbing other passengers. The bathrooms are not great for changing diapers or supervising potty-trained preschoolers.

The Good News:


As with everything, train travel is much easier as your kids get older.


---------


I'd love to hear your thoughts about transportation options when traveling with kids. What's your favorite (or least-favorite) and why?
7/18/19

Gallery Glass: Unicorn Sun Catcher

Check out my unicorn sun catcher! 


The Plaid Ambassadors each received the Gallery Glass Sun Catcher Kit (affiliate link here and throughout the post) to play with. I'd never tried Gallery Glass before. The verdict? Super fun!


To make your own sun catcher, you need Simulated Liquid LeadingGallery Glass Window Color, and Stencil Blanks. It also helps to have the design you want drawn out. The Sun Catcher Kit comes with a large idea book so I used that, but you can use coloring pages or draw your own designs instead. 

Place a stencil blank over your design. Trace the lines with Simulated Liquid Leading. There is a learning curve to this. At least, there was for me. You can see my first attempt here. Obviously, I wasn't keeping the pressure steady, nor letting gravity work for me.  


I did some more practicing before moving on to the pineapple, my fifth shape and the first that turned out well. The key was to think of the leading like frosting a cookie. Pipe with even pressure, holding the tip just above the surface, and let the leading fall gently into place. 


I drew a few more shapes, including the unicorn at the top of the post. In all, I made a dozen window catchers and there's hardly a dent in my 8 oz. bottle. 

Let the leading dry for at least 8 hours. I left mine overnight. Then fill in the spaces with the Window Color. It is much more fluid than the leading, but not enough to self-level. You want to fill in all the spaces so that they're almost overflowing. It looks like I filled in the pineapple completely...


... but once it dried, it's obvious that I didn't quite fill it all in.


Anyway, fill in all the spaces as full as you can get them. If any bubbles show up, poke them with a pin or a toothpick. Let the Window Color dry for at least 8 hours. 


When it is dry, gently peel the design off of the Stencil Blank. Then attach it to a window. You can remove it and reposition it as often as you want. 


Oh, the possibilities! I'm imagining all sorts of holiday and seasonal window catchers decorating the windows at Casa deRosier. Any suggestions for other things you'd like me to make with Gallery Glass? Better yet, try it yourself!

7/17/19

Rome 2019

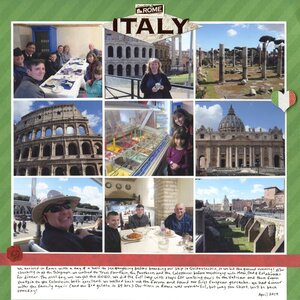
I hadn't planned to scrap our European adventure from April so soon, as I still have trips from 4+ years ago waiting to go in the albums. But when Paper House Productions sent me a box of goodies that included their Italy-themed stickers (affiliate link), I couldn't wait to dig in and play.  

Rome 2019 (affiliate link)

As you can see, I kept the layout very clean and simple. I chose 9 photos (four of scenery and five with people, making sure everyone from our family of nine appeared in at least one photo), mounted them on white, then put that on a green paper with a subtle diagonal stripe. I added the red as a border, wrote my journaling, then added stickers. I combined two to make the title, then two more to draw the eye where I wanted it. It's not a masterpiece, but I'm happy with how it turned out. 

7/16/19

My Job as Editor of Fun Family Crafts

Every once in a while, I make a reference to my job as Editor of Fun Family Crafts and link to the most recent post that explains what I do. That link is from 2016. My responsibilities have changed quite a bit over the years, so clearly it's time for an update!


---------

"What is Fun Family Crafts?"
Fun Family Crafts is a website. It is not a magazine (you're thinking of FamilyFun). Fun Family Crafts has links to over 11,000 kid-friendly craft tutorials. They are organized into 92 categories to make it really easy to find exactly what you're looking for.

"Wow. 11,000?"
Yep. Actually, it's 11,864 as of today. And with the exception of several hundred that were already on the site when I was hired, I personally checked out every one of those to make sure they were kid-friendly, crafts, and tutorials.

"How many of the 11,864 are tutorials you personally wrote?"
539. All of my tutorials are here at My Creative Life. You can search for them alphabetically or by topic.

"So what do you actually do as Editor?"
I run the site. All submissions come to me; I read each one to determine if it's kid-friendly, a craft, and a tutorial. If yes and it's something we want to feature, then I write up a description, categorize the project, add search terms, and schedule it to run. I also answer any questions our readers have, moderate comments, and promote the site, primarily via social media. I search for the most fabulous kid-friendly craft tutorials out there and feature them on the site. There's more, but that's the gist.

"What do you mean by kid-friendly?"
Fun Family Crafts showcases crafts for everyone from toddlers to teens, as well as crafts adults make for children (like a baby toy, for example, or a Halloween costume). Every craft is tagged by the age group(s) for which it is most appropriate. We do not feature tutorials that are inappropriate for kids. For example, you will not find crafts relating to drugs/smoking, bachelor/bachelorette parties, weddings, retirement, Over the Hill parties, or other topics that are not appropriate for kids. (You'd be surprised by some of the submissions we get.)

"How long have you worked for Fun Family Crafts?"
The owner of Fun Family Crafts, Amanda Formaro, hired me in December 2012 as an Editorial Assistant. At first, my job was to find and submit craft tutorials to flush out our categories that were lacking. Amanda gradually assigned me more tasks, then promoted me to Editor in January 2016. It's a great job. 

"How do I get my craft featured at Fun Family Crafts?
If you are a content creator, I'd love for you to submit any of your craft tutorials. The process is quick and easy, but if you have problems or any questions, please let me know!  


7/15/19

Future Eagle

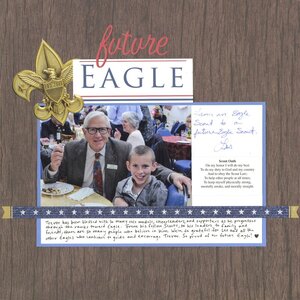
Trevor has been in Scouts since he was six and loves it. He earned the Arrow of Light (the highest Cub Scout rank) in March 2017 and has been working on Boy Scout ranks ever since. He has completed all the requirements for First Class and is scheduled for a Board of Review on Wednesday. We're so proud of the hard work Trevor has put in to reach this milestone. 

When Boy Scouts started, First Class was the final and highest rank, signifying that a boy was a complete outdoorsman. Now, in addition to the original four ranks, there are three additional ranks: Star, Life, and Eagle. With the completion of First Class, Trevor is officially on his way to Eagle. He has a lot to do along the path, but I'm confident that he will get there. 

Why I am so confident Trevor will get there? Steve and I support and believe in him, of course, but it's much more than that. Trevor has the support of many others: his fellow Scouts, his leaders, other family members, and friends. Most important of all, he has mentors, those who have gone before him and reached Eagle. Cousin Ian. Peers Mateo and Charlie. Church friends Garrett and Les. And so many others. 

Future Eagle (affiliate link)


This photo was taken at a church event. Les and Trevor were seated next to each other and spent time chatting about Scouts. Les gave the print to Trevor and signed it "From an Eagle Scout to a Future Eagle Scout." I knew I had to scrap it. The wood grain background is from the Great Outdoors collection from Paper House Productions and the star border sticker is from their Let Freedom Ring collection. I cut the Eagle emblem, Eagle title, and Scout Oath from an extra copy of the program from a fellow Scout's Eagle Court of Honor. The script letters are from Websters Pages. I'm so happy with how this page turned out and can't wait to see all the great things Trevor accomplishes with so many people behind him. 

7/12/19

Fun with Food!

Eagle-eyed readers may have noticed that there is a new tab on my site called FUN WITH FOOD. When you click it, it takes you to a landing page that gives me a place to organize everything food-related on my blog. I've added my Edible Crafts to this tab, along with five other categories. Four of them aren't done yet (going through all my old posts - over 2100 of them - is a huge job), but one is. Recipes from United States History is live.


I've divided the recipes into three categories: Native Americans and Early European Exploration; Colonial America and the Revolutionary War; and Expansion, Civil War, and the Industrial Revolution. I might add more, but for now those are the recipes I've posted since those are the broad categories covered in fifth grade.

While I'm very happy to have all the recipes in one place, I'm cringing at the photography. I'm not a great photographer even under the best of circumstances, but taking a quick snapshot in a dark classroom with 32 kids clamoring for samples leads to some pretty lousy photos. If/when I make these recipes again at home, I'll take the time to redo the photos.

---------

As an Amazon Affiliate, I would be remiss if I didn't remind you that Amazon Prime Day starts on Monday. Find these and thousands of other items at Amazon. I get a small commission for purchases and using my affiliate links won't cost you anything more. Thank you!

7/11/19

Spread Kindness Like Confetti

"Spread kindness like confetti." What a great way to go through life! This quote jumped out at me from the new Kindness Matters Coloring Book by Leisure Arts (affiliate link here and throughout the post) and so I decided to put it on a Plaid Wood Canvas Panel.  


To make your own, start by priming the canvas with white gesso. Brush it all over with Folk Art Hologram Extreme Glitter. When the canvas is dry, tear the page from the coloring book and scribble on the back with a charcoal pencil. Regular pencil works too. 


Carefully position the coloring book page inside the canvas, then trace over the design. Peek to make sure it is transferring. 


Now it's time for color! Use paints, paint pens, or Sharpies to color in the design. 

Use a kneaded eraser to remove any pencil marks or smudges. Then punch a bunch of confetti from colored cardstock and arrange it on the canvas. 


Now pull out the stylus from a Diamond Art kit. While you're at it, gather your extra Diamond Dotz. You'll be using those! Pick up a confetti (confetto?) with the stylus, add a dot of craft glue, and replace the confetti. 


Add coordinating Diamond Dotz to each confetti, using the same technique of picking one up with the stylus, adding a dot of glue, then placing it in the glue. It's hard to capture the sparkle, but the whole thing so glittery and shiny!


But, as sparkly as it is, there's one thing it still needs... more glitter! Use Folk Art Glitterific Paint to bring it to maximum bling. I used my finger to dab on a coat of green, let that dry, then went over the top with hot pink.


I wish you could see this sparkle in the light. 


I need to find a special place to put this where it will inspire others to spread kindness like confetti.