5/29/20

Found Item Stamped Frame

Need a fun activity for the kids? Challenge them to search the recycle bin, junk drawer, and garage for items they can use as stamps. I used four household items to make this stamped frame. Can you guess what they are? 


The first item I used is probably the most obvious. I'll get to it a minute. First, I painted my frame white. I couldn't find a link to the frame I used, but this one is inexpensive and has a good amount of surface area for stamping (affiliate link). When the white paint dried, I used a plastic lid to stamp pink circles.  


Did you guess that the small orange circles with the empty center were made with a screw?


I was particularly pleased with the interesting purple shape I got by stamping the edge of a nut.


The bread tab added a fun line detail.


Did anyone notice that I used one of my all-time favorite color combinations? It's a nod to tomorrow, which is a very special day in Casa deRosier. Happy anniversary, Steve! Sweet Sixteen in Quarantine, and there's nobody I'd rather spend it with than you. 

5/28/20

Never By the Fire

Yesterday I mentioned that one photo from the Klondike Derby deserved its own layout. This is that photo. That's Trevor, smiling by the camp stove, while the rest of the boys in his troop are seated around the campfire in the background. 

Never By the Fire (affiliate link)

For the past 9 years, Trevor hasn't gotten near a campfire after this scary experience. During all of his Scout trips, he cooks his food on a camp stove, even if everyone else is cooking over the fire. (Including s'mores.) He doesn't sit around the campfire at night or in the morning. At structured campfires in campground or summer camp amphitheaters, he sits (or stands) as far away from the fire as possible. 

Some kids might be frustrated by the limitation, or upset about missing out. Not Trevor. One of the things I admire most about him is that he's very matter-of-fact and accepts things as they are. He has an allergy, so no campfires. There's nothing to question or be upset about. He cooks, he eats, he spends time with his friends in places that aren't near a smoky fire. No problem.

5/27/20

Klondike Derby 2020

Most people are familiar with the Cub Scout Pinewood Derby. It's an annual tradition for virtually all Cub Scouts. Far fewer people are familiar with the Klondike Derby. Inspired by the Klondike Gold Rush, the Klondike Derby began in 1949 and is a wintertime event where troops or patrols compete together in various events with all gear transported on a homemade sled that is pulled by the Scouts. 

Trevor's troop signed up for their first-ever Klondike Derby back in fall of 2019. Between then and the event (February 21-23, 2020 near Truckee), they spent many hours designing and building sleds, learning cold-weather safety and gathering appropriate gear (it rarely drops below freezing where we live), and preparing for the event. They were so excited. 

Unfortunately, there wasn't any snow the weekend of the Klondike Derby, despite the freezing temperatures. While they weren't able to use their sleds, the organizers did a great job planning alternate activities and the boys had a ton of fun. 

Klondike Derby 2020 (affiliate link)

We didn't know it at the time, of course, but this was the last in-person Scout trip that would happen before COVID-19 canceled everything. Trevor and the rest of the Scouts are eager to resume trips, but it's going to be awhile before they can do so safely. Thank goodness for all the technology that keeps his troop connected virtually and going strong through the pandemic.

As you know, I only make one layout per event or trip, but there was actually one photo from the Klondike Derby that I set aside to use on its own page. I'll show you that tomorrow. 

5/26/20

Peacock Diamond Art

I did a lot of crafting during my pre-COVID-19 days, but the amount I do now that we're home 24/7 has increased significantly. I've made time to work on some big projects, including this FABULOUS Diamond Art peacock (affiliate link here and below).


This was the first large (14.6" x 16.5"), full-drill (dots covering the entire surface) Diamond Art project I've done. I didn't keep track of how long it took, but I'd estimate somewhere between 30 and 40 hours. Honestly though, the time flew by. I worked on it an hour or so at a time and loved seeing it come together. The sparkle and shine are amazing. Here's a close-up of the peacock's face:


I've mentioned before that our neighborhood is home to a flock of approximately 200 peafowl. I absolutely love them. Other neighbors, not so much. There is an ongoing battle between those who love the peafowl and those who inexplicably bought or rented a home where a flock of 200 birds that they don't like have been living for the last century. We've been living here for 16 years and the Peacock War has been raging the whole time. While there is no easy compromise between "I love the peacocks!" and "I want the peacocks gone, yesterday!" a group of neighbors from the former group stepped up with a partial solution. They feed the peafowl at a dedicated spot within the preserve in our neighborhood in order to encourage them to roost, scratch, and poop there instead of at people's houses. 

Peafowl food isn't free. To do my part to contribute, I'm selling this completed Diamond Art to the highest bidder. It is unframed (because I'm not going to a framing shop during a pandemic) but can easily be framed or mounted for display. I'll deliver locally or ship elsewhere. Since the materials alone are around $25, that's the minimum bid. If you'd like to bid, contact me at cindy.mycreativelife at gmail.com.

If you have 40 hours to spare and have Diamond Art experience, I'd encourage you to make your own Diamond Art peacock! However, if you've never done Diamond Art, I'd recommend starting with a much smaller project. The Beginner kits only take a few hours to do and will give you an idea of whether or not this craft is for you. Either way, I HIGHLY recommend my favorite magnifying lamp when doing Diamond Art. What a difference it makes! 

Long live the peafowl! 

5/25/20

Rice Krispie Treat Flamingo

I had so much fun with the rice krispie treat pig that I made a flamingo. 


Rice Krispie Treat Flamingo


Ingredients:


Steps: 

Use a sharp knife to carve away the corners of the rice krispie treat, as shown on this piece of paper.


Working on a piece of parchment paper, use the corners to shape a neck and head, making sure they're firmly attached to the body. Pop the flamingo (still on the parchment paper) into the freezer for a few minutes to firm it up. 


Insert a lollipop stick to make the leg of the flamingo. Melt 8 white Candy Melts with 1 red Candy Melt to get the perfect shade of Flamingo Pink. (I did 45 seconds at 50% power in small glass container, then stirred until it was smooth. Every microwave is different.) Use a butter knife to spread the melted candy on the flamingo. Some will puddle between the neck and the body, which is good. This will hold the neck in place when the candy sets up. Use the knife to swipe two teardrop-shaped globs of candy on the parchment paper. These will be the wings. Let the candy set up completely. (Notice I still have candy leftover in the glass dish. You'll need this to 'glue' the eyes and wings in place.)


When everything is hard, peel the wings and the flamingo from the parchment paper. Remelt the pink candy (about 20 seconds on 50% power) and spread use it to adhere the eyes and wings. Let them set. 

Melt a tiny bit of black Candy Melts and dip the tip of the beak. (Yes, it's worth the effort. It makes a big difference.)


I have more rice krispie treats in the pantry. What animal(s) should I make next?

5/22/20

Woven Tissue Paper Suncatcher

Remember the painted newspaper collage inspired by the book by The Carle Museum? Today's project is based on a project from The Carle's blog. Their artwork starts with folia paper (affiliate link) and is on a much larger scale than my tissue paper version. 


Woven Tissue Paper Suncatcher


Materials:

  • tissue paper
  • foam stamps
  • Folk Art acrylic paint
  • scissors
  • large cardboard tube
  • clear tape
  • twine


Steps: 


Choose 5+ colors of tissue paper and paint that you like together. Stamp patterns onto the tissue paper. If you don't have stamps, use bottle caps, the end of a cardboard tube, or anything else you can find around the house to make a pattern. Or, you can fingerpaint! 


I did a tone-on-tone and a different stamp for each of the colored tissue papers, then used all of the colors and stamps on white tissue paper (which I didn't end up using for this project). You can do whatever you want for your stamping. There's no right or wrong. 


When the paint is dry, cut the tissue paper into strips. Mine are about 2" wide. 


Tape one end of the strips to the cardboard tube until you have filled the length. I was able to fit 10 strips on my tube. 


Now weave additional strips through the existing strips. The easiest way is to fold back every other strip, lay down the new strip, and then wiggle it into place. Tape the two ends and trim any excess off the edges. 


Repeat the process of folding back alternating strips and taping horizontal strips in place until you near the end. I fit seven strips before I stopped. Cut the ends to make fringe. 


Put a piece of twine through the tube. The easiest way to get the twine through the cardboard tube is to attach a binder clip to one end of the twine, hold the cardboard tube vertically, then drop the binder clip through the tube and let gravity do the work for you. Remove the binder clip and tie the two ends of twine together to make a hanger. 

Here's what it looks like hanging on the wall. 


And here's how it looks on a window where the light can shine through it. 


This was a lot of fun to make and the colors make me happy. Try it yourself!

5/21/20

Celebrating New Year's in Jackson, Mississippi

For the first time in a long time, possibly in my entire life, there are no travel plans on my calendar. Every vacation, conference, family visit, Scout outing, weekend trip, even day trips... canceled. It feels really weird. I'm really looking forward to when we can start putting travel back onto the calendar, but I would prefer to wait longer than necessary than to rush and risk contracting and/or spreading COVID-19.

Instead of planning future travel, I'm scrapping past travel. I have a HUGE list of trips that still need to be scrapped (I just counted: 8 states, 2 countries, 3 cruises, several theme parks, and 2 school field trips), so I'll be busy for quite awhile. My most recent page is about celebrating New Year's Eve in Jackson, Mississippi. That was a great trip. 

Celebrating New Year's in Jackson, Mississippi (affiliate link)

My favorite part about this layout is that I incorporated two photos into the title. First, I trimmed down a picture of the huge 'Welcome to Jackson' mural and paired it with a cropped photo of 'Mississippi' done in agricultural products from the state. I stacked them together, then added stickers to create the entire title: Celebrating New Year's in Jackson, Mississippi. 

One thing I don't like about this layout is that Steve is not in any of the photos. Almost all of the photos I ended up using on the page are ones he took. I didn't realize this until after I'd ordered the photos (which is no longer a quick run to the 1-hour photo place like I used to do). Fortunately, Steve is in the first and second blog posts about our time in Mississippi, but I'm going to be much more careful when I order photos from here out, at least until the 1-hour places open up again.

5/20/20

Design a Fish Project

When I pulled out the student samples of the fish hat I shared last week, I found another fun fish project I wanted to show you. As part of the assessment following Ocean Week, I challenged my students to use their knowledge of fish structures and adaptations to design a made-up fish that is perfectly suited for a specific habitat. This is my sample, the Diversion Fish. I used colored pencils on white drawing paper, then cut it out. 


Here is the text that goes with it. I wrote it in front of the students to demonstrate the assignment. 
"The diversion fish lives in the open ocean, where he must face numerous predators. His silvery blue color, with a darker upperside and lighter colored belly, allows him to blend in to the colors of his habitat. Because he is not a very fast fish, diversion fish has another method of escaping predators. His large caudal fin makes him appear to be a much larger, more vicious fish. Instead, he is really a harmless plankton eater. While his body shape is fusiform, his fins are rounded, which do not allow him great speed."
I hope I made a new index card later to add something about the deceptive coloration on his sides that give the illusion of gills and fins; if so, I didn't save the updated index card.


Unfortunately, I don't have any student samples, which means that the students wanted to keep their own work. Understandable, and common for creative projects like this. However, I am absolutely kicking myself for not photographing the display of all of the creative fish they dreamed up. What I wouldn't give now to be able to go back and take pictures of all the awesome things we did my classroom. To any teachers reading this: Learn from my mistake and take photos of all the wonderfully creative things your students make!

5/19/20

Trevor's First Robotics Competition

Trevor joined his school's Robotics Club when it began a few months into 7th grade. The fledgling club met after school twice a week for an hour. Trevor enjoyed it and learned a lot. When it was time to pick electives for 8th grade, the Robotics Club advisor asked the 7th graders if they would like for Robotics to become their official elective the following year. They would work independently in the back of the room while she taught a STEAM class to younger students. Trevor and seven other rising 8th graders were interested.

The eight kids in the Robotics elective divided into two four-member teams to design robots based on the 2019-2020 VEX challenge, Tower Takeover. However, their building materials were very limited, their computer equipment was old and kept crashing, and it wasn't until November that they received a single sample of the block for the Tower Takeover challenge to share between the two teams. They continued to tinker, with hopes of entering a middle school competition. 

After some very frustrating issues with the district, we received word in mid-January that their advisor had finally successfully registered Trevor's team (who named themselves The Whales "because we like whales") for their first competition..... on February 1. The team of neophytes had only a single sample block, no towers, no testing arena, and only two weeks to get ready to compete. They worked hard and were so excited. 

We showed up to the competition and saw that many of the teams had matching shirts covered with logos from corporate sponsors. That might have discouraged some kids, but The Whales ignored the other teams and used every second before the competition to practice and improve. Their first match came very early in the competition. I can't tell you how exciting it was when they scored their first points!

Robotics Competition (affiliate link)

The Whales went on to lose that first match, as well as the rest of their matches that day. But after each match, they tinkered and practiced, and showed significant improvement over the course of the day. They watched and learned from their competitors. They finished the competition 27th out of 28 teams, thrilled with how well they had done in what was not only their first competition, but the first for their school.

I couldn't be more proud.

5/18/20

Dress My Craft Paper + Sentiment Stickers = 9 Cards

As part of my 2020 Creative Resolutions, I've been making cards using a variety of techniques and materials that I don't normally use. Here are my latest creations:


Each of the cards started with paper from the Romantic Roses collection by Dress My Craft (affiliate link here and throughout the post). This collection is not something I'd use for scrapbooking (too vintage for me), but it works really well for cards. The quality of the paper is fabulous - super thick and really smooth. 

I cut my card bases strategically. I positioned the roses to serve as embellishments on four of the cards. I fussy-cut one frame to make a shaker filled with flower pearls (the first shaker card I've ever made). The other frame holds a sentiment sticker. That sticker and all the others were part of a gift from my dear friend, Julie. I particularly love how the two pink cards with the white script turned out. That's one single white heart doily that I cut in order to decorate the two cards.

For the pet sitter card, I used this stamp to make the rabbit. Ordinarily, I would have had a chance to give the card to our awesome bunnysitter by now, but COVID-19 has canceled all our travel plans for the foreseeable future, and thus eliminated the need for pet sitter. 

None of these cards look like what I would usually make, so it a good challenge for me. 

5/15/20

Rice Krispie Treat Pig with Chocolate Mousse Mud

You guys, I am ridiculously pleased with myself because this pig turned out even better than I'd planned. It's inspired by friend Doreen. Doreen has a pet pig (Hamlet) and she is constantly showing off yummy desserts on her blog. 

My pig is made of Rice Krispie Treats and is sitting in chocolate mousse. Hamlet is black, not pink, and is a house pig, so I don't think he does much mud-wallowing. So I took some artistic license with my creation. 


But I didn't forget the curly tail. 


Read on to learn how I made it. Once I figured everything out, it was actually quite easy. (And delicious.) Affiliate links below. 

---------


Rice Krispie Treat Pig with Chocolate Mousse Mud


Ingredients:


Steps: 


Put 1/2 c. cream into a bowl and gently warm it (I did 30 seconds in the microwave). Use a serrated knife to chop the chocolate. Put half of the chocolate into the warm cream and let it sit for about two minutes, then whisk it together. Add the rest of the chopped chocolate and whisk until it is smooth. (Congrats - you've made ganache!)

Pour the remaining 1/2 c. cream into a large bowl and whip it to medium peaks. Gently fold half of the cream into the chocolate mixture. Fold in the rest of the cream. (Congrats - you've made mousse!) Gently spread the mousse into a shallow container and put it in the refrigerator to set up. 

Unwrap a pink Starburst and roll it out on a clean surface. 


Cut out a snout and two ears. I used a knife for the ears and an ancient cookie cutter for the snout (but I totally want this set. Imagine the possibilities!!) Don't eat the Starburst scraps (yet). First, roll a snake then twist it into a tail. Roll two itty bitty balls, then flatten them and put them on the snout to make the nostrils. Now you can eat the scraps. 


Now it's time to coat the rice krispie treat to make it pink. I melted 8 white Candy Melts with 1 red Candy Melt and it was the perfect amount for a single pig. (I did 45 seconds at 50% power in a glass container and then stirred, but every microwave is different).

The easiest way to get good Candy Melt coverage without too much waste or too much mess is to insert a stick into the short end of the rectangular rice krispie treat and spread the melted candy on using a knife. When it is covered on all sides, set it down on a piece of parchment paper. 


Let the candy set up for a minute or two, then place the snout, eyes, and ears in position. Let the candy firm up completely, either at room temperature or in the refrigerator. (Don't put it in the freezer, as it turns out that the condensation makes the eyeballs run when it comes to room temp.) Peel the pig up from the parchment paper. It would make a fun treat just like this, but the mud/mousse makes it more awesome. 


Remove the mousse from the refrigerator. It should have set up considerably so that it holds the pig upright without slumping. (If not, return the mousse to the fridge sans pig and try again later.)


Finally, nestle the pig's tail behind the pig into the mousse. 


Adorable, if I do say so myself! And sooooo yummy!

5/14/20

First Day of Eighth Grade

Here's Trevor on his first day of 8th grade, long before we'd heard of COVID-19 or experienced distance learning. It feels like a lifetime ago in many ways.  

First Day of Eighth Grade (affiliate link)


I've been keeping track of the dates related to this very unusual school year. 
  • On March 13, about an hour before school got out, we got the news that the next two weeks of school were canceled. During those two weeks, I set up a schedule of schoolwork and merit badges for Trevor to do, following the same schedule he had at school (science, language arts, history, robotics, lunch, PE, and math).
  • On March 25, the school district announced that we would not be returning to school on March 30th as planned. Instead, distance learning would begin that day, with the first day back tentatively Monday, May 4. 
  • On April 1, the State Superintendent of Public Instruction announced that schools in California would be unable to physically reopen this academic year. However, this was not a mandate and local school districts could still choose to reopen against the advice.
  •  On April 10, our school district announced that we would be on distance learning for the remainder of the school year, with spring break to happen as scheduled from April 10-17. The last day is June 11. 

Trevor has adapted well to distance learning and is continuing to do very well in school. I'm very thankful and appreciate all that his teachers are doing to ensure his education continues and he is prepared for high school and the future. 

5/13/20

Ocean Week: Fish Hat and Sign

Time for another stroll down Memory Lane back to my teaching days! 

When I was teaching 4th/5th grade, we had a school-wide Ocean Week every year. Each grade level studied a different ocean habitat (4th grade was Kelp Forest and 5th grade was Open Ocean). We decorated our classrooms and worked our study of the ocean into all our curricular areas. The kids made fish print t-shirts and we hosted an amazing Ocean Night for the community. The week culminated with a parade. 

Early in the week, each student in my class picked a different fish to study, focusing on its habitat, predators/prey, and the body structures that helped protect it or aid it in surviving in its environment. We then made fish hats and signs to wear around our necks. My students wore these to visit younger classrooms to present oral reports about their chosen fish, then wore them for the parade. Sadly, I have no photos of my class dressed up as fish from the kelp forest or the open ocean. What I wouldn't give to go back and get pictures of all the cool things we did! Fortunately, I saved a few samples (including the sea bass outfit I made and wore), which Trevor was kind enough to model.  

Picture a whole class dressed up like this, each with a different fish. It was awesome.


You don't have to celebrate Ocean Week to make your own fish hat and sign. Make your own hat based on your state fish

---------

State Fish Hat


Materials: 


Steps: 


Lightly sketch the fish's body on one sheet of paper. It should extend most of the 18" length in order to be big enough to fit on your head. When you are happy with the size and shape, add the major details - an eye, gills, spots, stripes, etc. 

Use paperclips to attach the second piece of construction paper to the first. Carefully cut around the fish you've drawn, moving the paperclips in as you cut away scraps. You should end up with two identical fish shapes, paperclipped together. 


Hold the paperclipped fish up to a window with the blank side up. Trace the eye, gills, and other features so that you now have two fish pieces that are a perfect mirror image of each other. 


Remove the paperclips and color in the fish.


Finally, staple the fish pieces together at the head and the tail to make a hat. 


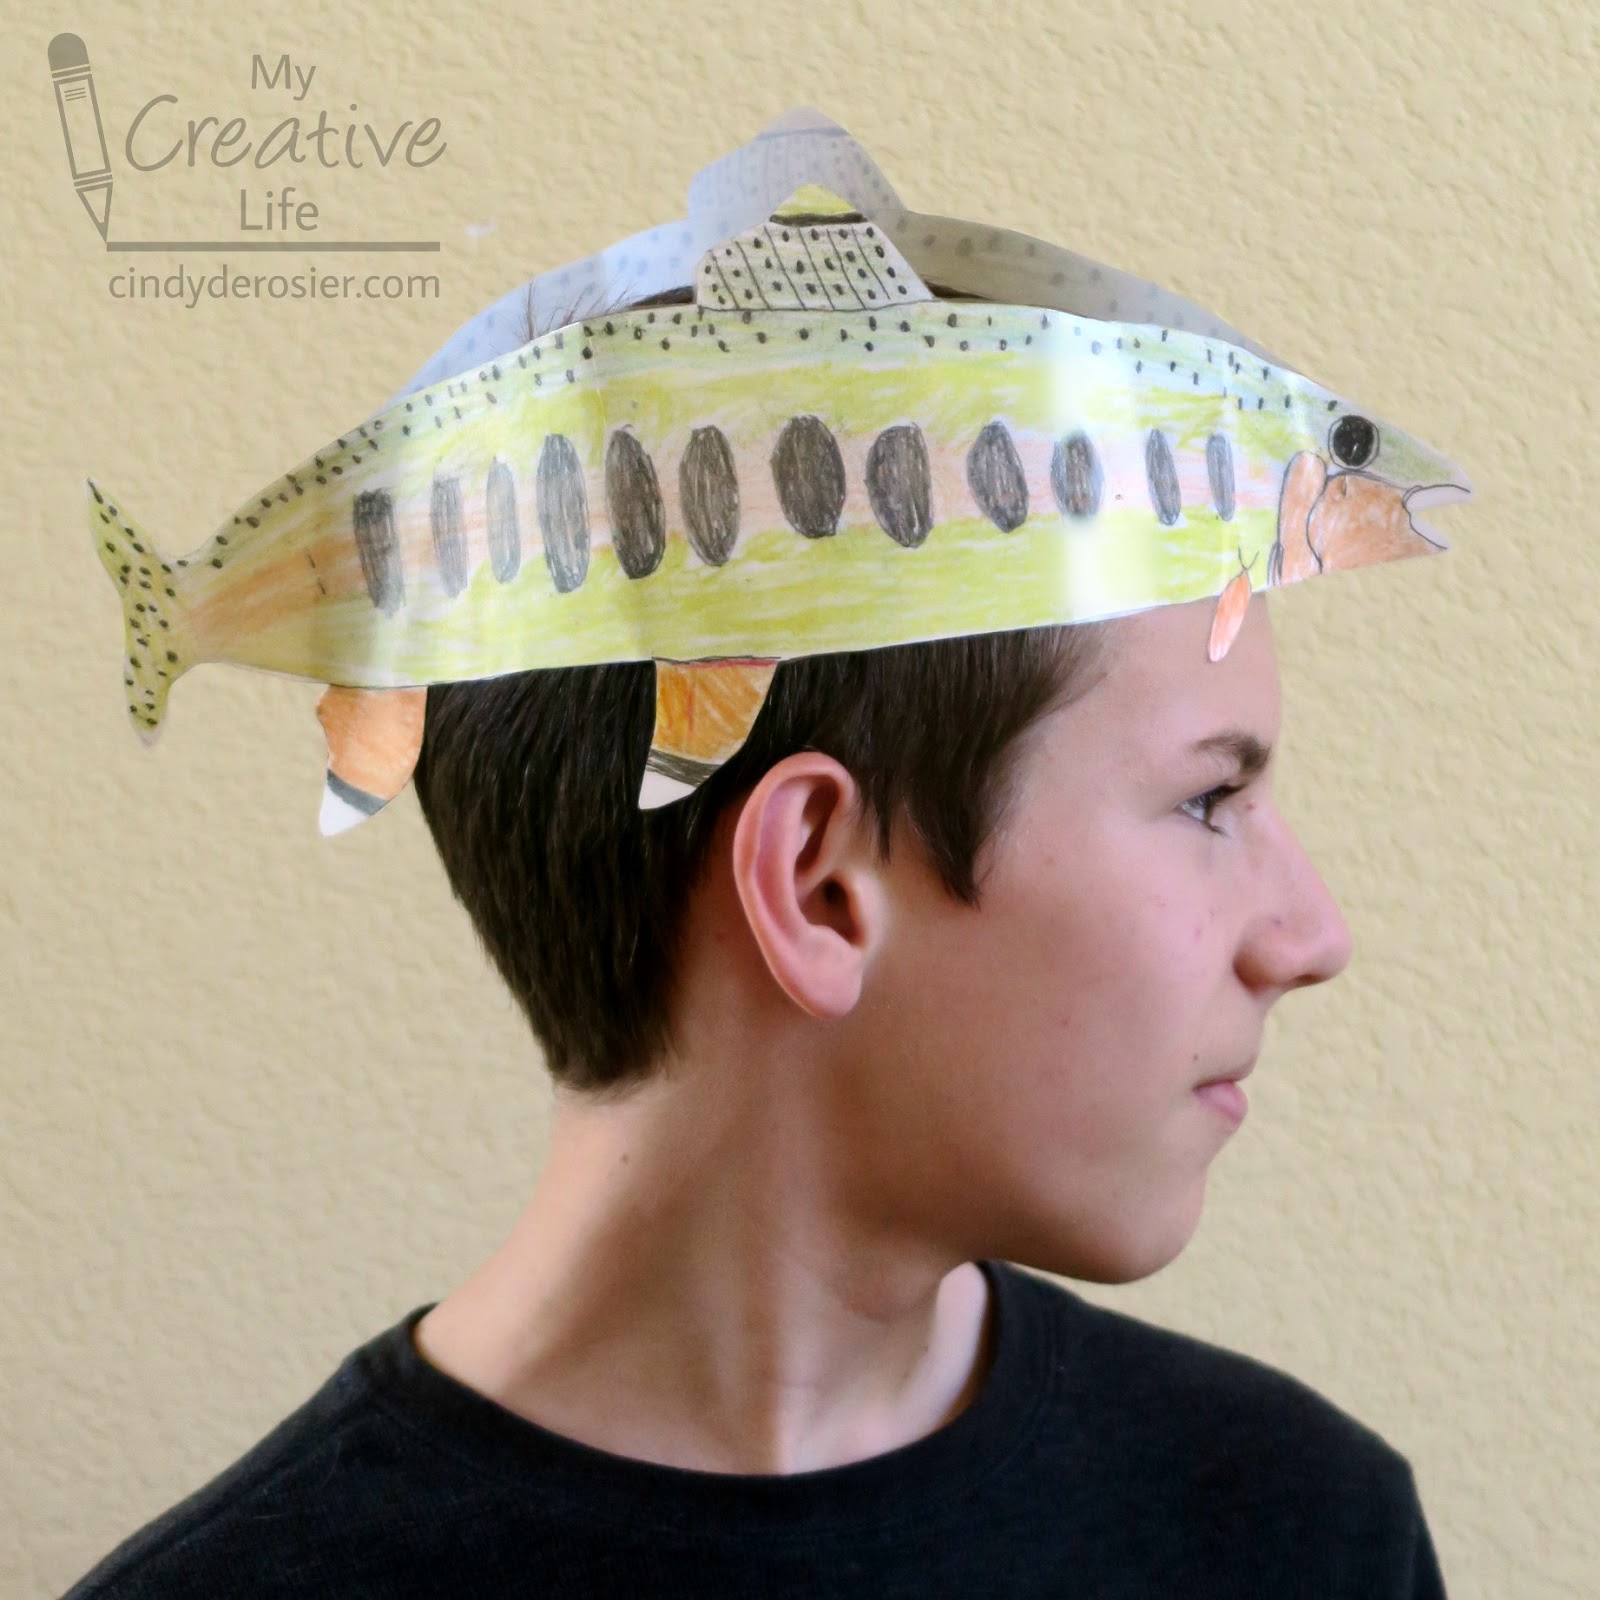
This is a cutthroat trout, the state fish of Idaho, Montana and Wyoming. Four more states (Colorado, Nevada, New Mexico and Utah) have particular subspecies of cutthroat trout as their state fish. 


Here's a sample done by one of my students, Catherine S., back in the day (modeled by Trevor, the most cooperative 13-year old boy of all time). 


It is California's state fish, the golden trout. 


---------

I checked out "fish hat" on Amazon to see what was out there and it did not disappoint. This light-up angler fish hat is awesome. I like the shine on these 'luau fish' hats, but I'm trying to understand why they only come in packs of six. And speaking of trying to understand, I don't understand this fish hat at all. It is just plain creepy. 

5/12/20

Scout Sunday

Trevor's Scout troop celebrated 2020 Scout Sunday at our church, back in February when going places in person and sitting next to other people was actually a thing. I put together this very simple layout to document the event.

Scout Sunday (affiliate link)

I'm looking forward to the time when we can safely return to church. I really miss my church family. We have been participating in the weekly service via Facebook Live, and I am very grateful to everyone who makes that possible.

5/11/20

Painted Chipboard Bighorn Sheep

I'm fascinated by bighorn sheep and their unique adaptations. For example, did you know that a male's horns can weigh up to 30 pounds and measure 50 inches? Or that they have glands on their feet that release scents to help assert dominance? Both males and females grow horns, which continue to grow throughout their lives. Amazing!

Two states (Nevada and Colorado) as well as one Canadian province (Alberta) have named the bighorn sheep as their state (provincial) mammal. Today I'm going to use a bighorn sheep to demonstrate my process for helping kids create a realistic version of an animal on chipboard. Follow along and give it a try! 


Painted Chipboard Bighorn Sheep


Materials:

  • chipboard
  • pencil
  • scissors
  • Folk Art paint
  • construction paper
  • black ink


Steps: 


Find a good reference photo. I usually look through dozens of photos to learn what the animal looks like from different angles and across individuals before picking one that will be my reference. Then I use a pencil to block out the body and head. Notice how blocky my drawing is. I'll be refining it later. For now, I just want the basic shapes. 


Next, I add legs. As I do, I reshape the body, smoothing out sharp corners and changing proportions as needed. I stay very focused on my reference photo, trying to draw exactly what I see (as opposed to what I think I should be seeing). 


When I think the body I've drawn matches the reference photo, I carefully cut it out with microtip scissors. I cut outside the lines, because I can always cut away tiny bits as needed but can't add material back. At this point, I walk away for at least a few minutes. Fresh eyes will help me see any areas that need additional cutting. 


The next step is adding a base coat of color. To keep myself from getting bogged down in details or painting what I think should be there instead of what I'm actually seeing, I use my fingers to add swaths of color. Fingers are not a great choice for detail, so this keeps me focused on undertones and shadows. 


Acrylic paint dries very on chipboard, so by the time I wash my hands I'm ready to add the next layers. Here, I use a paintbrush. As you can see, I'm constantly mixing shades and tones on my palette paper. My goal is to match what I see in the reference photo. It takes practice and patience. Fortunately, you can keep adding layers of paint as many times as it takes to get the results you want. 


I started with shadows, so my final painting step is to add highlights. And an eye, which I added after taking the photo. 


To make the mountain habitat for your bighorn sheep, tear a piece of grey construction paper in half. Use one half for the mountains that are the most distant, then tear the second half two more times and layer the pieces to make the foreground. 


Ink the edges of the mountains to create dimension, then layer them on a sheet of blue construction paper. Now add your bighorn sheep.


---------