2/28/23

Bash Bowl 2023: Restaurant Impossible

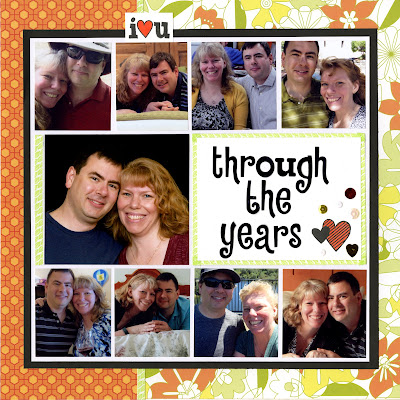
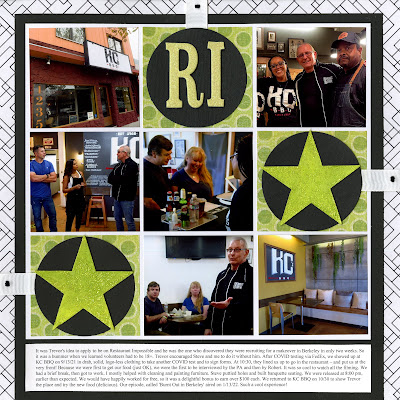
This is the third and final week of Bash Bowl 2023! I'm pleased to announce that my team, Twisted Scissors, won last week and we're now tied 1-1 with the Scrappin' Banshees. This is the first page I made for Week 3: 

Restaurant Impossible (affiliate link)

Here is the playbook for this round: 


Ignoring the fact that "medias" makes me twitch, this was a very challenging assignment for me. I use circles regularly and chipboard occasionally, but the rest of the items rarely appear on my pages. And certainly not all of them on the same page. And unfortunately, chipboard letters were specifically disqualified; they account for 95% of my chipboard usage. I was not at all confident that I could make a page I liked with all the elements. But I did! 

Since circles and chipboard were the easiest, I started there. I chose a patterned paper with circles, then punched large circles from black cardstock. I added the two required "medias" (paint and mist) to the chipboard stars, then added some bonus glitter. That wasn't necessary, as the chipboard letters are my glitter element (since they couldn't be my chipboard element). I struggled with where to put ribbons and stitching, settling on white ribbons to anchor the circles and stitching on the ribbons (three stitches on each, for a grand total of 9 stitches - not a lot, but it counts!). 

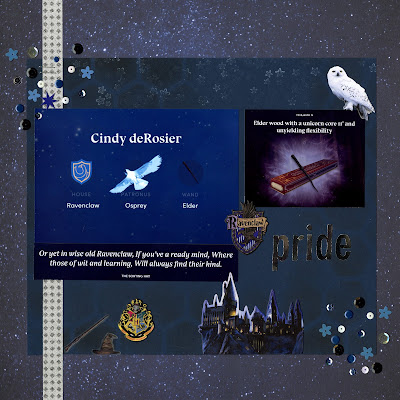
This page tells the story of Steve and me appearing on an episode of Restaurant Impossible in 2021. I thought I'd blogged about it at the time, but apparently I didn't. While watching the show together one evening, Trevor said it would be really fun to be volunteers on Restaurant Impossible. He did the research and discovered they were recruiting for a restaurant in Berkeley two weeks from then. Unfortunately, they were shooting on a school day... plus volunteers had to be 18+. Trevor encouraged us to apply without him, which we did. We were selected, had to do COVID tests via FedEx, and arrived to KC's BBQ in Berkeley early on a Monday morning. After doing another COVID test and signing paperwork (in which we found out we would be paid $16+/hour for work we would have happily done for free), it was time for shooting. 

The producers lined all the diners up in front of the restaurant. We were in the back, but a Production Assistant moved Steve and me to the very front of the line! I was the first one through the door, the first to order, the first to receive food, the first to be interviewed on camera by a PA, and the first to have an interview with Robert Irvine. I figured we were pretty much guaranteed to be recognizable in the episode, unlike our time on Mythbusters. Fortunately, the kitchen was clean and we were able to eat the food. We'd been warned that we might not eat (or be allowed to finish our food, if we were the first served) if Robert had to shut down the kitchen. Overall, the restaurant wasn't that bad. The food was fine, but nothing I'd return for. The seating area was old and battered, but clean. 

After we ate and did our interviews, we had a quick orientation and then cleared everything out of the restaurant. Everything, including outlet covers and fixtures... everything. With that done, my next job was cleaning the bases of all of the tables and then taping off the silver part to prep them for paint. I helped sort through all the random stuff we'd removed from the restaurant, cleaned and painted the host stand, helped schlep panels, and did more cleaning. Steve spent most of the day puttying holes in the walls and helping to build banquette seating. We hardly saw each other since he was in the restaurant most of the time and I was outdoors amongst the work tents. Dinner was catered. Other than that break, we worked hard until 8:00 pm when we were released. They'd told us to expect it to go until 10:00 pm or later - sometimes they go until 2:00 am – but this was a small restaurant and there weren't any big surprises or obstacles, the weather cooperated, and for the most part everything went as planned.

Of course, it was really neat meeting the on-camera people. While Tom Bury and and I didn't exchange more than 2 or 3 words, I spent a lot of time talking with Taniya Nayak. It was great fun chatting with fellow volunteers Ro and Alicia, sisters who are aunts of the current owner. They had a lot of neat stories to tell and behind-the-scenes details to share. The whole experience was so much fun. 

Since we weren't part of the reveal/dining the following night, we visited the restaurant a few weeks later with Trevor to see it. We sat on the banquette Steve built and admired the host stand I painted and the cement boards I schlepped. It was fun recognizing all the little details. We ordered a lot of food so that we could try what we had before (which was improved) and some new stuff too. Unfortunately, even though they now sell their burnt ends instead of throwing them out (!!) they were sold out. Everything was very tasty, particularly the brisket tacos they'd added to the menu. We brought home more than we ate, but BBQ makes good leftovers.

While we had to wait literally years before our first Mythbusters episode aired, our Restaurant Impossible episode (Season 19 Episode 5) aired 3 months to the day after we filmed. And as predicted, we were definitely recognizable. In fact, we didn't know the episode had aired until friends (who didn't know we'd been on) messaged to say they'd seen us! As I said, the whole experience was awesome and I'm glad to finally have it documented both in the scrapbook and now on the blog. 

2/27/23

Spanish-English Fruits, Vegetables, and Meat/Dairy Vocabulary Cards

I've been relearning Spanish using Duolingo since January 2021 and I have an uninterrupted streak of 770 days. I really enjoy it and am so pleased to have regained so much of the vocabulary I'd lost. I get to apply the Spanish I'm relearning during my twice-monthly shifts doing food distribution at the Food Bank, as many of the recipients speak little or no English. 

I'd been telling my mom for some time that she would enjoy Duolingo. When my parents were in California for Trevor's Eagle Court of Honor, I set Mom up with an account. Sure enough, she loves it and has maintained an uninterrupted streak of 178 days. While I am relearning Spanish, Mom started from ground zero. She spends a lot of time each day practicing and has recently been able to use her rudimentary Spanish at her local Food Bank, where she volunteers several times a week. About a month ago, she mentioned that she wished Duolingo would skip all the vocabulary about travel, clothes, school, and chores for now and just teach her the words she needs to communicate with the Food Bank recipients. I tucked that away in my brain as a gift opportunity. Yesterday, for Mom's birthday, I gave her these:


I made these cards using PicMonkey. Some of the images were ready-made in their Graphics collections; others I had to make. Since vocabulary is not standard amongst the 20 countries whose official language is Spanish, I defaulted to the most common translation when there were differences. In some cases, I used the Mexican vocabulary word, as that's what most commonly used here. I had the cards printed on cardstock and laminated so that Mom can bring them with her to the Food Bank and use them as needed. I hope they're useful. Happy birthday, Mom!

2/24/23

My Favorite Travel Memoirs

I just finished reading the excellent memoir 360 Degrees Longitude by John Higham. It's the story of a California family (a married couple and their kids, age 11 and 8) who took a year off from their jobs/schools to travel eastward around the world. They had some challenges along the way, including one that completely derailed their plans. Affiliate link here and below.  


My favorite genre of book, by far, is memoirs. I love learning about other people's lives and experiences, particularly when they are completely different than my own. I especially love travel memoirs, as they introduce me to places I definitely want to visit and allow me to vicariously experience places I almost certainly will not actually visit. The Higham family in 360 Degrees Longitude travels very differently than our family does, so even if I do end up visiting the places featured in the book, I will not be seeing them in the same way. Reading other people's travel stories is fascinating to me. 

There are so many travel memoirs I've enjoyed over the years. I couldn't possibly list them all, but here is a sampling. They're all quite different. Each book is linked so you can read a description if you're interested. 


Do you have any favorite travel memoirs? I'd love to hear what they are. Please list them in the comments!

2/23/23

Recycled Calendar Shamrock

Last year's calendars make great craft supplies. I used Trevor's 2022 Americana-themed calendar to make this shamrock. 


It is a shamrock and not a clover. If you're not clear on the difference, this article does a great job of explaining the difference between shamrocks and clovers. It also explains why the Christian missionary St. Patrick is associated with shamrocks and not clovers. 

I started making my shamrock just before 5:00 pm. Steve was at work and Trevor had an online meeting, so I thought I'd have an uninterrupted hour to finish, which was more than enough time. (Spoiler: I'm a mom. A mom can never count on her time being uninterrupted.) I mention this because my step-out photos show it getting progressively darker in my craft room, until I finally realized I was crafting in the dark and turned on a light. (The story behind the story...). As much as I hate Daylight Savings Time, I do look forward to crafting with natural light in the evenings. 

The first thing I did was draw a shamrock on my paper. I cut it out and flipped the paper over, though that wasn't necessary. The calendar bits will cover pencil lines. 


I hadn't looked through the calendar before starting. I assumed there would be plenty of green. As it turns out, there was absolutely no green on January or February.


Fortunately, March and April both had a bunch. 


I went through the whole calendar harvesting green. There was not as much as I expected, but fortunately it was enough. 


I struggled to sort my green bits from lightest to darkest. That's when I realized I was working in the dark.  


Turning on the light helped a lot. I cut my lightest greens into small pieces. I decided that the light source on my shamrock would be from the upper left, so I started arranging the lightest greens there. I used Tacky Glue to adhere them. 


I continued moving diagonally toward the lower right, adding increasingly darker greens. 


Then I was interrupted. (See spoiler above.) I finished the rest of the project the next morning with natural light. 


The final step was trimming off the excess bits that hung over the edge of the shamrock. I love how it turned out. 


There are so many possibilities with a recycled calendar. Or any recyclables, for that matter. Definitely give your castoffs a second glance before you get rid of them!

2/22/23

Bash Bowl 2023: Through the Years

I had time to make a third layout for this week's Bash Bowl competition. Steve and I are coming up on 21 years together, 19 married, so I gathered nine random photos of us together to make this 'Through the Years' page. 

Through the Years (affiliate link)

It's appropriate that this page includes photos from a long time ago, because the supplies I used are similarly old. I started with the double-sided background paper (hexagons and flowers - two of the challenge requirements!). It's from Scenic Route, and considering that they closed in 2009, I've had that paper for a LONG time. Since I only had the one sheet, I cut it, then glued the two parts to a cardstock base. The title is made from metal letters which I colored with a Sharpie. I estimate that they're around the same age as the paper. The light green washi is probably 10 years old and the love-themed stamp set is old enough that I couldn't find a product link. I haven't bought sequins in decades; they might be the oldest thing on the page. 

Back to the stamps. When I first completed and scanned my page, it looked like this: 


Fortunately, I realized almost immediately that I hadn't met the challenge requirement of using 2+ stamps. I added the 'I love you' stamp so that I would get the full seven points. It, and the other stamped heart, are colored with my Ohuhu markers. I can't decide whether I prefer the layout with or without the additional stamped image. I think I prefer the original version, as the stamping looks like the afterthought that it is. 

2/21/23

Bash Bowl 2023: 6101 Days

I didn't have any recent photos printed that were going to work well with the Bash Bowl Week 2 requirements (hexagons, flowers, sequins, washi tape, metal, and stamping), so I dug into my stash of photos I printed years ago but never used on a layout. I took a photo of Trevor from around age 9 and cropped it so just his eyes show. Then I used the date-to-date calculator at timeanddate.com to figure out how many days it had been since the first time I looked into those eyes and fell instantly in love. As of Saturday 2/18/23, it's been 6101 days of being Trevor's mom. 

6101 Days (affiliate link)

The first time I made a layout like this (using timeanddate.com) was May 7, 2011. At that point, I'd been a mom for 1795 days. Preschool graduation was just around the corner and we were planning zoo-themed parties for our family and Trevor's friends. It feels like so long ago, yet I remember it so well. Life is completely different now, but one thing that hasn't changed is how much I love being Trevor's mom. 

2/20/23

Bash Bowl 2023: Ravenclaw Pride

Unfortunately my team, Twisted Scissors, was slaughtered by the Scrappin Banshees in last week's Bash Bowl game. But that only makes me more motivated to contribute to my team this week. This is the first layout I made. 

Ravenclaw Pride (affiliate link)

This is the playbook for Week 2: 


This challenge wasn't quite as hard for me as last week's, mostly because there aren't any required lumpy items. It took some effort, but I did score a touchdown. The white/silver washi tape has staples (metal) holding it in place. There are a bunch of sequins, including some that are flower-shaped. (There's a "no double-dipping" rule, but this works because the flowers aren't the only sequins.) The hexagons are on the cardstock, using the same stencil/technique as on my Bumblebeast layout. (If I'd known hexagons were coming, I wouldn't have put the stencil away!) For the stamped images, I did 3rd generation stamping with white ink onto the background cardstock. I like that it's really subtle. 

About the layout itself: I've identified strongly as a Ravenclaw since I read the first Harry Potter around age 28. I'm still a big fan 25 years later. The transphobia of JK Rowling bothers me significantly; it also confuses me. She literally wrote the story that starts with a boy who is different than everyone else, doesn't know why, and isn't allowed to be who he really is. Vernon and Petunia try to suppress the wizard behaviors, but that doesn't change who Harry really is. Call me crazy, but I see parallels. Anyway, while JK Rowling is the author, the world of Harry Potter has become bigger than her and I'm a fan. Ravenclaw Proud! 

2/17/23

Mardi Gras Name Art

Next Tuesday is Mardi Gras, so I whipped up some quick Mardi Gras Name Art to celebrate. Any guesses how many name art projects this makes for me? (Hint: Enough that name art has its own page on my website.)


Mardi Gras Name Art


Materials:


Steps: 


Use a pencil to very lightly sketch your name in block letters. Add a jester's hat perched on the first letter and add a mask somewhere else. Mark where you want strings of beads to be. 

Begin coloring your design with green, gold, and purple. In retrospect, I wish I'd outlined my name in black instead of how I did, but you can do whatever you want. Obviously. Your art is yours. 


Fill in each letter with a different pattern or color arrangement. Try horizontal stripes, vertical stripes, diagonal stripes, dots, plaids, and/or a harlequin pattern. Color the hat, mask, and beads. 


You can stop here. I decided I wanted a black background (hence wishing I'd outlined in black). 


It was a nuisance coloring around all the individual beads, but I like the outcome. 


Happy Mardi Gras to all who celebrate!

2/16/23

Finger Painting Pineapple

Until yesterday, I had never done an entire painting using just my fingers. Well, maybe I did when I was a toddler. I don't remember. I've done a lot of fingerprint and handprint art over the years, but with those I used a brush at some point, decorated the painted part with pens, or otherwise did something other than just painting with my fingers.  

I challenged myself to paint a pineapple in my sketchbook (next to the gouache strawberries) using nothing but my fingers. Actually, I put a few more restrictions on myself. Because I would be taking process photos, I needed one hand to stay paint-free so I didn't mess up my camera. I also wanted to finish the painting without interruption, which meant I couldn't get up to wash my hands, nor could I set the project aside to let a layer dry. I intentionally didn't put anything nearby on which I could wipe my hands. I did allow myself to do a rough pencil sketch before I started. 

What you see here is a pineapple painted wet-on-wet with the four fingers of my left hand, which I didn't clean or wipe even when changing colors. It was a challenge, which was the whole point. 


Finger Painting Pineapple


Materials: 

  • sketchbook
  • acrylic paint (green, yellow, brown, and turquoise)

Steps: 


I used my pinky finger and some green paint to draw diagonal lines onto the pineapple, first one direction and then the other. This was really difficult. I don't have good pinky control (possibly due to the fact that I've broken that finger a couple of times, or maybe I just have a weak pinky). Fortunately, most of this would be covered, so it didn't really matter. 
 

I switched to my index finger for the crown. I made swooping motions in green from the base outward, which is what you see below.


I added a bit of brown to the crown, trying to get some shadow. After that, I dunked my index finger into the turquoise in a surprisingly effective attempt to dilute the green and the brown already on my finger. Then I painted the background. It was really hard getting between the leaves of the crown; quite a few got covered, as you can see. It was also hard to get right up to the edge of the paper without getting any paint on the strawberry side. I did my best, but had to mop up small mistake with my ring finger. 


I mixed a little bit of brown into the yellow (yes, with my finger) and stamped fingerprints into each of the white gaps between the original green lines. Then I dipped into plain yellow and re-stamped the areas in the upper right to add a subtle highlight. I touched up the crown with my pinky finger, which actually worked better than my index finger had. I mixed a small amount of yellow into the green to add some highlights on the left. 


The last step was (finally) washing my hands. This was such a fun challenge and definitely something I'd like to try again. 

www.dickblick.com

2/15/23

Bash Bowl 2023: Bumblebeast

I'm off to a good start with Bash Bowl 2023! This is my second touchdown in Week 1. 
 
Bumblebeast (affiliate link)

Same playbook. I got one point for the sticker (flag, top right), one for the twine (orange, left), one for the bling (enamel dot on flag), one for the stars (washi tape border), one for the wood (teardrop pointer), and two for the stencil (hexagon pattern inked onto plain kraft cardstock). It was definitely a challenge and once again it was painful to add lumpy stuff to a scrapbook page, but otherwise I'm happy with how it turned out. 

The journaling tells the story of Trevor, age 3.5, whose vocabulary had a few gaps. He was obsessed with mazes, so Grandma bought him the Labyrinth board game for Christmas, thinking he would like it. He loved it. Despite the fact that the game was recommended for age 7+, Trevor mastered the strategy right away. He knew the names of most of the pieces (including candelabra - no clue how he'd learned that so young), but a few were tricky for him. He referred to the treasure as "sack of money" which technically was not wrong, and he called the moth "mof." For unknown reasons, he insisted the fancy book was a "tote." Having no words for genie or troll, he called them "bumblebeast" and "monkey-gorilla" respectively. We tried correcting him, but it was no use and eventually we all called them bumblebeast and monkey-gorilla. Labyrinth is still a family favorite 13 years later and we all still call the pieces by those names. 

I checked Amazon for Labyrinth and unfortunately they are not selling the version we have. The new illustrations, I'm sad to say, do not include a bumblebeast or a monkey-gorilla. They also have a lot of fun variations, among them Harry Potter Labyrinth, Super Mario Labyrinth, Ocean Labyrinth, and even a Labyrinth Junior.  

2/14/23

Bash Bowl 2023: Our Christmas Card

Bash Bowl is back! You may remember the Super Bowl themed scrapbook competition I did last February. We competed in two teams and received weekly playbooks worth up to 7 points each. My team, Twisted Scissors, won a hard-fought battle. I'm doing my part to help the Scissors to another victory!

This is the first layout I made:

2022 Christmas Card (affiliate link)


This is the Round 1 Playbook: 


Looking at the list, I thought there'd be no way I could include all the elements and still make a layout I like. But I did! I'm very happy with my finished page. It was a challenge, but that's the whole point!

The hardest item for me was wood. We had to use actual wood, not woodgrain paper or washi, pictures of the woods, or anything else like that. I found the thinnest wood veneer I could (since I hate bulky items on layouts) and combined it with stickers and rhinestones (bling) to make an embellishment cluster in the lower right. I don't normally use twine on layouts, but the white/green bakers twine was easy to add. The stars are on the red patterned paper matting the photo. Did you spot the stencil? I used it to add a harlequin pattern to the solid red paper. 

Go Scissors! Beat those Banshees!

2/13/23

Conversation Heart Valentine Holders

I miss the elementary school version of Valentine's Day. I loved it as a kid, I loved it as a teacher, and I loved it as a parent. I loved making and receiving cards, eating lots of candy (especially conversation hearts!), and doing all sorts of valentine-themed crafting. 

As a bit of a throwback, I made these valentine holders for my two loves, Steve and Trevor. This was the first time I've ever sewn craft foam, something I will definitely be doing again. It's a great way to introduce young crafters to hand sewing. Affiliate links below. 


Conversation Heart Valentine Holders


Materials: 


Steps: 


Create a heart template using scratch paper. It should be big enough to hold cards and whatever else you'll be putting inside. Trace the template onto a sheet of craft foam, then cut out the heart. Repeat this step so that you have two hearts. 

Using conversation hearts as inspiration, think of a message for your valentine holder. You can write the message directly onto the heart with a red pen, or try this trick to make sure you get the spacing even. Write the message on a piece of binder paper, then center the paper onto the heart. Trace over the message with a pencil, pressing firmly. This will make grooves in the craft foam, which you can then trace with the red pen. 


Cut a long strand of embroidery floss. The amount you need depends on the size of your heart, how close you want your stitches to be, and how long you want the hanger to be. I used about 6 feet of floss. I sewed with it doubled up (two 6-strand pieces) but that is optional.  

Tie a knot at the end of the floss. Line up the two pieces of foam and start sewing approximately where your message starts. Don't stitch too high or you won't be able to put stuff into your valentine holder! Conversely, if you stitch too low, your stuff will fall out. Aim for the middle. 

Hide the knot inside the holder, then use a whipstitch to sew down one side toward the point. I went down the left and up the right, but you can do the opposite if you want. 


When you get to the point, do another whipstitch and re-enter the previous hole. Then continue up the other side. 


If you've never sewn craft foam before, let me tell you - it is a dream. Every beginner should learn stitches on craft foam. It's sturdy enough that you don't need to hold it taut like fabric and the needle glides through it with little pressure. 

You're finished sewing when you reach the point opposite where you started. Don't cut the floss yet! To make the hanger, stretch out the amount of floss you want. Put the needle into the very first place you started, but do not pull the floss tight. Bury a knot inside the hanger, then cut off any extra floss. 


Your valentine hanger is ready to fill with cards, candy, stickers, small toys, and other goodies!


Those Peanuts valentines peeking out are leftover from my teaching days (16+ years ago). I went poking on Amazon to see if they still make them, which led me down a path of all sorts of Peanuts-themed valentine stuff. Enjoy!