8/31/17

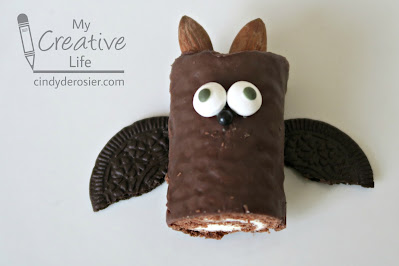
Ho Ho Bat Treat

We've had bats on our minds ever since the bat flyout. Trevor and I had fun putting together this edible craft. 


Ho Ho Bat Treat

Materials:


  • Ho Ho
  • Almonds
  • Oreo
  • Candy eyes
  • Black edible pearl
  • Peanut butter taffy
  • Pretzel
  • Knife

Steps:


Cut the bottom third off a Ho Ho. Insert almonds into the non-cut end to make the bat's ears. Open the Oreo and scrape out some cream. Use it to attach the candy eyeballs to the bat's face. Do the same to add the black nose to the bat.


Split one side of the Oreo in half to make the wings. Position them under the bat's body. 


Use the peanut butter taffy to make thin cylinders. Wrap them around the pretzel to make the bat's feet. 


Put the pretzel at the top of the plate. Arrange the bat's body so that it rests against the feet.


Here's some more fun bat facts for you!

  • There are over 1000 species of bats. (Source)
  • At birth, a bat pup weighs up to 25 percent of its mother’s body weight, which is like a human mother giving birth to a 31 pound baby! (Source
  • Bats can eat up to 1,200 mosquitoes in an hour and often consume their body weight in insects every night. (Source)
  • Some Mexican free-tailed bats can fly up to 250 miles in a single night. They can fly up to 10,000 feet high and reach speeds up to 60 miles per hour. (Source)


8/30/17

Bendable Bats

After viewing the spectacular bat flyout, I was eager to try some bat crafting. This bendable bat is inspired by our bendable monkeys


Bendable Bat Craft


Materials:

  • 2 black pipe cleaners
  • black cardstock
  • black tissue paper
  • googly eyes
  • yarn
  • scissors
  • craft glue

Steps:


Hold one pipe cleaner horizontally and bend the tips up. These will be the wings. Take the second pipe cleaner and twist it around the center of the first pipe cleaner. Continue twisting about halfway down, then bend the tips out. These will be the feet. 


Layer two pieces of black cardstock. Holding the pieces together, cut out a bat's body. You basically want a tapered cylinder with pointy ears and a blunt nose. Glue the googly eyes to one of the body pieces.


Cut a piece of black tissue paper to make the wings. It should be about 2 inches longer than the pipe cleaner arms and the same width as the twisted portion of the body pipe cleaner.

Glue the pipe cleaner structure to the plain body piece. Add the tissue paper wings, then top them with the body piece with the eyes.


Hang the bat by bending his pipe cleaner toes around a length of yarn. Your bat has his wings outstretched and is ready to take flight.


Gently bend the wings up to show that your bat is relaxing.


Bend the wings all the way up when it's time for your bat to go to sleep. 


I should have added eyelids... do bats have eyelids? Google says yes. Here are some other fun facts I learned about bats:
  • The surface of their wings have touch-sensitive receptors on small bumps called Merkel cells, which are also found on human fingertips. (Source
  • Bats have one-way valves in their arteries that prevent blood from flowing backwards. This is why they can hang upside down without blood rushing to their heads. (Source)
  • When bats relax, their body weight keeps their talons closed. If bats die while roosting, they will continue to hang upside-down until something shakes them loose. (Source)
  • While others can glide, bats are the only mammals capable of continued flight. (Source)

Bats are incredible!


8/29/17

Go See a Bat Flyout!

We did something really, really cool recently.

(Mom, me, Trevor. Steve took the photo.)

It just so happens that we live about 30 miles from the largest colony of Mexican free-tailed bats in California. The bats spend the day snoozing under the Yolo Causeway....


... then at sunset, literally hundreds of thousands of bats pour out from under the bridge to hunt for insects.


The Yolo Basin Foundation hosts family-friendly Bat Talk and Walk events throughout the year. The 3-hour events start with an indoor lecture and up-close-and-personal time with bats. Then the group caravans through wetlands and rice fields to a spot that is closed to the public. Here is Corky Quirk ("The Bat Lady") sharing her vast amounts of knowledge about these fascinating mammals. 


We arrived about ten minutes before the first bat scouts emerged. And then, the first wave. It was like nothing I've ever seen before. The bats poured out like ribbons. 


There were thousands and thousands of bats. It was incredible. 


There were four distinct waves, with at least 50,000 bats in each group. I got video of part of one wave. The quality isn't great, but it gives you an idea of what we saw. 


I hope all of you get to see a bat flyout in person someday. In the meantime, I'll be sharing some bat crafts that were inspired by this amazing experience. 

8/28/17

Guest Post: Total Solar Eclipse

Steve, Husband Extraordinaire, traveled to see the total solar eclipse last week. I’ve asked him to do a guest post sharing his amazing experience. Here's Steve.

-------

I don’t post on Cindy’s blog often, but it’s not because I’m not creative. Many of the photographs she shares are ones I’ve taken, and you've seen various projects I’ve built for Cindy’s craft room. My creative passions involve photography, astronomy, and building things with my hands.

I’ve been interested in both astronomy and photography since I was young, so it is natural that I’ve made many attempts to photograph various astronomical phenomena. Five years ago, I witnessed and photographed both an annular eclipse of the Sun...


... as well as Venus transiting across the face of the Sun.


Both events were amazing opportunities in themselves, but what I’ve always wanted to do is witness a total eclipse of the Sun. The eclipse last week was my first opportunity that was close enough to go see. 

Eclipses do take some planning, however. I’ve been counting on going to see this eclipse for over two years. First, you have to choose the right spot. The moon’s shadow across the earth (called the “umbra”) is only about 60 miles wide. It moves across the landscape at a pretty fast speed. You also need to pick a place where you’re not likely to have any cloud coverage.

I was lucky that a perfect place for viewing the eclipse was only about 500 miles from my home here in California. So, for the past several months I planned on seeing the eclipse from Madras, Oregon. Madras is perfect as it is in the exact center of the eclipse track and is high desert so it rarely has any cloud cover during the month of August.

Of course, the very things that made it attractive to me made it attractive to many people. I do not know the final numbers, but the town of Madras (population 6,200) was expecting nearly 100,000 people to come see the eclipse. Every hotel, business with a parking lot, or farmer with a field was selling spots for camping or just parking for the time of the eclipse. With this much overloading, I planned to get up there in plenty of time and to be able to just stay put. Thankfully my parents and my sister agreed to accompany me to the eclipse and so we were able to take advantage of the camping opportunity that their motor home offered.

We went up to the area around Bend several days before the eclipse, both to enjoy the many things that central Oregon offers as well as to be within striking distance of Madras for the day before and day of the eclipse. On the day before the eclipse, we relocated from our campground at Sisters to Oregon Solartown Campground in Madras. This 40 mile drive took us about two hours: the first hour plus to get there, and a second one in the line to get into the campground.


We benefited from my good planning – we left Sisters at 8am and so we only spent about 45 minutes in the long line, which eventually reached 2 miles long. I talked to others who didn’t arrive in Madras until after noon who spent over two hours in the backup!

When we got into the campground, we lucked out and got the best spot imaginable: on the eastern fence-line at the highest point in the campground. It was great being on the east side because the eclipse started at 9 am, and this meant no one would be able to get in front of my cameras. After setting up the motorhome, we had lunch and settled into a relaxing afternoon. We mainly passed the time watching more people arrive and setup their camps. At one point in the afternoon, the view from the top of the motorhome looked like this:


Notice that the clear skies that I came to Madras for were less than clear. We had a bit of cloud but with major fires burning both north and south of Madras we had lots of smoke and haze in the sky. I spent all afternoon hoping that the next day would dawn clear.

My priority was to experience the eclipse, but as I am a photographer with astronomy equipment I had to photograph it too. Totality only lasts about two minutes and according to many accounts only feels like eight seconds, so I knew the key to getting good photos and enjoying the eclipse was going to be preparation. A few weeks ahead of time, I rented a lens from lensrentals.com. I purchased Baader Astrofilm from Astro-Physics and made filters for my lenses. And the day before leaving home, I set everything up and tested it so that I knew I had everything packed and it all worked.

The night before the eclipse I set up my telescope and fully aligned it. While I wasn’t planning on taking photographs through the telescope because the focal length is too long, I was going to piggy back on it so I could use the mount to track the eclipse for the camera. With all that done, I went to bed.

First thing the next morning I went out and set everything up. I put my primary camera on the telescope, my secondary camera on the tripod, and also a video camera to record both audio and video of the event. You can see the setup below (my secondary camera would later go on the tripod in the background, right now I’m using it to take the photograph):


It was a lot to set up, but with everything finally ready, I had time to explore, talk to people, and just relax before the eclipse started. Here’s what Solartown looked like that morning:


Note the heavy smoke in the sky.  Luckily for me, it didn’t affect the eclipse much.

I was obviously not the only person taking photographs of the eclipse. I saw many telescopes, cameras, and other equipment out. I even met one man from France who was taking spectroscopic photographs of the event. Here’s what our fence line looked like:


While I’m sure the majority of people in Madras that day were Americans, I met people from all over the world. The aforementioned man was from France, another from Holland, and the people right next to us were from China.

On to the eclipse itself. The Sun has been in a “minimum” lately and has not been showing many sunspots. Thankfully it put on its makeup for the show and several popped up in the last week before the eclipse. Here’s how the sun looked right before the eclipse:


Cindy and Trevor did not travel with me, since Trevor started middle school the day I left. As I was planning my trip, Cindy asked me what she and Trevor would be missing by only seeing a partial eclipse. My answer? “Everything." A partial eclipse is as different from a total eclipse as night and day.


The partial eclipse started in Madras at 9:06 am. This is what we refer to as C1. Over the next hour, it got darker and the air started to cool. My mother and sister both complained about getting chilled. Along with the cold, my skin started to prickle. I’m sure there was no actual real effect there beyond the excitement of the moment, but it was still real.


As we approached totality, known as C2, people started getting quieter. Then a huge shout came up from the main campground area about a quarter mile to our west. Moments later, Baily’s Beads and the Diamond Ring appeared and it was time to remove our glasses and filters.

My mother was so entranced by the partial, that when it suddenly went black, she was just staring at a black sky and didn’t understand why she couldn’t see anything. My sister reminded her to take her glasses off and I could hear a gasp.

This was what we were all there to see. A total eclipse of the sun. The Sun’s corona, which is only visible during an eclipse. I hardly have the words to express the moment. I had waited over 30 years from the first time I knew I wanted to go see an eclipse to the moment I actually got to see one. And it was worth every moment, every effort at planning. It was a momentous and life-changing event, right up there with getting married, my son being born, and any other major event in my life. I loved and relished every moment of it. Unfortunately, those two minutes of totality only lasted exactly 8-seconds because during an eclipse time just flies that fast.


Even after all that, there were still photos to take. The Diamond Ring appeared again and the filters went back on. Many people hopped right in their cars and zipped out the second totality was finished. Over the next hour, I continued to take photographs so I could do the composite series I wanted to do. I talked to people and gave out cards to this blog. I tried to sear the moment of totality in my mind.

After the eclipse, I spent a couple hours breaking down my equipment while my family started to get the motorhome ready to travel.  Finally, at 20 minutes to 2pm, we left. The 40 mile trip back to Bend Sisters Garden RV Resort took forever: after six hours of sitting in traffic we were finally “home.”


Was all of it worth it? Absolutely. I am now hooked and someday will go see another total eclipse. However, I should do the next item on my bucket list first: go see the Aurora Borealis.

8/25/17

CreativeLive: Between the Lines

This post contains affiliate links.

I've been taking a CreativeLive class called Between the Lines and it is SO GOOD.


Between the Lines is a series of interviews with 16 authors, talking about their creative process, storytelling, and so much more. And what a list of authors! Check it out:


You can find this list here if it's too small to read on your screen. 

I've listened to the first nine so far and every single one has been fascinating. Those nine include authors I already know and love, and others who are new to me. I cannot wait to dive into their works. In addition to talking about their books, the authors have shared very interesting details about their former lives as publishers, book jacket designers, actors, lawyers, journalists, and more. 

The cost for this class? Nothing. It is free. If you are a reader, a writer, and/or a lover of story, I strongly encourage you to sign up for the class. If you don't have time to listen to all 16 interviews, sign up anyway and listen to just a few... though I think once you do, you'll make time to listen to the rest!

Already taking the class? Let me know which interview(s) you've enjoyed the most or tell me how you would answer the questions in the speed round. I've been thinking about my answers!

8/24/17

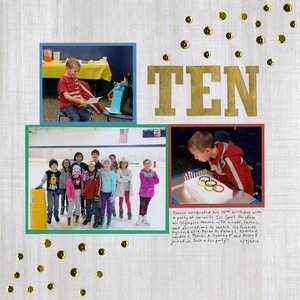
10th Birthday Party

Yes, Trevor has been 11 years old for a few months, but I just finished scrapping his 10th birthday party. I try not to let myself get 'lapped' when it comes to annual events, but it happens.

Ten (affiliate link)

Trevor actually had his 9th, 10th, and 11th birthday parties at the skating rink, so the challenge is scrapping each one to make it unique for the year. He chose an Olympics theme for his 10th, so I matted the photos with blue, red, and green from the Olympics rings and did the title and sequin embellishments in gold. I'm happy with how it turned out. 

8/23/17

Marble Art Cards

Marble art is easy enough for preschoolers, but fun for all ages! Use this sticker-resist technique to make your own greeting cards. 


---------

Sticker-Resist Marble Art Cards


Materials: 


  • white cardstock
  • paper trimmer
  • speech bubble shaped stickers
  • marbles
  • acrylic paint
  • empty containers
  • spoons
  • newspaper
  • black pen
  • glue


Steps:


Cut the cardstock to make card bases. I always make mine A2 (4 1/4 x 5 1/2). Then cut additional pieces of cardstock to make card faces that are slightly smaller than the bases (4" x 5 1/4"). Set the card bases aside.

Remove the stickers from their backing and stick them to your clothing. The goal is to remove some (but not all) of the stickiness so that you'll be able to remove them easily later.


Peel the stickers off your clothing. You should be able to see lint and the sticker should be considerably less sticky than before. You may need to stick and unstick it to your clothing more than once. 


Attach the stickers the card fronts. 

Now it's time to prepare the paint. Fill the containers with paint, add a spoon, and drop one marble into each color. These are baby food containers saved from many years ago. They come in handy for tons of different things. 


Place a card front into a container. You could use a shoebox. We used cleaned take-out containers. They come in handy almost as often as the baby food containers. Drop one (or more) marbles into the container using the spoons. Rotate the container to spread the paint. 


If you want to add more paint, simply return the marbles to their containers, give them a stir, and drop them back onto the artwork.


When you are happy with a design, remove it and place it on newspaper to dry. 


When the paint is completely dry, peel up the stickers. They should come up easily.


Outline the speech bubble, then add a greeting. Now glue the card front to the base, add a message inside, and it's ready to send. 


Trevor was concerned that the paint wouldn't wash off his marbles, but it did. Good as new! 


Thanks to Little Passports for inspiring us to try this classic craft again!


8/22/17

Exploring West Virginia Through Little Passports

Our next virtual adventure through Little Passports took us to West Virginia. We've never been there and had a great time learning more about it!

The first activity was about Bridge Day. On the 3rd Saturday of October, the New River Gorge Bridge closes to cars to allow people to rappel or parachute from the bridge, or launch themselves as human catapults into the river! Good grief. We were fascinated reading about it, but Trevor and I are about as risk-averse as people can be and have no interest in trying any Bridge Day activities!

West Virginia is the home of Marble King, which makes more than a million marbles a day. Trevor dug out his huge collection of marbles so that we could make some neat marble art, inspired by West Virginia. Trevor was only 5 the last time we did marble art. Tomorrow I'll show you how we turned our art into birthday cards. 


We were intrigued by the West Virginia cooking project, Pepperoni Rolls, and decided to have them for dinner. Here's Trevor kneading the dough.


While the dough was rising, we continued with the other activities in the West Virginia State Journal. We learned about West Virginia's music, including two of its four state songs. We read about famous events in the state and did an activity based on the West Virginia State Museum. It's on our must-visit list for our eventual trip to West Virginia!

Next was a challenging maze that taught about summer activities in the Appalachians. (Trevor LOVES mazes.) The pages about winter in the Appalachians included a word search and a cool science experiment involving flour. The flour was already out from making Pepperoni Rolls, so that was perfect! We filled a tray with flour to simulate snow. 


Little Passports suggested using clay to make a boot and cardboard to make a snowshoe, but we improvised with a transformer character and a mini paddle. First, Trevor dropped the transformer into the 'snow' from a standard height. Then he taped his feet to the paddle and dropped it from the same height. He repeated the steps several times. Trevor was able to see how snowshoes' larger surface area distributes the impact of a person's weight, preventing them from sinking deep into the snow. Try it yourself! 


We played with the flour for a good 30 minutes, trying all sorts of variations and designing our own experiments. It was a lot of fun and a great way to pass the time while we were waiting for our dough to finish rising. 


Trevor hates for his hands to be dirty, but he was all smiles this time. 


We cleaned up the flour just in time to finish our Pepperoni Rolls. We made five large rolls with pepperoni and three with cheese instead. We curved the cheese ones into C's so we could tell them apart. Both were delicious!


Another great adventure with Little Passports!