2/26/21

Review of Tablet Stand Holders

Back in December, my iPad keyboard case broke. This was super annoying for a number of reasons, the most obnoxious of which was that I no longer had a way to keep the iPad perfectly vertical for Zoom meetings. I can't replace the keyboard case because my iPad is apparently considered a prehistoric artifact, no longer worthy of accessories. 

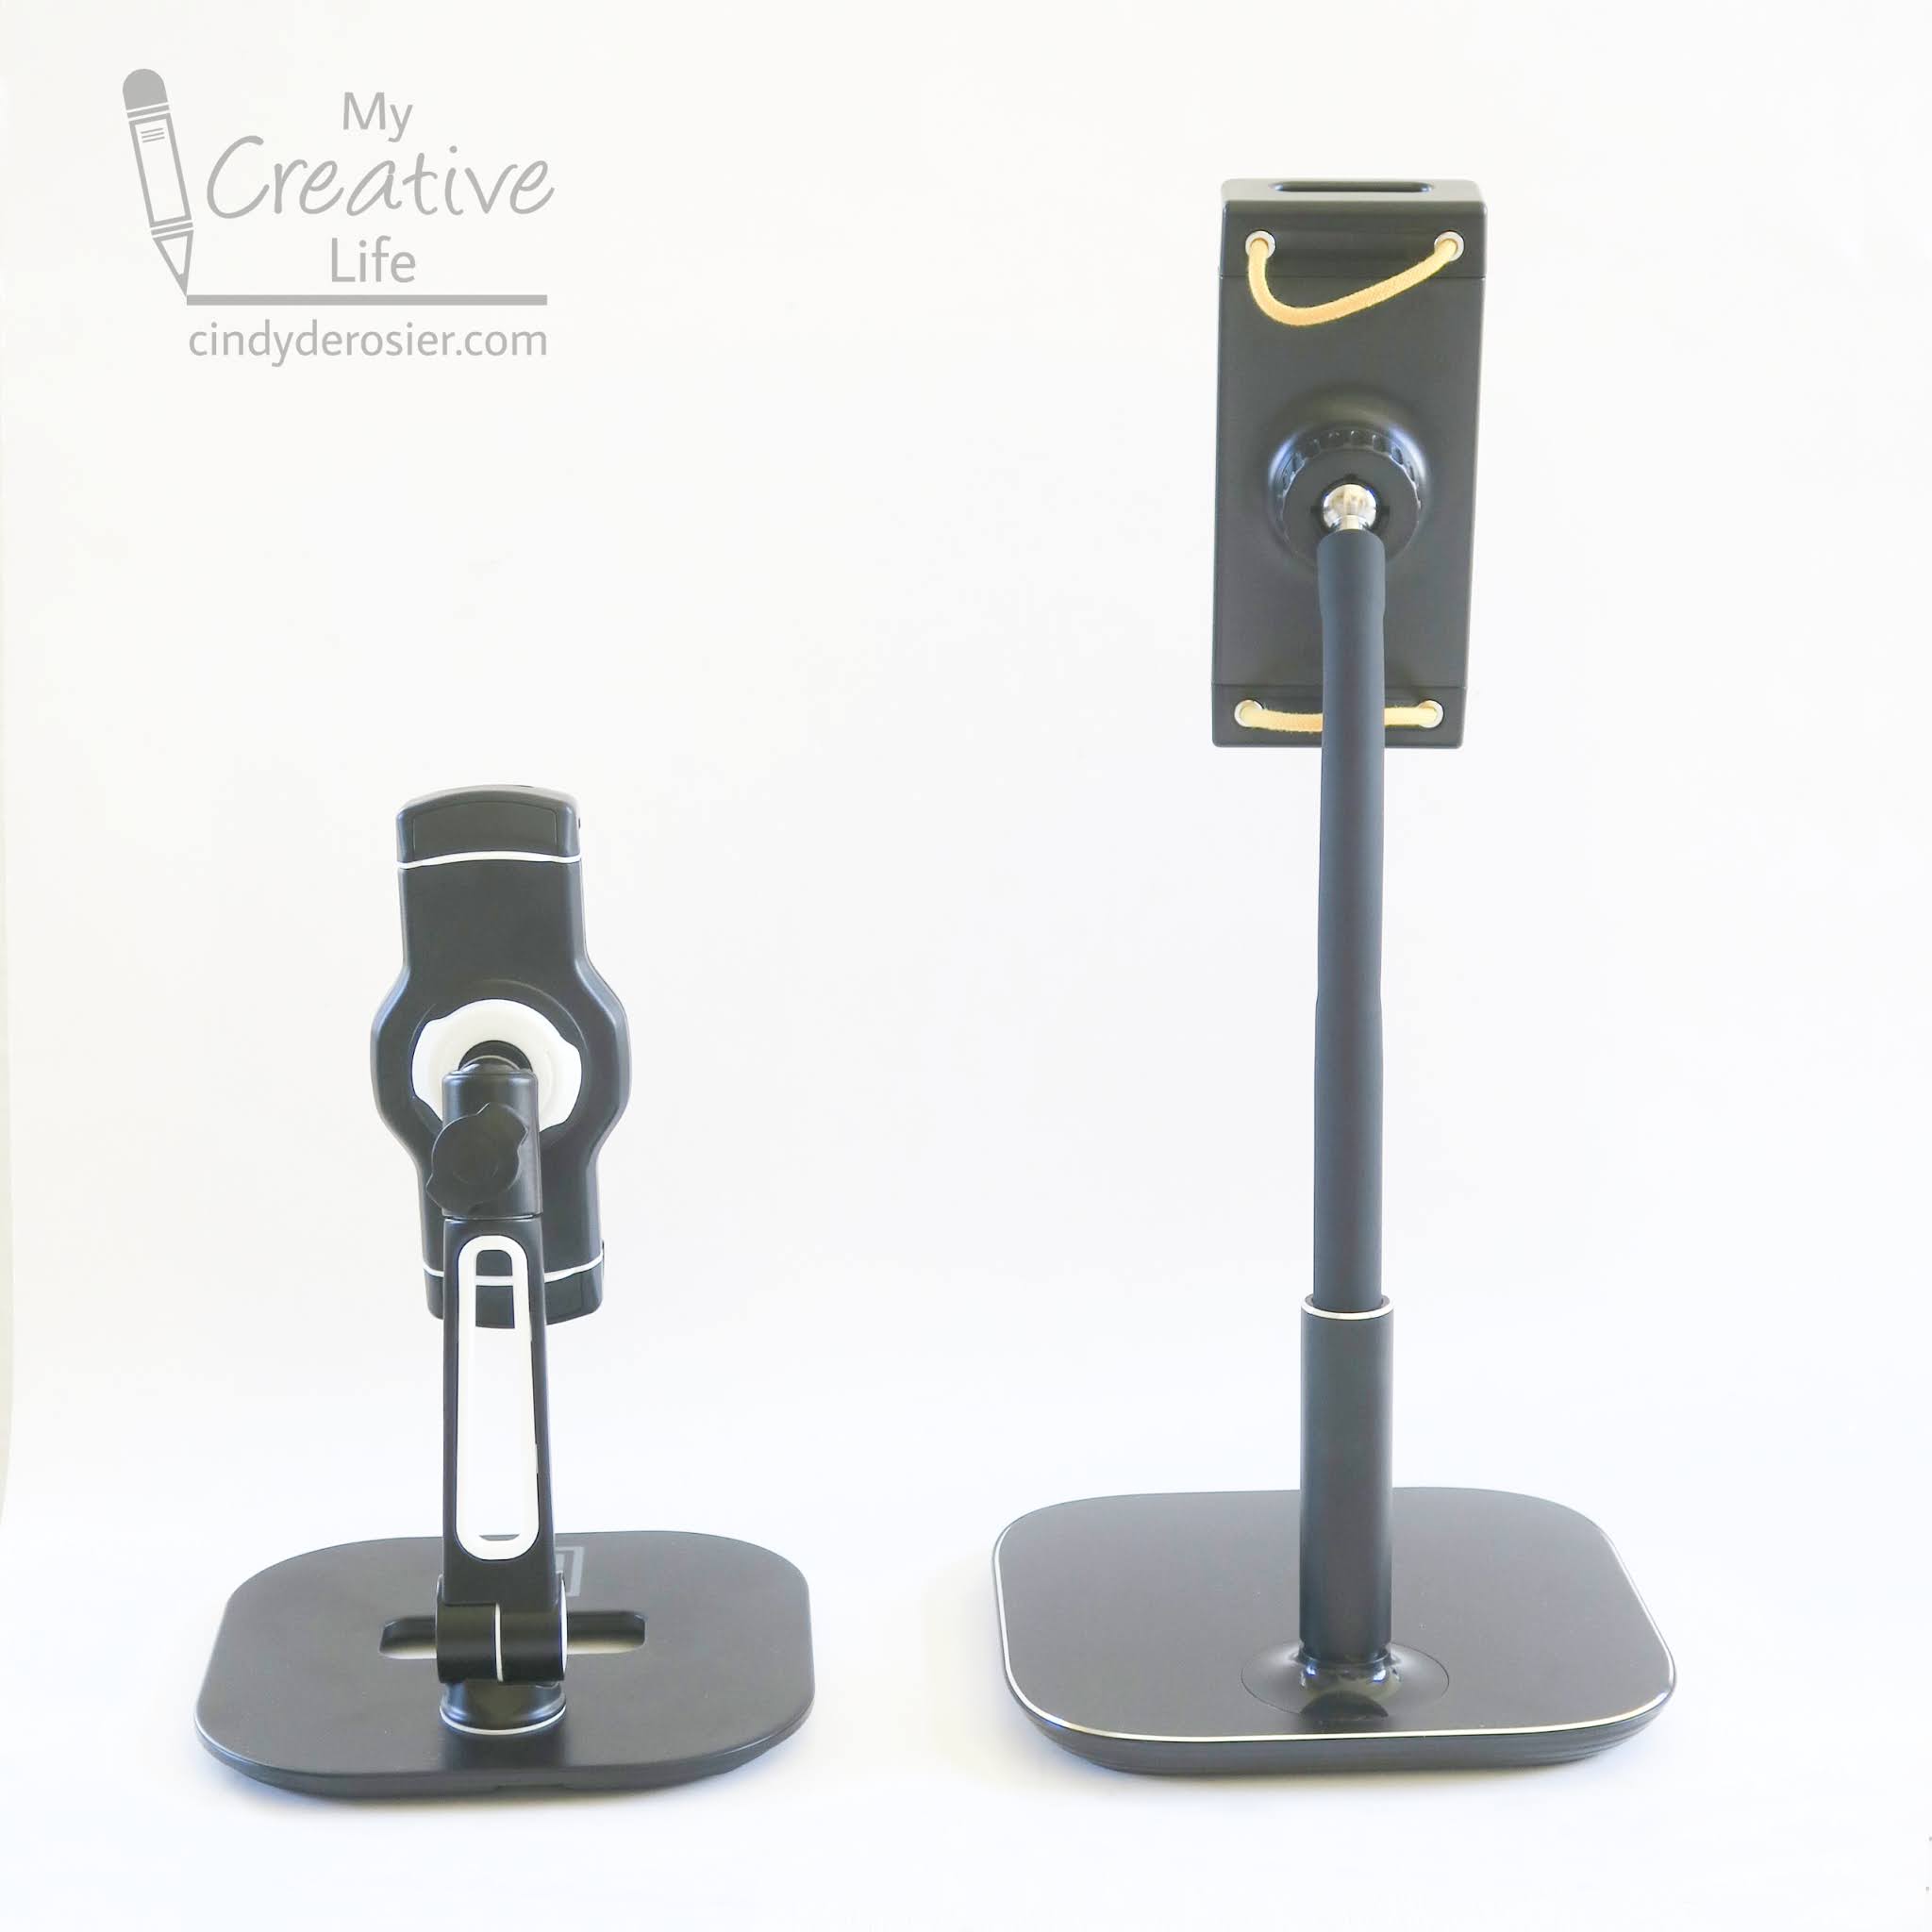
For the last three months, I've been using a variety of creative hacks to keep my iPad vertical for Zoom meetings. Success has varied. It was time for a better solution, so I started researching tablet stand holders. I narrowed the choices down to two and was agonizing between them. I asked Steve for his opinion, which was: "Why don't you just get both? They're not expensive and if you like both, you can leave one upstairs and one downstairs. If you hate one, you can return it." So that's what I did. I purchased the PWR+ 360 Degree Swivel Adjustable Tablet and Cell Phone Holder (left) and the Lamicall 360 Degree Rotating Adjustable Desktop Stand (right). Affiliate links here and throughout the post. 

My two tablet stand holders arrived together. The PWR+ came in one piece, while the Lamicall came in three pieces that needed to be put together. It took about 5 seconds and required no tools. The PWR+ weighs a little over 3 pounds and the Lamicall is a little over 2 pounds. Both are very sturdy and well-made. The PWR+ fits all devices between 4-11", while the Lamicall holds devices that are 4.7-13". 


You can see the differences between them better from the back view. The base and the top of the PWR+ each adjust 360° and the arm rotates 150°. The Lamicall has a gooseneck design with 360° rotation. Both adjust easily. 


The true test, of course, is how they perform while holding devices. I tested each holder with both my iPhone and my iPad. My goal was to compare how easy it is to get the device in and out of the stand, how easy it is to adjust the angles, how securely each device is held, and how well the stands maintain their position without slumping or slipping.  


Honestly, each did a great job. I would say it is slightly easier to put the device into the PWR+ and slightly easier to remove it from the Lamicall, but hardly enough to make a difference. Each holds both devices securely and is easy to adjust. Neither one slumped or sagged after a full day holding an iPad. I slightly prefer the Lamicall for my main desk and the PWR+ for my craft table, but that's simply because of the height differences between my chairs and the work surfaces. Other than that, I don't prefer one over the other. I'm very happy with both. 

I decided to send my mom a tablet stand holder for her birthday (which is today - Happy birthday, Mom!) to use for her eReader or Zoom meetings when she doesn't want to be at her desktop computer. Unlike me, she doesn't have a two-story house and definitely doesn't need two stands, so I had to decide between them. I went back and forth, but ultimately picked the PWR+ primarily because she could use it straight out of the box, without having to spend the 5 seconds on assembly. I'm sure she'll find plenty of uses for it. 

If you're in the market for a tablet stand holder, I think you'll be happy with either the PWR+ or the Lamicall. If you get one, or already have one, let me know what you think of it!

2/25/21

Twinkie Bird on a Stick

You had to have guessed that after making a heart from Twinkies I wouldn't just let Steve eat the rest of the Twinkies in the box without using them for a craft first, right? You know me so well. 


I had originally planned to make blue birds, but when I went through my "still need to try" flavorings, nothing made sense with blue. So I switched to pink and used grapefruit oil to flavor it. Affiliate link here and throughout the post. 

Fun fact: When I was a teenager, we had a yellow parakeet named Twinkie. He had a ton of personality. His favorite bird-approved food was oat groats, but he would regularly help himself to all sorts of human food (including chicken) if we left our plates unguarded for two seconds. 


Twinkie Bird on a Stick


Materials: 


Steps: 

Unwrap the desired number of Twinkies (one for each adult bird and one for each pair of baby birds). Insert the lollipop sticks into the Twinkies. 


Set out a set of small eyes and a yellow TicTac for each baby bird. Use a sharp knife to cut yellow M&Ms in half, then set out sets of medium eyes and an M&M half for each adult bird. 

Next, you're going to melt the candy according to the package directions and flavor it as desired. Here's where you need to learn from my mistakes: Do not leave the Twinkies on a wire rack and pour the melted candy over them. And, do not pour the melted candy over the Twinkies and then place them on a wire rack to drain. Why? Because when you remove them, a bunch stays behind. 


Now learn from my next mistake. After the wire rack fails, do not put the melted candy into a narrow glass, thinking you can just dunk the Twinkie and then lift it out perfectly covered. Instead, the stick comes out and the Twinkie stays put. 

Instead, I had the best luck putting the Twinkies onto parchment paper and spooning the candy over them, adding the eyes and beak, and giving them a good dusting of sanding sugar. Then I lifted the bird out of the puddle, dipped the uncoated back side into the puddle, let the excess drip off, and then placed the bird in a clean spot to set up. 


There are five more Twinkies in the box. Any suggestions for what I should make next? I have a few ideas, but I'd love to hear what you think. 

2/24/21

Name Art Inspired by Alphabits Cereal

Remember how much I love the graphic design on the Alphabits cereal box? I made myself some name art, inspired by the box. It makes me really happy. 


It was surprisingly quick and easy to do. Of course, I used PicMonkey. I found two fonts that most closely matched the original, using the first four letters of my name from Chunk 5 and last letter from Ultra. I used the dropper tool to perfectly match my CIND with their BITS, then chose a red for my Y.  

Then it was time to decorate. They used bee for the letter B, a popsicle (I think that's supposed to be ice cream) for letter I, a tree for letter T, and a spaceship and stars for letter S.  


For my name, I chose a chocolate chip cookie for letter C, an actual ice cream cone for letter I, a narwhal for letter N, a donut and dots for letter D, and a yeti for letter Y. I used the cookie and yeti exactly how they are in PicMonkey. I changed the colors on the ice cream and the donut, but otherwise didn't change them. To make the narwhal, I merged a whale and a unicorn graphic, then changed the colors. I built the dots and the face on the dot of letter I using basic shapes. 

Here's a look at the original and my name together. 


Now I am totally inspired to make name art using other logos! I'll be keeping a lookout at the store for interesting options. Let me know if there are any you think I should definitely do.

2/23/21

Beef Barley Soup

Years ago, I used to enter cooking contests that required participants to use their own original recipes. These contests were usually sponsored by a specific manufacturer and the recipe had to use a certain  minimum amount of their product. In this case, it was a beef bouillon brand. The contest was held during the summer, so I took advantage of the season and developed a beef barley soup with zucchini and fresh tomatoes as well as the more traditional root vegetables that usually appear in a beef soup. It's funny how effectively those two simple vegetables can turn a winter classic into a summer soup. 

This recipe is extremely flexible, so when it's wintertime and there are no tomatoes or zucchini in the garden, I leave them out. Either way, it's delicious. 


Beef Barley Soup


                      6 cups beef broth                                                        3 large carrots, cut in 1/2" slices
                      1.5 lbs beef chuck, cut in 3/4" cubes                       2 large potatoes, cut in 3/4" chunks
                      1 tsp. oil                                                                        5 celery stalks, cut in 1/2" slices
                      1/2 c. pearl barley                                                       2 medium zucchini, cut in 1/2" slices
                      1/4 c. tomato paste                                                    2 large tomatoes, cut into 3/4" chunks
                      1 onion, chopped                                                        salt and pepper to taste


Bring the beef broth to a boil, then cover and reduce heat to low. In a medium pan, heat the oil, then add the beef cubes and brown on all sides. Pour the contents of the pan into the beef broth. Add the barley, tomato paste, and onion. Cook, covered, over low heat for 45 minutes. 

Add the celery, potatoes, and carrots to the pot. Cook, covered for 60 minutes.

Add the zucchini and tomatoes to the pot and cook for an additional 45 minutes. Season to taste with salt and pepper.  

2/22/21

Mural at Bancroft Garden

As promised, here is the layout that prompted me to break my own scrapbooking rule. I only sort-of broke it, because the first photo is from 2016. I blogged about that event right after it happened, but it took 4.5 years to be able to finish the story. 

Mural at Bancroft Garden (affiliate link)

If you click the link to view a close-up of this layout on Scrapbook.com, you'll see that I used a white gelly roll pen on this page. If you can't tell where I used it, good! That was the goal. I didn't have enough of the correct white-on-orange Studio Calico letter stickers to spell out the title and dates, so I had to do a little creative manipulation with the white pen. Take a close look and see if you can find the two letters that I altered.
If you spotted that the R in garden used to be a P, or that the N in Jan used to be an H... well, you have better eyesight than I do!

2/19/21

Garden of d'Lights

Back in January, we visited the Garden of d'Lights at Bancroft Garden, a holiday event in which the 3.5 acre garden is dressed with beautiful lights. Bancroft Garden showcases succulents, cacti, and other drought-tolerant plants. In addition to being a beautiful place to visit, it offers workshops, education, and landscape design services for gardening with little water. 

Garden of D'Lights (affiliate link)

I had so much fun making this layout... the glittery letters, the sparkly washi tape (shaped with a border punch), and the dozens of gel pen dots! I've never added dots to a layout like that and I love the effect. 
It goes against my usual policy of creating one layout per event, but I actually made a second layout using a photo from the Garden of d'Lights. I'll share it on Monday and you'll see why I broke my own rule. 

2/18/21

Snake Doodle

I like snakes. I always have. 

For a number of reasons, I will never have a pet snake. The primary reason is that I can't deal with providing a pet snake with live mice, which I also like. I greatly prefer feeding our vegan pet. The second reason is that Steve would leave me. He does not like snakes. And since I like Steve more than I like snakes, I will never have a pet snake.

I will, however, continue to make snake art.


I was doodling mindlessly during a Zoom meeting. When the meeting ended, I realized I'd inadvertently doodled a bunch of snakes. 


So I decided to color them in. But rather than coloring randomly, I decided to do my best to color them realistically, using only species found in the US. I hadn't draw heads or tails (since I didn't realize I was doodling snakes) so I just focused on the patterns. I grabbed the fish box and the iPad and started researching, coloring as I went. 


As you can see in the photo, I used a scratch piece of paper to remind myself of the name of each species. Then when I was done coloring, I used the Sharpie to write the names along each snake. 


Another craft for my growing Reptiles and Amphibians page!

2/17/21

Encouragement Toast

As parents, we do everything we can to support our children and encourage them to do their best. Next time your kids have a big test, an important interview, or stressful tryouts or auditions, serve them up a delicious breakfast of Encouragement Toast.  


I dreamed up Encouragement Toast in the cereal aisle at the Safeway by my house. I noticed something I hadn't had since early childhood, Alphabits (affiliate link), and my mind was flooded with ideas for edible crafts. What fun! I tossed the box into the cart, excited to get started. 


As an aside, I absolutely love the design of this box. The notebook paper and fonts are perfect for this kid-oriented cereal. I adore the little bee, ice cream, turtle and space designs on the Bits letters. And using the cereal itself for their motto ("a story in every bowl!") is very clever. Good job, anonymous graphic designer!

I washed my hands, poured a cup of Alphabits onto a plate, and started sorting letters. About 10% of the letters were too misshapen or broken to use, so those went into a container for future breakfasts. As I sorted, I started spelling out my message. 


Then it was just a matter of toasting some bread, spreading peanut butter on top, and adding the letters. I surrounded the toast with orange segments and banana slices. Served with a glass of milk, this is the perfect way to fuel kids for that important test or presentation.  

Expect to see an Alphabits-inspired edible craft from me again. I've got a whole box of possibilities!

2/16/21

Salisbury, Stonehenge, and Windsor

During our Europe visit in April 2019, we took a 10-hour tour that started in Southampton (where we'd disembarked from a cruise) and took us to Salisbury, Stonehenge, and Windsor, before dropping us at our hotel in London. It was a great day (although the crowds at Stonehenge and Windsor Castle were insane) and we loved seeing these iconic locations in person.  

Salisbury, Stonehenge, and Windsor (affiliate link)

For the layout, I chose five photos from Salisbury (where it was easy to take pictures without 10,000 people in the way), two from Stonehenge, and three from Windsor. If you look really carefully (including in the phone booth), you can spot everyone in the family in at least one photo except for my dad. Fortunately, there's photo evidence of him in the blog post. 

2/15/21

Paper Plate Rainbow Craft

Kids of all ages are fascinated by rainbows. Start with a science experiment to see firsthand how light passing through water makes a rainbow, then create this cute paper plate craft as a reminder that rainbows only appear in the sky when it's sunny and rainy at the same time!


Paper Plate Rainbow Craft


Materials:

  • 2 paper plates
  • scissors
  • acrylic paint
  • construction paper
  • yarn
  • craft stick
  • craft glue
  • binder clips (optional)

Steps:


Cut one paper plate in half. Remove half of the center of a second paper plate. Cut out clouds and raindrops from grey construction paper. 


Paint the half paper plate yellow, then paint a rainbow on the 'handle' of the second paper plate. When the paint is dry, glue the two plates together, securing them with binder clips while the paint dries. Paint, dry, or cut out black construction paper to make the sun's face. 


Cut a length of yarn long enough to go from the sun, up to the clouds, and then back to the sun. Glue the center of this piece of yarn onto the craft stick. Cut six lengths of yarn and glue raindrops to each. Glue the other end of the yarn to the craft stick. 


Glue the two loose yarn ends to either side of the rainbow. Finally, glue the clouds over the craft stick to cover it.


When the glue is dry, your paper plate rainbow craft is ready to hang!


2/12/21

Mount Rushmore: Guess the Presidents Craft

As Presidents' Day nears, I've come across a lot of crafts inspired by Mount Rushmore. Most of them involve gluing coins or doing rubbings of coins on paper to represent the four presidents carved into the iconic monument in South Dakota. Unfortunately, only three of the four presidents at Mount Rushmore actually appear on United States coins. Very few people mention in their tutorials that they are portraying the wrong man. As for the rest, I don't know if it's worse if they don't know they have the wrong person, or they know they do and are pretending they don't. 

Here's an idea for a project inspired by Mount Rushmore that not only identifies the presidents correctly, but teaches the reason why each was selected for the carving. Before reading any further, read the clues and see if you know the faces of Mount Rushmore! Affiliate links below. 


Mount Rushmore: Guess the Presidents Craft


Materials:


Steps: 


Print out the photo of Mount Rushmore so that it fills most of a sheet of paper. Trim two index cards into 3" x 1.5" pieces. (Adjust the size if your printout is significantly larger or smaller than mine.)

Score each index card at 0.5" to form the flaps. 


At the top of each flap, write WHO AM I? and then draw a dotted line across the score line. Below the line, write the clues:

  • I represent BIRTH. I became the first president of the United States in 1789 and led the new country through its infancy. 
  • I represent GROWTH. I doubled the size of the United States with the Louisiana Purchase.
  • I represent DEVELOPMENT. My progressive policies and many anti-trust suits were critical in developing the US. I established the National Park System, too. 
  • I represent PRESERVATION. I kept the country united during the Civil War, abolished slavery, and modernized the United States economy. 

On the back of each flap, write the answer. It should be right-side up when you flip the tab up, so you'll be writing it in the opposite direction as the clues. 

  • George Washington
  • Thomas Jefferson
  • Theodore Roosevelt
  • Abraham Lincoln
 

Apply adhesive to the back side of the tabs and place each clue over the proper face. Be sure that the face is fully covered and that it will be fully revealed when you lift the tab. 


Here's a fun fact for you for Presidents' Day from History.com

Presidents' Day never falls on the actual birthday of any American president! Four presidents (George Washington, William Henry Harrison, Abraham Lincoln and Ronald Reagan) were born in February, but their birthdays all come either too early or late to coincide with Presidents' Day, which is always celebrated on the third Monday of the month.

2/11/21

Thanksgiving for Three

We were under a stay-at-home order for Thanksgiving, so it was just the three of us. (Trouble was here too, but since he's both crepuscular and a raw vegan, he had no interest in our celebration.) It turned out to be a wonderful day, relaxing and spending time together watching the parade, playing board games, and cooking. 

Thanksgiving for Three (affiliate link)

For this layout, I challenged myself to start with a busy background paper. I almost always start with plain cardstock (white, tan, brown, or black) and build from there, so this was outside my comfort zone. Happily, it came together easily and I'm pleased with it. 

2/10/21

Heart Twinkie Dessert

I spy a Twinkie, turned into a heart!
 

Yes, that's really a Twinkie. And yes, it's delicious. WAY better than a plain old Twinkie.


This is about the easiest plated dessert of all time. It doesn't take any longer than scooping ice cream into a bowl and topping it with syrups and nuts. 

To make it, unwrap a Twinkie with the underside facing up. Cut it on the diagonal, right through that middle cream spot. 


Arrange the two halves on a plate with their cut sides touching. One piece will be right side up and one will be upside down. 


Cover the heart with frosting. 


Cover the frosting with flavored sanding sugar. I used cinnamon, which tastes just like Red Hots. Yum! 


You can use whatever flavor you want, which is the beauty of making your own sanding sugars. I think raspberry would be amazing.

Decorate the plate with swirls of chocolate syrup, then add nuts. In just a few minutes, you have a plated dessert that belies its true origin as a lowly Twinkie.  


Turns out, there are a lot of Twinkie-themed items on Amazon. A surprising number of them reference grandmas. In my entire life, I've never come across anyone who calls their grandmother Twinkie. Grandma, Nana, Memaw, Nanny, Granny, Grammy, Nona... never Twinkie. 

Here are some non-grandma Twinkie items for your enjoyment. The t-shirt cracks me up.


2/9/21

DIY Flavored Sanding Sugar

Sprinkles make everything a little bit more special. I know that you can make your own jimmies, quins (sugar shapes) and other sprinkles with royal icing, but I prefer to buy those. I can't justify the time and effort it takes to make them compared to how cheap they are to buy. On the other hand, I almost always make my own sanding sugars. It's quick and easy and it's way cheaper to make a rainbow of colors than to buy them. Plus, you can make shades they don't sell in store. 

I've been making my own sanding sugars forever, but only recently started flavoring them. With my latest obsession, I have tons of options and am eager to try them all! Check out my newest creations:

 
There are SO many things you can do with flavored sanding sugars, which I'll be sharing as I use them. Today I want to show you how to make them. I used regular granulated sugar for these because I like the fine consistency. If you prefer a courser sugar, use it! Affiliate link here and below. 

---------


Flavored Sanding Sugars


Materials:


Pour some sugar into the ziplock bag. I do about 1/4 cup at a time, but you can make whatever amount you want. Just make sure the bag is less than half full. Dip a clean toothpick into the gel food color, then wipe it off on the inside of the bag. Repeat until you have a decent smear of color on the bag. 


Zip the bag shut, removing all the air. Gently massage the sugar into the color. Flip the bag over occasionally and continue to massage the color and the sugar together. When you get to the desired shade, stop. If you've used all the color and you haven't reached the shade you want, just put more gel on the inside of the bag.

When you have the shade you want, use the pipette to drip 6-8 drops of flavor onto the sugar. Close the bag, then massage the scent all around. 


Then, just repeat the process to make whatever flavors and colors you want! You can reuse the same pipette many times - just use it to suck up some clean water from a cup, squirt it out, and repeat. I have dedicated pipettes for mint and cinnamon since they don't play nicely with the other flavors, but otherwise I just rinse and reuse. 

I love how my flavors look together! 


I think I need to make a sky blue next... maybe Tropical Punch flavored? I have a true red that's not in the this photo. Tomorrow I'll show how I used it for an edible Valentine's Day craft.

2/8/21

"You've Stolen My Heart!" Raccoon Valentine

While brainstorming ideas for my money valentine cards, an idea popped into my heart for a raccoon valentine. With their adorable little robber's masks, raccoons are the perfect way to tell someone, "You've Stolen My Heart!" Affiliate links below. 


"You've Stolen My Heart!" Raccoon Valentine


Materials:


Steps:


Wrap grey cardstock around the box of conversation hearts, leaving the side you open uncovered so that the recipient can eat the candy. Use the scraps to cut out a face, two ears, and a tail. Use the black pencil to draw the mask and the nose on the face, the center of the ears, and stripes on the tail. Add accents to the snout and forehead with the white pencil.  


Glue the googly eyes and the ears to the face. Cut a thin rectangle of grey cardstock and accordion-fold it to make a neck. Glue one end to the back of the face and the other end to the box. Glue the tail behind the other side of the box. Punch a heart from pink cardstock. 

Write "Valentine, you've stolen my heart!" on it. Glue the heart to the box. 


2/5/21

Crayola Sweet and Stinky Markers

Trevor and I both love pens, so when I see a set I want that I know he'd like too, I buy it as a gift for him ("To Trevor and Mom, From Mom"). Such was the case for Crayola Sweet and Stinky Scented Markers (affiliate link here and throughout the post). 


I fell in love with Mr. Sketch markers when I was a kid and I introduced them to my own kid at a young age, so I was eager to see how these Crayola markers compare. I was careful not to read the box or even do more than glance at it before trying them for the first time so that I could test the scents with an unbiased nose. 

When I opened the outer box, I discovered two inner boxes- one stinky and one sweet. 


I discarded the inner boxes, mixed up the pens, then organized them by color. I made a chart, then tested them one by one. 


First up, a pure red that smelled just like strawberries. Delightful! Then a pink that smelled like watermelon candy. Not my favorite, but fine. The fuschia color smelled like overripe fruit. Not BAD, per se, but off just a bit. And then, I removed the cap on a pale peach marker and was met with an overwhelmingly bad smell. I couldn't place the smell - it was medicinal and rotten and horrifying - but eventually labeled it "awful diaper rash ointment." I was VERY surprised to learn it was supposed to be mushroom. 

Fortunately, what turned out to be my very favorite scent in the whole box was next - orange. I followed that up with what I thought was "rotten lunchmeat" but turned out to be Cheese (really?), then "smoking sugar" (Pizza), "lemon soap" (Lemon), "garlic + exhaust" (Onion), and "marshmallow" (Banana).  


The mushroom was the only scent in that bunch that was truly horrifying. Not only that, it performed the worst as a pen. As you can see, most of the colors above are rich and uniform. The mushroom marker didn't color as nicely as the rest. 

Moving on to the cool shades. I started off on a roll, correctly guessing both Green Apple and Pickle. However, what I thought was "spoiling chives" turned out to be Old Rotten Tooth. Never would have guessed that! It was unpleasant, but not awful. I guessed "lime soap" for lime, then got three in a row - Blueberry, Smoke, and Garlic. I guessed "hair conditioner" for Coconut.

I was not prepared for the next marker. It ranks among the worst things I've ever smelled in my life. "How bad could it be?" you might be thinking. Bad enough that my guess was "dirt + death = grave." When I rotated the pen to read what it was, I was fully expecting it to be corpse or gangrene or something. Nope. Dirty Potatoes. 

Let me make something clear: dirty potatoes do not smell like this. We grow potatoes, which I harvest from dirt. During my biweekly shift at the Food Bank, I divide tons (literally) of fresh-from-the-dirt potatoes into portions suitable for families. I know dirty potatoes. They smell nothing like that pen.

I ended on a sweet note, as the final pen was Grape. Phew! 


Overall, I'm very happy with our new set of markers. Other than the Mushroom pen, the quality is what I expect from Crayola. I will never willingly open Mushroom or Dirty Potatoes again, but I'll be holding onto them solely to make people smell them once we're back to having visitors in our house. While I was surprised there isn't a black marker in the set, I appreciate having three different gray shades, which is quite unusual. 

I highly recommend getting a set of Crayola Sweet and Stinky Scented Markers for the child (or pen-loving adult) in your life!