8/31/20

Our Evacuation Story

As COVID-19 has raged on for far too many months, I've been increasingly worried about what would happen here in California as summer approached. What would people do when temperatures soar and the usual cooling centers they depend on (such as the mall) aren't open? What about Public Safety Power Shutdowns (PSPS), when people flock to libraries for the internet access they need for work and school? While our libraries are technically open, the capacity is extremely limited and you have to make a reservation for a 1-hour time slot to visit. And the biggest concern of all - what if fires force people to evacuate? Where can displaced people go when social distancing means the usual places can only hold a tiny fraction of their usual capacity, and friends may be reluctant to welcome people into their homes? I desperately hoped that we would be spared the horror of a natural disaster occurring during a pandemic. We were not.

On Sunday, August 16 we were woken up at 4:00 am with crazy wind and lightning. Lightning is very rare here, but when it does happen, it comes with rain. Not this time. Dry lightning, strong winds, and golden hills mean that a single strike could start a fire that could spread quickly. I wasn't too scared for us, as there was quite a bit of time between the flashes and booms, but I was worried for wherever it was the lightning was striking. Over the next day, the so-called 'lightning siege' consisted of over 10,000 strikes that started hundreds of fires, including three in next-door Napa County. By the Tuesday, August 18th, those fires were sending a lot of smoke our direction. 


During the very early hours of Wednesday, August 19, Steve and I each woke up and noticed our power was out. Around 2:00 am, Steve got up and checked to see if there was an obvious problem (no) and went back to sleep. At 5:14 am, we were still sleeping and didn't see this message:


This is an ADVISORY due to a wildfire north of Fairfield near Pleasants Valley Rd and Cherry Glen Rd. This advisory is for the following areas in Fairfield:

Residential areas east of I-80, north of Manuel Campos Rd
Residential areas west of I-80, off Hilborn Rd and Lyon
Residential areas off Rancho Solano Pkwy
We will update when and if an EVACUATION ORDER is issued.


It wasn't until the 6:00 hour that Steve checked his phone and saw a message from a Scout friend saying, "If we evacuate, we'll need to leave the Scout trailer behind." And then a message from a different friend on my phone. "Are you going to evacuate?" Then I saw the advisory. After a brief discussion, Steve and I made the decision to evacuate. If the fire was coming this way, it'd be better to get out early. Even if the fire didn't come our direction, we couldn't stay with the power out. 

We loaded up our cars with the things we most wanted to keep safe, packed enough clothes and bunny supplies for a week, and headed to our friends Ken and Sheena's house on the other side of town. We dropped off Trevor so that he could do his distance learning, parked Trouble in his carrier in front of a fan, and headed back to our house, where we did a few last-minute tasks. As we left our house around 11:00 am, Steve took this photo:


We picked up Trevor and Trouble and headed to our friend Suzzi's house in Sacramento. Traffic was surprisingly light and we arrived in time for Trevor to have lunch and then attend his 1:00 pm virtual class, his last of the day. (By this point, school was optional because of the evacuations and had been canceled completely for Thursday and Friday.) 

The evacuation order for our area came at 2:42 pm. At that point, we'd been in Sacramento for two hours and were so glad we'd made the decision to evacuate when we did. I was hearing from friends saying there were too many cars and nowhere to go. The fire jumped I-80, forcing more neighborhoods to evacuate and making the traffic nightmare even worse. It's hard to express how grateful we were that we were safe with good friends who had welcomed us with open arms. 

We slept surprisingly well on Wednesday night, considering our home was in danger. It was quite a contrast to my inability to sleep during the Atlas Fire. Staying with calming and caring friends, Trouble with us and our most important items safe made, made all the difference.

This is what we woke up to on Thursday morning:


Thankfully, there were no structures or lives lost in Fairfield. Unfortunately, many in nearby Vacaville were not so lucky. My heart breaks for them.  

At 10:00 am, we got notification that our mandatory evacuation was lifted. While we technically could go back, they advised evacuees to stay put due to risk of flare-ups. We decided to stay in Sacramento until the fire was officially contained in our direction and our power was back on. 

On Saturday, August 22 our power was restored, but the forecast called for more dry lightning on Sunday. Since the last thing we wanted to do was go home and then re-evacuate, we stayed until Monday just to be sure. It turned out not to be necessary, but better safe than sorry. We really enjoyed the extra day with our friends. 

It was crazy seeing all the burned areas once we reached Vacaville and into Fairfield. I took this photo from the car (Steve was driving):


This is what our street looked like when we got home. The air was still a bit smoky, but not bad. You can see just a hint of a scarred hill.


That hill ended up being the southernmost point of the still-burning LNU Complex


Here's that same hill, taken the next day from our upstairs window. As you can see, the air quality improved significantly overnight. 


We are now settled back in to the routines of our daily lives. Things went perfectly for us: an easy evacuation turned into a mini vacation, but so many others weren't so lucky. It's too early to know what effect the fires might have had on COVID-19 in Solano County. We can only hope that we don't see a surge following this catastrophic fire. So many people stepped up to help not only friends and family, but strangers too. I am so grateful. This is what I posted when we returned home:


And thank you to all who are reading this. I'm so glad to have you in my life as well.  

8/28/20

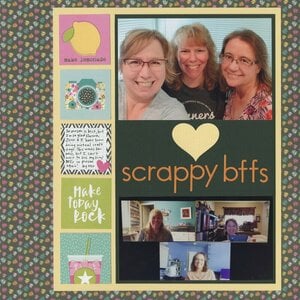
Scrappy BFFs

For years, scrapbooking was a solo activity for me, but for the last decade or so I've gotten together regularly with my #ScrappyBFFs, Sheena and Jennifer. We usually meet in person once every few months and do a marathon 12-hour craft session, with lots of laughing mixed in. And lots of eating. (Jennifer makes the BEST cookies.)  

COVID-19 ended our in-person crops, but we've traded those for shorter and more frequent get-togethers via Zoom. It's not quite the same (for one thing, there aren't any cookies), but there are just as many laughs and we always have a great time. One big advantage is that we all work in our own craft spaces, so we don't have to lug huge amounts of supplies to each other's houses. 

Scrappy BFFs (affiliate link)

We almost always take a selfie when we're together, and we've been doing screenshots of our Zoom calls. I put one from each together to make this layout. And I used the patterned paper we bought during our most recent trip to Scrapbook Expo together. 
Most of my scrapping documents Trevor's life and our family's travels. Pages about my friends are rare, but are some of my favorites. They are a major part of my life and I'm glad my Scrappy BFFs are in the album. 

8/27/20

Paper Plate Sperm Whale

You can thank the state of Connecticut for today's project, as the sperm whale became their state animal in 1975. (Connecticut used to be a major player in the whaling industry.) The sperm whale is the largest of the toothed whales, growing up to 70 feet long and weighing as much as 118,000 pounds. It has the largest brain of any animal, weighing up to 20 pounds. They dive up to 2 miles deep in search of squid, the main part of the 2000 pounds of food they consume each day. The sperm whale was a favorite of whalers because their oddly-shaped head contains a big reservoir of spermaceti, a liquid oil that hardens when cold. Affiliate links below. 


Paper Plate Sperm Whale


Materials:


Steps:


Paint 2/3 of the paper plate with an ocean blue color. Add white paint to make a sky color and paint the rest of the plate. Cut the whale's body and fin from grey cardstock. Cut a narrow strip of blue cardstock. 


Glue the whale's fin to its body. Draw on an eye with the black pen. Then accordion-fold the blue cardstock and glue one side to the back of the whale. 


Glue the other side of the blue cardstock to the paper plate. 


8/26/20

Personalizing a Diamond Art Kit

I recently finished my latest Diamond Art project. It's a full-drill 12"x12" snowman and I love it! 


I made it with the Snowman Diamond Art kit by Leisure Arts (affiliate link here and throughout the post). This is what the finished design looks like if you follow the directions.... 


.... but I'm not much of a 'follow the directions' person when it comes to crafts (or cooking, for that matter). Here are the two designs side-by-side. See if you can spot all the changes I made.


There are five major changes: 
  • replaced the light blues and creams in the scarf and hat with darker blues and purples
  • turned the stubby red nose to an orange carrot
  • changed the buttons from red to black
  • thickened the arms so they weren't so spindly
  • removed the dark blue mountain and moved some clouds in the background on the left

So how did I do it? The first step was deciding what changes I wanted to make. Then I used the colors provided with the kit to fill in anything that I DIDN'T want to change. With those elements completed, I dug through my Diamond Art storage and chose colors for the items I did want to change. 

Below, you can see that I've filled in the background and changed the nose, arm, and buttons. The red vertical stripes in the scarf are complete, so my next step was filling in with blues (and eventually purples). It took a little bit of trial and error to make things look the way I wanted, but it is really easy to pop up the gems after you've placed them if you aren't satisfied. 


I love the way the hat and scarf turned out. I'm happy with the carrot nose, too. In fact, my only complaint about changing up the colors is that there are a few places where the original canvas color shows through. You can see this in the black buttons - the area around them is clearly red. You can also see a tiny bit of red at the bottom of the snowman's arm where I widened it. I can live with that. 


With the Diamond Art and Diamond Dotz Freestyle Program, you can make your own design completely from scratch, or do like I did and alter a kit with a few replacement colors. I love the flexibility. Diamond Art is so much fun. 

8/25/20

Michigan Love Mitten Ornament

I was 16 the first time I met someone from Michigan. I was part of the California delegation attending the 1988 National 4-H Congress in Chicago. All 50 states were represented and we were all staying in the same hotel, so every elevator ride was an opportunity to ask the other teens where they were from. Everybody answered in words... except the people from Michigan. One after another, they answered my question of where they were from by silently holding up one palm and pointing to it with the other hand. It was weird and I had no idea what to make of this at first.

It didn't take long for me to learn that if a Michigander held up their right hand and pointed with their left, they were from Lower Michigan. If they held their left hand up sideways and pointed with their right, they were from the Upper Peninsula. The pointing finger told you exactly where. It's actually kind of brilliant, but not until the clueless girl from California was keyed in on the mitten situation.

Michigan was on my list to meet my goal of creating at least two crafts per state. Mittens seemed like a natural choice. My first thought was that it would be awesome to turn a Michigan baby's first pair of mittens into a darling Christmas tree ornament. I don't have a Michigan baby's first mittens, so I used felt. Affiliate links below.


Michigan Love Mitten Ornament


Materials:


Steps:


If you have mittens, skip this step. Otherwise, cut mitten shapes from felt. You will need four identical pieces. Cut one small heart from the scraps.

If you have mittens, stitch a heart on one of the mittens in the location of your hometown. If you're using felt, sew the heart to your hometown. I chose the capital, Lansing, for my sample. We really enjoyed our brief time there.

If you have mittens, skip this step. Sew two pieces of felt together, leaving a hole at the bottom like a regular mitten would have. Do the same for the other two pieces of felt.

Add Poly-fil to both mittens, pushing some into the thumbs. Stitch across the bottom to seal the stuffed mittens.


Arrange the mittens to mimic the shape of Michigan. Be sure the heart is facing toward the front. Sew the Upper Peninsula mitten to the Lower Michigan mitten. Add a loop of embroidery floss to the thumb of the Upper Peninsula mitten. 


This makes me want to return to Michigan to explore the mittens state more thoroughly. Someday, I hope!

8/24/20

Construction Paper Walrus

I was going through my alphabetical list of kids crafts and noticed that I have animals for every letter except I, V, W, and X. So I made a walrus. At some point, I'll add an iguana (ibis? impala?), vulture (vole?), and x-ray fish (xeme?). 


Construction Paper Walrus


Materials:

  • construction paper (brown, white)
  • scissors
  • pencil
  • glue

Steps:


Start by cutting a walrus body, snout, back flipper, and two front flippers from brown construction paper. (Fun facts: Young walruses are deep brown, turning cinnamon-colored as they age. Older walruses can become nearly pink. Because the blood vessels in their skin constrict in cold water, walruses can look almost white when swimming.)


Use the colored pencil to add eyes. Then draw wrinkly lines along the contours of the body and flippers. Draw nostrils and whiskers on the snout. 


Cut two pointy tusks from white construction paper. Glue them behind the snout, then glue the snout to the face. Glue the back flipper behind the body and the front flippers to the front of the body. (My walrus changed color not because of aging, but because I took photos of the craft in progress and scanned the finished walrus. But it's fun to pretend it's due to aging.)


I enjoyed reading all sorts of walrus fun facts. They're really interesting and unique animals.

8/21/20

Bobwhite Intarsia

Organizing all of the Scout-themed crafts I've shared at My Creative Life made me realize I never showed you the bobwhite intarsia my dad made for Steve's Wood Badge beading


When a Scout leader goes through the Wood Badge leadership course, they are assigned to one of eight animal-themed patrols, including Beaver, Bobwhite, Eagle, Fox, Owl, Bear, Buffalo, and Antelope. Steve was a proud member of the Bobwhite Patrol. (He's since gone on to be on Wood Badge staff as the leader of the Beaver Patrol, in case you remember me making a ton of beaver crafts.)

I've shared some of my dad's intarsia here, but I didn't go into the process, which is pretty interesting. He starts with a pattern. He finds a photo he likes, then scales it to the size he wants. He prints out copies, then cuts it apart to make patterns for the individual pieces.


Next, he searches for the perfect species of wood for each piece. Remember, there is no staining or painting in intarsia. The colors and patterns are a natural part of the wood. Here are Dad's notes on the woods he used for the bobwhite:


He attaches the patterns to the wood, then cuts them with a scroll saw. He saves all his scraps - even tiny pieces can be used for a future intarsia project. When all the pieces are cut, he does a test fit, sands everything, and then glues it all together. He put a clear sealant on the finished pieces, then adds a hook to the back. The end result is always beautiful, and I have a house full of examples to prove it. 


8/20/20

Construction Paper Watermelon Self-Portrait

Watermelon self-portraits are a fairly common project in elementary school. In this version, first graders used crayons and paint to create their portraits. Here, second and third graders used a black marker and paint, with a focus on layering. These first graders used watercolor crayons and glued their completed work to a tablecloth background. They're all adorable.

We used to have a construction paper version of a watermelon self-portrait on Fun Family Crafts (I'm the Editor) that was fairly popular. Unfortunately, the teacher who submitted her project to FFC took down her blog, so we no longer have a linked tutorial. When that happens with a popular craft, I try to find another similar tutorial to replace it. If I can't, I either delete the craft entirely or add it to a list of projects for one of us to remake. In this case, I knew I could whip up my own construction paper self-portrait in no time. Well, sort of. Instead of doing a self-portrait, I actually styled it like a Peanuts character. Affiliate links below.


Construction Paper Watermelon Self-Portrait


Materials:


Steps:


Make the watermelon by cutting a semicircle from dark pink or red construction paper, keeping one of the straight edges of the construction paper intact. Glue the semicircle top of a piece of white construction paper, with the straight edges lined up. Cut just outside of the edge of the red/pink semicircle. Glue this to a piece of green construction paper, again lining up the straight edge. Cut just outside the white semicircle. Cut out a 'bite mark' from the three layers, then use a black pen to draw seeds randomly on the watermelon. 

Select construction paper that matches your skin tone. Place your hand along one of the straight edges so that half of your palm and four fingers are on the construction paper. Trace, then repeat the same steps with the other hand. Cut out both hands and set them aside. From the remaining construction paper, cut out a semicircle for your face. Draw eyes and a nose. 

Choose construction paper that best matches your hair and cut it into the style you want. If you want, add hair accessories or head coverings. (I cut two black barrettes.)


Select a piece of construction paper for the background and a second color for the shirt. Round off the corners of the shirt to make your shoulders, then glue it to the bottom of the background paper. Position the face and hair, then glue them in place. 


Glue the watermelon in place, then add the hands. 


There are so many ways to personalize this project, which is what makes it such a great classroom activity. It's fun to see the variety across a group of kids. 

8/19/20

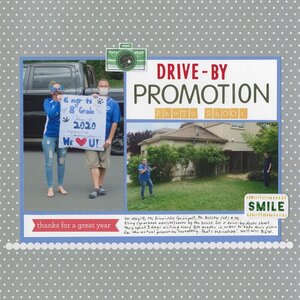
Drive-By Promotion Photo Shoot

Traditionally, 8th graders leaving middle school have a promotion ceremony and a dance to mark the transition to high school. With Trevor's school distance learning from March through the end of the school year, it was impossible to hold in-person celebratory events at the end of the year. Instead, the school put together a virtual promotion video. Over the course of three days, the principal, vice principal, and yearbook advisor visited every 8th grader to congratulate them and take a socially-distanced photo in the front yard. These photos appeared in the promotion video. 

Drive-By Promotion Photo Shoot (affiliate link)

Nothing about the end of the 2019-2020 school year was ideal, but it certainly is memorable. I am so grateful to the teachers and administrators who went the extra mile to help the students have the best possible experience during a really challenging time. Hats off to Ms. Dinwiddie, Mr. Nelson, and Ms. Kling for their dedication and devotion to their students at B. Gale Wilson. We appreciate you and will miss you. 

8/18/20

Nutrition Unit - Marketing Vegetables

During the pandemic, our family has been ordering a produce box every ten days or so from a local farm. Each box has been stuffed to overflowing with at least three times the produce that the same money would buy at the grocery store or farmers market. The quality has been top-notch and the variety has been impressive. We've been planning our meals around whatever shows up in the box and it has been a fun challenge. 

When I unpacked our latest box, I found a bunch of okra. Steve claimed it to make gumbo, but seeing raw okra brought me right back to my 5th grade classroom... specifically, the annual nutrition unit. As part of the unit, each student chose a different vegetable to study (ideally, one that they didn't know well). They'd research the nutritional content and learn what its various vitamins and minerals contributed to human health. The kids designed attention-grabbing packaging for their vegetables, which went up on the bulletin board. It was hilarious overhearing them one-upping each other's vegetables while they worked ("Well, you might be a good source of iron, but I am high in fiber, low in sodium, AND have over 100% of the RDA for vitamin A!") 

On a designated day, each person would bring in their vegetable (raw, or cooked with no other ingredients if it couldn't be eaten raw) and we'd have a taste test. EVERY year, EVERY student discovered at least one vegetable they liked that they'd never had before. It was awesome seeing a classroom of kids so excited to be trying and loving 33 types of vegetables. I absolutely loved the messages that came from shocked parents telling me all the vegetables their 10 year olds had put on the grocery list!

I went to the file cabinet and dug out my nutrition teaching materials in hopes of finding samples of the student advertisements. Success! This is my sample. It makes you want to rush out and buy kale, right?


Catherine's Squash-in-a-Box is adorable. The corners say "Fat Free! NEW! Really good! Healthy too!"


This is Aldren's celery. "2 GOOD 2 PASS!"


I love Anela's box of turnips. Turnips are so low fat that they actually have no fat!


As always, I wish I had taken photos of the rest of the student work. All my samples are boxes, but I remember cans and bottles and cartons. Kids are so creative. And, even picky kids learn that they like new vegetables when you give them the chance to try them. 

8/17/20

Pilgrim Loaf

It's no secret that I love bread. There are plenty of foods that I like, but none that I love as much as bread. I made a Pilgrim loaf for the first time in a long while and I'm kicking myself for not making it more often. It is fairly quick and easy to make and so, so delicious. 


Pilgrim Loaf


3 1/2 - 4 1/2 c. flour                            2 T. vegetable oil
1/2 c. cornmeal                                    2 T. molasses
2 1/4 tsp. yeast                                     2 T. honey
1 tsp. salt                                               1/2 c. chopped walnuts
1 c. water


Combine 3 c. flour, cornmeal, yeast, and salt in a large bowl. In a separate bowl, heat water, oil, molasses, and honey until very warm (125°-130°F), then add to the dry ingredients. Stir in nuts, then add enough flour to make a soft dough. Knead on a lightly floured surface for 8-10 minutes, or until the dough is smooth and elastic. Cover with a clean towel and let rest for 10 minutes. 

Press the dough into a 9" circle. Fold the dough in half, slightly off center, so that the top layer sits approximately 1" from the bottom edge. Use a sharp knife to make four equally-spaced cuts from the curved edge toward the folded edge, cutting through both layers. Place a Silpat on a baking sheet and sprinkle with 1 T. cornmeal. Place the loaf on the baking sheet, cover it with the towel, and let in rise in a warm place until doubled in size, approximately 45 minutes. 

Bake at 375°F for 40 minutes. Remove from the sheet and cool on a wire rack. 


This bread is hearty, dense, and deeply flavorful, with a hint of honey and molasses. It's great for sandwiches, with dinner, or on its own. 


8/14/20

A Brand Kit for My Creative Life

Yesterday, I blogged about brand palettes. A brand palette is one component of a brand kit, which typically also includes logos, watermarks, fonts, style guides, and anything else that identifies a brand. The goal of a brand kit is to maintain the brand's identity across multiple users. Any company with more than one person should have a brand kit to make sure that the company maintains the same look, tone, and feel no matter who works on a product. Universities typically have brand kits as well; check out the one for my alma mater, the University of California at Davis

Since I am the only one who creates content for My Creative Life, having a brand kit isn't vital. I'm unlikely to invert or distort my own logo, randomly use 20 pt. ComicSans and 6 pt. Curlz for a blog post, or arbitrarily use red and purple for my watermarks. I don't need to have discussions with anyone about tone, word choice, or the (mandatory) use of the Oxford comma when I write my posts. 

Even so, I still have a brand kit. All of my brand assets, including my logo, watermark, blog header, brand palette, avatar, favicon, and graphic ads are in one folder. I recently pulled my header, brand palette, favicon, graphic ad, watermark, and logo into a single image. Having it all in one place helps me visualize my overall branding.  


This is my most-used item in my brand kit. These are all of the colors that appear on my blog. I've added the hex number to each for quick reference. When I create a graphic, I drag this image to the bottom, then either use the eyedropper tool or type in the hex color to get a perfect color match. Then I delete this image from the graphic. It works like a charm.   


Of course, I created everything in my brand kit with PicMonkey. It's my favorite.

8/13/20

The Importance of a Brand Palette

Are you familiar with brand palettes? A brand palette consists of the colors (typically 3-5) that a brand uses for their logo, as well as for marketing materials, like a website or print advertisements. A brand palette helps establish whether that brand is serious or whimsical, upscale or affordable, simple or high-tech, for kids or for adults. This article does an outstanding job talking about the importance of color choice in logos. 

I recently discovered brandpalettes.com/ and thought it would be fun to take a single category and look at the different brand palettes of seven major companies. Each of the brand palettes below are for well-known soft drinks. Can you identify them?


Here are the answers:

C. Sunkist
D. Pepsi
E. Fanta
F. Sprite


How many did you get correct? Were some easier than others? Do you have a favorite palette? I think it's fascinating that some palettes look more refreshing and appeal to me than more others and they match up pretty well with my preferred sodas.

More on brand palettes, as well as brand kits, tomorrow. 

8/12/20

Construction Paper Anchor

Today's craft, a construction paper anchor, is inspired by Rhode Island. Despite the fact that 30 of the 50 states have a coastline, Rhode Island is the only state whose flag features an anchor. (Slightly random, but read here to learn why it is impossible to measure the length of a coastline. It's fascinating.)

Anyway, the flag of Rhode Island is white with a gold anchor and the word HOPE on a blue ribbon. It was adopted in 1877 and based on the state seal. The seal was first adopted in 1664 for the colony, a good 120+ years before Rhode Island became a state. It is believed that the word HOPE was taken as the colony-then-state motto from Hebrews 6:19 - "We have this hope as an anchor for the soul, firm and secure." Affiliate links below.


Construction Paper Anchor


Materials:


Steps:


Turn a piece of grey construction paper vertically. Use a ruler and a pencil to draw a cross, leaving a 2" gap at the top and extending all the way to the bottom. Approximately 1/2" from the bottom, draw a smile that intersects the cross. 


Use the ruler to draw lines 1/2" to the left, right, top, and bottom of the cross. Mark spots 1/2" above the smile, then connect them into a curve. Draw arrow points at the ends of the smile. Round off the ends of the anchor's cross piece, then add a point to the bottom. Round off the top of the anchor, then add an oval in the rounded portion. 


Use microtip scissors to cut out the anchor, saving the scraps. Cut the scraps into strips approximately 1/2" x 4". Make a chain by inserting one strip through the hole at the top of the anchor, then gluing the ends together. Insert a new strip through that hole and glue it together. Continue until the chain reaches the desired length. 


In addition to a study of Rhode Island, this would be a fun project for a pirate-themed party, to say bon voyage, or to count down to a cruise! 


8/11/20

Happy #Quaranteen Birthday

Celebrating anything under quarantine is far from ideal, but we made the best of it for Trevor's 14th birthday with a 'when life gives you lemons... share them with friends' theme. This is the layout I made from his special day.

Happy #Quaranteen Birthday (affiliate link)

I'm so thankful for friends who helped make his day special (from a distance). 

8/10/20

Watermelon Felt Coaster and a Special Christmas Treat

Today I'm sharing Felt Fruit Coaster #6, Watermelon. (Here are the tutorials for the lemon, lime, orange, apple, and kiwi coasters.) Affiliate links below. Along with the watermelon coaster, I'm sharing a very special watermelon Christmas treat. 


Watermelon, for Christmas? Yep! When I was a kid, my grandparents had a huge garden (bigger than whatever you're imagining) at their home near Seattle, Washington. My grandma would preserve 90% of what they grew to enjoy during the winter, including melons. She'd use a melon baller to make perfect spheres and pop them into the freezer. On Christmas, she would fill the crystal glasses with melon balls, then pour ginger ale over the top. It was such a treat having melon in the winter and the only time I can ever remember having soda of any kind at my grandparents' house. Everything about this treat was special. 

Steve and Trevor never had Grandma's melon balls with ginger ale (she died 6 weeks before my wedding), so when I stitched the watermelon coaster, I knew that Grandma's special treat would be perfect to share along with the tutorial. Sure enough, it transported me right back to my childhood Christmases in Washington. 

---------


Watermelon Felt Coaster


Materials:


Steps: 


Cut out a circle of green felt, approximately 4" in diameter. Cut out a circle of white felt that is slightly smaller than the green circle. Cut a pink circle that is slightly smaller than the white circle. Set the white and green circles aside.  

Use all six strands of black embroidery floss to sew seeds onto the pink circle. Each seed is made with three satin stitches, with the center one the longest. Vary the size and orientation of the seeds. 

When you've competed the seeds, use pink thread to sew the pink felt to the white felt. Then use white thread to sew the white felt to the green felt.