8/30/19

Peanut Picnic Ants

Inspiration can come from the most random things. I was eating peanuts in the shell when I realized my pile of discarded shells looked like a trail of ants. So naturally, I made this:


First, I painted the peanut shells with black acrylic paint (Plaid, of course), and set them aside to dry. I glued scraps of green, white, and red cardstock together, then cut the stack on an angle to make the wedge shape. I used a Sharpie to draw watermelon seeds. I glued the watermelon to the plate, then arranged the peanut shells to make a trail up and over the plate with the watermelon slice. Simple and cute.

This project reminds me of one of my absolute favorite books from childhood. I LOVED "I Can't" Said the Ant when I was a kid. I still love it.


Here are some other fun ant books to accompany this craft.

8/29/19

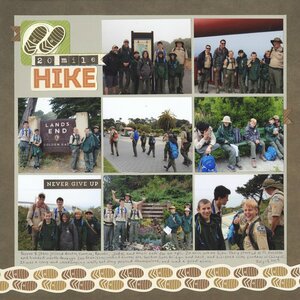
20 Mile Hike

Trevor is working on the Hiking Merit Badge for Scouts. One of the requirements is to hike 20 continuous miles in one day. Five boys in Trevor's troop met this requirement with a 20-mile urban hike through San Francisco back in July. They started at Ft. Funston, walked through Golden Gate Park, reached Lands End, crossed over the Golden Gate Bridge and back, continued through the Presidio, and finished their LONG day with sundaes at Ghirardelli Square. It was quite an accomplishment. 

20 Mile Hike

Steve and Trevor took a ton of photos along the way. I chose 8 that best represented the different locations and terrain, making sure that all the Scouts and adults were in at least one photo. The boot print embellishments were the perfect finishing touch. 

8/28/19

Dragonfly and Damselfly Garden Stakes

As you know, I'm a Plaid Ambassador, which means that the folks at Plaid send me boxes of products to try. (I know. Coolest thing ever.) When I opened a box with two bottles of  Dragonfly Glaze (affiliate link here and throughout the post), naturally I used it to make dragonflies! (Actually, one dragonfly and one damselfly.) They look so cute bobbling around in my houseplant.


---------


Dragonfly and Damselfly Garden Stakes


Materials:


Steps:


Paint a jumbo craft stick the color you'd like your dragonfly or damselfly to be. (I made one green with mini craft sticks representing Washington's state insect, the green darner dragonfly, and one blue with standard craft sticks, representing Nevada's state insect, the vivid dancer damselfly.) Paint the mini or standard craft sticks white. When the paint is dry, give each a coat or two of Dragonfly Glaze.

When the glaze is completely dry and you're happy with the shimmer, glue the eyes and the wings to the body. Leave a small gap between the wings. When the glue is dry, place a white Twisteezwire between the wings.


Twist the two ends of the wire together close to the insect's body. Then continue to twist the two wires around each other. 


Thread the twisted wire into a clear drinking straw, then press the straw into the potted plant. Adjust the wire as desired. 


My dragonfly and damselfly will be staying indoors, but you could put these in the garden instead. A coat of sealant will help it stay intact and shimmery throughout the growing season.

8/27/19

Touring the Amazon Fulfillment Center

On Thursday, Trevor and I joined friends to tour the Amazon Fulfillment Center in Sacramento. The tour was fantastic... and completely different than I expected. Literally every single thing I assumed about how things are done there was incorrect.


Tours are offered at 22 Amazon Fulfillment Centers (and counting) across the United States. The tour is free, but you have to sign up in advance and provide your full name and birthdate. Children must be at least 6 years old. All visitors must wear closed-toe shoes and tie up long hair. Guests can bring in a wallet, cell phones, and keys, but nothing more. Photos are strictly forbidden. Fortunately, there are many photos of Fulfillment Centers (FC) online, some of which I'm using in this post. I've linked to the source under each photo.

The Sacramento FC is located right next door to the Sacramento airport. Our 2:00 pm tour began in the (very loud) lobby where our guide checked us in and distributed visitor badges. We were escorted to a (much quieter) conference room where we received instructions and headsets. Then we climbed four flights of stairs to our first stop, Stowing.

In the Stowing department, workers scan products that are coming in from Amazon manufacturers and third-party sellers. After scanning the item, they stow it into one of the compartments in these large, multi-sided yellow bins:


The items aren't stowed by category, type, or anything else you might expect. Instead, they are stowed almost randomly. I say 'almost' because occasionally a purple light shines on one of the compartments, which tells the stower that the item they're holding cannot go into that space. Why? Because there's something already in that space that is too similar in size, shape, or color. They can put the item into any other compartment, as long as there is space. So one bin space might hold a shirt, a DVD, dog food, and birthday candles, but it would never hold two types of dog food, since they could be mistaken for each other. 

When a bin is full, a robot (which looks like a large orange Roomba) lifts the bin and moves it out of the way. How does it know where to go? The floor has white barcode stickers evenly spaced throughout. The robots read the stickers and drive the bins exactly where they need to go, using the most efficient pathway. Many robots zip right by each other without colliding, because each robot knows exactly where every other robot is. It is amazing to watch. 

The Picking Department is equally fascinating. As live orders come in, the robots drive the bins to picking stations. An item comes up on the screen, a light shines on the bin compartment holding it, the picker reaches in and grabs it, scans it, and puts it in a yellow tote. Repeat, repeat, repeat. I expected that one tote would contain one person's entire order, but no. If you order 10 items, chances are almost non-existent that the same picker will pull all ten of your items. 


As you know, I love factory tours, but rarely do I wish I could stay there all day long and just watch. That's what I wanted to do at Amazon. When a small item fell out of a compartment and onto the floor, our guide explained what would happen, but moved us on to the next stop. I desperately wanted to stay to watch the robots notice the item and move around it, then notify someone who puts on a special detected-by-robots vest in order to pick it up. But alas, we had to move on. 

Next, packaging. The department was on afternoon break, so we didn't see it in progress, but our guide walked us through the steps. As the totes arrive at a station, the packer scans an item. The computer decides which box is appropriate and how much bubble wrap is needed, then cuts the correct amount of tape for the packer to use. The packed box goes onto a conveyer belt where it is weighed. If it doesn't match the exact expected weight for the item(s), box, bubble wrap, and tape, it is spit out for someone to deal with it. Otherwise, it continues along where it is scanned and an address label is blown onto it. Yes, blown. The robot gets close to the box, but never touches it, instead puffing the label onto the box.  


Weighed and addressed packages head down spiral slides to the Packing Department. There, they are scanned (this is a common theme at a Fulfillment Center) and sorted. All packages at the Sacramento FC leave via truck, though some only go as far as the airport next door before coming off the truck. 


Ever wondered why your Amazon order sometimes arrives earlier than expected? There was room on an earlier truck, so they stuffed your box onto it so as not to send a truck out half full. Curious why your order may appear in separate boxes? Not everything comes from the same FC. The Sacramento FC inventory contains nothing larger than their yellow totes, which hold two basketballs. Want to know why some items come in an Amazon box and others in just their manufacturer box? The computer knows which manufacturer boxes are adequate for shipping and bypasses those items so as not to waste packaging material.

I highly recommend visiting an Amazon Fulfillment Center. The tour was so interesting, and you certainly can't beat the price (free)!

In the spirit of "You can find literally anything on Amazon," you'll find affiliate links below to some of the more unusual items I've found, all of which are small enough to be shipped from Sacramento (though I'm guessing/hoping the clams aren't.) It's never too early for Christmas shopping. (Unless, perhaps, you're giving fresh clams.) You're welcome.

8/26/19

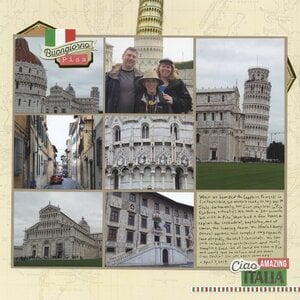
Pisa 2019

I've completed another page about our April adventures in Europe. This layout is all about our day in Pisa

Pisa (affiliate link here and below)

I chose seven photos to use, only one of which included people. That's unusual for me - normally, I like to have more people pictures than scenery photos on a layout. But I had to work with what I had and we'd taken tons of photos of the architecture and almost no pictures of each other. 

I received two sets of Italy-themed stickers from Paper House Productions, which I combined with stickers from Reminisce and Simple Stories to embellish the page. But I didn't use them as is. Take this sheet of dimensional stickers, for example:


If you look carefully at my page, you'll see that I took apart the "Discover Rome" sticker and cut the background diamond to use in two different places. I layered "Buongiorno" to cover "la dolce" and tore "Ciao" off of "Bella" to use at the bottom of the page. As another example, I'm sure you noticed the Leaning Tower sticker. I couldn't make the sticker fit anywhere without covering things I didn't want covered... until I stuck behind the photo of our family. I had to chop off the top, but I like the way it draws the eye to the one and only people photo. I love the challenge of seeing how I can make embellishments work for me.

8/23/19

Twisteezwire Girl with Flowers

It had been far too long since I'd played with Twisteezwire, so I challenged myself to make a person, with puzzle pieces providing the main structure. This post contains affiliate links. 


Twisteezwire Girl with Flowers


Materials:


Steps:


These are the steps I used to make my sculpture. Feel free to follow my instructions or be creative and come up with your own design!

1. Wrap the center of a blue wire around a puzzle piece torso, then attach the ends to puzzle pieces to make feet. Adjust everything until it balances nicely.  
2. Cut a yellow wire in half. Wrap each half around the handle of the wire cutters to make curls, then attach the hair to a puzzle piece head. Glue the eyes to the face.  
3. Wrap the center of a cream-colored wire around the neck, then wrap each end around the torso. Fold the ends of the arms back slightly and twist to make hands.  
4. Cut four lengths of green wire, each twice as long as you want the flower stems to be. Cut short lengths of red, pink, orange, and yellow wire, and wrap each around one end of the green wires. Thread the bundle of green wires through the girl's hand, then twist the non-flowered end of each green wire around the flowered end of a green wire.

8/22/19

Accordion Flamingo Party Decorations

I love flamingos, so you'd think they'd show up in my crafting a lot. But I've only made one flamingo craft before. Time to change that! The inspiration for this flamingo came from a fuchsia accordion paper lantern a friend randomly gave me (affiliate links here and throughout the post). 


-----------


Accordion Flamingo Party Decorations


Materials: 


Steps:


Decide whether you want your flamingo to be one-sided or if it will be viewed from multiple sides. Mine is one-sided (since it's hanging against a fence). If yours will be two-sided, simply double everything and sandwich it together when you assemble it. 

For one side, you will need one neck/head and two wings (fuchsia), two legs with knobby knees (light pink), one beak and two wingtips (black), and one googly eye. I cut my shapes using scratch paper to figure out the size, then used that as a template for the colored paper. 


Glue the beak and the eye to the face and the wingtips to the wings. Glue the neck to a wooden skewer. If your cardstock / construction paper is not very rigid and you're making a single-sided flamingo, you may need to reinforce the neck. I used a scrap. 


Bend a small flap at the top of each leg, apply glue, and stick the legs to the bottom side of the closed accordion lantern. Bend one leg if you'd like. 


Poke a second skewer through the center of the accordion lantern, then glue a wing to each end of the skewer. I reinforced them with tape so they wouldn't come off when the glue was still wet. 


Poke the flamingo head skewer into the front hanger hole on top of the lantern. 

You can leave your flamingo like this, or tear blue paper to make water for the flamingo to stand in. I taped the 'water' to the fence then tucked the flamingo's feet behind the 'water.'


This makes me want to throw a flamingo-themed party! Or, at the very least, to make more flamingo projects to add to my Bird Crafts page

8/21/19

Football Photo Frame

A friend gave me a stack of foam sports ball embellishments, so I challenged myself to use the football. This frame was a lot of fun to make and would be great for displaying a team photo, a special autograph, or other memorabilia. This post contains affiliate links. 


---------

Football Photo Frame


Materials:


Steps: 


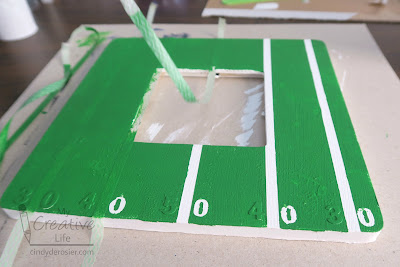
Paint the frame white. When the paint is completely dry, add evenly-spaced strips of tape vertically on the frame. Starting at the center, use number stickers to label the 50-yard line. (I didn't have enough 0 stickers, so I had to reuse it, which was a giant pain. Make sure you have enough stickers.)


Paint over the frame in green, using a pouncing motion. Don't use normal brushstrokes or you could get paint under the tape and stickers. 


I had to carefully paint around the areas that don't have their last 0 stickers yet. You won't have this problem, because you will have enough 0's for the whole project. 


Carefully remove the tape by lifting straight up. 


Now, peel up the numbers. I like to use a retractable craft pick for a job like this. (Note that even though the tool is completely ambidextrous, the printing makes it obvious that it was designed for/by right-handed people. Sigh.)


Anyway, use the pick to peel up the numbers. You may need to do a little bit of touch-up painting. When the paint is dry, use craft glue to attach the football to the upper right corner. 


Now just add your photo, autograph, or memorabilia and your frame is ready to display!

8/20/19

Harry Potter Travel Game Holder

In addition to their annual framed layouts, I made Harry Potter themed travel game holders for my goddaughters' birthdays. Paper House Productions sent me some adorable Harry Potter goodies (affiliate link here and throughout the post) and I couldn't wait to dive in and try them! I made a Hufflepuff tin for Ellia and a Griffindor for Kylinn. 


Inside each: a Magic deck, curated specifically for each girl by Trevor; Tant Fant, and the materials for a Native American stick game. There's plenty of room if they want to add dice, cards, or other game pieces. 


---------


Harry Potter Travel Game Holder


Materials:


Steps:


Cut a strip of black cardstock the length of the lid. Apply red line tape and secure it in place. Punch a black circle and apply the desired house sticker to it. Use the dies to cut a label from gold cardstock. Attach the black circle to the center. Add narrow washi tape to the center of the black cardstock, then edge it with wider washi. Attach the label in the center. 


Obviously, you can change up the decorations any way you'd like. For Ellia's Hufflepuff tin, I put the narrow washi on both edges of the black cardstock, then added the wider washi below. I used a different label die and adhered it horizontally instead of vertically.  


Fill the tin with games (or collectibles, money, or anything else) and your gift is ready to give!

8/19/19

Updates to the 50 States Album

Trevor has added three new pages to his 50 State Album. Here's Virginia, from his March trip with his school. The trip included Maryland, Pennsylvania, and New York also, but he'd already been to those states, so Virginia is the only new page.  


We just returned from Missouri and Kansas (as well as Idaho, but that wasn't a new-to-him state). Here are those pages:


While blogging and scrapbooking (and then blogging about scrapbooking!) are my preferred ways to document our trips, this simple format works well for Trevor. Slide in the postcard, write a paragraph and add a flag sticker, then choose one photo to represent the state. Quick and easy.

I absolutely love looking through Trevor's 50 States album. It's now 32/50 complete. You can see all 32 pages here, along with links to buy supplies to make your own album. Obviously, this idea isn't limited to the 50 states. Use it to document any sort of travels. Or, switch out the postcard for an invitation or a second photo and document pretty much anything else. It would be super cute to have an album about a child's birthday parties each year, or their Halloween costumes.

8/16/19

Family Cooking Competitions

As promised, I've finished organizing another category for my FUN WITH FOOD page. Presenting... Family Cooking Competitions!


Any guesses how many cooking competitions the deRosier family has done? Hop over to my Family Cooking Competitions page to find out! I've organized the page based around the Food Network show that inspired our competition... and ended up with a bunch that we came up with on our own. Reading these posts bring back lots of good memories of fun times and (usually) tasty food.

8/15/19

Ellia at 10

As hard as it is to believe my goddaughter Kylinn is 13, it's harder to believe that her little sister, Ellia, is 10. I was there when Ellia was born, which will always be special to me. Watching her grow up has been a delight.

Ellia at 10 (affiliate link)


Each year, it seems like one of the girls' layouts comes together much easier than the other. This time, Ellia's was the challenge. When I pulled the black of her outfit or her purple hair, the page was too dark and heavy for this happy, sassy, imaginative girl. The page worked so much better when I switched to the lighter background with pinks. 

Looking back at her 9 previous pages, I've used a lot of different colors and to capture expressive and creative Ellia as she's grown. But many of the words I've used to describe her have stayed the same from year to year, which is true for Kylinn and Trevor as well. It's so interesting to me that their personalities as preteens/teens are the basically the same as when they were toddlers.

8/14/19

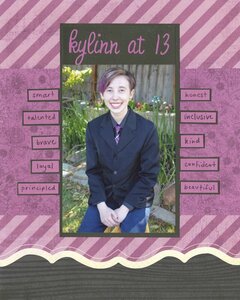
Kylinn at 13

I gave my goddaughters their birthday layouts yesterday, so I can share them here now. Here's Kylinn at 13:

Kylinn at 13 (affiliate link)


I am proud of the teenager she's become. Kylinn is very interested in social justice and equality for all. She speaks up against injustice and is a kind and caring person. 

As always, I didn't look back at the previous layouts I've made for her until I finished this one. If I had, I probably wouldn't have chosen a purple color, since I've used some shade of purple on 6 of the previous 12 layouts! On the other hand, she does have purple hair and a purple tie in the photo, so the color scheme was pretty well set for me. I'm pleased to see that I haven't used this particular arrangement before either. There's only so many ways to put a title, one 4x6" photo, and list of adjectives on a 8x10" page. I'm very happy with how this turned out. 

8/13/19

Family-Friendly Things to Do in Boise, Idaho (Part 7)

This is the seventh and final post about our family's adventures in July 2019. If you haven't already, I recommend reading the firstsecondthirdfourth, fifth, and sixth posts about this trip. 

---------

After our week exploring Missouri and Kansas, we flew to Boise, Idaho for a family reunion. My parents and my sister's family live there now. My aunt, uncle, and cousins and their families drove over from Spokane for a long weekend.


The first morning we were there, my mom joined Steve, Trevor, and me to do the Boise Urban Adventure Quest. It started at the State Capitol.


The Quest took us by Freak Alley, JUMP, the Anne Frank Memorial, the Boise Art Museum, and the Basque Block.


We also passed by the library. Or, more accurately, the Library! The next time I'm in town, I'm going to visit the four branches to find the one with exclamation point shelves.


As always, we had great fun doing the Quest. It wasn't our best showing (2 mistakes) and our time was terrible (we stopped to tour JUMP, took photos at a bunch of places, and looked around a bit at other sites), but we thoroughly enjoyed ourselves. And it introduced us to places we didn't know existed that we'll explore further during future visits.

We finished the Quest a half block from Boise Fry Company, so that's where we had lunch. We've eaten there during both of our previous Boise trips, and it never disappoints. We did find it funny that we went all the way to Idaho and they had Heretic on tap... it's only a few miles from our house and hosts Steve's homebrew club meetings.


And check this out! Idaho potatoes, of course... but I spy California sweet potatoes. And the 'Ruddy Spuddy' boxes are labeled California Potatoes. Funny!


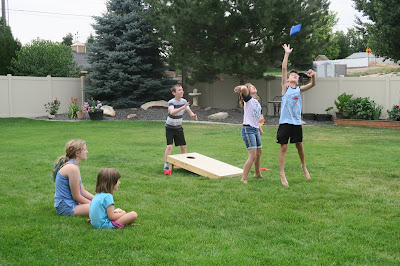
We spent the rest of the day hanging out with our extended family (19 people) at my sister's house. We played a bunch of games, indoors and out. That's my nephew, Timothy, with cousin Aiden on his back and cousin Lillian as his cornhole partner. 


Here are cousins Trevor, Ethan, and Aiden playing a non-standard version of cornhole while Lillian and Allison watch. 


My godson Teagan and my niece Allison both helped me work on a Diamond Art project (affiliate link here and throughout the post). Both kids are 6 and did a great job. 


Meanwhile, Timothy, Lillian, Trevor and Grandma played Harry Potter Labyrinth. We LOVE Labyrinth. It's one of our favorite games


We ate a lot, too.


On Saturday, we did a float trip on the Boise River. 


It's mostly relaxing, with bursts of excitement here and there. In addition to the excitement of the rapids, there was unexpected 'excitement' when my brother-in-law helped save a young girl who was not wearing a life jacket. He was injured in the process, but all ended well. Please, parents: insist your children wear life jackets, even if they're strong swimmers. And wear your own!


We stopped for lunch along the river.


In the afternoon, we returned to Kari's house for more food and family fun. And a group photo.


This Disney-themed Eye Found It game is great fun for all ages. 


Nertz is a family favorite, too. 


All too soon, it was time for us to head home. We had a fantastic time exploring Missouri and Kansas, plus returning to Idaho. This trip brings us up to 32 states... only 18 more to go! Follow the link to see our updated map, plus recommendations for all 32 states we've visited. Any guesses where we're headed next?!