Showing posts with label Cards. Show all posts

7/28/26

Making Cards Using Metallic Watercolors

After using Soho Metallic Watercolors for the first time on my Liberty Bell project, I wanted to play with them a bit more. I tried them on black cardstock and white coldpress watercolor paper, then experimented with coloring over them with alcohol markers and colored pencils. Then I turned my painted doodles into cards. Affiliate links below. 


Metallic Watercolor Cards


Steps:


I started with scraps of watercolor paper and black cardstock. I painted dots onto one of the watercolor papers and flowers onto the other two papers. While I needed two coats to get decent coverage on the watercolor paper, the colors popped on the black with just a single coat of paint. The Sohos definitely perform better on a dark background, whether that's black paper or an underpainting. 


Since I was happy with how the little flowers looked on the black paper, I trimmed that paper down to size for a card, backed it with pink, added a sentiment on a pink strip, then glued sequins to the center of each flower. 


Moving on to the other two. I wondered if the metallics would pop better if I colored the white space around the flowers black, so I used a Honolulu on each. That improved things slightly, but the colors weren't quite as shiny as they were on black paper. I also learned that the metallic paint will show through the ink of the alcohol marker slightly if you try to color over it. Good to know. I backed the dotted painting with yellow dotted paper and added a sentiment. 


I used Posca colored pencils to add flower centers and leaves to the final painting. The creamy pencils worked beautifully on the metallic paint. They also colored over the alcohol marker really well. I backed this card with purple and added a sentiment. 


I had fun experimenting with the metallic watercolors - making these cards was a lot more entertaining than making swatch cards would have been. I love the wide variety of colors. They have an incredible shimmer that doesn't come across in photos. And now that I know, I'll be painting these metallics on dark paper or with a base layer underneath.

7/9/26

Trio of Floral Cards

We had a cardmaking workshop after church last weekend. I made three cards using the same layered stamp set. It's fun to see how changing out the small details can significantly alter the card's appearance. The muted colors and subtle sentiment of this sympathy card...


... give a completely different look than the bright colors and bold sentiment of this thank-you card. 


The backgrounds on the first two cards are just ink. For this Hello card, I did a quick sweep of ink directly on the die-cut, then added details and shading with Prismacolors (affiliate link). 


I have very little experience with layered stencils and it was fun to experiment with different techniques.  Cards are great for trying out new skills and taking risks. I'm looking forward to playing with ink on cards again soon!

5/26/26

Wings, Flowers, and Bling Card Trio

The final National Scrapbook Day challenge I completed was Wings, Flowers, and Bling. We could make any sort of project, as long as it had flowers, wings, and bling. Doodlebug's Hello Again collection was perfect, since it has all three in abundance. 


I only had to make one card for the challenge, but I ended up making three. Once all the stuff is out, you might as well make multiples, right? I had a fun time making these bright and cheerful cards. 

5/22/26

Duo of Floral Cards

The Celebrate Women challenge at A Cherry on Top required us to follow a sketch to make a card for (or a layout about) someone female. The project had to include a heart. I ended up making two cards since I was so happy with the first one I made.  

Flower Card Duo (affiliate link)

This is the sketch we had to follow. As you can see, I rotated the sketch. I replaced the main circle with the rectangular sentiments and changed up the proportions of the layers.  
 

This challenge was a lot of fun. I'll definitely be using that collection again to make more cards. 

5/15/26

Cards with Fall Puns

I'm not really into puns, so when I saw that one of the National Scrapbook Day challenges at A Cherry on Top was to make a project featuring a pun, I wasn't 100% sure if I even had any supplies that would work. But once I started looking through my stash, I found a fall collection with puns. I used them to make these two cards. The fox says, "Falling for you" and the squirrel says "I'm nuts about you."

Cards with Fall Puns (affiliate link)

Steve loves puns, so maybe he'll get two unexpected greeting cards in the fall. Or I might just donate them. Either way, it was a fun challenge and I enjoyed the opportunity to work with fall colors.

3/24/26

Decoupage Backgrounds for Cards

Recently, I've shared how to make flowers, a dolphin, and a cross using decoupage. You can use the same techniques to make backgrounds for cards. Affiliate links below. 


Decoupage Backgrounds for Cards


Materials:


Steps: 


For each card, cut a piece of Bristol vellum in half to make two pieces that are 8.5" x 5.5".  Fold one of the halves in half in order to make a 4.25" x 5.5" card base. You'll use the other piece for the decoupage. 

You can decoupage with sheets, strips, or torn pieces tissue paper. You can mix colors or use just one color. If you are going to use strips or pieces, tear those before moving on to the next step. 

Pour some Mod Podge into a cup and dilute it with a little bit of water (about 3 parts Mod Podge to 1 part water). If you're using an intact piece of tissue paper, paint a coat of the watered-down Mod Podge onto a half-sheet of paper. Carefully lay the tissue paper onto the moist paper. Load the brush with more Mod Podge and paint a coat over the top of the tissue paper. Use the brush to smooth any wrinkles as best you can. Don't worry about any overhanging tissue paper. If you are using strips or torn pieces, work on one area at a time. Paint a coat of Mod Podge onto the bottom inch of the paper, lay down a strip or piece of tissue paper, then paint over that to seal it. Add Mod Podge to the next section of the paper, then add the tissue paper, slightly overlapping the previous piece. Seal it. Repeat until you've covered the entire half-sheet. 

When the decoupage is completely dry, trim the decoupaged sheet to make a 4" x 5.25" piece. Adhere it to the card base. Decorate with stickers. 


* For the Happy x 3 card, I used Gloss Mod Podge and stickers from Happy Planner - Celebrate


* For the unicorn card, I used Matte Mod Podge and stickers from Echo Park's Birthday Girl


* For the make a wish card, I used Sparkle Mod Podge and stickers from Echo Park's Happy Birthday Boy

3/11/26

Paper Quilt Cards

A friend gave me a big pile of 1.5" pre-cut squares of gingham paper in rainbow colors. They looked like tiny quilt squares, so I decided to turn them into cards that our quilting group can use to thank people who donate supplies to us. I started out ambitiously, cutting the squares down into even smaller shapes before gluing them onto a cardstock base. It was fun playing with the itty-bitty squares, rectangles, and triangles. I experimented with different patterns, designs, and color combinations, just like our group does with fabric. I even changed up the dimensions of the cards. Eventually, I realized that I was spending WAY too much time cutting the squares apart when I could make perfectly functional cards using the squares as is. 

Here is a look at some of the cards I made. If you want to see the supplies I used, click the affiliate link below. 


Quilt Square Cards (affiliate link)

All the quilts we make go to people in need and we rely on donations for our supplies. If you're local and have extra fabric, thread, or batting you're not using that you'd like to go to a worthy cause, let me know. We also appreciate sheets (they make good quilt backs). If you're not local, look into whether there is a group near you making quilts for Lutheran World Relief or another charity and consider donating supplies to them. Thank you!

2/19/26

Another Batch of Cards

We had a card making workshop immediately after church recently. Anyone who wants to participate can. The idea is that you leave some of your finished cards there for the church to send out to members who are celebrating a birthday, or are ill, etc. and take the rest of your cards home to use. It's always a fun time. 

These are first four cards I made:


Then I made these three. I don't work with purple very often, so it was really fun to branch out. And I really enjoyed layering the die cuts to make my own clusters paired with sentiments. 


Big thanks to Ann, who puts together these workshops. I'm already looking forward to the next one!

3/19/25

Monotype Print Cards

 After making name art using some of my monotype prints, I used the rest of the prints to make cards. 


I had so much fun playing with the Gelli Plate (affiliate link). I need to spend a lot more time experimenting to fully understand how to use it and how best to make interesting layers. I don't own one, but that may need to change soon. 

2/20/25

Celebrate Card with Heart Balloons

Remember that yesterday I told you I dropped sequins onto my heart project? It occurred to me that, in addition to being a pretty piece of art and a functional set of swatches, I could also use my color chart as a fun way to randomly pick a color palette for a project to challenge myself. Sort of like throwing darts, but without putting holes in the wall. 

Once I had my color palette, I made this card.  


So how exactly did I pick my color palette? When I dropped the sequins, one landed on a pink heart with a teal background. (Kuretake calls those colors "Rose Madder" and "Turquoise Deep Green.") The other sequin landed on "Imperial Violet." I was really happy with that trio of colors. Pink, teal, and purple are beautiful together. That would be an easy challenge. 


Too easy. So I decided to add the next closest color to the sequin ("Lemon Yellow") to make it harder. I went through my cardstock to find the closest matches I could to the four colors. I used the teal as a background, punched a bunch of hearts from the yellow, pink and purple, then arranged them into a bunch. I added embroidery floss strings and glued a pre-cut sentiment over the top. I thought I was done at that point and scanned the card...


... but I decided later that my balloons needed highlights. After a few quick marks with the Posca pen, my card was done. Much better. 


I had a lot of fun with this challenge. I will definitely be using my color chart as a color selector again in the future!

12/11/24

Winter Thank You Cards

One of my creative goals for the year is to try at least four Pinterest ideas: a craft, a recipe, a scrapbook layout, and a card. I needed to make a set of cards to use as this year's Christmas thank you notes, so I decided that was the perfect opportunity to get inspired by something on my Cards and Card Sketches Pinterest board
 
This is what I made:

Winter Thank You Cards (affiliate link)

And this is my inspiration: 
 

I really like this farm-themed card by Kristie Marcotte. Not only is it eye-catching, but it's a great way to incorporate a lot of different patterned papers and a fantastic way to use up scraps. I can definitely see myself using this design again. 

The paper I used for my cards is from a really old collection: Winter Song by SEI. It's so pretty, but I've struggled to use it over the years. It has some papers with large focal images that I tend not to use for layouts. Since I had the paper out anyway, I decided to finally cut into them to turn them into cards. Here are some of the additional cards I made:


I need to go through my older patterned paper and see if there are other papers I'm not using because of large focal images. I can always use more cards. 

11/27/24

Rosie's Studio Bayfair Collection - 24 Cards (and Counting!)

On Saturday, I did something I've never done before: attend an ordination. I've been to an installation (where an existing pastor formally begins working with a new congregation) but never an ordination (where a seminary graduate formally becomes a pastor). It was a really neat ceremony and incredibly satisfying to see my friend officially become Pastor Rob. 

This is the card I made for him.  


I used paper and die cuts from the Bayfair Collection from Rosie's Studio (affiliate links here and below) plus scraps from a woodgrain paper by Echo Park. After I finished Rob's card, I made a few birthday cards. And some thank you cards. And some everyday cards. I've now made 24 cards using the Bayfair collection... and I still have a bunch of papers and die cuts left! 

Here are all my cards (so far!):


I'm particularly fond of the whale and lobster holding banners in this last batch. 


It's been awhile since I've made so many cards at one time. I had a lot of fun putting them together and it's good to see my card box filling up again. 

10/17/24

Two Cards, Same Five Elements

My godchild Andrei just graduated from Pacific Coast Horseshoeing School, following an intensive 8-week session. It's a good thing I make all my own cards, because good luck finding a "Congrats on Becoming a Farrier!" card at a store. I don't imagine there are a lot of general graduation cards for sale in October, let alone one with a horseshoe on it. 

Here's what I made for Andrei, using the only paper I could find with a horseshoe that didn't have a leprechaun as well. I had to hide a bunch of print that didn't make sense for my card, which is why my sentiment block is so large. 

Yea! You're a Farrier! (affiliate link)

Cards (and other small papercraft projects) are allowed during the BYSS World Series, but you have to make two to count as one project. So I made a birthday card that I'll be sending in a few weeks. 


Together, the two cards count as one grand slam (6 points). Each has 3+ stickers, a cut-apart card, a chipboard element, enamel dots, and an embossed border. It's interesting to me how the two cards share the same five elements, yet look completely different. 

5/24/24

Watercolor Challenge

The Watercolor Challenge on National Scrapbook Day required us to make a project with a watercolor background. I made a colorful card. 


I used my favorite watercolor set (affiliate link here and below) to paint colorful flowers on a green background. When the paint was dry, I outlined the flowers with a black Sharpie and drew leaves with a Flair pen. I layered a die cut sentiment onto green cardstock, then used deco edge scissors to make the scalloped border. Three matching sequins for sparkle and the card is ready to send. Another fun challenge complete!

5/16/24

Choose a Number Challenge

Many of the challenges during the National Scrapbook Day event at A Cherry on Top specifically required scrapbooking, but others included cards or other papercrafting projects. The Choose a Number Challenge was all about cards. We had to choose a number that would determine what the card sketch and theme we'd be using. 

This is the card I entered in the challenge. Can you guess the required design elements and theme?

Cupcake Card (affiliate link)

Before you guess, take a look at this card. Each participant could only enter once, but since I had my cardmaking supplies out, I wanted to challenge myself to follow the same requirements in a way that would look completely different. 

Happy Birthday (affiliate link)

I'm sure by now you've guessed that the required theme was birthday. Did you also guess that the sketch had a horizontal band anchoring two different sized circles?  


The sketch came from Freshly Made Sketches, which is a new site to me. I poked around a bit and really like it. I especially like that there's so much inspiration for what to do with each sketch. There are some really beautiful cards based on this sketch!

12/8/23

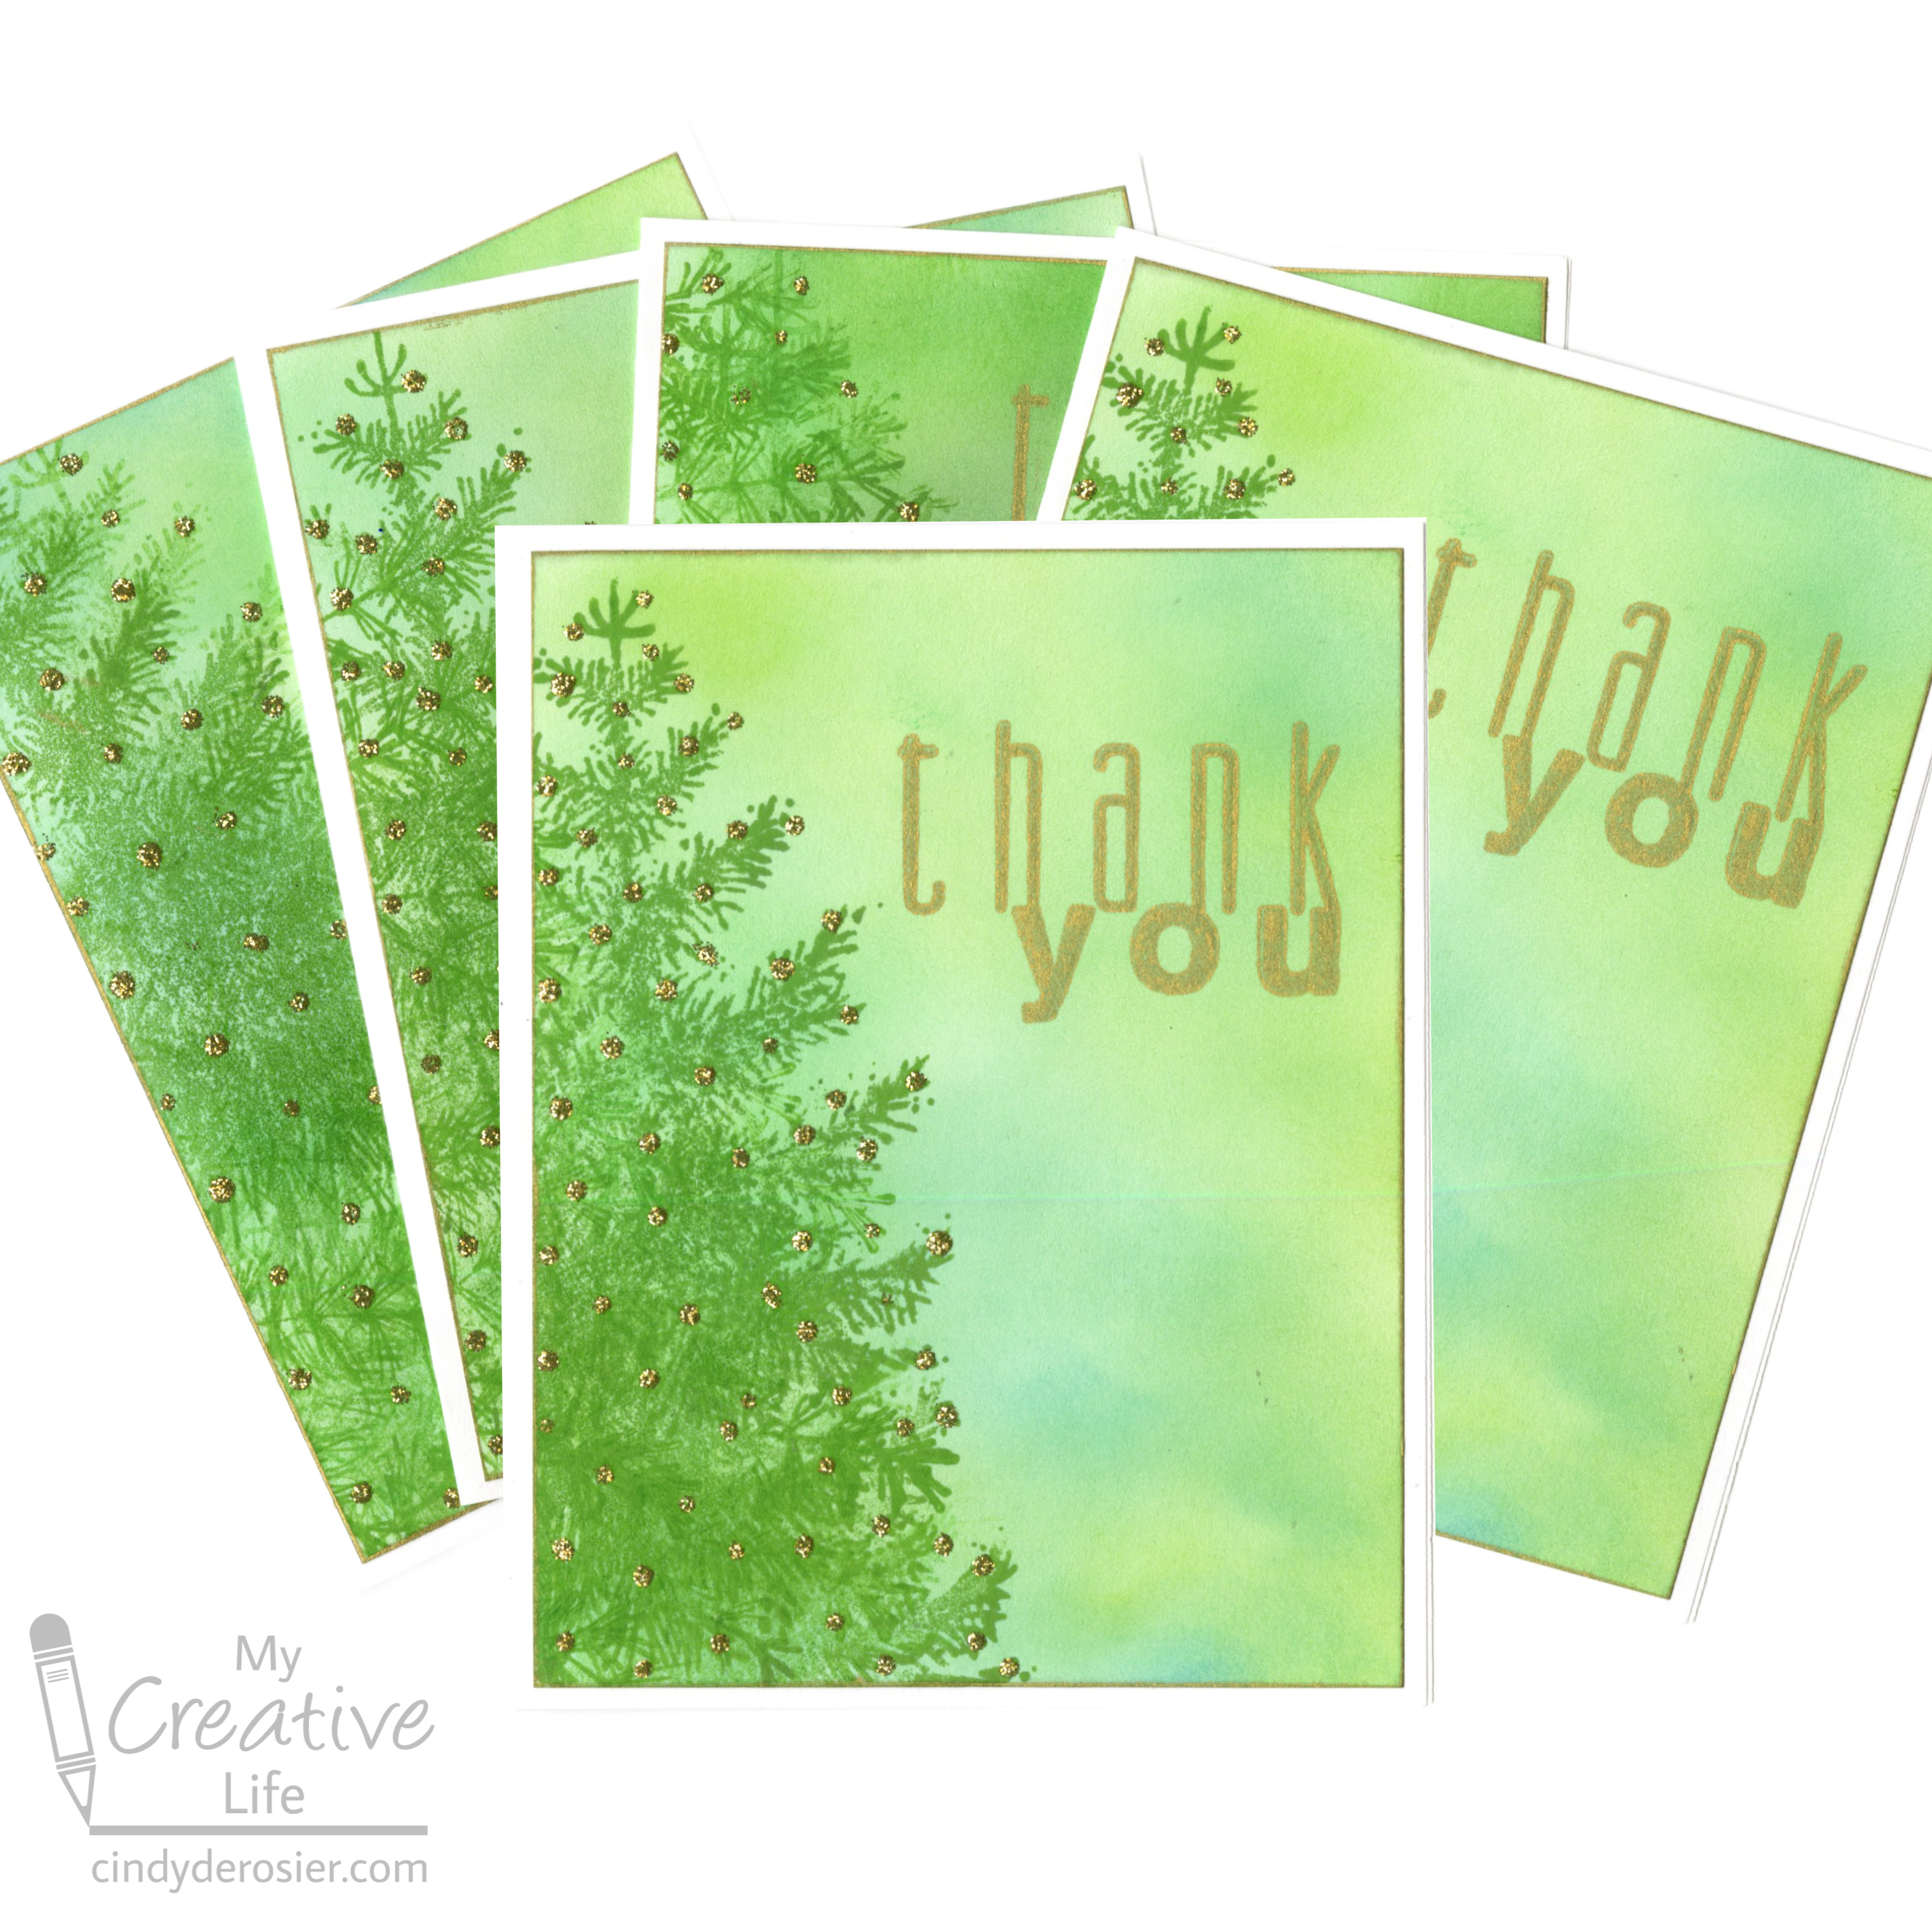
Christmas Tree Thank You Cards

When Trevor was little, we had great fun making Christmas-themed thank you notes together. I think these handprint reindeer from 10 years ago were my very favorites. Trevor is no longer interested in making cards with me, but he knows that mailing thank you notes to people who send him gifts is non-negotiable. Now I make the cards by myself. I had a lot of fun with this design, using inks in so many different ways! Affiliate links below. 


Christmas Tree Thank You Cards


Materials: 


Steps: 


Cut a piece of cardstock in half, then fold each half to make two 4.25" x 5.5" card bases. Use a separate sheet of cardstock to make 4" x 5.25" card faces. Repeat until you have the desired number of card bases and faces. 

Use a blending brush and several shades of green inks to color the card faces. Work on a piece of scratch paper and go all the way to the edges. 


Stamp the tree onto the left side of the paper. My stamp isn't as big as the paper, so I stamped at the top first, then stamped lower and lower to extend the tree to the base of the card. 

Stamp the sentiment in the upper right quadrant, then use the same gold to ink the edges. Add dots of gold Stickles all over the stamped tree. 

When the ink is dry, adhere the card faces to the bases. 

11/30/23

Another Set of Cards from Doodlebug's 'Hello Again' Collection

Here's the next batch of cards I made with Doodlebug's 'Hello Again' collection. I love how well everything mixes and matches. This collection is absolutely fantastic for cards.  Affiliate links below. 


Despite making over 30 cards, I still have a bunch of die-cuts, tags, stickers, and sentiments left from this collection. Not bad! There's even some paper I haven't used. It's perfect for a layout I have in mind, so I'm going to do that before making any more cards from this collection.